Table of Contents
Advertisement
Quick Links
Advertisement
Table of Contents
Troubleshooting

Related Manuals for Carestream DRYVIEW CHROMA


Summary of Contents for Carestream DRYVIEW CHROMA
- Page 1 CARESTREAM DRYVIEW CHROMA Imaging System H210_0843AC Preliminary User’s Guide...
- Page 2 Carestream Health, Inc. 150 Verona Street Rochester, New York 14608 © Carestream Health, Inc., 2011 Pub No. 9G4260_en Rev. 30...
-
Page 3: Table Of Contents
Table of Contents Overview CHROMA Imager at your site..........................1-1 Intended Use..............................1-1 Imager Features ...............................1-2 Film and paper sizes ..........................1-2 Network interfaces .............................1-2 Film throughput ............................1-2 Power management features ........................1-2 Configuring and monitoring the system (using the Web Portal)..............1-2 Enhancing serviceability with remote monitoring ..................1-3 How the Imaging System works........................1-4 System Components ............................1-4 DICOM Interface ............................1-4... - Page 4 Changing configuration items........................... 3-2 Entering maintenance mode ........................3-2 Exiting from maintenance mode ........................ 3-2 Imager language ............................3-2 Units of measurement ..........................3-3 Temperature units ............................. 3-3 Auto cleaning............................. 3-3 Alert settings .............................. 3-3 Number of minutes before automatic sleep mode ..................3-3 Number of idle minutes before imager turns off..................
- Page 5 Surface levelness ............................4-2 Environmental effects ............................4-2 Power requirements ............................4-2 Network requirements............................. 4-3 Ink cartridges..............................4-3 Cartridge life.............................. 4-3 Temperature.............................. 4-3 Capacity..............................4-3 Weight ............................... 4-3 Media ................................4-3 Environmental ............................4-3 Publication History ............................4-4...
-
Page 7: Overview
Intended Use The DRYVIEW CHROMA Imaging System is intended to provide hard copy images from digital imaging source output signals. The device is intended for use with DRYVIEW CHROMA film and reflective media. -
Page 8: Imager Features
Overview Imager Features Film and paper sizes The imager is a wide-format ink jet color printer that supports the following in the media cassette: • 8x10 in. blue base film • 10x12 in. blue base film • 11x14 in. blue base film •... -
Page 9: Enhancing Serviceability With Remote Monitoring
Overview Enhancing CARESTREAM Remote Management Services is set up through the Web Portal, and is designed to enhance efficient system serviceability serviceability with and simplify analytical and service processes through the monitoring of remote monitoring your equipment. Additionally, this simplifies the service process by providing qualified service personnel with faster, easier, and more complete access to the operational history of each system. -
Page 10: How The Imaging System Works
Overview How the Imaging System works Imager DICOM interface The imaging system consists of a DICOM interface (a small computer) and a printer (imager), connected together with a USB cable. The DICOM interface receives, processes, and manages the images, and the imager holds the media and ink and prints the images. -
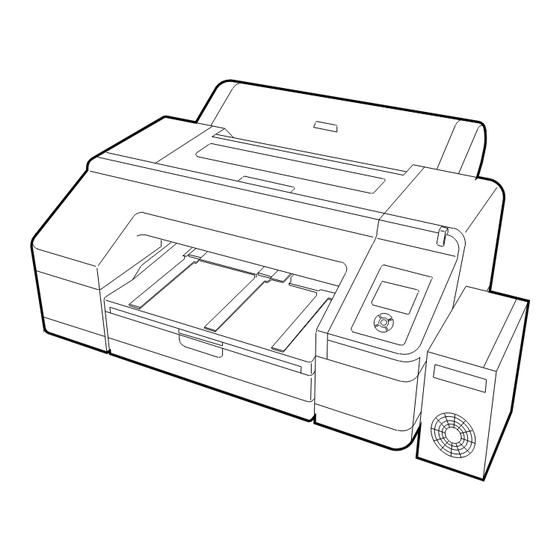
Page 11: Imager
Overview Imager H210_0844HAA H210_0844HA Front cover. Cartridge cover (left). Ink cartridges #1-6 are behind the cover. Media cassette. Load the media pack in the cassette. Output tray. Collects the ejected paper and film. Extend the tray according to the size of the media that is being ejected. Maintenance tank. -
Page 12: Rear / Spindle
Overview 10 Print head. Fires ink via high density nozzles while moving left and right. Do not move the print head by hand. 11 Control panel. See page 1-7. 12 Alert lamp. Lit or flashing when an error or warning occurs. •... -
Page 13: Control Panel
Overview Control Panel Power light. Indicates the operational status. • On - Power is on. • Flashing - Receiving data or performing processes such as turning off the power, head cleaning, auto nozzle check, or changing the type of black ink. •... - Page 14 Overview Up/down or media feed buttons. • When a menu displays, press the up or down arrow button to select an item. • Press to feed media from the cassette and to eject it from the imager. Menu button. • Press in the Ready status (or when no media is loaded) to display the menu. •...
-
Page 15: Screen View
Overview Screen view Message. Displays status, operation, and error messages. Media source setting. Indicates the media source status that is set with the Media Source button. (Only Cut Sheet is supported.) Ink cartridge status. Displays the approximate level of remaining ink and the current status. - Page 16 Overview Ink cartridge status imager 1. Ink slot number. When facing the , the slots are numbered from left to right in ascending order from 1. The following shows the colors that correspond to the ink slot numbers. 1 GR (Green) 2 LLK (Light Light Black) 3 Y (Yellow) 4 LC (Light Cyan)
- Page 17 Overview Maintenance tank status There is sufficient space in the maintenance tank. When flashing, the maintenance tank is almost full. Prepare a new maintenance tank. When flashing, the maintenance tank is full. Replace it with a new tank. TIP: You can check the available space in the maintenance tank any time by checking status at the Menu.
-
Page 18: Using The Web Portal To Access Additional Functionality
Overview Using the Web Portal to access additional functionality The Web Portal is your interface to additional features. In addition to the installation and setup of your system, you can view and manage the imager's connections over the network, configure features, view error messages and access general status information at the Web Portal. -
Page 19: Agency Compliance
Overview Agency Compliance See the Safety Manual, 9G4259. User Guide Conventions The following special messages emphasize information or indicate potential risks to personnel or equipment. NOTE: Notes provide additional information, such as expanded explanations, hints, or reminders. Important notes highlight critical policy information that IMPORTANT: affects how you use this guide and this product. -
Page 21: Working With Ink And Media
Working with Ink and Media Working with Ink and Media Working with media (film or paper) When working with media: • Leave the media in the carrier when you load it in the cassette. • Avoid touching the printable surface with your bare hands. Fingerprints might affect print quality. - Page 22 Working with Ink and Media 2. Slide open the media cassette, lift it slightly, and pull out. 3. What size media will you load? A3 or larger Smaller than A3 Extend the cassette to match the size of Go to step 7. the media.
- Page 23 Working with Ink and Media 4. To extend the cassette, pull the lever in the cassette while extending. It locks in place when the lever is released. Extend it to match the size of the media according to the stamps in the cassette. 5.
- Page 24 Working with Ink and Media Be careful not to drop the media! The media must remain IMPORTANT: in the original orientation and with the same side facing up. Do not remove or lose any sheets from the media cassette. If any sheets are removed, the imager cannot accurately track the media count.
- Page 25 Working with Ink and Media 8. Load the media package (with the carrier) into the cassette. Keep the media carton. If you change the media size in the IMPORTANT: imager later, place the media back in the original carton. Media carrier 9.
- Page 26 Working with Ink and Media 10. Insert the cassette and push it firmly into the imager. 11. Replace the output tray. 12. Extend the output tray for the media size and raise the flap. Adjust the output tray depending on the size of the media loaded in the cassette: •...
- Page 27 Working with Ink and Media • A3: Pull out the third section of the output tray, and then raise the flap. • Larger: Slide out the second and third extensions of the output tray, and then raise the flap. Align the marks on the second extension of the output tray and the cassette.
- Page 28 Working with Ink and Media 13. Make sure the imager is on. 14. Check the media source settings. Check that the media source icon on the screen is for Cut Sheet and the appropriate size. NOTE: The media type is set during the imager installation. If the media type is not set to Cut Sheet, change it: •...
-
Page 29: Changing The Media Size In The Imager
Working with Ink and Media Changing the media size in the imager If a print request has arrived with a different media size than what is installed in the imager, the new size appears on the DICOM interface screen to alert you to install the requested size. 1. - Page 30 Working with Ink and Media 5. Load the new media in the carrier. 6. To check that the new media size has been read by the imager, view the display screen and check that the new media size appears. The system is ready, and the print job resumes.
-
Page 31: Working With Ink
Working with Ink and Media Working with ink DANGER: KEEP INK CARTRIDGES OUT OF THE REACH OF CHILDREN AND DO NOT DRINK THEIR CONTENTS. IF INK GETS ON SKIN, WASH IT OFF WITH SOAP AND WATER. IF INK GETS IN EYES, FLUSH IMMEDIATELY WITH WATER. CAUTION Do not dismantle ink cartridges or try to refill them. -
Page 32: Checking Ink Levels
Working with Ink and Media Checking ink levels Check the ink level at the control panel screen. 1. Ink cartridge number - corresponds to the cartridge locations in the imager 2. Ink levels - the icons show the approximate amount of remaining For more information on the ink level icons, see “Ink cartridge status”... -
Page 33: Replacing Ink Cartridges
Working with Ink and Media Replacing ink If one of the ink cartridges is empty, printing will stop. If an ink-low warning displays, replace the ink cartridge(s) as soon as possible. cartridges This procedure uses Matte Black ink as an example. Use the same procedure to replace any ink cartridge. - Page 34 Working with Ink and Media 5. Remove the ink cartridge from the bag. Shake the ink cartridge for approximately five seconds, and 15 times, horizontally. CAUTION Do not touch the green IC chip on the ink cartridges. This can cause the imager to malfunction. 6.
-
Page 35: Replacing The Maintenance Tanks
Working with Ink and Media Replacing the If the message “Replace Maint Box” or “Not Enough Empty Space” displays, replace the specified maintenance tank. maintenance tanks Do not try to reuse a maintenance tank that has been IMPORTANT: removed and left out for awhile. The ink inside will dry and will be unable to absorb new ink. - Page 36 Working with Ink and Media 3. Place the used tank in the plastic bag that is included with the new tank. Dispose of it carefully and in accordance with local ordinances. 4. Insert the new maintenance tank. Do not touch the green IC chip on the side of the IMPORTANT: maintenance tank.
- Page 37 Working with Ink and Media 2. Release the tank lock. 3. Pull out the maintenance tank carefully so it does not tilt. DANGER: IF INK SPILLS ONTO YOUR SKIN OR INTO YOUR EYES, WASH THE AFFECTED AREA WITH WATER IMMEDIATELY. 4.
- Page 38 Working with Ink and Media Do not touch the green IC chip on the side of the IMPORTANT: maintenance tank. Do not remove the film from the top of the maintenance tank. 6. Set the lock. 7. Replace the output tray. 2-18 9G4260_en 2011-03-01...
-
Page 39: Settings, Maintenance And Troubleshooting
Settings, Maintenance and Troubleshooting Settings, Maintenance and Troubleshooting Overview This chapter provides instructions to: • Change settings such as date, time, and language for the imager • Change configuration items such as sleep mode and idle time • Check imager status •... -
Page 40: Changing The Date And Time
Settings, Maintenance and Troubleshooting Changing the date and time This procedure lets you change the date and time for the imager. NOTE: To change the date and time for the Web Portal, log on to the Web Portal, then click the Documentation link for instructions. 1. -
Page 41: Units Of Measurement
Settings, Maintenance and Troubleshooting Units of measurement 1. Enter maintenance mode. 2. Press to select Length Units, and then press 3. Press to change between metric and feet/inch, and then press 4. Press Temperature units 1. Enter maintenance mode. 2. Press to select Temperature Units, and then press 3. -
Page 42: Return Settings To The Defaults
Settings, Maintenance and Troubleshooting Return settings to the 1. Enter maintenance mode. defaults 2. Press to select Default Panel, and then press 3. Press OK. 4. Press Checking imager status Print a status sheet or view various items on the imager screen. Print a status sheet The status check sheet shows some default settings, the media count, and the status of the maintenance tanks. -
Page 43: Preventing Issues By Keeping The Imager Clean
Settings, Maintenance and Troubleshooting Preventing issues by keeping the imager clean Clean the outside To keep the imager in optimal operating condition, clean it regularly (about once a month). 1. Remove any media from the imager. 2. Turn off the imager. Wait for the screen to turn off, and then unplug the power cable from the electrical outlet. -
Page 44: Dirty" Prints: Clean The Inside
Settings, Maintenance and Troubleshooting “Dirty” prints: Clean 1. Turn off the imager. Wait for the screen to turn off, and then unplug the power cable from the electrical outlet. the inside 2. Wait for one minute. 3. Open the imager cover and use a soft, clean cloth to carefully clean away any dust or dirt inside the imager. -
Page 45: Correcting Print Quality Issues By Checking For Clogged Nozzles
Settings, Maintenance and Troubleshooting CAUTION Do not touch the roller and the ink absorption (the gray parts in the illustration); otherwise, prints may be soiled. Do not touch the ink tubes inside the imager. This can damage the imager. 4. Close the imager cover. Correcting print quality issues by checking for clogged nozzles If white lines appear in the prints or if print quality has declined in any... - Page 46 Settings, Maintenance and Troubleshooting Check the results. • For a Nozzle Check, a message displays if a clog is detected. If no clogs were detected, press OK. If nozzles are clogged, press to start Auto Cleaning, and then press OK to close the Ink Menu.
-
Page 47: Working With The Print Head
Settings, Maintenance and Troubleshooting Working with the print head • Clean the print head if print quality declines; for example, if the Overview printout is blurry or the color is incorrect or missing. Ink is consumed when head cleaning is performed. •... - Page 48 Settings, Maintenance and Troubleshooting Press to select Yes, and then press OK. The cleaning starts. • Power clean all colors – Press to select All Colors (Powerful), and press . Press to select Yes, and then press OK. The cleaning starts. The power light flashes and head cleaning starts.
-
Page 49: Align The Print Head
Settings, Maintenance and Troubleshooting Aligning the print head is important to ensure the best print quality. If Align the print head banding appears on your prints, or if prints look grainy or blurry, align the print head. Perform a nozzle check before you align the print head. See “Correcting print quality issues by checking for clogged nozzles”... -
Page 50: Correcting Errors
Settings, Maintenance and Troubleshooting Correcting errors Introduction There are several places to check the status of the system: • The alert lamp on the imager automatically lights or flashes when an error or warning occurs. You can set or change the alert lamp settings in maintenance mode. - Page 51 Settings, Maintenance and Troubleshooting Message Action Ink Cartridge Error. Please Remove the ink cartridge, and install an ink cartridge that can be used install the correct ink with this imager. cartridge. No Ink Cartridges. Install ink Install ink cartridges. cartridge(s). Ink Low Prepare a new ink cartridge for replacement.
- Page 52 Settings, Maintenance and Troubleshooting Message Action Auto Cleaning Press OK to remove the message. Then execute a Print Check Pattern. “Correcting print quality issues by checking for clogged nozzles” on This feature is not available page 3-7. now. Print the check pattern in the nozzle check menu.
- Page 53 Settings, Maintenance and Troubleshooting Message Action Maint Box 2 Unlocked. Lock Lock maintenance tank 2 (borderless tank). lever for maintenance box 2. Not Enough Empty Space. Replace the maintenance tank 1 (maintenance box) with a new tank. See Replace the maintenance box page 2-15.
-
Page 54: Maintenance Or Service Call Is Required
Settings, Maintenance and Troubleshooting Message Action Paper Out. Load paper in Confirm that no media is being printed, then remove the cassette and paper cassette. load the media. Paper Sensor Error. Loaded If this error displays when performing automatic head alignment, check paper or print out has a the following items: problem. -
Page 55: Troubleshooting
Settings, Maintenance and Troubleshooting Message Action Call For Service. Code XXXX A call for service occurs when: Power off and then on. • The power cable is not connected securely If this doesn't work, note the • An error that cannot be cleared occurs code and call for service. -
Page 56: Imager Sounds Like It Is Printing, But Nothing Prints
Settings, Maintenance and Troubleshooting Imager sounds like it is printing, but nothing prints Symptom Action The print head moves, but Confirm the imager operation. nothing prints. Print a nozzle check pattern. See “Correcting print quality issues by checking for clogged nozzles” on page 3-7. - Page 57 Settings, Maintenance and Troubleshooting Symptom Action • Is the media size setting correct? The print is not positioned properly on the paper. • Is the media skewed? If Paper Skew Check is set to Off, even if it is skewed, the imager might exceed the print area when printing on the paper.
-
Page 58: Feeding Or Ejecting Problems / Media Jams
Settings, Maintenance and Troubleshooting Feeding or ejecting problems / Media jams Symptom Action • Is the media cassette loaded in the correct position? The imager is not feeding or ejecting media. • Make sure Cut Sheet is selected from the Paper Type menu. •... - Page 59 Settings, Maintenance and Troubleshooting Symptom Action • Remove the jammed media from where the cassette was inserted. • If media is jammed in the back, remove the rear unit by pulling it towards you with the knob moved to the inside as shown, and then remove the jammed media.
-
Page 60: Miscellaneous Problems
• Model number • K-number • Error code from the display screen and/or code and error message from the Web Portal Worldwide support numbers are available at www.carestream.com. Click Contact Us, then select your region. 3-22 9G4260_en 2011-03-01... -
Page 61: Specifications
Specifications Specifications Dimensions and clearance Dimensions Height 58.6 cm (23.1 in.) Width 116.3 cm (45.8 in.) Depth 134.9 cm (54.1 in.) Weight 52 kg (114.4 lbs) Make sure that you have adequate space and clearance around the imager. Allow at least 5.08 cm (2 in.) clearance around the top, sides, and back of the imager. -
Page 62: Packed Dimensions
Specifications Packed dimensions Dimensions Height 58.4 cm (23 in.) Width 101.6 cm (40 in.) Depth 91.4 cm (36 in.) Environmental Temperature • Operating: 10 ° to 30 °C (50 ° to 86 °F) • Storage: -20 ° to 60 °C (-4 ° to 140 °F) Relative humidity Keep the imager away from drying, direct sunlight, or heat sources to maintain the appropriate humidity. -
Page 63: Ink Cartridges
Specifications Ink cartridges Cartridge life Two years from production date if unopened; within 6 months after opening the package, at 25 °C ( °F). Temperature Storage (not installed): -30 to 40 °C (-22 to 104 °F); one month at 104 °F Storage (installed): -20 to 40 °C (-4 to 104 °F);... -
Page 64: Publication History
Specifications Publication History Revision Date Reason for Change 2011-03-01 Preliminary release 9G4260_en 2011-03-01...
Need help?
Do you have a question about the DRYVIEW CHROMA and is the answer not in the manual?
Questions and answers