Table of Contents
Advertisement
Quick Links
Download this manual
See also:
Operator's Manual
LSC Lighting Systems (Aust) Pty. Ltd.
ABN 21 090 801 675
Building 3, 66-74 Micro Circuit
Dandenong South, Victoria 3175 Australia
Tel: +61 3 9702 8000
email: info@lsclighting.com
web:
www.lsclighting.com
CLARITY
Lighting and Media Control
OPERATOR MANUAL
Desktop (MAC/PC)
LX600
Covering software Version 2
Document number:
Fax:+61 3 9702 8466
Issue 2.01
LX300
LX900
May 2013
LX-T01U-A2
Advertisement
Table of Contents

Related Manuals for LSC CLARITY LX300

Summary of Contents for LSC CLARITY LX300
- Page 1 LX900 Covering software Version 2 May 2013 Document number: LX-T01U-A2 LSC Lighting Systems (Aust) Pty. Ltd. ABN 21 090 801 675 Building 3, 66-74 Micro Circuit Dandenong South, Victoria 3175 Australia Tel: +61 3 9702 8000 Fax:+61 3 9702 8466 email: info@lsclighting.com...
- Page 2 Information contained in this manual is subject to change without notice. In any event, neither LSC Lighting Systems (Aust) Pty. Ltd. nor OpenClear Pty. Ltd. can be held liable for any direct, indirect, special, incidental, or consequential damages or loss whatsoever...
-
Page 3: Table Of Contents
Clarity Contents Operator Manual Contents 3.18 Wing Playback Pages _______________ 20 1 Latest Features 3.18.1 Locking a Playback __________________ 21 3.18.2 Page Bookmarks ___________________ 21 Overview _________________________ 1 3.18.3 Managing VX Pages _________________ 21 Version 2 _________________________ 1 3.19 Wing Playbacks ____________________ 21 1.2.1 Rig Mode __________________________ 1 3.20 Wing Group Masters ________________ 22... - Page 4 Contents Clarity Operator Manual 7.2.11 LED Desk Lamps ___________________ 41 10.7 Universal and Direct _______________ 69 7.2.12 External Inputs ____________________ 41 10.8 Attribute Control Size ______________ 69 7.2.13 Reset ___________________________ 41 10.9 Preferences ______________________ 71 LX900 Front Panel __________________ 42 10.10 Keyboard Shortcuts ________________ 71 LX900 Split Cross Fade ______________ 42 Patching Fixtures...
- Page 5 Clarity Contents Operator Manual 16.4.2 Timing Tab _______________________ 93 20.7.1 Fixture Specific Presets _____________ 116 16.5 Setting Times _____________________ 94 20.7.2 Fixture Type Presets _______________ 116 20.8 Freesets ________________________ 116 16.5.1 Setting Times by Direct Entry _________ 94 16.6 Fade Curves ______________________ 95 20.8.1 Permutating Freesets _______________ 116 20.8.2...
- Page 6 Contents Clarity Operator Manual 21.9.3 Remainder Dim ___________________ 137 25.3 Editing Follow or Wait Times ________ 163 21.9.4 Controls ________________________ 137 25.3.1 Saving the Edit ___________________ 165 21.9.5 Renumber Fixtures ________________ 137 25.4 Editing Channels to be “Cue Only” ___ 165 21.9.6 Grab DMX _______________________ 137 25.4.1...
- Page 7 Clarity Contents Operator Manual 31.2.1 Setting up OSC on an iPhone ________ 184 39.3 Priority Control ___________________ 202 31.2.2 Setting up OSC on Clarity ___________ 184 39.4 Attribute Default Values ____________ 202 31.2.3 Controlling Clarity with OSC _________ 185 39.5 Programmer Control _______________ 202 31.3 Controlling Other Devices From Clarity 186 39.6 Playback Control __________________ 203 39.7 Recording and Playback Concepts ____ 203...
-
Page 8: Conventions Used In This Manual
Copyright © 2009 OpenClear Pty. Ltd. All rights reserved. USB and RDM software modules and LX products are developed by LSC Lighting Systems (Aust) Pty. Ltd. www.lsclighting.com Copyright © 2009 LSC Lighting Systems (Aust) Pty. Ltd. All rights reserved. -
Page 9: Latest Features
Latest Features OVERVIEW Both LSC Lighting Systems (Aust) Pty. Ltd. and OpenClear Pty. Ltd. have a corporate policy of continuous improvement covering areas such as product design and documentation. To achieve this goal, we undertake to release software updates for all products on a regular basis. The latest features to be added to this version of Clarity are listed below. -
Page 10: Touch Mode
Introduction/Models Clarity Operator Manual 1.2.9 Touch Mode Enabling the option “Show, Settings, Control widget touch mode” optimizes operations on touch screens so that the cursor is not hidden and makes it easier to make larger changes by flicking any parameter control so that the value will continue moving with inertia (similar to scrolling on an iPhone). -
Page 11: Minor Changes
Clarity Latest Features Operator Manual Action button toggle. When a cue-list is assigned to an LX600 or LX900 Action button, pressing the Action button will play the cue-list. If this option is ticked, pressing the Action button will play the cue-list and pressing the Action button again will release the cue-list. This option is used with cue-lists that contain a single cue allowing you to fade the cue up and down using just the one button. -
Page 12: Introduction/Models
Introduction/Models Clarity Operator Manual Introduction/Models OVERVIEW Clarity lighting and media control is available as a Desktop software package for PC or MAC (with optional USB connected peripherals) or in three console models, LX300, LX600 and LX900. There are separate sections in this manual for the Desktop version (with its optional peripherals) and for each of the Console models. -
Page 13: Help
Unique Performance window live interface, a very powerful ad-lib playback matrix grid. HELP The desktop installation includes a copy of this manual that can be found in the LSC folder. The LX consoles contain a copy of this manual that can be viewed on screen and on-board video tutorials of common operations. -
Page 14: Desktop (Pc Or Mac) Clarity
LSC cannot supply a replacement in these circumstances. 3.1.1 Software The Clarity software contained on the Clarity CD is also available as a download from the LSC website, www.lsclighting.com. Both the CD and downloaded versions are identical although both LSC Lighting Systems (Aust) Pty. - Page 15 This takes a few moments and windows will inform you that “Your device is ready to use”. To run Clarity, click on Start\All Programs\LSC\Clarity where you will see all of the installed files. Click on Clarity to run the program.
-
Page 16: Installing Clarity On A Mac
Desktop Clarity Clarity Operator Manual INSTALLING CLARITY ON A MAC Previously Clarity-Mac was distributed as an installation package. When you run the package it displays a wizard that walks you through the installation procedure. This has now been replaced with a simpler process. Drag the app (Clarity.app) over to the Applications folder. -
Page 17: Desktop Dmx Output
Multiple devices can be connected. LSC Clarity QX1 interface provides 1 universe of DMX output. LSC Clarity QX2 interface provides up to 2 universes of DMX output. LSC Clarity VX10 wing provides up to 2 universes of DMX output. ... -
Page 18: Vx20 Programming & Playback Wing
VX20 PROGRAMMING & PLAYBACK WING Programming controls on a computer can be augmented by adding an LSC Clarity VX20 wing. This has all of the features of the VX10 but adds 10 button Playbacks with LCD displays and multiple page selection, Programmer controls (including trackball), MIDI in and out and includes four DMX512 universe outputs. -
Page 19: Starting Clarity
USB port on the PC or in the secure rear port your VX10 or VX20 wing before you start Clarity. To start Clarity, double click on the Clarity icon on your desktop or browse to the LSC menu from your Start button. -
Page 20: Modes Of Operation
Desktop Clarity Clarity Operator Manual 3.12 MODES OF OPERATION Clarity's top toolbar is available in all modes of operation and has tabs allowing you to switch between the main windows of: Patch, Rig, Programmer, Palettes, Control Booth, Performance, Levels and Intensity Levels. Desktop Mode When Clarity is started in a LX console emulation mode (described above), the main window is contained within a special ‘wrapper’... -
Page 21: Console Window
Clarity Desktop Clarity Operator Manual Click here for display options Split/Join (LX900 mode only). The LX900 has two internal monitors. This splits the wrapper into two separate wrapper windows. If this is running on a system with two or more monitors then the other wrapper window will be presented on the other monitor and will appear full screen if the original wrapper was full screen. - Page 22 Desktop Clarity Clarity Operator Manual LX Programmer LX Action Buttons LX600 Playbacks The buttons and faders all work as if they were on the actual console. If you need to press two buttons at the same time, pressing and holding a button for 1 second will latch that button down.
-
Page 23: Basic Desktop Operation
Clarity Desktop Clarity Operator Manual Display scrolled to see Playback contents Playback contents LX600 Playbacks with main screen scrolled down to see the playback displays. The playback controls work in exactly the same manner as in the actual consoles. See the playback sections of the consoles for details. -
Page 24: Patching
Desktop Clarity Clarity Operator Manual 3.14 PATCHING Clicking on the Patch tab reveals the patch window. Patch Field Library Information on selected fixture Connections To patch a fixture: In the Library, click on the fixture manufacturers name to show all of their models then select your model of fixture. -
Page 25: Programming
Clarity Desktop Clarity Operator Manual 3.15 PROGRAMMING Clicking on the Programmer tab reveals the programmer window. Click on Fixtures to select them Selection Sidebar Controls Attribute Controls Fixture type and Group Tabs Tabs Universal Controller Controls All patched fixtures are available in the Selection sidebar, organized in tabs of patched fixture types and groups. -
Page 26: Attribute Quick Menus
Desktop Clarity Clarity Operator Manual When you select different fixtures that have multiple attributes, Attribute Controls automatically appear for each type of fixture and each attribute of each fixture type. Attribute Name 3.15.2 Attribute Quick Menus To access the “Attribute Quick Menus, either click on the name of an Attribute Control or right click in the Attribute Control area. -
Page 27: Playback
Clarity Desktop Clarity Operator Manual To record this look as the next cue in the Cue-list click Append Last. Repeat until all cues in the cue-list have been recorded. Click Clear to clear all attributes from the Programmer. 3.16 PLAYBACK Desktop Clarity provides several means of playing back the cues that you have recorded. -
Page 28: Adding A Cue-List To A Vx Wing
Desktop Clarity Clarity Operator Manual Virtual VX20 Wing VX20 Virtual Wing Display 3.17 ADDING A CUE-LIST TO A VX WING To add a cue-list to a playback on a wing, in the Control Booth window, drag the cue-list from the cue-list column onto the LCD window of the virtual wing playback. If the actual wing is connected, the cue-list also appears in the same playback as on the virtual wing. -
Page 29: Locking A Playback
Clarity Desktop Clarity Operator Manual When you start a new show, only page one exists. When a cue-list is dropped onto any playback on a page of a virtual wing, the next higher page is automatically created. You can manually create any page number (up to 99) by directly selecting that number as described below. -
Page 30: Wing Group Masters
Desktop Clarity Clarity Operator Manual Intensity fader: that controls the overall intensity of all fixtures on the output of its playback (Playbacks 1 to 10 only). Flash button: Instantly flashes the intensity of all fixtures on the playback to full level (Playbacks 1 to 10 only). -
Page 31: Extended Wing Controls
Clarity Desktop Clarity Operator Manual On the “Create Group Master Dialog” select the required fixture Group to master then choose the Master Type to use: Additive. The fader level is added to the current intensity level of all fixtures in the group. For example, if the fader is at 50% each fixture would get 50% added onto its current level. - Page 32 Desktop Clarity Clarity Operator Manual If a cue-list is loaded on a playback and there are un-used (clear) playbacks to the right of the loaded playback in the same group of 5, then the unused playbacks can now be linked to the loaded playback to provide greater live control.
-
Page 33: Programming With The Vx20 Wing
Clarity Desktop Clarity Operator Manual instant control but you can hold the Flash button down to 'scoot' the fader. See section 34.1 for User Preferences. 3.22 PROGRAMMING WITH THE VX20 WING The VX20's programmer section assists programming by providing hard controls for the main programming functions. -
Page 34: Vx20 Soft Menus
Desktop Clarity Clarity Operator Manual Record: opens the Record Cue dialog box and all playback buttons on VX wings flash. To record the programmer contents to a VX20 playback, press any (flashing) playback button. If the playback is empty a new cue-list will be created. If the playback already contains a cue-list, the new cue will be appended to the end of that cue-list. -
Page 35: External Control Inputs
Clarity Desktop Clarity Operator Manual 3.23 EXTERNAL CONTROL INPUTS The “external Inputs” 9-pin D-SUB connector on the back of the VX10 and VX20 wing can be used to connect up to 6 external push buttons that act the same way as the “Go” buttons on the playbacks. -
Page 36: Desklamp Intensity
Desktop Clarity Clarity Operator Manual 3.25 DESKLAMP INTENSITY The brightness of the LED desk light on the VX wing control can be controlled by holding down [Function] and [Select] together. 3.26 FREE MODE Early versions of Clarity will run in free mode. Clarity will only run in free mode if it was downloaded as version 1.3 or earlier and registered for free mode prior to April 8, 2011. -
Page 37: Lx Consoles
Clarity LX Consoles Operator Manual V2.0 LX Consoles OVERVIEW There are three models in the Clarity LX range of consoles…. LX300 LX600 LX900 Sections 5, 6 and 7 of this manual describe the rear panel connections and the front panel control surfaces of each model respectively. -
Page 38: Lx300 Console
LX300 Clarity Operator Manual LX300 Console OVERVIEW LX300 with External Monitor The LX300 has the following features: One 10.4 inch “encoder wheel touch screen”. 15 Fader Playbacks. Each playback has a fader with RGB mode indicator plus Select, Go and Pause/Back buttons. -
Page 39: Power Input And Mains Switch
Note: The LX300 will not start correctly if an external monitor is not plugged in. See section 35 (LX Tools) for details on how to setup the external monitor. Only compatible external touch screens can be used. Contact LSC or your local LSC dealer for compatible touch screen models. -
Page 40: Reset
Circuit to operate button playback 10 5.2.10 Reset The Reset button should only be used if instructed by LSC technical support. The LX300 GUI (Graphical User Interface) can be reset from the LX tools utility. See section 35 Page 32... -
Page 41: Lx300 Front Panel
Clarity LX300 Operator Manual LX300 FRONT PANEL The main areas of the LX 300 are: 1. Grand Master and DBO (Dead Black Out) button. 2. 10.4 inch multi function encoder wheel touch screen. 3. Encoder wheels and modifier buttons. 4. Keypad and command centre. 5. - Page 42 LX300 Clarity Operator Manual See section 8.7 for details on how to assign cuelists and configure playbacks. 15 Button Playbacks Pause/ Back 30 Playback touch screens Pause/ Back Right Page Left Page Right Page Down Left Page Down 15 Fader Fader Playbacks Contents...
-
Page 43: Lx600 Console
Clarity LX600 Operator Manual LX600 Console OVERVIEW LX600 The LX600 has the following features: Pivoting monitor panel. One 10.4 inch “encoder wheel touch screen”. One 17″ touch screen. 15 motorized Fader Playbacks. Each playback has a fader with integral RGB “mode” indicator plus Select, Go, Pause/Back and Flash buttons. -
Page 44: Lx600 Rear Panel
Hint: When using ArtNet, you can connect both Ethernets and use them as main and back up into two independent (dual redundant) networks. The two networks can be connected into an LSC Nexus (ArtNet to DMX converter) which can accept both networks and will automatically change over in the event of a loss of a network. -
Page 45: Usb
Circuit to operate button playback 10 6.2.12 Reset The Reset button should only be used if instructed by LSC technical support. The LX600 GUI (Graphical User Interface) can be reset from the LX tools utility. See section 35 Page 37... -
Page 46: Lx600 Front Panel
LX600 Clarity Operator Manual LX600 FRONT PANEL The main areas of the LX 600 are: Grand Master and DBO (Dead Black Out) button. 10.4 inch multi function encoder wheel touch screen. Encoder wheels and modifier buttons. Keypad and command centre. -
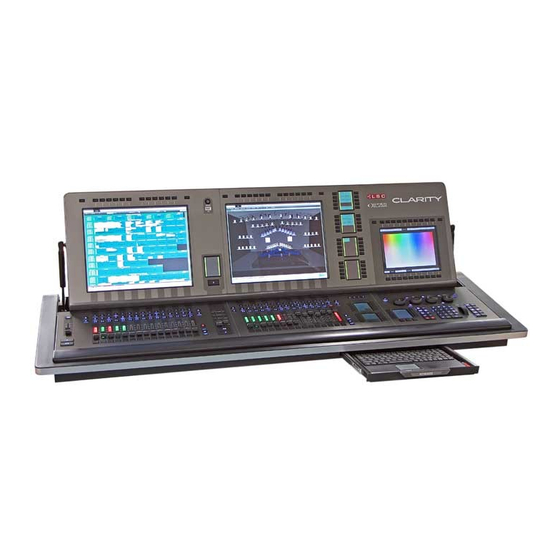
Page 47: Lx900 Console
Clarity LX900 Operator Manual LX900 Console OVERVIEW LX900 The LX900 has the following features: Pivoting monitor panel. One 10.4 inch “encoder wheel touch screen”. Two 17″ touch screens. 30 motorized Fader Playbacks in two banks of 15 playbacks. Each playback has a fader with integral RGB mode indicator plus Select, Go and Pause/Back buttons. -
Page 48: Power Input And Mains Switch
Hint: When using ArtNet, you can connect both Ethernets and use them as main and back up into two independent (dual redundant) networks. The two networks can be connected into an LSC Nexus (ArtNet to DMX converter) which can accept both networks and will automatically change over in the event of a loss of a network. -
Page 49: Led Desk Lamps
Circuit to operate button playback 10 7.2.13 Reset The Reset button should only be used if instructed by LSC technical support. The LX600 GUI (Graphical User Interface) can be reset from the LX tools utility. See section 35 Page 41... -
Page 50: Lx900 Front Panel
LX900 Clarity Operator Manual LX900 FRONT PANEL The main areas of the LX 600 are: Grand Master and DBO (Dead Black Out) button. 10.4 inch multi function encoder wheel touch screen. Encoder wheels and modifier buttons. Keypad and command centre. - Page 51 Clarity LX900 Operator Manual Touch screen Select Fader Fader Pause/ Back LX900 Split Playback To quickly assign a cuelist to the split playback, double tap the touch screen then press the select button of playback containing the cuelist. Currently the split playback is an extension of the master playback, so is only assignable from an existing physical fader assignment.
-
Page 52: Lx Console Controls
LX Console Controls Clarity Operator Manual LX Console Controls OVERVIEW The following controls on the LX consoles that are common to all models. POWER SWITCHES There is a mains power switch located on the rear. There is also a Power switch on the front panel. To switch on the console, switch on the rear panel power switch then press the front POWER button. -
Page 53: Trackpad Mode
Clarity LX Console Controls Operator Manual There are also 10 virtual buttons (with labels) across the bottom of the screen that provide different functions for the current mode. These 10 buttons are duplicated by the 10 real buttons directly below them. You can use either the virtual button or the real button to make a selection. -
Page 54: Encoder Wheels And Buttons
LX Console Controls Clarity Operator Manual ENCODER WHEELS AND BUTTONS Current functions of Encoder Wheels Encoder Wheels Above the bottom row of virtual buttons on the touch screen are four labels that show the current functions of the four encoder wheels. These functions change as different modes or attribute rows are selected. -
Page 55: Rig
Clarity LX Console Controls Operator Manual These modes allow you to control the attributes of the selected fixture in the current programmer as selected in the Programmer window. There are 2 programmers available and programmer 1 is selected by default. 8.5.1 Rig mode is a fixture selection tool and 2 dimensional visualiser. -
Page 56: Universal
LX Console Controls Clarity Operator Manual 8.5.3 Universal Universal mode provides a means of controlling the attributes of the selected fixture(s). It provides universal attribute controls that are always in the same locations on the screen and operate in exactly the same way, regardless of which fixture types you have selected. This allows multiple types of fixtures to be controlled simultaneously and also simplifies the control of complex fixtures. -
Page 57: Direct
Clarity LX Console Controls Operator Manual button and selecting from the sub pages that appear or using their page buttons at the bottom of the screen. See section 13 for more details on Universal Mode. 8.5.4 Direct Direct mode provides another means of controlling the attributes of the selected fixture(s). When you have selected a fixture(s), direct mode provides attribute controls for the selected fixture as specified for that fixture in the fixture library. -
Page 58: Intensities
LX Console Controls Clarity Operator Manual 8.5.7 Intensities Intensity mode is a fixture selection, intensity control and visualiser tool. Intensity Fixtures are selected by touching them. Selected fixtures have a yellow border. Touch again to de-select a fixture. If you touch a fixtures number then drag over multiple fixtures, Clarity draws a line showing the drag path and selects each fixture that you drag over. -
Page 59: Timing
Clarity LX Console Controls Operator Manual Hue/Sat Swatch The Gobo page allows you choose a gobo for the selected fixture(s) by touching a gobo shape. It also has additional sub pages for controlling gobo indexing and gobo rotation by touch and drag using the widgets at the bottom or with the encoder wheels. -
Page 60: Dynamics
LX Console Controls Clarity Operator Manual 8.5.10 Dynamics Dynamics mode provides real time effects for the attributes of selected fixtures by adding modulation (variation) to any attribute or combination of attributes. See section 17 for more details. 8.5.11 Matrix Matrix mode allows you to place fixtures on a two dimensional grid and then display static or moving imagery on them. -
Page 61: Keypad And Command Centre
Clarity LX Console Controls Operator Manual KEYPAD AND COMMAND CENTRE Command Centre Numeric Keypad Intensity 5 User Wheel buttons Escape Command Centre User Pages 8.6.1 User Buttons The 5 user buttons (U1 to U5) on the right are used to save and recall your favourite screens and attribute selections on the “encoder wheel touch screen”. - Page 62 LX Console Controls Clarity Operator Manual The buttons on the default page are: Clear or Close as appropriate for the current programmer. The label also displays the name of current programmer session (e.g. “Programmer 1” or “Name (of cue-list being edited”).
-
Page 63: Playbacks
Clarity LX Console Controls Operator Manual The 5 buttons to the right if the Intensity wheel are: Copy Copies the attribute values of the currently selected fixture or multiple fixtures to the clipboard. Paste Pastes the attribute values of the clipboard to the currently selected fixture or multiple fixtures. -
Page 64: Fader Playbacks
LX Console Controls Clarity Operator Manual 8.7.2 Fader Playbacks Select Pause/ Back Right Page Left Page Right Page Down Left Page Down 15 Fader Playbacks Fader Contents Release Indicator Edit Function Main Flash Main Pause/ Back LX600 and LX900 Fader Playbacks The LX600 and LX900 use the lower part of the large touch screen(s) above the playbacks for assigning and configuring the playbacks and to show their contents and status. -
Page 65: Playback Touch Screens
Clarity LX Console Controls Operator Manual Function+ . Snap to the next cue. Select. Connects that playback to the main play button and main II I (Pause/Back) button. Also used to select a playback when editing etcetera. ... -
Page 66: Playback Pages
LX Console Controls Clarity Operator Manual This screen allows you to change the cue-list into a chase or vice versa and to alter all of its playback settings. These settings are also available and fully described in the “Control Booth” window. -
Page 67: Locking A Playback
Clarity LX Console Controls Operator Manual Tap to move the page divider Left/Right page divider The yellow vertical line and green/blue bars show the left/right page division. The division between left and right can be moved by touching the screen at the desired position. -
Page 68: Page Groups
LX Console Controls Clarity Operator Manual Page Record after making Bookmark your selections below The “Create Page Bookmark” dialogue appears: It allows you to: Name the bookmark. Give it a number. Tick or un-tick the page groups that you want included in the bookmark. A page group is the left or right side of a VX10 or VX20 wing, or a split page section on an LX console. - Page 69 Clarity LX Console Controls Operator Manual Columns At the top right of the screen choose either “single column”, 2, 3, 4 or 5 columns. The number of columns that are available depends upon the number of clear playbacks to the right of the playback containing the cuelist.
-
Page 70: Releasing A Playback
LX Console Controls Clarity Operator Manual always connected giving you instant control but you can hold the Flash button down to 'scoot' the fader. See section 34.1 for User Preferences. On LX consoles, the color of the fader contents indicators of any faders set as “extended playback controls”... -
Page 71: Playback Contents Indicator
Clarity LX Console Controls Operator Manual Inhibitive. This is the default, and operates in the same way as a fader assigned to a cue- list. For example, if the fader is at 50%, fixtures at 25, 50 and 75% would be at 12.5, 25 and 37.5%. -
Page 72: Action Buttons
LX Console Controls Clarity Operator Manual ACTION BUTTONS The LX600 and LX900 both have 60 Action Buttons arranged in 6 banks of 10 buttons with 4 pages of memory. Each of these banks comprises a 3.2" LCD touch screen with 10 physical buttons located around its peripheral. -
Page 73: Clearing An Action Button
Clarity LX Console Controls Operator Manual Assign Action Clear Action button button Select Assign Action Button. The Palettes window changes to grey. Select a group, preset or freeset by touching it. The borders around all Action button touch screens flash red. Touch an Action touch screen or press its button to make the assignment. - Page 74 LX Console Controls Clarity Operator Manual Programmer Tab The right end of the top toolbar on the desktop version has buttons for Clear All, Release All and DBO. Clear All clears all fixtures from all Programmers. Release All releases all fixtures from all Playbacks. See the Programmer and Control Booth sections for more details on Clearing and Releasing.
-
Page 75: Basic Operation
Clarity Basic Operation Operator Manual Basic Operation OVERVIEW Clarity is a “programmer and playback” lighting controller and uses tracking playback by default. If you are unfamiliar with these terms it is recommended that you read the “Operating Concepts and Terminology” section at the end of this manual before proceeding. The basic steps in controlling lighting fixtures are: ... -
Page 76: Programming
Basic Operation Clarity Operator Manual PROGRAMMING Clarity provides many methods of selecting your fixtures. Touching fixtures or groups in Rig mode. See section 12 for details. Clicking on fixtures or groups in the Programmer window Selection sidebar. Touching groups in Palettes or the LX600/LX900 Action buttons. -
Page 77: Customizing Clarity
Clarity Customising Clarity Operator Manual 10 Customizing Clarity 10.1 OVERVIEW You can control the look and feel of Clarity to suit your individual requirements. Windows and panes can be un-docked, moved and re-sized and attribute controls can be expanded or compressed as described below. - Page 78 Customising Clarity Clarity Operator Manual In the top right corner of the Attribute Control window, are buttons that allow you to control the size of the Attribute Controls for all of the selected fixtures. Clicking Compact, Capped or Expanded allows a trade off between screen area and detail as described below.
-
Page 79: Preferences
Clarity Customising Clarity Operator Manual Expanded Display (All selected devices shown) 10.9 PREFERENCES You can customize many of Clarity’s features in the “User Preferences” settings. Click on “Show, Settings, Preferences” then make your selections. User Preferences are described in section 34. 10.10 KEYBOARD SHORTCUTS Keyboard shortcuts allow you to perform certain functions on Clarity by simply pressing a keyboard key or combination of keys. - Page 80 Customising Clarity Clarity Operator Manual Select a function from the list and press OK. Now press your new key or combination of keys for the shortcut for this function. To delete a shortcut, select it by clicking on it then click -. Page 72...
-
Page 81: Overview
Clarity Patching Fixtures Operator Manual 11 Patching Fixtures 11.1 OVERVIEW Clicking on the Patch window tab reveals the patch window. The Library sidebar lists fixtures by manufacturer and model. If you click on a fixture, additional information for the selected fixture is shown at the bottom of the patch window. The right side shows the 512 patch slots for each internal universe as selected by the Universe # tabs. -
Page 82: Spreadsheet View
Patching Fixtures Clarity Operator Manual 11.2 SPREADSHEET VIEW Clicking on the Spreadsheet View button displays the patch information in a spreadsheet view. Spreadsheet View The columns can be re-arranged by dagging a column name. The order in a column can be sorted by clicking on the column’s name. -
Page 83: Clone From Other Fixture(S)
Clarity Patching Fixtures Operator Manual Quantity: allows you to enter the quantity of fixtures to patch. Location: sets the Universe (A, B etc) and starting DMX slot number. Use custom interval: when ticked, quantities of fixtures greater than 1 will be spaced apart in the patch by the number slots that you enter in the box. -
Page 84: Cloning Example
Patching Fixtures Clarity Operator Manual Presets will be automatically cloned for the new fixtures however you can choose whether or not to clone cues buy using the Clone Cues check box. To clone the programming of the source devices to the destination devices click Finish. 11.4.1 Cloning Example Program a show with 10 “scanA”... -
Page 85: Copy Multi-Patch
Clarity Patching Fixtures Operator Manual For example: # (unit number) @ # (slot number) + # (slot number) Enter. This command patches a fixture unit number to two DMX slot numbers. When patching dimmers only you can supply a range of DMX slot numbers. For example: ... -
Page 86: Intensity Fade Profiles
Patching Fixtures Clarity Operator Manual Normal Inverted Pan Inverted Tilt Inverted Pan & Tilt Swapped Pan & Tilt To change the alignment status of a fixture, right-click on the fixture then select either: invert pan, invert tilt or swap pan & tilt. Note: This action affects all currently selected fixtures. -
Page 87: Minimum And Maximum Intensity
Clarity Patching Fixtures Operator Manual Available curves 11.10 MINIMUM AND MAXIMUM INTENSITY You can set minimum and maximum intensity values for a fixture or dimmer. These values are applied “proportionately” throughout the dimming range. Setting a maximum value for a fixture will reduce the intensity value on the output relative to the intensity value that you have programmed. -
Page 88: Custom Fixtures
Clarity fixture editor described later in this manual or request a fixture file from LSC. Please supply all details of the fixture including brand, model, version number, operating modes and a DMX chart or list. Submit your request including this information at: http://www.lsclighting.com/help-centre/clarity-templates... -
Page 89: Editing A Fixtures Address
Clarity Patching Fixtures Operator Manual To deselect a fixture, click on it again. To select all fixtures, right-click on any fixture then click Select all. To deselect all fixtures, click on an un-patched DMX slot. Selected fixtures have a black border. 11.14.1 Editing a Fixtures Address Selected fixtures can be dragged and dropped onto any DMX slot or universe. -
Page 90: Rig
Clarity Operator Manual 12 Rig 12.1 OVERVIEW Rig mode is a fixture selection tool and two dimensional visualiser. It shows a geographical view of the patched fixtures (and groups) which you can arrange so that they are positioned as they actually are in your rig. This allows you to rapidly find and select fixtures for programming by clicking on them or touching them or by dragging the mouse cursor through multiple fixtures. -
Page 91: Aligning Fixtures
Clarity Operator Manual You can now move and organize the fixtures and groups by dragging and dropping them. Selected items have a yellow border Click a fixture or group then drag it to its new position. Multiple items can be moved by clicking each one the dragging. ... -
Page 92: Multiple Views
Clarity Operator Manual Combined/Compact. All attributes combined into a compact display. Position Intensity + Colour Intensity + Colour + Beam Beam + Position Fixture unit number Detailed Combined/Compact Icon Icon Fixture icons can be individually set by selecting the fixture(s) and right clicking then selecting either Detailed or Combined/Compact. -
Page 93: Background Image
Clarity Operator Manual Assign Selected Un-assign Selected Assign All Un-assign All The “Contents” pane allows you to select either Fixtures or Groups tabs and then make you selection by clicking on the fixture or group names. You can then assign or un-assign them from the current view by clicking on the arrow buttons. - Page 94 Clarity Operator Manual If you click on the background area then drag a box, all fixtures within the box are selected. When multiple fixtures are selected, the selection order numbers are shown on the selected icons. You can select multiple fixtures from different views. The order in which you select the fixtures is used for certain effects (such as fans and dynamics) and can be also utilized by the Programmers “sort”...
-
Page 95: Universal
Clarity Universal Operator Manual 13 Universal 13.1 OVERVIEW When you have selected a fixture(s), Universal mode (on the consoles encoder touch screen) provides universal attribute controls that are always in the same locations on the screen and operate in exactly the same way, regardless of which fixture types you have selected. This not only allows multiple types of fixtures to be controlled simultaneously but also simplifies the control of complex fixtures that might use multiple attributes to control an effect or fixtures that use one attribute to change the mode of another attribute. - Page 96 Universal Clarity Operator Manual Beam, Gobo (whls 1-4) Gobo Wheel 1 Gobo Wheel 2 Gobo Wheel 3 Gobo Wheel 4 Gobo Wheel Spin 1 Gobo Wheel Spin 2 Gobo Wheel Spin 3 Gobo Wheel Spin 4 Gobo Index 1 Gobo Index 2 Gobo Index 3 Gobo Index 4 Gobo Rotate 1...
-
Page 97: Direct
Clarity Direct Operator Manual 14 Direct 14.1 OVERVIEW When you have selected a fixture(s), Direct mode provides attribute controls for the selected fixture as specified for that fixture in the fixture library. For example, the fixture being controlled might have a colour wheel with a colour mode attribute and a colour index/spin attribute. -
Page 98: Intensities
Intensities Clarity Operator Manual 15 Intensities 15.1 OVERVIEW The Programmer’s Intensities tab displays the intensity channel of every patched fixture represented by two separate vertical bars. The left bar shows the programmer level (if any) and the right bar shows the output level. The numbers below each channel are the fixture “unit numbers”... -
Page 99: Settings For Channel Controller Mode
Clarity Intensities Operator Manual be required when the same cue is used again at a later time or on another day. The playback’s master still fades the cue up and down and if the cue-list is advanced to the next cue the edit session automatically keeps track. -
Page 100: Timing
Timing Clarity Operator Manual 16 Timing 16.1 OVERVIEW Clarity provides comprehensive controls for the timing of your Cuelists and Cues. Timing information can be entered either when recording a cue, in the Control Booth Window or when editing a cue. Time Presets and Freesets allow you to create building blocks of timing patterns for use in programming or to use them in live playback from the Palettes window. -
Page 101: Cue Attribute Times
Clarity Timing Operator Manual Out Fade. If any Intensity values are set to decrease when the cue fades out they will use the Out Fade time. Increasing intensity values and all other attributes ignore this setting. The default Fade Out time is 0 seconds. 16.4 CUE ATTRIBUTE TIMES Clarity provides several methods for setting the delay and fade times for each attribute in a cue. -
Page 102: Setting Times
Timing Clarity Operator Manual Below the filter attributes are the Timing Controls. The detail shown in the Timing Control can be varied by clicking on either: Compact: one line is used for all devices of that type Capped: the height of the Timing Control is limited to a maximum of 5 lines – the individual value rectangles are compressed to fit into the available space. -
Page 103: Fade Curves
Clarity Timing Operator Manual Set fade times. Align delay times that have been skewed and shift fade times accordingly. Equalize unevenly skewed delay times and shift fade times accordingly. Right-clicking in the right column displays a menu where you can choose to: Set duration times. -
Page 104: Combining Filters
Timing Clarity Operator Manual Position filter has been selected. The lower Timing Control still controls IPCB (Intensity, Position, Colour, Beam) but the new Timing Control above it has been filtered for P (Position) information only. No change has yet been made and the new Timing Control is only temporary as indicated by the paler colour and the menu button on the Timing mode changing to “Confirm”... -
Page 105: Complex Timing
Clarity Timing Operator Manual 16.7.2 Complex Timing The separate Timing Controls allow you to see a lot of timing information at a glance, even if attribute times are at very different orders of magnitude. The above complex example has the following timing. Intensity (I) is delayed for 0.2 seconds then fades up over 1 second. -
Page 106: Applying Time Presets
Timing Clarity Operator Manual The Source pane allows you to filter the timing data that will be recorded by Intensity, Position, Colour and Beam. It also allows you to record the time data of the “Selected fixtures only”. The Options pane allows you to name the Time Preset and to specify the: “Application mode”. -
Page 107: Dynamics (Real Time Effects)
Clarity Dynamics Operator Manual 17 Dynamics (real time effects) 17.1 OVERVIEW Dynamics can save you hours of programming time by creating movement from an otherwise static cue. Dynamics mode (on the encoder touch screen) allows you to add modulation (variation) to any attribute or combination of attributes. When a cue has been played back, the attribute values will normally be steady on the recorded values in that cue. -
Page 108: Controlling Dynamics
Dynamics Clarity Operator Manual 17.3 CONTROLLING DYNAMICS Current waveform Selected Waveform selection Attributes and modifiers Pan Attribute controls Tilt Attribute controls The list at the top-left of the pane shows the attributes that you selected for dynamics to be applied to and at the bottom are the sets of dynamic Attribute Controls, one set per attribute. The controls in the centre allow you to select a waveform and to modify various aspects of that waveform. -
Page 109: Dynamics Attribute Controls
Clarity Dynamics Operator Manual 17.3.2 Dynamics Attribute Controls The dynamics Attribute Controls allow you to modify the values that are applied to each individual fixture attribute being modulated by the selected waveform. The values can be directly changed by dragging with the mouse in their respective Attribute Control and they work in the same way as regular Attribute Controls. -
Page 110: Stopping Dynamics
Dynamics Clarity Operator Manual Selected Attributes Each selected attribute(s) can have its own waveform and modifiers selected. For example, select the pan and tilt attributes of a fixture and set them to a sin waveshape running at 15 cycles/min. Click on pan (only) select a different waveform and double the pan speed to 30 cycles/min. -
Page 111: Matrix
Clarity Matrix Operator Manual 18 Matrix 18.1 OVERVIEW The encoder touch screens Matrix mode allows you to place fixtures on a two dimensional grid and then display static or moving imagery on them. Therefore, the fixtures output can be tightly integrated into a complete lighting and visual show. Clarity allows you to control and program the imagery just like any another lighting fixture. -
Page 112: Editing A Matrix
Matrix Clarity Operator Manual The available (patched) devices are listed on the left-hand side and are divided into two categories: RGB(AW). All fixtures that use Red Green Blue colour channels including those with Amber or White. Typically these are LED arrays. ... -
Page 113: Matrix Control
Clarity Matrix Operator Manual 18.6 MATRIX CONTROL The left hand image is a view of the source media for the selected Pixel Source and its cursor shows where the source areas transforms will be applied. In the example above, the cursor is full screen. -
Page 114: Adding Media To A Pixel Source
Matrix Clarity Operator Manual Output Zoom. Sets the size of the output image. Output X. Adjusts the horizontal position of the output image. Output Y. Adjusts the vertical position of the output image. You can also click on the actual output image and drag its position. ... -
Page 115: Adding And Deleting Pixel Sources
Clarity Matrix Operator Manual Select Media for Pixel Source 18.10 ADDING AND DELETING PIXEL SOURCES To create a new Pixel Source click New Source. The new pixel source appears at the bottom of the pane and it is automatically selected. Media is added to the new source as describe above. Clicking on a pixel source selects that pixel source. -
Page 116: Activating Selected Cells
Pixel Source). You can add additional wipes as simple monochrome images that you can easily create with any paint program. Contact LSC for details. 18.16 DYNAMICS You can add continuous dynamic effects to any of the transforms by using dynamics tab. Select the Dynamics tab then click New. -
Page 117: Recording Matrix Settings
Clarity Matrix Operator Manual Select the attribute(s) to which you want to add dynamic effects then click OK. See “Dynamics (real time effects)”, section 17 for more details. 18.17 RECORDING MATRIX SETTINGS Matrix Settings are recorded as a cue in a cue-list, just like recording cues for regular lighting fixtures. -
Page 118: Media
Media Clarity Operator Manual 19 Media 19.1 OVERVIEW Media servers provide video and graphics playback for visual projection on video screens or LED walls. Clarity allows you to control media servers and program them just as if they were another lighting fixture. Therefore, their output can be tightly integrated into a complete lighting and visual show. -
Page 119: Browser
Clarity Media Operator Manual Browser Controls Selected Layer Layer Controls Selected Server Level Control Media Server Browser tab 19.5.1 Browser The Browser tab shows the available folders in the left hand pane and the contents (media items) of the selected folder in the right hand pane. At the bottom are the “Layer Control”... -
Page 120: Supported Media Servers
Media Clarity Operator Manual timing values that you might set in the Timing tab and dynamics set in the Dynamics tab and are included in a cue by clicking on the red Record button. See section 23, “Record” for details. 19.7 SUPPORTED MEDIA SERVERS Clarity currently supports the open-standard CITP/MSEX protocol as well as the Hippotizer HMAP protocol for thumbnail exchange. -
Page 121: Palettes
Clarity Palettes Operator Manual 20 Palettes 20.1 OVERVIEW Palettes is the home of groups, presets and freesets that you record and also for Clarity’s in- built library of groups, presets and freesets ready for you to use. (Freesets are a special type of preset described below). -
Page 122: Arranging Palettes And Groups
Palettes Clarity Operator Manual Encoder touch screen Palettes with “All” tab selected When you record a group it will appear in the Groups category and when you record your own presets and freesets they are automatically sorted into the appropriate category of Position, Colour or Beam, depending upon the attribute(s) that they will affect. -
Page 123: Beam Presets
Clarity Palettes Operator Manual Hover the mouse over a colour to see a larger view preview of that colour. 20.5 BEAM PRESETS the beam presets and also shows the gobos for the currently The Beam Presets pane shows selected fixtures. Hover the mouse over a gobo to see a larger view preview of that gobo. -
Page 124: Fixture Specific Presets
Palettes Clarity Operator Manual Presets can also be nested. That is, a new preset can be constructed from other presets. Presets can also contain dynamic (real time effects) values. See section 17, Dynamics for more details. 20.7.1 Fixture Specific Presets If you record a preset that contains multiple fixtures with different values for each fixture, then that preset will be applicable only to the specific fixtures used to record the preset. -
Page 125: Dynamic Presets
Clarity Palettes Operator Manual as the start and end values thus creating an evenly spread rainbow across any quantity of selected fixtures. 20.9 DYNAMIC PRESETS Dynamic presets are presets or freesets that contain dynamics (real time effects). See section 17, “Dynamics” for more information on dynamics. Clarity includes many dynamic presets in its inbuilt library, ready for you to use or you can create your own as described below. -
Page 126: Palette Icons
Palettes Clarity Operator Manual 20.11 PALETTE ICONS 20.11.1 Group Icons Group Icons Each group icon displays its name and a number. auto indicates groups that have been automatically created. Clarity automatically creates a group for every different type of fixture that has been patched. Auto groups cannot be edited or deleted. -
Page 127: Applying Presets And Freesets
Clarity Palettes Operator Manual Combine Dynamics Only available for presets. Allows a dynamic preset to be combined with any existing dynamics that have been applied. The resulting combined effect can also be recorded as another preset. De-activate. Clears all programming from the affected attributes. ... -
Page 128: Apply In The Palettes Window
Palettes Clarity Operator Manual to show that they are available. Masking rules apply (see below) to presets or freesets in the Position Presets, Beam Presets and Colour Presets panes. 20.12.3 Apply in the Palettes window The presets or freesets in the Palettes window can be applied to selected fixtures in either Programmer 1 or Programmer 2. -
Page 129: Apply Palettes In The Programmer Window121
Clarity Palettes Operator Manual There are 3 methods of time selection: 1. Enter a time in the “Fade time” box (see below). 2. Select one of the time shortcut buttons. 3. Select a previously recorded Time Preset. The entry in the “Fade time” box can type a simple fade time, a fade time range or a delay and fade time (with optional range). -
Page 130: Applying Dynamic Presets
Palettes Clarity Operator Manual Auto Mask Palettes tab, Auto Mask. For example: A “CB preset” appears in both the Colour Presets and in the Beam Presets. When “Auto mask” is ON, applying the “CB preset” from the Colour Presets pane only applies the preset to Colour attributes of the selected fixtures. -
Page 131: Preserve Dynamics
Clarity Palettes Operator Manual 20.13.3 Preserve Dynamics Selecting a preset or freesets will usually replace any existing programming. There are times when you might want to apply a dynamic effect then apply a non dynamic preset or freeset to position the dynamic effect. To preserve any existing dynamics click Preserve Dynamics then apply the non-dynamic presets or freesets. -
Page 132: Recording Cues With Presets & Freesets
Palettes Clarity Operator Manual 20.16 RECORDING CUES WITH PRESETS & FREESETS. When you have created the desired look, record it as a cue using the Record or Append last buttons in the command centre. Cues containing a preset, only include a link to the preset so that if the preset is updated, the cue will use the updated values. - Page 133 Clarity Palettes Operator Manual Click Update and the changes will be tracked back to the preset. See section 21.8.8 “Update” in the Programmer for more details. Page 125...
-
Page 134: Programmer
Programmer Clarity Operator Manual 21 Programmer 21.1 OVERVIEW The Programmer window allows you to: Select Fixtures. Select Groups. Create new Groups. Control fixture attributes. Adjust timing and preview moves. Record cues and presets. Renumber fixtures. -
Page 135: Selection Sidebar
Clarity Programmer Operator Manual 21.3 SELECTION SIDEBAR All patched fixtures are available in the “Selection Sidebar”. Patched fixtures are automatically organized into tabs of each fixture type and the Groups tab automatically contains a group for every type of patched fixture. You can create your own groups and add them to the groups tab. -
Page 136: Selection Order
Programmer Clarity Operator Manual To deselect all selected fixtures in all type tabs click None in the Programmer Toolbar. Keyboard shortcut = [Space-bar] To clear all programmers and deselect all fixtures click Clear All twice. 21.4.4 Selection Order The order in which you select the fixtures is used for certain effects (such as fans and dynamics) and can be also utilized by the sort function described below. -
Page 137: Individual Fixture Control
Clarity Programmer Operator Manual If the current programmer is empty, clicking All will select all patched fixtures. 21.5 INDIVIDUAL FIXTURE CONTROL When more than one fixture is selected, you can use the Programmer Toolbar buttons (or the Prev and Next buttons above the Encoder wheels to refine your control to an individual fixture whilst still maintaining your multiple selections. -
Page 138: Sort
Programmer Clarity Operator Manual 21.6.2 Sort Clicking on the Sort tab shows the currently selected fixtures and automatically opens the “Sorting/Grouping:” pane. Clicking on one of the following buttons allows you to re-order the selected fixtures to suit the following criteria: ... -
Page 139: Ctrl Tab
Clarity Programmer Operator Manual In this example, buddying is set to 2 and the In this example, buddying is set to 3 and the intensity has been fanned, so that each pair intensity has been fanned, so that each trio of fixtures gets fanned by the same amount. -
Page 140: Session Control
Programmer Clarity Operator Manual Position panned right Position tilted up In the above example, fixtures 1 and 2 are panned to the right, 3, 4 and 5 are centred, and 6, 7 and 8 are tilted up. 21.7 SESSION CONTROL The area at the bottom of the Programmer screen is called the Session Control. -
Page 141: Blind Programming
Clarity Programmer Operator Manual beside their names. Studio Colours 17 and 18 are selected but none of their attributes have been altered. The * on the “T Beam F” tab indicates that some (or all) of these fixtures are also grabbed in the current session. -
Page 142: Grab
Programmer Clarity Operator Manual Hint: Use the “Highlight” function (below) to identify the fixture being controlled. 21.8.3 Grab The Grab function automatically selects active fixtures. Clicking Grab offers two selections: Grab Active. Grabs all attributes that are active on the output of Clarity into the current programmer. ... - Page 143 Clarity Programmer Operator Manual several cues plus the programmer output. The cues might also have been linked to presets and the cues might include tracked values from previous cues. Clarity's Update function can guide you through this operation by showing you which cues and presets have been overridden by the programmer.
-
Page 144: Highlight
Programmer Clarity Operator Manual Only include selected fixtures. Preserve existing timing (trackback only). Finally, you can choose to Clear stored information from programmer when finished by ticking the box – any information that wasn’t stored remains in the programmer. To update all of the selected cues and/or presets click Update. -
Page 145: Programmer Toolbox
Clarity Programmer Operator Manual 21.9 PROGRAMMER TOOLBOX Clicking Toolbox access further advanced functions as described below: 21.9.1 Show Undo View Show Undo View shows the entire undo history for the current session. Clicking on a line in the history instantly jumps to that undo level. A separate history is saved for each programmer and each cue-list being edited. -
Page 146: Flip
Programmer Clarity Operator Manual 21.9.9 Flip Flip will alter the current pan and tilt values of the selected moving yoke fixture(s) to the other possible combination of values that achieves the same position on stage. Moving yoke fixtures typically have 2 combinations of pan & tilt values that can aim the fixture at the same location. -
Page 147: Universal Control Panel
Clarity Programmer Operator Manual Set the Preferences in the Show Menu to "Restore Playback State". Activate the cue and save the show. Whenever you load the show this cue will automatically run and stay on for the duration of the show. -
Page 148: Fixture Quick Menus
Programmer Clarity Operator Manual For example: Typical Pan Attribute Quick Menu Typical Gobo Attribute Quick Menu 21.13.2 Fixture Quick Menus The Menu button in the top corner each fixture type can be clicked to access the fixture quick menus. These menus provide rapid access to common attribute settings for all selected fixtures of the same type. -
Page 149: Attribute Control Order
Clarity Programmer Operator Manual 21.13.4 Attribute Control Order The order in which the Attribute Controls appear can be sorted by clicking the left-hand toolbar button: Logical: This uses standardized attribute ordering grouped into Intensity, Position, Colour and Beam Common: When multiple fixture types are selected, only the attributes that are common to all selected types are displayed. -
Page 150: Fanning In The Universal Control Panel
Programmer Clarity Operator Manual 21.14.3 Fanning in the Universal Control Panel Selected fixtures can also have their attributes fanned by holding [Ctrl] and dragging in the Universal Control Panel. Universal Control Panel showing Intensity, Strobe, Position and Colour all fanned Page 142... -
Page 151: Command Line Programming
Clarity Command Line Programming Operator Manual 22 Command Line Programming 22.1 OVERVIEW You can use command line programming to directly select fixtures and set intensity levels and fade times. If you type in a (fixture unit) number on the keypad, the “command line” automatically appears at the bottom of the encoder wheel touch screen. -
Page 152: Intensity Wheel
Command Line Programming Clarity Operator Manual For example, if some fixtures is already selected, to set them all at full intensity press: @ Enter To set them all to 0% press: @ 0 Enter Hint: You can alleviate the need to press Enter when entering 2 digit intensity values by ticking the box for “Auto-enter commandline after 2 digit after AT”... -
Page 153: Record
Clarity Record Operator Manual 23 Record 23.1 OVERVIEW The looks that you create with the programmer can be recorded into Cue-lists for later playback. A cue-list can contain any quantity of individual cues. The transition from one cue to the next in the list can be set to be either manually started or automatically started at the completion of the previous cue. -
Page 154: Cue-List Playback Settings And Options
Record Clarity Operator Manual Cue name = Cue Fade in = 0 seconds Fade out = 2 seconds Prior to pressing Record, you can enter your own names and settings as described below. 23.2.2 Cue-list Playback Settings and Options When recording a New Cue-list, setting “Playback”... -
Page 155: Contents Options
Clarity Record Operator Manual Record to Existing Cue-list 23.2.5 Contents Options When recording a New Cue-list, setting “Playback” to either “Tracking” (Default) or “Cue Only” will automatically select the appropriate “Contents Options” for playback in that mode. However you can change these options if you desire or select exactly which attribute groups you want to include in the cue. -
Page 156: Keep Settings
Record Clarity Operator Manual Include unchanged information. This records all grabbed values in the current programmer session. This cue is suited to playback in Cue Only mode and is automatically selected if you set a new cue-list to ‘cue only’ playback mode in the Record Cue dialog box. Blocking –... -
Page 157: Undo Redo
Clarity Record Operator Manual see the changes that you are making on the output click Blind on the Programmer toolbar to toggle the current session to <on stage>. Hint: You can always open an edit session <on stage> by un-ticking “Start cue-list edit blind”... -
Page 158: Control Booth
Control Booth Clarity Operator Manual 24 Control Booth 24.1 OVERVIEW The Control Booth window is the location of all cue-lists and provides controls to set the playback modes and settings of cue-lists, organise cue-lists in folders and to arrange the order of cue-lists and cues. -
Page 159: Cue-List Playback Options
Clarity Control Booth Operator Manual Hint: The current settings that you choose for a cue-list can be used as the defaults for all new cue-lists by right clicking on a cue-list and selecting “Use Current options as default”. 24.2.1 Cue-list Playback Options These options affect the way a cue-list will playback. - Page 160 Control Booth Clarity Operator Manual Cue 1 = intensity to 100% and colour to green. Cue 2 = Colour to red. When you transition from cue 1 to cue 2, the intensity attributes will be released. Activate (fade in) time. Default time = 0 seconds.
- Page 161 Clarity Control Booth Operator Manual Playback Options Release at end. When the last cue has completed its fade, the cue-list is automatically released. If not set to release at end, it will loop back to the first cue. Loop at end.
-
Page 162: Cue-List Chase Options
Control Booth Clarity Operator Manual 24.2.2 Cue-list Chase Options Clicking the drop down box in the Chase pane allows you to select the chase mode for the currently selected Cue-list. The 5 choices are: Off. The cue-list does not chase and behaves like a normal cue-list. It will use the Delay and Fade times and Halt or Follow settings of each step. -
Page 163: Cue-List Priority Settings
Clarity Control Booth Operator Manual You can manually change the length by entering a length value in the form “bars.beats”. For example: 2.0 for 2 bars duration. The X button returns the length to the automatically calculated value. For more information see “Metronome” in section 26.6 “Performance Window”. 24.2.3 Cue-list Priority Settings Priority. -
Page 164: Manipulating Cues And Cue-Lists
Control Booth Clarity Operator Manual 24.4 MANIPULATING CUES AND CUE-LISTS In the Control Booth window, click on a cue-list to select it. Clicking (Back) or (Forward) lets you step through your previous selections. The order of the cue-lists can be re-arranged by dragging and dropping a cue-list. Right-clicking on a cue-list offers the Right-clicking on a cue offers the following following options:... -
Page 165: Copy Full State
Clarity Control Booth Operator Manual The options to insert or merge will be automatically pre-set by where you drop the cue. Dropping a cue on a cue selects the “Merging” options. Dropping a cue between two cues selects the “Inserting” options. ... -
Page 166: Cue Notes
Control Booth Clarity Operator Manual 24.4.5 Cue Notes Notes can be added to any cue by clicking on the cue then double clicking on the cue’s Notes cell and entering your text. 24.5 SYNC FX If a cue contains dynamic effects (created in the dynamics tab of the programmer or applied by a dynamic preset or freeset), the “rate”... -
Page 167: Audio Playback
Clarity Control Booth Operator Manual 24.7 AUDIO PLAYBACK You can include an MP3 music file that will be played when a cue is triggered. All MP3 files that need to be played must be loaded into the Audio Resources dialog box. In the Control Booth window, selecting Audio will open the Audio Resources dialog. -
Page 168: Audio Fixture
Control Booth Clarity Operator Manual 24.7.1 Audio Fixture Clarity has an inbuilt “Audio Fixture” available. This “fixture” has two attributes, Volume (Intensity) and Play Mode (Play/Pause/Stop). This allows you to program Audio as if it was a lighting fixture. You can set the level on a cue by cue basis, give it fade times (with wait, delay, etc) and do anything else that you can do with a normal dimmer channel. -
Page 169: Learn New Cue-List
Clarity Control Booth Operator Manual or the name of the file preceded by a / (forward slash). e.g. play audio /prettyfly or play audio /prettyfly.mp3 (There is no need to include the path). pause audio:# Pauses the specified audio file. stop audio:# Stops the specified audio file. -
Page 170: Bookmark
Control Booth Clarity Operator Manual Press Finish & Create Cue List to create the new master cue-list. If you selected an audio file then the name of the audio file will be used for the name of the master cue-list. Press Release all then playback the master cue-list that you have just created. -
Page 171: Editing Cues And Cue-Lists
Clarity Editing Operator Manual 25 Editing Cues and Cue-lists 25.1 OVERVIEW Playback settings, times and names can be changed in the Control Booth window (Section 24) and in the Playback configuration (Section 8.7.6). The selected settings are automatically saved with the cue-list. To change the contents of a cue you Edit the cue. - Page 172 Editing Clarity Operator Manual Programmer Window The time line shows the actual time when each cue will play, counting from the first cue from which the others will automatically follow. For example, if you want to know when cue 4 will be played you can read it directly from the time line rather that adding up all of the fade and wait times from the preceding cues.
-
Page 173: Saving The Edit
Clarity Editing Operator Manual existing parameter types and falling back to less-filtered types. For example, if you touch RGB, it will use existing RGB timing if there is any, otherwise it will use any pre- existing colour timing, else if will use overall cue timing, else it will use 2s. Clarity also tries to match ranged timing. -
Page 174: Live Edit Indication
Editing Clarity Operator Manual Cue only channels 25.5 LIVE EDIT INDICATION In the Control Booth any cue-lists being edited live <on stage> have a red E beside their name. E = Cue-list being LIVE edited (on stage) 25.6 BLOCK CUE Cues that are recorded to be used in tracking playback mode only contain the changes that are required when the cue is played back. -
Page 175: Performance Window
Clarity Performance Window Operator Manual 26 Performance Window 26.1 OVERVIEW The performance window provides a unique and intuitive method of playback especially designed for busking or improvising a show. The grid area of the performance window is arranged as a grid of playable items. The top row is fixed and provides column master stop buttons. -
Page 176: Previewing Cue-Lists
Performance Window Clarity Operator Manual 26.2 PREVIEWING CUE-LISTS The selected cue-list in the cue-lists browser can be previewed without having to drop it onto a cell by using the preview ► (play) and ■ (stop) controls at the bottom of the browser. Selecting another cue-list automatically stops the previous preview. -
Page 177: Managing The Grid
Clarity Performance Window Operator Manual Right clicking on a cue that contains dynamic effects (in the Properties pane above) and selecting Sync FX toggles whether the effects are synchronized to the metronome or not. See section 24.5 for more details on Sync Fx. 26.5 MANAGING THE GRID To manage columns, Right-Click in the top cell of the column and select either: ... - Page 178 Performance Window Clarity Operator Manual Source. This allows you to select the source for the cell or to make a deep copy of the current cue-list. A deep copy duplicates the cue-list and sets the new copy as the current source.
-
Page 179: The Metronome
Clarity Performance Window Operator Manual The Chase and Playback controls are identical to those in the Control Booth window. See section 24.2.1 “Cue-list Playback Options” in the Control Booth for details. Lock to tempo: When ticked, this causes the cue-list/chase to use the metronome timing as set at the top of the Performance window. -
Page 180: Metronome Settings
Performance Window Clarity Operator Manual 26.6.1 Metronome Settings Time sig: Time signature allows you to select the number of beats within a bar, 2/4, 3/4, or 4/4. BPM: (Beats Per Minute) is the tempo of the metronome. Set the tempo by either entering a BPM number or by using the <tap>... -
Page 181: Levels Window
Clarity Levels Window Operator Manual 27 Levels Window 27.1 OVERVIEW The Levels window provides comprehensive monitoring of levels and activity within Clarity. The selection tabs allow you to view: DMX. Output. Programmer. The levels of all attributes controlled by either programmer. ... -
Page 182: Programmer Values
Intensity Levels Window Clarity Operator Manual 27.4 PROGRAMMER VALUES The Programmer tab allows you to view the output of either Programmer or any edit sessions that ere open by clicking on the drop down box or you can tick the Follow current check box to show the contents of the current programmer. -
Page 183: Intensity Levels
Clarity Intensity Levels Window Operator Manual 28 Intensity Levels 28.1 OVERVIEW The Intensity Levels view complements the normal Levels views by providing intensity specific information with optional auto-compression (hiding levels that are at zero). This makes it much easier to see all of the channels in use when there a large quantity of fixtures. The window provides two default views: ... -
Page 184: Console View
Intensity Levels Window Clarity Operator Manual Animate Activity changes. If ticked, the channel number will be highlighted in yellow whenever its level is changing. The Detail pane allows you to select the detail that is displayed for each channel number: ... -
Page 185: Show Files And Packages
Clarity Show Files Operator Manual 29 Show Files and Packages 29.1 OVERVIEW Version 2 of Clarity has changed the way that show files are handled. Clarity “Shows” can still be saved and loaded but you can also Export or Import “Clarity Show Packages”... - Page 186 Show Files Clarity Operator Manual If you use existing media libraries that are not in the Clarity media folder and you export your show to another computer running Clarity, save it on this machine and then import it back to the original machine, you need to be aware that the second machine will place the media in its Clarity media folder.
-
Page 187: Midi
Clarity MIDI Operator Manual 30 MIDI 30.1 OVERVIEW MIDI (Musical Instrument Digital Interface) is an international standard for data communication between musical instruments, computers and other equipment such as lighting controllers. The MIDI IN connector on the rear panel receives signals from a MIDI device such as a keyboard, MIDI sequencer or computer with MIDI output and uses the signals for various functions. -
Page 188: Midi Control Function
MIDI Clarity Operator Manual 30.2.4 MIDI Control Function “Control Change” is a type of MIDI message. This message consists of a function and a value. The value that is sent with that message is used by Clarity to “pre-select” a cue in the currently selected cue-list. -
Page 189: Automatic Entry Of Events
Clarity MIDI Operator Manual The “Timecode Configuration” dialog box opens: Event Playlist Details Contents Playlists There are three main panes, “Playlists”, “Playlist Contents” and “Event Details”. Each Playlist contains a list of events (Playlist Contents). Each event specifies a time that a cue in a cue-list will be played. -
Page 190: Managing Playlists
MIDI Clarity Operator Manual 30.3.4 Managing Playlists Multiple Playlists can be created by clicking on symbol in the Playlists pane. To delete a Playlist, click on the Playlist then click the ▬ symbol in the Playlists pane. ... - Page 191 Clarity MIDI Operator Manual Clicking in the Format box allows you to select your required Timecode format from the drop down box. 24 Frames. For film projection rate. 25 Frames. For PAL video rate. 30 Frames – non drop. Non-drop Timecode for NTSC video rate. ...
-
Page 192: Remote Control
LX console’s Ethernet connection. Alternately you can connect the console to an existing wireless network. LSC recommends using the “Ethernet 2” port to connect to the wireless router or a network because Clarity’s default setting for Ethernet 2 is “DHCP”. This allows the router or network to automatically assign an IP address to Clarity. -
Page 193: Controlling Clarity With Osc
Clarity Tracking Backup Operator Manual On a desktop version of Clarity, navigate to your computers network connections and make a note of your computers IP Address. On the LX console, start the LX Tools by pressing Function+Fine+Fine at the same time. Navigate to the “Networking”... -
Page 194: Controlling Other Devices From Clarity
Tracking Backup Clarity Operator Manual Groups Keypad Pan/Tilt Playback Update Your iPhone will automatically show the Groups and cuelists that exist on Clarity. 31.3 CONTROLLING OTHER DEVICES FROM CLARITY Open Clarity’s OSC server from the “Show/OSC settings” menu and tick the “Enable OSC client”. -
Page 195: Scheduler
Clarity Tracking Backup Operator Manual 32 Scheduler 32.1 OVERVIEW Clarity can also be configured to automatically execute various playback actions at specific times and dates with optional repeats for “n” repeats or forever. This function is intended for scenarios where Clarity operates unattended. 32.2 SCHEDULE AN EVENT To schedule an event, from the menu select “Show/Time date scheduler”. -
Page 196: Tracking Backup
Tracking Backup Clarity Operator Manual If you select “All” in the Target pane then the only “Action” available is to “Release” the cuelists. 33 Tracking Backup 33.1 OVERVIEW Tracking Backup allows another LX console to track a master instance of Clarity on the LX console so that the playback state and show contents are kept in sync on both sessions via a network connection. -
Page 197: Operating From The Slave
Clarity Tracking Backup Operator Manual Although the “Tracking Backup Slave” dialog box must remain open on the slave computer, you can still observe the operation of the slave’s windows in the background by clicking on the Patch, Programmer, Palettes, Control Booth, Performance or Levels buttons in the dialog box. -
Page 198: Preferences And About
Preferences Clarity Operator Manual 34 Preferences and About 34.1 USER PREFERENCES Selecting Show, Settings, Preferences, from the main menu, allows you to customize the operation of Clarity. The default settings for new cue-lists can also be customized or reset to standard. - Page 199 Clarity Preferences Operator Manual If not ticked they will fade to their values using the fade times recorded in the cues. Only available if “Save/Restore playback” is ticked. See also “DMX holdoff after load” below. "Programmer release intensity first". Default = ticked. If ticked, when a Programmer is cleared, all intensity attributes will fade out before any other attributes are cleared.
- Page 200 These log files can be used by LSC to check the operation of Clarity. Only tick this box if instructed to by LSC. If the box is ticked it has no effect on the operation of Clarity but if the log files are not required they can accumulate over time.
-
Page 201: New Show Preferences
Clarity Preferences Operator Manual Set the default fade time that will be used for new parameter values in the programmer when recording a cue. "Blind time". Default = 1000 ms. The fade time that the programmer uses to go in and out of blind mode, entered in ms (milliseconds). -
Page 202: About Clarity
Preferences Clarity Operator Manual 34.2 ABOUT CLARITY Selecting, Show, About LSC Clarity…, displays the About LSC Clarity dialog box. Version number Here you can find information about your version of the Clarity software. Page 194... -
Page 203: Lx Tools
Clarity LX Tools Operator Manual 35 LX Tools 35.1 OVERVIEW LX Tools is a utility program that provides access to hardware configuration, help files and software upgrades on the LX consoles. 35.2 STARTING LX TOOLS To start LX Tools from the console press Function+Fine+Fine at the same time. ... -
Page 204: Software Management
LX Tools Clarity Operator Manual 35.2.2 Software Management The LX Tools Software Management button provides tools for upgrading the software. See also section 36, “Software Upgrade”. 35.2.3 Help The LX Tools Help button, pprovides a copy of this manual and video tutorials. 35.2.4 Configure Monitors The LX Tools Configure Monitors button allows you to optimise the displays for the physical... -
Page 205: Networking
The LX Tools Networking button allows you to setup the network connection of the two Ethernet ports. See also section 37 for details on how to allow LSC to connect to your console via the internet to resolve problems. Page 197... -
Page 206: Calibrate Touch Screens
The LX Tools Clock button allows you to set the Clock that is displayed beside the Playbacks. 35.2.9 Diagnostics The LX Tools Diagnostics should only be run when instructed by LSC technical support. It requires a password. 35.2.10 System Information The LX Tools System Information button provides system information such as ….. -
Page 207: Software Upgrade
36 Software Upgrade 36.1 OVERVIEW Both LSC Lighting Systems (Aust) Pty. Ltd. and OpenClear Pty. Ltd. have a corporate policy of continuous improvement covering areas such as product design and documentation. To achieve this goal, we undertake to release software updates for all products on a regular basis. -
Page 208: Technical Support
Clarity Operator Manual V2.0 37 Technical Support If you are experiencing problems with Clarity either contact your local LSC agent or post a message on the LSC forum at http://www.lsclighting.com/forums/ LSC technical support staff can remotely interrogate any LX console that is connected to the internet. -
Page 209: Fixture Editor
Carallon, an independent supplier of fixture libraries. However, if you have a fixture that is not in the library you can either request a fixture personality file from LSC or use the Clarity fixture editor to create your custom fixture personality. -
Page 210: Operating Concepts And Terminology
The operation of Clarity is easily understood when you know the meaning of certain key terms that are frequently used by Clarity. These terms have been adopted by LSC as the best descriptions for functions and operations performed on Clarity and may not be terms adopted on similar equipment. -
Page 211: Playback Control
Clarity Operating Concepts & Terminology Operator Manual attribute is no longer touched. If it is varied after being recorded it is again touched. When an attribute is no longer controlled by a programmer it is said to be cleared from the programmer. 39.6 PLAYBACK CONTROL When a cue is played back, any fixture attribute values in that cue appear on the output (subject to priority rules above). -
Page 212: Advantages Of Tracking
Operating Concepts & Terminology Clarity Operator Manual Record the look as a cue in a new cue-list. The first cue in the cue-list will contain the values of all attributes that have been touched by the programmer. After the cue is recorded, no attributes have been touched. -
Page 213: Cue Only Playback
Clarity Operating Concepts & Terminology Operator Manual Clear programmer, dimmer 2 fades off. Select dimmer 3 and set to 100%. Record cue 3. Clear programmer, dimmer 3 fades off. Playback cue-list in tracking mode. Playback cue 1, dimmer 1 fades on. -
Page 214: Content Options
Operating Concepts & Terminology Clarity Operator Manual If you intend to playback the cue-list in Cue only mode, then you should include any unchanged information in the cue and not just the changes. In other word, you should record all grabbed values, not just the touched values. -
Page 215: Cue Only (Recording)
Clarity Operating Concepts & Terminology Operator Manual Channel 1 Channel 2 Channel 3 Cue 1 Output Cue 2 Output Cue 3 BLOCK Output Cue 4 Output Cue 1 contains hard values for attributes 1, 2 and 3 so when it is played back, the attributes go to 100%, 50% and 25% respectively. -
Page 216: Mark Cues (Move In Black)
Operating Concepts & Terminology Clarity Operator Manual 39.8.3 Mark Cues (Move in Black) A Mark cue is a special type of cue that you can insert in a cue-list. Mark cues are also known as “move in black” and are used to pre-position fixture attributes without their movements or changes being seen on stage. - Page 217 Clarity Operating Concepts & Terminology Operator Manual controller has no idea what it is connected to, or even if what it's connected to is working, switched on, or even there at all! RDM changes all that allowing the equipment to answer back! An RDM enabled moving light, for example, can tell you many useful things about its operation - the DMX address it is set to, the operating mode it is in, whether its pan or tilt is inverted and how many hours since the lamp was last changed.
-
Page 218: Hints And Tips
Hints and Tips Clarity Operator Manual 40 Hints and Tips 40.1 SIMPLE CUE PLAYBACK If you are a novice and are having trouble understanding tracking the following settings will make Clarity operate in Cue Only mode with the cues automatically playing and releasing when a fader is raised or lowered. -
Page 219: Flashing A Cue
Press Function+ II I to snap to the previous cue. 40.8 OPERATE CLARITY LIKE A MANUAL DESK If you want to work in the same fashion as an LSC maXim console or other similar manual console then you can simply record each of your looks to separate playback. -
Page 220: Audio Playback
Hints and Tips Clarity Operator Manual Media Server IP Addr: 2.0.0.201 Subnet : 255.0.0.0 Gateway:2.0.0.101 2) Do you have Sun VirtualBox installed on your computer? If so, then by default it re-routes all the network traffic and stops thumbnail exchange from working. In this scenario please disable the VirtualBox Host-Only Ethernet Adapter from within the device manager to resolve the problem. -
Page 221: Recording Only Pan (Or Tilt)
Clarity Hints and Tips Operator Manual 3) Do the same for the Red and Green cues. Now you can use the Red, Green and Blue cues to have live colour mixing of the RGB fixtures. 40.14 RECORDING ONLY PAN (OR TILT) When you only adjust Pan, Clarity automatically selects Tilt as well (as usually a position needs both). -
Page 222: Fans Buttons
Hints and Tips Clarity Operator Manual and Clarity will look after the color conversion whilst ignoring the Pan/Tilt parameters that don't exist on the par cans. 40.19 FANS BUTTONS The LX consoles provide dedicated Fan End and Fan Centre buttons, located right next to the encoders, to allow quick one handed fanning of any parameter. -
Page 223: Index
Clarity Index Operator Manual V2.0 41 Index <> Button, 46 Copy, 55, 137, 213 Action Button Pages, 64 Copy Full State, 157 Action button toggle, 153 Copying and Merging Cues, 156 Action Buttons, 64 Ctrl Tab, 131 Activate (fade in) time, 152 Cue Notes, 158 Adding a Virtual VX Wing, 19 Cue Only, 146, 151, 165, 207... - Page 224 Index Clarity Operator Manual LX600, 37 Jump, 155 LX900, 41 Keyboard, 198 VX Wings, 27 Keyboard Shortcuts, 71 Fade Curves, 95 Keypad and Command Centre, 53 Fade Profiles, 78 Knock Out Remainder, 137 Fade Time, 146 KO, 46 Fader affects all attributes, 153 Learn new cue-list, 161 Fader Playbacks, 56 LED Matrix, 103...
- Page 225 Clarity Index Operator Manual V2.0 Mask, 171 Selection Order, 128 Metronome, 171 Session Control, 132 Range, 171 Setting Times, 94 Restrict, 171 Shortcuts, 71 Special Action, 170 Show Files and Packages, 177 Sync Fx, 168 Simple Cue Playback, 210 Trigger, 170 Simple SCRIPT language, 160 Use Local Player, 170 Simulator, 182...
-
Page 226: Compliance Statements
Connectors with conductive back shells must be used. Federal Communications Commission (FCC) Declaration of Conformity LSC Lighting Systems (Aust) declares that the LX, QX and VX products comply with Part 15 of the FCC Rules. Operation is subject to the following two conditions:...
Need help?
Do you have a question about the CLARITY LX300 and is the answer not in the manual?
Questions and answers