
Subscribe to Our Youtube Channel
Related Manuals for Snapkis UltraFix 0-11


Summary of Contents for Snapkis UltraFix 0-11
- Page 1 UltraFix 0-11 USER MANUAL Group 0+,I,II,III Suitable from 0kg to 36kg (approx. Birth to 11 yrs) Approved to ECE R44-04 standard (Please read this instruction manual carefully before installation)
-
Page 2: Table Of Contents
1. Understanding Your Vehicle Contents 1. Understanding Your Vehicle..................2 Notice:This child restraint is suitable for the following cars: 2. Safety information....................3 3. Checklist before use.....................5 Vehicles without ISOFIX Vehicles with ISOFIX anchorages systems anchorages systems 4. Car seat parts......................6 5. How to fasten the harness buckle.................7 6. -
Page 3: Safety Information
7. Always keep the car seat secured in the vehicle even when it is unoccupied. This car seat can only be installed on a forward facing passenger seat. Do not 8. For your child’s safety, do not use a damaged or second-hand car seat. This car seat install the child car seat at the lateral and rear-facing passenger seat. -
Page 4: Checklist Before Use
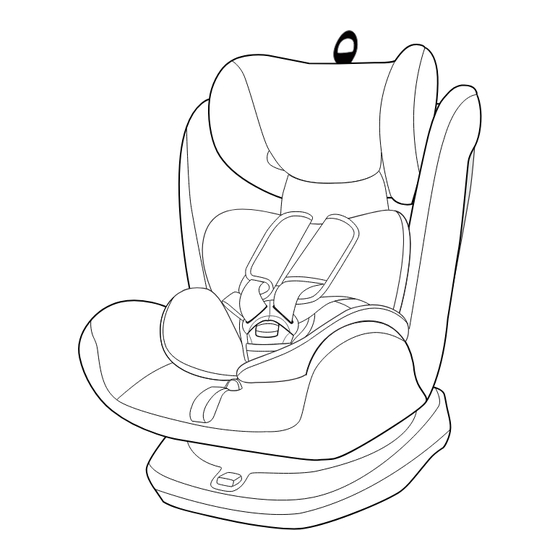
3. Checklist before use 4. Car seat parts Seat belt slot Height Adjuster Secure child properly in child restraint 5-point harness Headrest system 1. Correct shoulder strap height. 2. 5-point harness is not twisted. Shoulder belt Shoulder pad 3. 5-point harness is secured and tight. Quick adjuster Inner cushion button... -
Page 5: How To Fasten The Harness Buckle
5. How to fasten the harness buckle Tightening the harness Place your child in the car seat. Fasten the joined tongues into the harness buckle. Adjust the position of the lap and shoulder belts. Pull the harness adjuster strap until the harness is tight. click Important: Tighten the harness as far as Step 3... -
Page 6: How To Adjust The Shoulder Belts
8. How to adjust the shoulder belts 9. How to adjust the reclining position of the car seat If the height of the shoulder belt is not suitable for your child, adjust according to the following steps: Step 1: From the back of the car seat, remove both shoulder belts from the yoke connect plate. -
Page 7: How To Rotate The Car Seat
11. How to rotate the car seat Step 2: Pass the top tether through the slot between the headrest and backrest. Fix the hook of the top tether on the vehicle seat’s top tether anchor according to the vehicle usage manual. - Page 8 Vehicles with ISOFIX anchorage systems: Step 2: Place the car seat facing the vehicle seat backrest. Make sure the front of the car Step 1: Clip the two insert guides with the seat is resting firmly against the vehicle seat cut-out facing upwards onto the two ISOFIX backrest.
-
Page 9: How To Install Car Seat Forward Facing For Group I (9-18Kg)
Step 4: Pass the top tether through the Step 2: Pull the vehicle seat belt and pass slot between the headrest and the vehicle shoulder belt through the seat backrest. Fix the hook of the top tether belt slot on the headrest. The vehicle lap on the vehicle seat’s top tether anchor belt should go through the gap between according to the vehicle usage... - Page 10 Vehicles with ISOFIX anchorage systems: Step 4: Pass the vehicle belt through the back of the inner cushion to the other side and fasten the seat belt into the buckle Step 1: Clip the two insert guides with the Click until you hear a “click”...
-
Page 11: How To Install Car Seat Forward Facing For Group Ii,Iii (15-36Kg)
15. How to install car seat forward facing for Vehicles with ISOFIX anchorage systems: Group II, III (15-36kg, approx. 3 to 11 years) Step 1: Clip the two insert guides with Important: Before installing the car seat, remove the 5-point harness system the cut-out facing upwards onto the two and inner cushion. -
Page 12: How To Remove The Car Seat Cover
17. Cleaning & Maintenance Periodically check the car seat for damaged or worn parts. Do not use this car seat Step 4: Fasten the seat belt into the if any part is damaged or worn. buckle until you hear a “click” sound. Pull the vehicle seat belt upwards and make Click 5-point harness buckle...
Need help?
Do you have a question about the UltraFix 0-11 and is the answer not in the manual?
Questions and answers