
Related Manuals for Drive Medical i-walker


Summary of Contents for Drive Medical i-walker
- Page 1 #s: RTL10555BL RTL10555RD RTL10555SL www.drivemedical.com Rev.1.07.21.14...
-
Page 2: Parts List
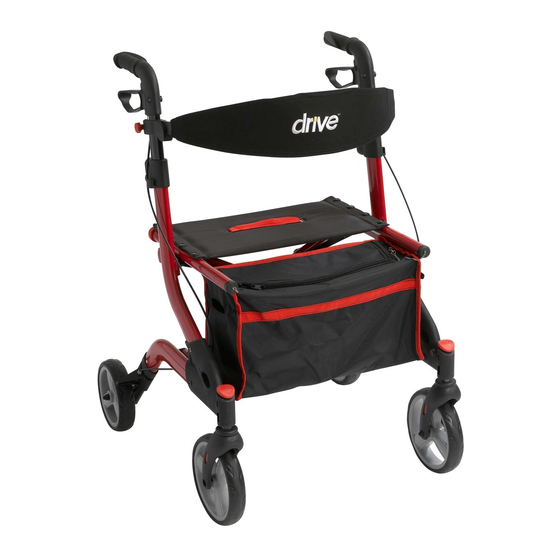
parts list Item # RTL10555SL WEIGHT CAPACITY: 300 LBS (136 KG) 7. Seat Handgrip 8. Bag 2. Adjustable tubing handgrip 9. Front wheel 3. Rear reflector on handgrip 10. Rear wheel 4. Brake lever 11. Cane Holder 5. Interlock button for handgrips 6. - Page 3 The Walking aid is suitable for a single user with limited mobility. The I-Walker is ideal for indoor and outdoor use. includes: 1. Wheels 3. Carry Bag 5. Cane Holder 2. Handles 4. Backrest 6. Operating Instructions assembly instructions 1.
- Page 4 The push pin will snap into place when secure. Repeat for the second back wheel. (Figure 3) Figure 3 4. Unfold the I-Walker by pressing down on both sides of the seat frame. (Figure 4) Figure 4 5. Insert the handles (C) into the handle receptacles.
- Page 5 Replace the knobs to secure in place. (Figure 6) NOTE: Fold the I-Walker slightly to make it easier to install the bag. Figure 6 7. Attach the backrest (E) by sliding the backrest hooks down into the receptacles located on the front of the frame.
-
Page 6: Height Adjustment
(Figure 10) Always brake slowly and steady. Figure 10 Press both brake levers down to apply the locks while the I-Walker is stationary. (Figure 11) Pull up the brake levers and release to release the locks. The effect of the brakes can be affected by abrasion of the wheels. - Page 7 11. Position the I-Walker on an even and solid surface. Lock the brakes (parking position). The I-Walker must stand and must not slip. Sit straight up and do not lean backwards. DO NOT MOVE ROLLATOR WHILE SEATED. folding / transport / storage 12.
-
Page 8: Safety Instructions
• Do not expose the product to temperatures above 104°F for an extended period of time, as this can cause the I-Walker parts to overheat and burn the user. • Please make sure the Rollator is fully opened, seat is down and the folding bar under seat is locked in the down position. -
Page 9: Lifetime Limited Warranty
The frame of your Drive Medical product is warrantied to be free of defects in material and workmanship for the lifetime of the product for the original consumer purchaser. The brake handle and housing are covered for a period of 5 years from the date of purchase for the original consumer purchaser. -
Page 10: Lista De Partes
lista de partes Artículo # RTL10555SL CAPACIDAD: 300 LBS (136 KG) DE PESO 7. Asiento Mango 8. Bolsa 2. Tubo ajustable del mango 9. Rueda frontal 3. Reflector trasero sobre el mango 10. Rueda posterior 4. Palanca del freno 11. Sujetador de bastón 5. -
Page 11: Instrucciones De Armado
introducción Este dispositivo auxiliar para caminar es adecuado solamente para un usuario con capacidad limitada de movilidad. El I-Rollator es ideal para usarse en interiores o exteriores. incluye: 1. Ruedas 3. Bolsa 5. Sujetador de bastón 2. Agarraderas 4. Respaldo 6. - Page 12 3. Introduzca la rueda trasera (B) dentro de la parte trasera del armazón, para hacerlo presione sobre la clavija de presión y deslícela dentro del receptáculo trasero, asegúrese de que las ruedas apunten hacia afuera del armazón. La clavija de presión encajará...
- Page 13 6. Sujete la bolsa (D) al armazón del asiento al girar y quitar las perillas ubicadas en la parte frontal del armazón de la silla y deslice la bolsa dentro de las ranuras ubicadas en la parte interna del armazón. Vuelva a colocar las perillas para asegurarla en su lugar.
- Page 14 ajustes de altura 9. Presione los botones rojos de liberación (G) de abajo de los mangos, como se muestra en la figura 9 y jale los mangos hacia arriba al mismo tiempo. Suelte el botón a medida que se mueve el mango. Esto lo bloquea automáticamente en la siguiente altura disponible.
- Page 15 para sentarse 11. Coloque el I-Rollator sobre una superficie uniforme y sólida. Bloquee los frenos (posición de estacionado). El I-Rollator debe permanecer erguido y no debe resbalarse. Siéntese derecho y no se incline hacia atrás. NO MUEVA EL ROLLATOR MIENTRAS ESTE SENTADO. doblado / transporte / almacenaje 12.
-
Page 16: Instrucciones De Seguridad
instrucciones de seguridad • ¡Úselo solamente como un dispositivo auxiliar para caminar! • Úselo solamente sobre superficies uniformes y sólidas. • Peso máximo del usuario: 300 lbs (136 kg). • Revise con frecuencia los tornillos y los sujetadores del I-Rollator y apriételos cuando sea necesario. -
Page 17: Garantía Limitada De Por Vida
El armazón de su producto Drive Medical está garantizado contra defectos en material y mano de obra de por vida del producto por el comprador- consumidor original. El mango del freno y el bastidor están cubiertos por un periodo de 5 años desde la fecha de compra por el consumidor original. -
Page 18: Liste Des Pièces
liste des pièces Article # RTL10555SL CAPACITÉ DE POIDS DE 300 LBS (136 KG) 7. Siège Poignée 8. Sac 2. Tubulure de poignée ajustable 9. Roue avant 3. Réflecteur arrière sur la poignée 10. Roue arrière 4. Levier de frein 11. -
Page 19: Instructions Pour L'assemblage
Cet appareil d’aide à la marche convient à un usager unique à mobilité réduire. Le I-Walker est idéal pour une utilisation à l’intérieur et à l’extérieur. inclut 1. Roues 3. Sac 5. Porte-canne 2. Poignées 4. Dossier 6. Instructions pour l’utilisation instructions pour l’assemblage... - Page 20 3. Insérez une roue arrière (B) à l’arrière du cadre en enfonçant le bouton à ressort et en glissant la roue dans le réceptacle. Assurez-vous que la roue est du côté extérieur du cadre. Le bouton à ressort doit ressortir pour que la roue soit solidement fixée.
- Page 21 6. Pour fixer le sac (D) au cadre du siège, tournez, puis retirez les boutons situés à l’avant du cadre du siège, et faites glisser le sac dans les rainures situées à l’intérieur du cadre. Replacez les boutons pour sécuriser le tout.
- Page 22 ajustement de la hauteur 9. Appuyez sur les boutons rouges (G) sous les poignées, comme dans l’illustration 9, tout en tirant les poignées vers le haut. Relâchez les boutons pendant que les poignées remontent – elles se verrouilleront à la prochaine position disponible. Répétez cette opération jusqu’à...
- Page 23 prendre place sur le i-ambulateur 11. Placez le I-Ambulateur sur une surface solide et à niveau. Verrouillez les roues (ambulateur à l’arrêt). Le I-Ambulateur doit tenir en place, sans bouger. Asseyez- vous bien droit, sans vous pencher vers l’arrière. NE DÉPLACEZ PAS L’AMBULATEUR PENDANT QUE VOUS ÊTES ASSIS DESSUS.
-
Page 24: Mesures De Sécurité
mesures de sécurité • N’utilisez que comme aide à la marche! • Ne l’utilisez que sur les surfaces solides et régulières. • Poids maximal de l’utilisateur : 136 kg (300 lb). • Vérifiez fréquemment les vis et les attaches du I-Ambulateur et resserrez-les au besoin. -
Page 25: Garantie Limitée À Vie
à vie Le cadre de votre produit Drive Medical est garanti à vie contre les défauts de fabrication et de main-d’œuvre, limitée à la vie du product pour l’acheteur de consommateur original. La poignée et le logement du frein sont couverts par une garantie de cinq à... - Page 26 Rev.1.07.21.14...
Need help?
Do you have a question about the i-walker and is the answer not in the manual?
Questions and answers
how do you fold up this walker when not in use
To fold the Drive Medical i-walker, pull the seat upwards using the red handle on the seat plate. Once folded, secure it with the safety clasp labeled (G).
This answer is automatically generated
left brake doesn't hold ,right works fine I have a basic rollator
First, check if the brake lever is fully engaging. Pull up and release it to see if it locks properly. If the brake still doesn't hold, inspect the brake cable for any looseness or damage. Tighten or adjust the cable if necessary. Also, check the wheels for wear or dirt that may affect braking. If the issue persists, ensure that all screws and fasteners are properly tightened. If the brake system is still not functioning correctly, consider replacing worn components or contacting an authorized Drive dealer for further assistance.
This answer is automatically generated
How to turn sound off
How to turn off sound