Table of Contents
Advertisement
Advertisement
Table of Contents

Related Manuals for Mazda BT50 2015


Summary of Contents for Mazda BT50 2015
- Page 1 Mazda BT50 In-Dash GPS /Multimedia System User Manual...
- Page 2 Since we adhere to the strategy of sustainable development, printing error in the manual, incompliance with latest materials, software upgrade, the product improvement may be performed at any time. The product is subject to change without further notice and a revised version will be directly edited in new edition of manual.
- Page 3 To ensure the traffic safety and avoid contravening the traffic regulations, please obey the local laws while the Bluetooth or any other options are working. And do not watch any programs or operate the system whilst driving. For the safety and correct operation of this product, the product shall be installed by a professional. Do not disassemble or repair the system by yourself to avoid an accident or damage to the system.
- Page 4 Note: For safe and correct use of the product, please read this manual carefully. If there are any further technology improvements later on, the specifications are subject to change without further notice.
- Page 5 If the unit was turned off by removing the car key from the ignition, it will turn on automatically by inserting the key again and turning to the accessory position. If you pressed the power button on the panel to turn off the unit last time, press the power button lightly again to turn the unit on.
- Page 6 In the spectrum mode interface. Touch switch between the different EQ modes whilst still in the spectrum mode state. Turn the volume button on the panel to adjust the volume up/down. Press the Mute button on the panel to enable the mute function and then press the mute button again to exit the mute mode.
- Page 7 In the main menu, touch on the main page to enter the radio interface. After a few seconds, the screen will automatically return to the spectrum mode interface, Click to switch between the frequency spectrum modes then touch anywhere on the screen or touch to return to the radio interface.
- Page 8 Select the band first, then touch the preset of a radio station (which can play radio station of the exact preset ones. The selected radio station will be blue). For example: The figure on the right side represents FM1 band, M1 radio station and frequency digit is 87.50KHz.
- Page 9 The unit can play discs in format of DVD/VCD/CD/MP3/WMA/JPEG/MPEG4/CD-R (Only for those standard discs with diameter of 12cm). In the main menu, touch to enter the disc menu interface. When hand brake is off the disc function interface displays a warning - like the picture shown on the right.
- Page 10 to display the keyboard, as the figure shows on the right: Touch Touch the numbers on the numeric keyboard to select tracks directly, then touch to confirm to play that track Touch or to play the other tracks automatically minutes later. Touch again to hide the keyboard.
- Page 11 If the unit has a disc in the format of DVD in - without showing a menu - the system will read it automatically and start playing directly, if the disc has main menu page press the option to start playing disc. You may touch the name of a favourite track to play instantly.
- Page 12 Insert a disc in a format of VCD into the DVD player, the system will play the songs in order after reading disc. During playback, press to return to the PBC menu catalogue (Disc is required) When the disc support to play by the numeric keyboard, you can open the numeric keyboard to select tracks directly, and it will show the information playing on the small screen.
- Page 13 Insert a disc in the format of a CD into the DVD player, the system will play songs/tracks in order after reading the disc . Current track no. Total tracks. PLAY PLAY Audio state Current track no.. When playing a disc and there is no operation within 10sec, the system will switch to the spectrum mode automatically.
- Page 14 * MPEG is the abbreviation of “Moving Pictures Experts Group”, and the MPEG4 is the fourth generation encoder standard for video/audio as released by the specialist’s group. * The operation of MPEG4 is basically the same as the DVD. * The MPEG4 disc available on the market adopts different kinds of file formats such as XVID, the AVI DIVX RM etc.
- Page 15 Insert a disc in the format of a JPEG into the DVD player - the system will start playing the first file after reading the disc. The JPEG USB connection Touch play after reading the USB, it will automatically start playing the first file on the USB drive.
- Page 16 Enter into the DVD state and then touch screen to bring up the menu. Then ... to enter DVD set-up options gently touch Again to exit from the setup menu or Touch touch the exit icon In the setup interface, click the icons to enter into the corresponding functions interface.
- Page 17 Stereo/L-Mono/R-Mono/Mix-Mono (choose the dolby digital sound channel) Stereo/L-Mono/ R-Mono/Mix-Mono (choose the dolby digital sound channel) Note: Preference Set - can be set only when there is no disc inside player. English/Chinese/French/Hungarian/Italian/Russian/German/Spanish/Portuguese/others Select the language for audio during playback. (disc support is needed) English/Chinese/French/Hungarian/Italian/Russian/German/Spanish/Portuguese/others Select the language to be displayed during playback.
- Page 18 Insert/remove Portable USB Drive This unit is equipped with a USB port and portable USB drives can be connected to the unit through the USB connection. When removing the USB drive, please exit from the playing state in the USB drive - then remove USB drive from the port.
- Page 19 The system provides bluetooth hands free communication function. If your mobile phone is bluetooth enabled, it can establish a point-to-point connection with the system, providing telephone dial up and call answering, phonebook, bluetooth music play functions. As the bluetooth modules and software of mobile phones differ between brands - some functions may be different or not compatible with the system.
- Page 20 Turn on the Bluetooth function of your mobile phone and enable the Bluetooth device searching function, the screen will display, after the connection succeeds, the phone wil display the device name. During connection input device connection password by prompt of phone (PIN code : 0000). The Bluetooth icon will appear icon to enter into the bluetooth paired Touch...
- Page 21 You can dial the number through a mobile phone or the keyboard on the screen when connected successfully. Input numbers on the keyboard and if needed touch the to delete, one by one if there was a wrong number selected. to hang up after phone call is finished.
-
Page 22: Call History
to search the phonebook contacts by Touch typing contacts name Language switching Hide keyboard Add the selected number to speed dial function. Refresh the phone book. Stop refresh for phone book. Touch to scroll up and down the phone book list. The user can slide the scroll bar on the right to scan the phone book list to search for a contact. - Page 23 To delete a speed dial contact number Touch to delete selected phone number Touch to confirm the delete Touch to cancel the delete If your phone supports playing bluetooth music - you can play the audio and videos from your phone into the car speakers.
- Page 24 When the unit is connected with an external iPod player, the audio stored in iPod player can be played through the unit. In the main menu, touch to enter the iPod interface. to enter into the main menu interface, then Touch touch other icons to exit from the iPod function.
- Page 25 to return to iPod main menu directly. The system classifies files according to the Playlist above-mentioned 6 types and shows files in the corresponding folders. Touch to open folders and Artist to play the corresponding files. Press Albums to return to iPod main menu interface. Genres Songs Composer...
- Page 26 Displaying play information: Current tracks Current track total playing time playing time Frame displayed in the iPod player X As iPods are continuously upgraded, some iPods have software differences. There may be incompatible iPods with the head unit in actual use.
- Page 27 to enter into the Virtual In the main menu, Press CDC function playing state. to enter the main menu interface, Touch then touch the other icons to exit from the Virtual CDC function. Delete disc Play/pause The previous track The next track Page up menu bar Page down menu bar...
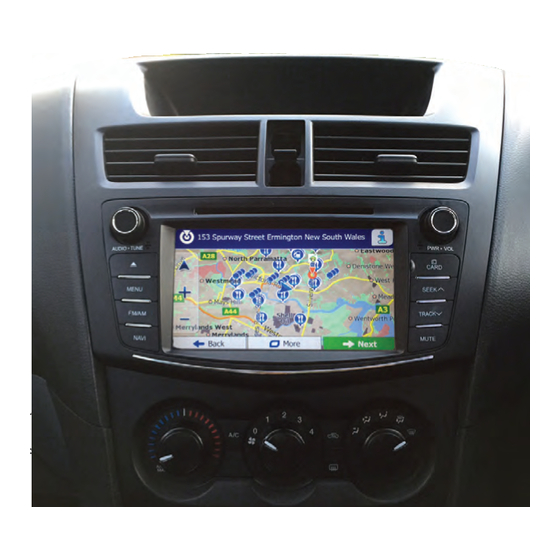
- Page 28 In main page interface, press to enter nav interface. In NAV state, press NAVI button to exit and enter other states. Do not pull out the map card in navigation state to avoid corrupting the map data card. X In NAV state, you can only operate functions related to GPS on the screen, if you need to adjust other functions, please exit NAV first.
- Page 29 2.9 AV IN/AUX Function Operation In the main menu, Press to enter into the AV IN/AUX function playing state: to enter the main menu interface, Touch then touch the other icons to exit from the AV IN/AUX function. 2.10 Rear Function Operation The system provides dual zone function - this means that the driver can enjoy music and radio in the front - the rear passengers can also watch programs in the back without effect on the rear-screen that has been fitted.
- Page 30 to enter into the setup In the main menu, Press interface. to enter the main page interface Touch to exit basic operation of setup menu function or touch back Touch icon to turn on/off time display function more precisely in the upper left corner of the screen - it will display the time.
- Page 31 Key sound icon to turn on/off key sound Touch function, when screen is touch button operation is made there will be a key sound. Audio with navigation Touch icon to turn on/off audio with navigation function, in the navigation state, if there is no operation on screen or navigation voice prompts within several seconds the system will continue the audio which was being played before the navigation prompt started.
- Page 32 Interface: Touch icon to adjust Treble/Middle/Bass/ BBE/and centre volume. Touch icon to restore parameters back to system default state. Touch icon to choose EQ mode: Customized, Standard, Pop, Rock, Classic, Jazz. Touch icon to choose to turn on/off 5.1 channel. Touch icon to enter into balance setup interface.
- Page 33 to select navigation software Touch path to setup navigation path icon to choose 24 hour display. icon to choose whether to synchronise icon to choose whether to synchronise with navigation or not Press to choose Daylight Savings time which will make the time go forward by 1 hour. By unselecting the the time will go backward by 1 hour.
- Page 34 Screen Calibration If Touch deviation occurs, calibration is available by touching the screen to recalibrate. Then Touch “+” with stylus from point 1 to point 5 to calibrate screen touch. After calibrating from Point 1 to Point 5 touch the blank area on the screen to finish calibration and return to setting menu.
- Page 35 The product uses Win Op System, therefore it will increase the startup time by system detecting. Please don’t insert coins or metal objects. Please don’t try to repair. This product is coded - if disassembled or refitted. If failure does happen please turn off the power supply immediately and notify the dealer.
- Page 36 Press for a short time to switch mode among normal/night/black for the screen, long press to be used as a power key, and long press once to enter standby state, long press twice to turn on. Press to select function among Radio/DVD/AV/iPod/USB/Virtual CDC Press for a short time for mute state, turn on/off at any state.
- Page 38 Before sending this player for service as required, please carry out inspection or small adjustment according to possible causes of occurred problems stated on the list below. It is possible that the problems will be solved and this player will go back to normal operation. If you have any doubt about the problems on the list or the problem can’t be solved effectively by following the remedy as instructed, please contact our company or professional service centre.
Need help?
Do you have a question about the BT50 2015 and is the answer not in the manual?
Questions and answers