Advertisement
Advertisement
Table of Contents

Related Manuals for Sauber Brilliance Jubilee SJ-200


Summary of Contents for Sauber Brilliance Jubilee SJ-200
- Page 1 brilliance jubilee User Manual SJ-200...
- Page 2 brilliance jubilee...
- Page 3 We congratulate you for choosing the Sauber Brilliance Jubilee, which provides efficient and eco-friendly cleaning, using the natural principle of dry steam. Before operating your Sauber Brilliance Jubilee please read this instruction manual carefully and keep for future reference. - It’s German for Clean...
-
Page 4: Safety Instructions
Do this by executing a test on a hidden surface of the material you wish to treat. The Sauber Brilliance Jubilee should only be used for its intended purpose as described in this instruction manual. -
Page 5: Grounding Instructions
• Do not use the product to clean stairs. the tap water in your area is very hard. • Burns can occur from touching hot • Damage caused by improper use of parts, hot water or steam. Use caution steam on objects, materials, persons when draining the appliance after or animals or by not observing the use as there may be hot water in the... - Page 6 Accessories Display Hose brilliance jubilee...
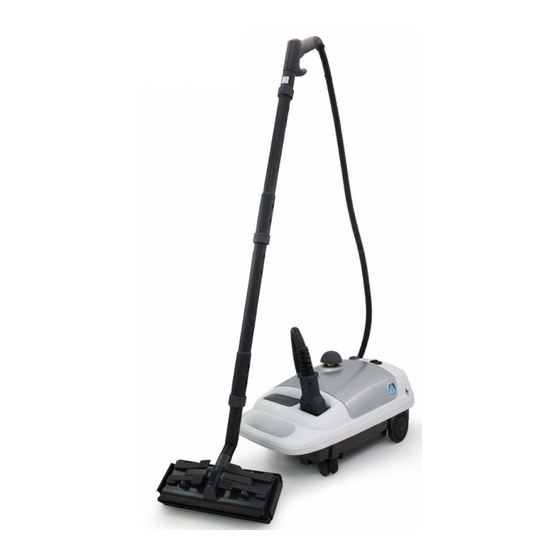
- Page 7 Overview Patented tank closure (filler cap) Extension rods Floor brush Display Floor brush protection plate Carrying handle Diamond shaped brush Heater switch High pressure steam nozzles Hose connection with security closure cap Special cleaning brushes ON/OFF button Filling bottle Button for cable compartment Window Wiper and Brush Hose with control handle Cleaning Clothes...
-
Page 8: Start The Unit
Assembly Open the security Insert the hose closure cap to end (H) into the access the hose connector opening connection (E). (E). To click it into place, press the switch on the hose. Turn the locking ring in a clockwise direction, connect the tube then turn the locking ring in an anticlockwise direction to fasten. - Page 9 Switch on the unit Wait until the by pressing the ON/ steamer has OFF button (F), the reached “Max orange light will turn tank pressure, no on. On the display heating” [G]. (B) the indicator “heating power 100%” [I] and “low steam in the boiler, heating up”...
-
Page 10: Operation
Operation ATTENTION - The surfaces treated with the steamer have to be steam and heat resistant. Test the colour fastness in a hidden corner (excluding: carpets & upholstery). Do not clean cold surfaces; the sudden rise in temperature can damage the surface. - Page 11 Display Water shortage, no Steam Level 1, 2 and 3 (B,C heating (A) &D). Not enough water in the 1 – Minimum steam output. boiler. When this symbol 2 – Medium steam output. is illuminated, the steamer 3 – Maximum steam output. is no longer heating.
- Page 12 Cleaning tiled floors The steamer can be used as a powerful steam mop to clean (steam level 2), scrub (steam level 3) and dry (no steam). To do so, simply attach the cleaning cloth onto the floor brush clamps as shown.
-
Page 13: Steam Nozzle
Steam nozzle Connect the high To remove stains pressure steam from carpets (not nozzle (M) to the hose wool carpets) hold handle. With this the nozzle low and accessory you can even above the floor. clean toilets, sinks, grooves, ovens, shower frames, etc. - Page 14 Window wiper Connect the window Set the wiper on the wiper (P) with the brush side, activate connector to the the steam and brush hose. the window. Press the switches on the control handle on 0, turn the wiper on the squeegee side and wipe the window dry from the top to the...
-
Page 15: Cleaning The Unit
Cleaning the unit Overtime limescale residues can deposit in the boiler. The patented system of the steamer avoids the scaling of the boiler walls. Therefore the boiler only needs to be rinsed and not descaled with special products. Open the filler cap by following the Water Filling procedure outlined in this manual. -
Page 16: Filler Cap
When there is no more pressure in the tank, the red indicator will be in the downward position and the cap can be opened. In case of doubt, contact Sauber Customer Service. Safety feature on: Firmly push on the... -
Page 17: Technical Data
31400146 Square brush 31151780 High pressure nozzle 31151781 Tool kit 31600041 Plastic bottle 63200313 Safety cap 33101060 Customer Service For Customer Service or product enquiries please visit our website or call: 1800 SAUBER 1800 728 237 www.sauber.com.au www.sauber.co.nz brilliance jubilee... -
Page 18: Also Available
ALSO AVAILABLE brilliance jubilee... - Page 19 ALSO AVAILABLE For a complete healthy home brilliance jubilee...
-
Page 20: Year Warranty
2 Year Warranty BRILLIANCE JUBILEE Conditions of warranty Your Sauber cleaner, in the case of domestic use, Sauber is unable to accept responsibility under has a 2 year parts and labour warranty, in the case this warranty for any repair work not carried out by...
Need help?
Do you have a question about the Brilliance Jubilee SJ-200 and is the answer not in the manual?
Questions and answers