Table of Contents
Advertisement
Advertisement
Table of Contents

Related Manuals for Welcat GTX-221-G

Summary of Contents for Welcat GTX-221-G
- Page 1 Wireless Two-dimentional Handy Terminal GTX-221-G User's Manual...
-
Page 2: Trademarks
・ Microsoft and Windows are either registered trademarks or trademarks of Microsoft Corporation in the United States and other countries. ・ Bluetooth is a registered trademark of Bluetooth SIG, Inc. and licensed to and used by Welcat Inc. ・ The bitmap fonts developed by Ricoh Company, Ltd. are installed in the Handy Terminal. -
Page 3: For Safe And Correct Use
This symbol indicates Alert. The specific details of alert are indicated in a figure with this symbol. To prevent injury to the user and others as well as property damage, observe the precautions described in the subsequent sections. GTX-221-G User’s Manual... -
Page 4: Required Precautions
To use the Handy Terminal, strictly observe the safety instructions (danger, warning, and alert) recom mended by the manufacturers of the PC and peripherals you are using. Common to GTX-221-G Main Unit and Battery Pack (BP-004) Danger Be sure to use the specified periph erals. - Page 5 Otherwise, there is a risk of elec-trical shock, injury, or the device may become faulty. Use the specified battery charger to charge the battery pack. Otherwise, the battery pack could overheat, explode, or catch fire. GTX-221-G User’s Manual...
- Page 6 It should be noted that Welcat Inc. will not take any responsibility for damage caused by use for the pur poses mentioned above that involve serious danger to life, the human body, and the environment.
- Page 7 For Safe and Correct Use GTX-221-G Main Unit Warning Be sure to prevent the hand strap from Do not use the Handy Terminal near being caught while carrying the product . electronic equipment requiring high- accuracy control or handling feeble Be very careful with the hand strap.
- Page 8 —Connect the equipment into an outlet on a circuit different from that to which the receiver is connected. —Consult the dealer or an experienced radio/TV technician for help. Changes or modifications not expressly approved by the party responsible for compliance could void the user’ s authority to operate the equipment. GTX-221-G User’s Manual...
- Page 9 Some studies have suggested that some biological effects might occur, but such findings have not been confirmed by additional research. [Wireless 2D-code Handy Terminal (GTX-221-G)] has been tested and found to comply with FCC/IC radiation exposure limits set forth for an uncontrolled environment and meets the FCC radio frequency (RF) Exposure Guidelines in Supplement C to OET65 and RSS-102 of the IC radio frequency (RF) Exposure rules.
- Page 10 Do not use the battery pack if it leaks, or gets deformed or discolored. If you continue to use the battery pack as-is, it could overheat, e xplode, catch fire, or leak. And keep the battery pack away from fire. Otherwise, leaked electrolyte could catch fire. GTX-221-G User’s Manual...
-
Page 11: Laser Safety Standard
Laser-Related Warning Label Be sure to observe instructions in the user's manual and don't disassemble the C aution product. Otherwise, there is a risk of exposure to dangerous laser emitting. GTX-221-G User’s Manual... -
Page 12: Lcd Screen
・Should the Handy Terminal cause harmful radio interference with a private radio station for mobile-unit identification, immediately change the frequency used, or stop emitting radio waves. Then, take measures to avoid interference such as installing partitions. GTX-221-G User’s Manual... -
Page 13: Notes On Microsd Cards
Notes on microSD Cards Use microSD cards proved operable (See "1-2-3 Handling the microSD Card" (P.38)). For details on how to handle microSD cards, see the instruction manual provided with your microSD card. GTX-221-G User’s Manual... -
Page 14: Table Of Contents
1-2-3 Handling the microSD Card ............38 ■Tested microSD Card ..............38 ■Installing the microSD Card ............39 ■Detaching the microSD Card ............41 1-2-4 Charging the Battery Pack ............43 ■Charging One Unit ..............44 ■Charging Multiple Units ............... 46 GTX-221-G User’s Manual... - Page 15 2-3 Create an Application Software ........... 63 ■Peripheral Softwares ..............63 ■Operating Environment ..............64 Chapter 3 Communication Environment Settings 3-1 Communication Type ............66 ■WLAN Communication ..............66 ■Bluetooth Communication ............... 67 ■Infrared Communication (IrDA) ............67 GTX-221-G User’s Manual...
- Page 16 ■Entering Data Using a Barcode ............100 4-2 System Menu Structure ........... 101 4-3 System: Settings to Simplify Your Operations ......103 4-3-1 Auto Execute: Automatic Execution of the Application Software ....104 4-3-2 Clock: Time Settings ............105 ■Current Time ................. 105 GTX-221-G User’s Manual...
- Page 17 4-5-4 DNS: DNS Server Settings ............140 ■Primary ................140 ■Secondary ................141 ■Advanced ................141 4-5-5 SNMP: SNMP Setting ............. 142 ■Community (R/Only) ..............142 ■Community (R/W) ..............143 ■Trap ................. 143 ■Advanced ................144 4-6 Receive: Receiving Files ..........146 GTX-221-G User’s Manual...
- Page 18 4-10-3 Clone: Creating a Copy ............187 ■How to Execute Clone ..............187 ■Bluetooth/IrDA ............... 188 ■microSD ................192 4-10-4 Drive: Displaying Drive Information ........... 195 4-10-5 Mothball: Settings When Not Using the Product For Long ......196 GTX-221-G User’s Manual...
- Page 19 4-11-6 Key: Testing Key Operations and Indicators ........208 Chapter 5 Specification 5-1 Product Specifications ..........210 5-1-1 GTX-221-G Wireless Two-Dimensional Handy Terminal ......210 ■Dimensions ................214 5-1-2 QC-006 Single Charger ............215 5-1-3 QC-007 Multi Charger ............216 5-1-4 IU-004 USB Communication Unit ..........
-
Page 20: Summary Of This Manual
Explains how to operate basic functions and explains the system menu. Chapter 5 Specification Product specifications list. Chapter 6 FAQs and Answers Explains FAQs and trouble, and explains items required to check for troubleshooting. Consumables Explains consumables. Appendixes Desribes the settings before shipment and sample barcode. GTX-221-G User’s Manual... -
Page 21: Notes On Symbols, Terms, And Manual Conventions
Describes useful information and tips. Introduces pages describing related information or other manuals. r r r r e e e e f f f f Means the GTX-221-G main unit. Product/main unit Names of keys on the control panel are described using 【... -
Page 22: System Architecture
/b attery p ack + (One unit) (Fo ur unit) Charg e the hand y term inal /b attery p ack (One unit) QC -0 0 6 QC-0 0 7 IU -0 0 4 IU -0 0 4 C GTX-221-G User’s Manual... -
Page 23: Wlan Communication System Configuration
·When sending files to a PC from the Handy Terminal r r r r e e e e f f f f "4-7 File: Executing, Uploading, and Deleting Files" (P.152) ・When receiving files from a PC to the Handy Terminal "4-6 Receive: Receiving Files" (P.146) GTX-221-G User’s Manual... -
Page 24: Bluetooth Communication System Configuration
ID for Terminal Iden- using BluePorter-V. tification" (P.163) Bluetooth You can perform settings such as "4-9-3 Bluetooth: Regis- Registration security, and registration of the tering and Setting the connection destination required by Bluetooth Device" (P.169) Bluetooth communication. GTX-221-G User’s Manual... -
Page 25: Infrared Communication (Irda) System Configuration
Com m unication via the USB cab le b etween the PC having the USB d river com m unication/ and transfer utility charg ing unit and PC. (BluePorter-V) installed GTX-221-G User’s Manual... - Page 26 Chapter Hardware...
-
Page 27: About The Scanner
One user manual CD (this manual) is supplied with each order (one CD is included r r r r e e e e f f f f with each order regardless of the number of units ordered). GTX-221-G User’s Manual... -
Page 28: Optional Items
It is required when using IU- 004/004C or Bluetooth USB adapter.A USB adapter is attached. WebGlider -X2 WGE-002 This is required when performing data communication with a PC or building a system using WebGlider-X2 Editor Package Browser. GTX-221-G User’s Manual... - Page 29 WebGlider Integration WGS-001 This is required when building a system by which HTTP Server communication is performed with GTX-221-G. To perform communication with the WebGlider inte- gration server, you will need to install WebGlider- X2 Browser into the Handy Terminal.
-
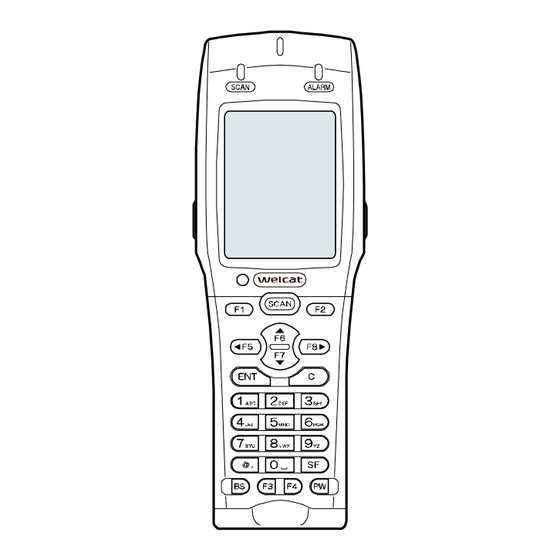
Page 30: Name And Function Of Each Unit
Hand Strap At- Used for attaching the hand strap. taching Hole ⑧ Barcode Window A window for reading barcodes. *Do not look into the window as it is irradiated with laser light. ⑨ Trigger Key Pressed when reading barcodes. GTX-221-G User’s Manual... - Page 31 The supplied lithium ion secondary battery. ⑰ Serial Number Seal Displays the serial number. Please provide this serial number in case of any product- related inquiry. ⑱ Hand Strap Used after being attached to Hand Strap Attaching Hole. GTX-221-G User’s Manual...
-
Page 32: Led Indicator
Orange Blinking: Authentication in progress while WLAN is enabled LED OFF: Within range while WLAN is enabled Can control LED ON / Blink / LED OFF at any timing from an ap- plication software while WLAN is disabled GTX-221-G User’s Manual... -
Page 33: Names Of Operation Keys
Dot ( .) key SF key PW key BS key Fu n ction key For operations of the keys during system menu operation, see "4-1-1 Operation Keys" r r r r e e e e f f f f (P.92). GTX-221-G User’s Manual... -
Page 34: Lcd Screen Status Bar
Indicates the current charge level in the battery pack. The number of bars decreases as the charge level in the battery pack decreases (see "1-2-5 Remaining ⑦ Battery Pack Charge Level Display and Alarm for the Battery Pack" (P.48)). GTX-221-G User’s Manual... -
Page 35: How To Use The Scanner
C aution to injury. ・When charging the Handy Terminal using the multi charger (QC-007), bring the hand strap to the front right of the Handy Terminal so that it will not get caught in the charging terminals. GTX-221-G User’s Manual... -
Page 36: Handling The Battery Pack
②Pull the battery cover toward you from the lock lever side. Lo ck le ver ③Holding the battery pack with the label side facing upward, move it forwards so that its terminals make contact with the electrodes of the Handy Terminal. GTX-221-G User’s Manual... - Page 37 ・Do not touch or pull the electrodes.This may cause contamination and/or deformation of the electrodes, leading to poor contact. If the electrodes are dirty, wipe them using a clean and dry cloth (see "1-4 Maintenance Method" (P.57)). GTX-221-G User’s Manual...
-
Page 38: Detaching The Battery Pack
①To release the lock, move the lock lever in the arrow direction (towards the Barcode window). ②Pull the battery cover toward you from the lock lever side. Lock lever ③Lift the back end of the battery pack (Barcode window side) and take it out. GTX-221-G User’s Manual... -
Page 39: Handling The Microsd Card
・If you open the battery cover, a warning message will be displayed. Before opening the battery cover, save the data, terminate the application software, and then turn off the power. ■Tested microSD Card For tested microSD cards, contact your dealer. GTX-221-G User’s Manual... -
Page 40: Installing The Microsd Card
SD car d co ver ③Insert the microSD card into the slot. At this time, hold the card with its electrode side facing downward and its arrow mark (▲) pointing toward the slot. Slo t m icro SD ca rd GTX-221-G User’s Manual... - Page 41 ⑤Return the cover of the microSD card to its original position. m icro SD car d co ver ⑥Attach the battery pack, and return the battery cover to its original position (see "■ Attaching the Battery Pack“ (P.35)). GTX-221-G User’s Manual...
-
Page 42: Detaching The Microsd Card
①Detach the battery pack (see “■Detaching the Battery Pack” (the previous page)). ②Lift the microSD card cover, and push the microSD card into its slot till it "clicks". ③The lock is released, and the microSD card comes out partly. Then, pull out the card using your fingers. GTX-221-G User’s Manual... - Page 43 ④Return the cover of the microSD card to its original position. m icro SD car d co ver ⑤Attach the battery pack and return the battery cover to its original position (see “■Attaching the Battery Pack” (P.35)). GTX-221-G User’s Manual...
-
Page 44: Charging The Battery Pack
If the electrodes of the charging terminals of the battery pack or the Handy Terminal have become dirty, charging may not be performed normally due to poor contact.In such a case wipe the electrodes using a clean cloth. GTX-221-G User’s Manual... -
Page 45: Charging One Unit
①Insert the DC plug of the AC adapter into the DC jack located on the back of the charger. Connect the AC cord to the AC adapter, and then connect the plug of the AC cord to the mains outlet. DC j ack DC p lug AC ad ap ter AC co rd GTX-221-G User’s Manual... - Page 46 To charge the Handy Terminal and the battery pack at the same time, attach the battery pack first. GTX-221-G User’s Manual...
-
Page 47: Charging Multiple Units
Connect the AC cord to the AC adapter, and then connect the plug of the AC cord to the mains outlet. DC j ack DC p lug AC co rd AC ad ap ter Verify that the POWER LED on the front of the charger is turned on in red. GTX-221-G User’s Manual... - Page 48 When charging the Handy Terminal using the multi charger (QC-007), bring the hand C aution strap to the front right of the Handy Terminal so that it will not get caught in the charging terminal unit. GTX-221-G User’s Manual...
-
Page 49: Remaining Charge Level Display And Alarm For The Battery Pack
The battery’s remaining charge level is sufficient. The battery’s remaining charge level is getting low. The battery’s remaining charge level is insufficient. Please charge it. The battery has no charge left.Charge your battery pack immediately or replace it with a charged battery pack. GTX-221-G User’s Manual... -
Page 50: Charging The Backup Battery
②As soon as the battery pack is attached to the Handy Terminal, the backup battery starts to be charged. If the backup battery has been completely depleted, charging requires at least 24 hours.During this time, do not detach the battery pack. GTX-221-G User’s Manual... -
Page 51: Memory Backup
In such a case, you will need to replace the backup battery by purchasing a new battery. Therefore, it is recommended to always keep the battery pack attached except when replacing it. GTX-221-G User’s Manual... -
Page 52: Charging The Backup Battery
②As soon as the battery pack is attached to the Handy Terminal, the backup battery starts to be charged. If the backup battery has been completely depleted, charging requires at least 24 hours.During this time, do not detach the battery pack. GTX-221-G User’s Manual... -
Page 53: Long-Term Storage
Handy Terminal, detach the battery pack, and store it in a cool place with it approximately 50% charged. Storage with full charge or in a high-temperature environment shortens the service life of the battery pack. GTX-221-G User’s Manual... -
Page 54: Basic Usage Method
・To launch the system menu, press the 【PW】 Key for at least one second while holding down the【SCAN】Key. ・When auto execution of application software has been set, the selected ap- plication software is started (see "4-3-1 Auto Execute: Automatic Execution of DHCP the Application Software " (P.103). PW key GTX-221-G User’s Manual... -
Page 55: How To Read A Barcode
ワイヤレス二次元 ハンディターミナル Trig g er key Trig g er key SCAN key Laser light is irradiated from the Barcode window. Do not look into the Barcode C aution window or look at the laser light. GTX-221-G User’s Manual... -
Page 56: Useful Features During Operation
On the system menu, select [7:Device]-[5:Tone/Vibrator] and make the setting. For its detailed setting method, see "4-9-5 Tone/Vibrator: Setting the Volume, r r r r e e e e f f f f LED, and the Vibrator" (P.178). GTX-221-G User’s Manual... -
Page 57: Resume Function (Retention Of The State During Power Off)
You can set the time after which the power is turned OFF when selecting <1:System> > <3:Power Management> > <3:Auto power off> on the system menu. For its detailed setting method, see "■Auto Power OFF: Automatic Power OFF" r r r r e e e e f f f f (P.111). GTX-221-G User’s Manual... -
Page 58: Maintenance Method
Particularly, because the electrodes on the Handy Terminal side may get deformed, please wipe them gently. Barco d e wind ow ワイヤレス二次元 ハンディターミナル Electro d es GTX-221-G User’s Manual... - Page 59 Chapter Software...
-
Page 60: About Software
Card This drive is used as an V aries depending on the Even after the backup ex ternal extension area for card. battery is depleted, the storing files in the microSD drive data is still re- card. GTX-221-G User’s Manual... -
Page 61: About File Name
The Handy Terminal identifies the file types using the following file extensions: File Extension Purpose Application Software Image files that can be displayed on the Handy Terminal. JPEG Audio files that can be played on the Handy Terminal. GTX-221-G User’s Manual... -
Page 62: Files Created By The System Or The Application Software
Four files are created, but they are not displayed on the system menu as they are hidden files. For registries, see "2-2 Registry" (P.62). r r r r e e e e f f f f GTX-221-G User’s Manual... -
Page 63: Registry
Using the initialization menu ("4-10-2 Format: Formatting Registry/Drive" (P.185) makes it possible to erase the registry contents and return the settings to factory default. GTX-221-G User’s Manual... -
Page 64: Create An Application Software
For details, see the online help of the WebGlider-X2 integration server. Transfer Utility WLF-003 This transfer utility can send/receive files to/from a PC. BluePorter-V Uses the supplied Bluetooth communication adapter to send/receive files between a PC and the Handy Terminal. GTX-221-G User’s Manual... -
Page 65: Operating Environment
However, more resources are needed depending on the specifications of the database and the server side applications to be used. For details on creating the application software, view the WebGlider-X2 Editor r r r r e e e e f f f f online help. GTX-221-G User’s Manual... - Page 66 Chapter Communication Environment Settings...
-
Page 67: Chapter 3 Communication Environment Settings
・ N etwo rk co ntro l too l (Sup p lied with W GS-0 0 1 ) A ccess p o int *Please use o ur reco m m end ed p ro d ucts. GTX-221-G User’s Manual... -
Page 68: Bluetooth Communication
Com m unication via the USB cab le b etween the PC having the USB d river com m unication/ and transfer utility charg ing unit and PC. (BluePorter-V) installed GTX-221-G User’s Manual... -
Page 69: Building Wlan Communication Environment
You will need to connect a PC to the system where WLAN communication is available. Please prepare by yourself an access point, a LAN environment, a HUB, etc. *Please use an access point recommended by Welcat. Install the following peripheral softwares and bring them to an operating state. -
Page 70: Preparation On The Product Side
DHCP Configured when you need to solve the DHCP client function. Supports the DHCP server of the network administration tool supplied with the "WebGlider Integration Server". Terminal ID (When using the terminal ID of the Handy Terminal) GTX-221-G User’s Manual... -
Page 71: Wlan Communication Settings By Setting Wizard
If it was not set the first time, launch the setting wizard by selecting [8:Manage] - [6:Wizard] . ①The setting wizard start screen is displayed. Select[Yes] to execute the wizard. < Wizard > Start wizard? Communication set- ting can be done with guidance GTX-221-G User’s Manual... - Page 72 Select[9:Test]-[1:WLAN]-[1:Configuration]on the system menu, and execute[2:WLAN/ping] after entering the IP address of the access point. < WLAN/ping > Host=000.000.000.000 Time < 000.000 msec No.00000 1472Bytes LnkQ CH:11 AP_MAC[000000000000] ④In the same way, perform Ping test for the IP address of the PC. GTX-221-G User’s Manual...
- Page 73 ・WLAN communication's authentication method cannot be set in the wizard. Perform the setting manually due to the complexity, especially in EAP certification where reception of files including certificates is required. For manual setting, see "4-4 WLAN: WLAN Communication Settings" (P.114). GTX-221-G User’s Manual...
-
Page 74: Wlan Communication Settings By The System Menu
"3-5-2 DHCP: DHCP Configuration" (P.133) FTP Configuration <3:Network> <3:FTP> "3-5-3 FTP: FTP Configuration" (P.136) DNS Configuration [3:Network]-[4:DNS] "3-5-4 DNS: DNS Configuration" (P.140) Terminal ID <6:Terminal ID> "4-8 Terminal ID: Configure the ID Configuration for Terminal Identification" (P.162) GTX-221-G User’s Manual... -
Page 75: Wlan Communication Settings By Dhcp
See "4-5-2 DHCP: DHCP Settings" (P.133) and "WebGlider Integration Server r r r r e e e e f f f f WGS-001 Manual". Hint This manual has a mark for items that can be configured by DHCP. DHCP GTX-221-G User’s Manual... -
Page 76: Downloading The Application Software By Wlan Communication
・Select the [FTP server] (FTP サーバー) checkbox. ・ [Transmit folder] (送信フォルダ) and [Receive folder] (受信フォルダ) specify the folders on the FTP server where the application software file is located. ④Select [4:Receive]-[1:WLAN]on the system menu. GTX-221-G User’s Manual... - Page 77 Select the files to be downloaded by checking their names. Press the【F1】key to start the download.When the confirmation prompt is displayed, select [Yes] and then press the【ENT】key. Downloading a large file may take long time. < File list > SAMPLE1.OUT SAMPLE2.OUT Receive Menu GTX-221-G User’s Manual...
-
Page 78: Building Bluetooth Communication Environment
■COM Port Verification You will need to verify the COM port to which the Bluetooth communication adapter has been connected. For how to verify the COM port, see the BluePorter-V operation guide. GTX-221-G User’s Manual... -
Page 79: Preparation On The Product Side
After the Bluetooth communication environment is ready, you can download your files according to the following procedure: ①To launch the transfer utility BluePorter-V on your PC, Click [Start] (スタート)-[Program] (プログラム)-[Welcat BluePorter-V]-[Welcat BluePorter-V]. ②Right-click the icon of the transfer utility BluePorter-V displayed in the task tray. - Page 80 ⑤Press the [OK] button to close the window. After the following screen appears, click [Yes] (はい). ⑥Copy the execution file of the application software to the folder set as the transmission folder of BluePorter-V("C:\Welcat\test_apl" in the above example). ⑦Select [4:Receive]-[2:Bluetooth] on the system menu. GTX-221-G User’s Manual...
- Page 81 Pressing the【F1】Key displays the confirmation message box.Move your mouse over [Yes] and then press the【ENT】key to start download. It will take from several seconds to several minutes to complete. However, downloading a large file may take long time. < File list > SAMPLE1.OUT SAMPLE2.OUT Receive Menu GTX-221-G User’s Manual...
-
Page 82: Building Infra-Red Communication (Irda) Environment
The error that the COM port cannot be enabled may occur when the WL7-USB dedicated software "WL7-KEY" is used by customers who use Welcat cordless Handy Terminal C aution set, WL7-USB.If WL7-KEY is Ver 1.02 or lower, as the COM port has been occupied, it cannot be enabled. -
Page 83: Preparation On The Pc Side
For installation and the setting procedures, see the user manuals of the respective products. U SB p ort U SB cab le Tran sfer utility M anual CD BluePo rter-V IU -0 0 4 /0 0 4 C Driver So ftware GTX-221-G User’s Manual... -
Page 84: Downloading The Application Software By Infrared Communication (Irda)
This wizard is not required in infrared communication mode. Selecting[No]on the wizard screen launches the system menu. To perform Bluetooth communication, start the wizard with reference of "4-10-6 Wizard: Starting the Screen Facilitating Configuration of Communication Settings" (P.197) and make the settings. GTX-221-G User’s Manual... -
Page 85: Transfer Utility Blueporter-V Startup
3-4 Building Infra-red Communication (IrDA) ■Transfer Utility BluePorter-V Startup To launch the transfer utility BluePorter-V, Click[Start] (スタート)- [Program](プログラム) -[Welcat BluePorter-V]. After it is launched, its icon is displayed in the task tray. Right-click the displayed "BluePorter-V" icon, and then click[Communication setting]on the displayed menu. - Page 86 [Receive folder] (受信フォルダ)and [Transmit folder] (送信フォルダ) specify the folders where the application software file is located. The following figure shows an example where the application software is located in the "C:\Welcat\test_apl" folder. ③Press the[Yes]button to close the window. When the following screen appears, click[Yes] (はい). GTX-221-G User’s Manual...
-
Page 87: File Download
3-4 Building Infra-red Communication (IrDA) ■File Download ①Copy the execution file of the application software to the folder set as the transmission folder of BluePorter-V ("C:\Welcat\test_apl" in the above example). ②Next, launch the system menu. On the system menu, select [2:Receive]-[3:IrDA]-[1:Select from list]. - Page 88 ④Set the Handy Terminal to the USB communication unit. Pressing the【F1】key displays the[Would you like to receive it?] screen.Select[Yes]and then press the【ENT】Key to start download. It will take from several seconds to several minutes to complete. However, downloading a large file may take long time. GTX-221-G User’s Manual...
-
Page 89: Executing The Application Software
< File type > 1:System 6:ID 1:FDrive Application 2:WLAN 7:Device 2:SDrive Data 3:Network 8:Manage 3:RDrive(microSD) Audio 4:Receive 9:Test Graphic → → 5:File All type ②Select the application software and then press the【F1】key < FDrive > WGX2BRWS.OUT Menu SDrive GTX-221-G User’s Manual... - Page 90 For how to use the respective application softwares, see the operation instruction manual and other manuals prepared by the application software developer or the system administrator. The application software is basically terminated by pressing the【PW】key. However, this may not apply to all application softwares. GTX-221-G User’s Manual...
-
Page 91: Automatic Execution Upon Startup
When the power is turned on the next time, the registered application software is launched. The system menu is launched if it has been set for automatic execution. < Auto execute > System menu WGX2BRWS.OUT Property GTX-221-G User’s Manual... -
Page 92: Chapter 4 System Menu
Chapter System Menu... -
Page 93: Using The System Menu
If【⊳F5】【 F6】【 F7】【 F8】are specified, F5–F8 are assigned to the respective arrow keys.They are used in libraries, etc. Trigger keys Used for reading a barcode. The 【F9】 and 【F10】 keys are respectively assigned to the two trigger keys. 【PW】key Used to turn the power on/off. GTX-221-G User’s Manual... -
Page 94: List Of Key Assignments
D E F G H I J K L M N O P Q R S T U V W X S p a c e .(dot) * $ - + / % : # @ & GTX-221-G User’s Manual... -
Page 95: Launching The System Menu
Handy Terminal. < Wizard > Start wizard? Communication set- ting can be done with guidance • Select [Yes] to execute the wizard where you perform WLAN communication settings. • Selecting [No] launches the system menu. GTX-221-G User’s Manual... -
Page 96: Using The System Menu
The operations after the confirmation vary depending on the items. • Execute the selected function • Select one of the two options:[Yes] or[No] (button) • Display its submenu ●Cancel Your Selection Press the【C】key to return to the immediately previous operation. GTX-221-G User’s Manual... -
Page 97: Entering Data Using Keys
Alphabets (upper case / lower case), numerals Mode: and symbols can be entered. The "A" icon is displayed in the status bar. ●Enter Numerals Press the【SF】key to switch to the numeric input mode (cursor: (underline)). Keys that can be used:【0】–【9】keys GTX-221-G User’s Manual... - Page 98 *2 The number of characters you can enter may vary depending on the items. You cannot delete characters on items that have a fixed entry format (e.g., local BD address).This manual uses the following delete-disabled icon for items with a fixed entry format. GTX-221-G User’s Manual...
-
Page 99: Other Operations
(【 】, 【▼】,【⊳】,or【 】) to select your desired button (highlighted), and then press the【ENT】key to confirm. The remote has been already Press the【C】key to select the button on the right. registered. Would you like to overwrite it? GTX-221-G User’s Manual... - Page 100 "4-9-5 Tone/Vibrator: Setting the Volume, LED, and the Vibrator" (P.178). By changing this setting, you can create your individual indicator in a simple way. In addition, there are operations that are not applicable for some indicators. GTX-221-G User’s Manual...
-
Page 101: Entering Data Using A Barcode
Press the【SCAN】key or the trigger keys to allow the laser to irradiate and scan the barcode. Regarding data entry, the readable barcodes are as follows: JAN-13/8, EAN-13/8, UPC-A/E, NW-7, Code39, Code93, Code128, EAN-128 (GS1-128), ITF, Industrial 2 of 5, GS1 DataBar (RSS) The laser irradiation time is set in the trigger mode. GTX-221-G User’s Manual... -
Page 102: System Menu Structure
2:Manager IP address 2:Community(R/W) 1:Community name 2:Manager IP address 3:Trap 1:Community name 2:Manager IP address 3:Advanced 1:Authentic trap 2:Agent port 4:Receive 1:WLAN 3:Trap port 2:Bluetooth 4:Trap retry 1:Select from list 2:wait(PC) 3:wait(HT) 3:IrDA 1:Select from list 2:wait(HT) GTX-221-G User’s Manual... - Page 103 3:AP Search 1:Master 2:Bluetooth 2:Slave 3:IrDA 4:Barcode test 5:Display test 6:Key test For the factory setting of the system menu, see "Appendix-1 Factory Default List" r r r r e e e e f f f f (P.232). GTX-221-G User’s Manual...
-
Page 104: System: Settings To Simplify Your Operations
Select the item to be set. < System setting > 1:Auto execute ・Auto execute: Automatic execution of the application software 2:Clock 3:Power management (P.103) 4:Password ・Clock: Clock Verification (P.104) ・Power Management (P.107) ・Password: Setting/Clearing Password (P.107) GTX-221-G User’s Manual... -
Page 105: Auto Execute: Automatic Execution Of The Application Software
Property Press the 【F1】 key to display the information related to the selected < File Property > application software. Name SAMPLE1.OUT Press the【C】key to return to the <Auto execute> screen. Type[Application] Library[1.00] Size[00000000]Bytes Modified 2012/01/01 00:00:00 GTX-221-G User’s Manual... -
Page 106: Clock: Time Settings
2012/01/01 00:00:00 Press the【ENT】key to confirm the time and return to the <Current time> screen. Press the【C】key to cancel the setting and return to the <Current time> screen. GTX-221-G User’s Manual... -
Page 107: Server Setting: Receives The Time Automatically From The Server
・The access point and the PC have been powered up. ・The access point and the PC have been configured and connected correctly. ・The access point is operating normally. ・The DHCP server of the network administration tool has been started. GTX-221-G User’s Manual... -
Page 108: Power Management: Various Settings Related To Power
• Resume function enabled: Resumes from the process executed immediately before power off. • Resume function disabled: Always executed from the beginning process. To cancel the resume function and launch the system menu, press the【PW】key while Hint holding down the SCAN key. GTX-221-G User’s Manual... - Page 109 You can also enable the resume function from the DHCP server, a network ad- r r r r e e e e f f f f ministration tool (see "7-2 DHCP Server Mode" of "Network Administration Tool User Manual"). GTX-221-G User’s Manual...
-
Page 110: Auto Wakeup: Started At The Predefined Time
The currently set start schedule is displayed. Select the item to be set. Select from the following items: < Present schedule > at 07:30 ・Set: Sets the schedule on Monday every week. ・Clear: Clears the schedule 1:Set 2:Clear GTX-221-G User’s Manual... - Page 111 You can also enable the auto wakeup function from the DHCP server, a network r r r r e e e e f f f f administration tool (see "7-2 DHCP Server Mode" of "Network Administration Tool User Manual"). GTX-221-G User’s Manual...
-
Page 112: Auto Power Off: Automatic Power Off
You can also enable the auto power off function from the DHCP server, a network r r r r e e e e f f f f administration tool (see "7-2 DHCP Server Mode" of "Network Administration Tool User Manual"). GTX-221-G User’s Manual... -
Page 113: Password: Setting / Clearing Password
Write down your password and keep it somewhere safe in order not to forget it. C aution Please contact your dealer if you are unable to recall the password. [System Menu]→[1:System]→[4:Password] You can set or clear the password. Select from the following items: < Password > 1:Set ・Set 2:Clear ・Clear GTX-221-G User’s Manual... -
Page 114: Set: Setting The Password
New password again ■Clear: Clearing the Password [System Menu]→[1:System]→[4:Password]→[2:Clear] Clear the password. Select[Yes]to clear the password; the set password will be erased. < Password clear > Select[No]to cancel the clearing. Would you like to clear a password? GTX-221-G User’s Manual... -
Page 115: Wlan: Wlan Communication Settings
Although SSID can be set automatically by using the DHCP function, security issues C aution may occur. Avoid configuration by DHCP. [System Menu]→[2:WLAN]→[1:SSID] Enter SSID. < SSID > SSID is specified with up to 32 alphanumeric characters.It is case sensitive. GTX-221-G User’s Manual... -
Page 116: Roaming Level: Setting The Roaming Level
WLAN response will be degraded accordingly. It can be configured automatically if the DHCP function is enabled. [System Menu]→[2:WLAN]→[3:Doze mode] Select the time duration after which timeout occurs. < Doze mode > Quick 1 second None GTX-221-G User’s Manual... -
Page 117: Security: Wlan Communication Security Settings
You can select the encryption method and set the key used for encryption. [System Menu]→[2:WLAN]→[4:Security]→[1:Encryption] Select the item to be set. < Encryption > 1:Method ・Method: Selects the encryption method 2:WEP 3:PSK(TKIP/CCMP) ・WEP: Sets the WEP key ・PSK(TKIP/CCMP): Sets the encryption key GTX-221-G User’s Manual... - Page 118 < Method > Disabled ・Disabled WEP(40 bit) WEP(128bit) ・WEP(40-bit) TKIP CCMP ・WEP(128-bit) ・TKIP ・CCMP(AES) ●WEP [System Menu]→[2:WLAN]→[4:Security]→[1:Encryption]→[2:WEP] Select the item. < WEP > 1:TxKeyID KEY-1 KEY-2 KEY-3 KEY-4 2:Key modification GTX-221-G User’s Manual...
- Page 119 26 characters when 128-bit is selected. The actual entry 0000000000000 is always 26 characters, and when 40-bit is selected, only the 0000000000000 first 10 of these 26 characters are accepted. Press the【F1】key to move to the ASCII character entry screen. ASCII GTX-221-G User’s Manual...
- Page 120 (key). Perform the same setting as for the access point. You can enter 8–63 characters when setting using ASCII charac- ters.You can enter 64 characters when setting using HEX numbers. To use PSK (TKIP/CCMP), set the authentication method (P.121) to "Open". GTX-221-G User’s Manual...
- Page 121 WEP or TKIP, new hardware process will be required. ・CCMP CCMP (Counter mode with CBC-MAC Protocol) is a tamper detection protocol used by AES. The CBC-MAC (Cipher-Block Message Authentication Code) method is used to detect tampering. This CCMP method is required by WPA2 (IEEE802.11i). GTX-221-G User’s Manual...
-
Page 122: Authentication
Chapter 4 System Menu 4-4 WLAN: WLAN Communication Settings ■Authentication Select the authentication method. [System Menu]→[2:WLAN]→[4:Security]→[2:Authentication] Select the item to be set. < Authentication > 1:Method 2:EAP modification GTX-221-G User’s Manual... - Page 123 There are also limitations on environment that can be used (such as certificate authority and authentication (RADIUS) server). Therefore, if you want to use the "EAP" authentication method, please contact your dealer. GTX-221-G User’s Manual...
- Page 124 ・Private key ・User name ・EAP-PEAP-MSCHAPv2 This authentication method requires a server certificate for server authentication, and a user name and a password for client authentication. The required settings are as follows: ・CA root certificate ・User name ・Password GTX-221-G User’s Manual...
- Page 125 This is a client certificate required for client authentication. Clear entry Press the【F1】key to clear the setting value. Select from the received files. <Reference to file> (Pressing the【F1】Key allows you to view the file information) ROOTCERT.CER CLIENTCERT.CER PRIVATE.KEY Property GTX-221-G User’s Manual...
- Page 126 2:Password **************** The password used for authentication. *************** Enter a password that is case sensitive and consists of up to 31 alphanumeric characters. As a security measure, the password characters entered will be displayed as asterisks (*). GTX-221-G User’s Manual...
-
Page 127: Attention
From the security perspective, disabling this setting is not recommended. C aution Be sure to configure security when performing WLAN communication. [System Menu]→[2:WLAN]→[4:Security]→[3:Attention] Select Display/Don’t Display. < Attention > Display Not Display GTX-221-G User’s Manual... -
Page 128: Advanced: Advanced Settings Related To Wlan Communication
01b Auto 11bg Auto 11g 9M 11g 6M 1 or 2M 5.5M ③Select[RTS_Threshold]. You can set the RTS Threshold value. < Advanced > 1:Rate control [11b Auto] 2:RTS Threshold [2347]Bytes GTX-221-G User’s Manual... - Page 129 *2 Connectivity Related to the Rate Setting on the Access Point Side.*2 ◎: Connectable.The 11g rate will take precedence, and high transmission rate is possible. ○: Connectable.Communication is performed at the 11b rate. △: Connectable.The throughput is reduced somewhat due to negotiation of 11b/g. ×: Non-connectable. GTX-221-G User’s Manual...
-
Page 130: Mac Address: Displaying The Mac Address
4-4-6 MAC address: Displaying the MAC Address You can display the MAC address (hardware specific address). The MAC address cannot be changed. [System Menu]→[2:WLAN]→[6:MAC address] The MAC address of the Handy Terminal is displayed. < MAC address > [00:16:41:C1:B9:BD] GTX-221-G User’s Manual... -
Page 131: Network: Network Connection Settings
・TCP/IP: Settings related to TCP/IP communication (P.131) 2:DHCP 3:FTP ・DHCP: Settings of DHCP client function (P.133) 4:DNS 5:SNMP ・FTP: Settings for using the FTP (P.136). ・DNS: Setting for the DNS server address (P.140) ・SNMP: Various settings for SNMP (P.142) GTX-221-G User’s Manual... -
Page 132: Tcp/Ip: Tcp/Ip Settings
・Unless "Application boot" is selected in DHCP settings' "■Startup type(P.134)", all the items excluding MTU are read-only and cannot be changed. [System Menu]→[3:Network]→[1:TCP/IP] ① The current settings are displayed. < TCP/IP > 1:IP Address [000.000.000.000] 2:NetMask [000.000.000.000] 3:Gateway [000.000.000.000] 4:MTU [1500]Octet GTX-221-G User’s Manual... - Page 133 Enter a value in the range 000–255 for each field separated by a period (e.g.,192.168.254.254). Enter the values for "NetMask" and "Gateway" using the same procedure. For settings related to the respective items, contact your network administrator. GTX-221-G User’s Manual...
-
Page 134: Dhcp: Dhcp Settings
< DHCP > ・Item not to update: Setting of items for which update by DHCP is 1:Startup type disabled. 2:Item not to Update 3:Server port ・Server port: Setting of the port number for the DHCP server [08067] Execute GTX-221-G User’s Manual... -
Page 135: Startup Type
In addition, when the application software is started by[5:File] on the system menu, DHCP will not be executed. ・System menu boot DHCP will be executed when the system menu is launched. ・Auto wake up boot DHCP will be executed when auto wakeup is started. GTX-221-G User’s Manual... -
Page 136: Item Not To Update
Handy Terminal. The DHCP server port number is 08067 by default. This is to avoid conflict with other DHCP servers that are being operated in the same Execute network (well-known port number is 67). GTX-221-G User’s Manual... -
Page 137: Ftp: Ftp Settings
3:Name ・When host name is selected Enter the host name of the FTP server under "3:Name". Spaces cannot be included in the host name. Perform DNS settings (P.140) if you want to use "Host name". C aution GTX-221-G User’s Manual... -
Page 138: User Name
Enter a password that is case sensitive and consists of up to 20 < FTP > alphanumeric characters. 1:Server Address Spaces cannot be included in the password. 2:User name 3:Password As a security measure, the password entered will be displayed after 4:Advanced being converted to an asterisk (*). GTX-221-G User’s Manual... -
Page 139: Advanced
The firewall has a setting that denies connection from the outside to the inside. While this setting is enabled, FTP communication is not available in Active mode. Using Passive mode allows you to perform communication with an FTP server located on the other side of the firewall. GTX-221-G User’s Manual... - Page 140 The text set here will be added to the FTP method of "CWD". As the text set here is directly used for FTP communication, the file path must be correctly entered. (Ex.) "dir1/dir2/dir3" Spaces cannot be included in the specified folder. GTX-221-G User’s Manual...
-
Page 141: Dns: Dns Server Settings
[000.000.000.000] 2:Secondary [000.000.000.000] 3:Advanced ■Primary This is used to set the IP address of the primary DNS server. [System Menu]→[3:Network]→[4:DNS]→[1:Primary] Enter the IP address of the primary DNS server. < DNS > 1:Primary [000.000.000.000] 2:Secondary [000.000.000.000] 3:Advanced GTX-221-G User’s Manual... -
Page 142: Secondary
Its setting range is 0 - 9999 minutes.If it is set to 0, the cache function will be disabled.The maximum number of entries at the cache table is 8. If the maximum value is exceeded, the old entry is erased and a new entry is created. GTX-221-G User’s Manual... -
Page 143: Snmp: Snmp Setting
・Manager IP address Sets the IP address of the SNMP manager that is enabled using the community name set at[Community name]. When the IP address is set to "000.000.000.000", this community name is enabled for all the SNMP managers. GTX-221-G User’s Manual... -
Page 144: Community(R/W)
You can set the Trap community name. The community name is [000.000.000.000] specified using up to 16 alphanumeric characters. ・Manager IP address Sets the IP address of the SNMP manager, which is the transmission destination Trap. When address "000.000.000.000", no trap will be sent. GTX-221-G User’s Manual... -
Page 145: Advanced
It is set to 161 (00161), a well-known SNMP number, in the factory settings. ・Trap port The trap port number for sending the trap.The well-known port number is 162. ・Trap retry Specifies the number of times for resending the Trap. GTX-221-G User’s Manual... - Page 146 [1.3.6.1.2.1.7] MIB2-UDP [1.3.6.1.2.1.11] MIB2-SNMP [1.3.6.1.4.1.12392] Welcat Enterprise MIB Welcat Enterprise MIB is described in ASN.1 format. Welcat Enterprise MIB is included in "WebGlider Integration Server" (for more information, contact our sales office). ・Supported Traps Trap Description Cold Start Sent during communication start after MIB is initialized.MIB is ini- tialized upon power on.
-
Page 147: Receive: Receiving Files
• BluetoothManager is ON, and the BluetoothManager icon displayed in the task tray of the PC has become white. • As the default device of the Handy Terminal, the PC on the sending side has been registered (see "4-9-3 Bluetooth: Registering and Setting the Bluetooth Device" (P.169)) GTX-221-G User’s Manual... - Page 148 ・ Communicate with reference to communication between Handy Terminals in "3-4 Building Infra-red Communication (IrDA) Environment" (P.81) [System Menu]→[4:Receive] Select the communication means for reception. Select the reception method. < Device type > 1:WLAN ・WLAN 2:Bluetooth 3:IrDA ・Bluetooth ・IrDA GTX-221-G User’s Manual...
-
Page 149: Receiving Files (Wlan)
All checks applied All checks removed ・Full name Displays the full name of each selected file. ・All checks applied Selects all the checkboxes in the file list. ・All checks removed Clears all the checkboxes in the file list. GTX-221-G User’s Manual... - Page 150 A file named Select[Yes]/[No]. “SAMPLE1.OUT” already exists. Would you like to replace it? ③ Reception takes place. Upon completion of reception, [ (Number of Reception Suc- cesses/Number of Checks)]will be displayed in the message box. Press the【ENT】key. Completed GTX-221-G User’s Manual...
-
Page 151: Receiving Files (Bluetooth/Irda)
All checks applied All checks removed ・Full name Displays the full name of each selected file. ・All checks applied Selects all the checkboxes in the file list. ・All checks removed Clears all the checkboxes in the file list. GTX-221-G User’s Manual... - Page 152 A file named Select[Yes]/[No]. “SAMPLE1.OUT” already exists. Would you like to replace it? ④ Reception takes place. Upon completion of reception, [ (Number of Reception Suc- cesses/Number of Checks)]will be displayed in the message box. Press the【ENT】key. Completed GTX-221-G User’s Manual...
-
Page 153: File: Executing, Uploading, And Deleting Files
Copy to FDrive Copy files to the F drive. Copy to SDrive Copy files to the S drive. Copy to RDrive Copy files to the R drive (microSD). (microSD) ※1 You can not operate files in the S drive. GTX-221-G User’s Manual... - Page 154 Each file whose name is listed in a file list is played only once. If an error occurs during playback, the subsequent audio files will not be played. You cannot list names of other SFL files in a SFL file. Description example ALARM_MELODY.WAV (line feed) LOCATION_3F_2.WAV (line feed) SHIP_ERROR.WAV GTX-221-G User’s Manual...
- Page 155 Select the file and press the 【 ENT】 key to mark and unmark the checkbox < FDrive > for that file. 132X128.JPG There are two types of operation: operation to target the marked COPAN1.JPG COPAN2.JPG file and operation to target the selected file. HABANERO.JPG KOUME1.JPG KOUME2.JPG MAKE.TXT Menu GTX-221-G User’s Manual...
- Page 156 ・Copy to SDrive: Copy files to the S drive. ・Copy to RDrive(microSD): Copy files to the R Drive. Depending on the selected drive, copy destination drives to be displayed are C aution different. Note that the selected drive cannot be set as a copy destination. GTX-221-G User’s Manual...
-
Page 157: Execute: Execute An Application Program
[System Menu]→[5: File]→[Audio]→Select the drive→[F1 Menu]→[Play] Play the audio data. The audio file being selected will be played (regardless of whether < Audio > its checkbox is marked). Press the【C】key to stop playing the file. Playing ... Stop ■View: Display Graphic Data GTX-221-G User’s Manual... -
Page 158: Properties: Display Detailed Information Of A File
Name SAMPLE1.OUT ・Type Type[Application] ・Size Library[1.00] Size[00000000]Bytes ・Modified Modified 2012/01/01 00:00:00 Information about the file being selected (highlighted) will be displayed (regardless of whether its checkbox is marked). Press any key to return to the <File> screen. GTX-221-G User’s Manual... -
Page 159: Upload: Upload Files To A Pc Or Another Terminal
・Place the Handy Terminal in the USB communication unit and prepare infrared communication. ■ When the uploading side is a XIT-2xx series product ・Uploading becomes ready when "wait (HT)" is selected. (For details on how to configure BluePorter-V, see "3-2 Configuring BluePorter-V" in "File Transfer Utility BluePorter-V Operation Guide".) GTX-221-G User’s Manual... - Page 160 Select the upload method. < Device type > ・WLAN 1:WLAN ・Bluetooth 2:Bluetooth 3:IrDA ・IrDA ③ Uploading will start. The upload status is displayed on the screen. < 送信中 > sam p le1 .OU T 0847872 / 2101161 GTX-221-G User’s Manual...
-
Page 161: Delete: Delete Files
Delete the marked file(s). If there is no marked file, the file being selected (highlighted) will be deleted. A confirmation dialog box appears. < File delete > Select [Yes] or [No]. Would you like to delete this file? GTX-221-G User’s Manual... -
Page 162: All Checks Applied: Select All Files
■All Checks Removed: Deselect All Files [System Menu]→[5:File]→ Select the drive → Select the file type → [F1 Menu]→[All checks removed] All the checkboxes will be unmarked. < File > 132X128.JPG COPAN1.JPG COPAN2.JPG HABANERO.JPG KOUME1.JPG KOUME2.JPG MAKE.TXT Menu GTX-221-G User’s Manual... -
Page 163: Copy To The Specified Drive
[System Menu]→[5:File]→ Select the drive → Select the file type → [F1 Menu]→ Select the copy destination drive Copy files to the specified drive. A confirmation dialog box appears. < File Copy > Select [Yes] or [No]. Would you like to copy this file? GTX-221-G User’s Manual... -
Page 164: Id: Setting The Terminal Identification Id
Use this category to set an ID number for terminal identification to each product. Set a number unique to each product. [System Menu]→[6: ID] Set an ID unique to your terminal. You can enter an ID number in the range 000-999. < ID > [000] GTX-221-G User’s Manual... -
Page 165: Device: Setting Hardware Functions
・Trigger mode: Set the image Handy Terminal operating conditions. 2:Version 3:Picklist mode ・Version: Display the version of decoding. 4:Inverse(1D) ・ Picklist mode: Set the Picklist mode (targeted scan function). ・ Inverse(1D): Set the scanning of black-and-white-inverted barcode. GTX-221-G User’s Manual... -
Page 166: Trigger Mode
Press the Trigger key to make laser light start blinking. Press the key again to irradiate laser light. ・Release Press the Trigger key to make laser light start blinking, and release the key to irradiate laser light. ・Auto Automatically irradiate laser light regardless of trigger operation. GTX-221-G User’s Manual... - Page 167 < Trigger mode > You can set a value in the range 00-60 seconds. 1:Trigger operation When 00sec. is set, the laser light will not be turned OFF and [Normal] 2:Power saving continue to be irradiated. [Full] 3:Irradiation time [20]sec GTX-221-G User’s Manual...
-
Page 168: Version
Disabled Scan symbols in the scan area according to their priorities. The Enabled center of the aimer is the easiest area to scan symbols. ・Enabled Scan only barcodes in the center of a cross aiming pattern. GTX-221-G User’s Manual... -
Page 169: Inverted Barcode
[System Menu]→[7: Device]→[2: Key] The effective range is 0100-1000 milliseconds. < Key > When 0000 milliseconds is set, it is prohibited to repeat key input. 1:Key repeat delay [0500] ms 2:Key repeat rate [0100] ms GTX-221-G User’s Manual... -
Page 170: Bluetooth: Registering And Setting The Bluetooth Device
[Yes] on a confirmation dialog box. Would you like to save settings? Only when Local device is currently set, a search from a remote device is allowed. Hint Otherwise, no search will be allowed. GTX-221-G User’s Manual... - Page 171 The PIN (Personal Identification Number) code is a password used Pairing Enable for authentication. PIN code You can enter a value up to 16 characters using uppercase and lowercase alphabet, numeric, and symbol characters. The entered PIN code is displayed hidden beneath the asterisks (*). GTX-221-G User’s Manual...
-
Page 172: Remote Device
・Device list: Register remote device information. < Remote device > ・Search for devices: Search for remote devices around the Handy 1:Device list Terminal. 2:Search for devices 3:Search option ・Search option: Set the number of devices to search for through Search for devices. GTX-221-G User’s Manual... - Page 173 Erase the registered device information. ② Select the item to set. Set the following items, press the【F1】key, and select [Yes] to < Prooerty > save the settings. 1:Device name XIT-220 ・Device name 2:BD Address [00:03:7A:0B:0A:AB] ・BD Address 3:Security ・Security Save Search GTX-221-G User’s Manual...
- Page 174 Pairing Enable authentication. PIN code [******** You can enter a value up to 16 characters using uppercase and lowercase alphabet, numeric, and symbol characters. For security, the entered PIN code is displayed after being converted into asterisks (*). GTX-221-G User’s Manual...
- Page 175 The names of detected remote devices are displayed in list form. < Search results > USB-Adaptor Label-Printer Property Device names in alphanumeric and symbol characters can be detected. Do not use Hint kana or kanji characters for device names. GTX-221-G User’s Manual...
- Page 176 Remote4 Remote5 Remote6 Remote7 Property If you select the already registered remote device number, a confirmation dialog box for overwriting appears. The remote has Select [Yes] or [No]. been already registered. Would you like to overwrite it? GTX-221-G User’s Manual...
- Page 177 < Search option > You can set a value in the range 1-9 for the number of devices. Search MAX [9] (1-9) The greater the number of devices to search for, the longer the search duration becomes. GTX-221-G User’s Manual...
-
Page 178: Setting The Display/Backlight Luminosity
【▲】key is used to move the slider up and the【▼】key is used < Luminosity > to move the slider down to adjust luminosity.. F6(High) You can set luminosity in four steps; move the slider and luminosity Level : 2 changes in real-time. F7(Low) Level Luminosity High Bright Dark GTX-221-G User’s Manual... -
Page 179: Light Sensor
Use this category to set the volume, LED, and vibrator. [System Menu]→[7: Device]→[5: Tone/Vibrator] Select the device to set. Make a selection from the following items: < Tone/Vibrator > ・Volume 1:Volume ・Indicator func 2:Indicator func 3:Click Sound ・Click Sound GTX-221-G User’s Manual... -
Page 180: Volume
• When data is entered, generate one short high tone and light the green LED ON • When an error occurs, generates three low tones while operating the vibrator and blink the red LED As shown in this example, various settings can be made to suit the customer's use environment. GTX-221-G User’s Manual... - Page 181 After selecting the item to set on the screen in step ①, and press < Device > the【ENT】key to display the device name. 1:Buzzer Select the device to set and press the【ENT】key. 2:Audio 3:Vibrator 4:LED Set the operating conditions for each device by referring to the next section. GTX-221-G User’s Manual...
- Page 182 Initialize ・Initialize Discard the settings for the pattern currently set and restore the initial settings. Note that when【F1】is displayed in the bottom left of the screen, the operation procedure is the same for all device operation conditions. GTX-221-G User’s Manual...
- Page 183 Mediant High tone on the sample. Set the LED color ([4:LED]). Move the cursor over [Color] and press the【ENT】key. < LED > Enabled Color [Red [00500]ms [00000]ms Repeat[00] Menu Select a color from the submenu. Green Orange GTX-221-G User’s Manual...
-
Page 184: Click Sound
Read a number when a numeric key is pressed. Generate a beep sound when any other key is pressed. ・Audio Read a number only when a numeric key is pressed. Do not generate any sound when any other key is pressed. GTX-221-G User’s Manual... -
Page 185: Management: Setting Basic Information And Management
・OS Update: Update the OS of the Handy Terminal (P198.) 4-10-1 System info: Checking the OS Version Display the version information of the installed OS. [System Menu]→[8: Manage]→[1: System info] Check the OS version. < System info > O S : 01.03.04 GTX-221-G User’s Manual... -
Page 186: Format: Registry/Drive Formatting
If none of the checkboxes is marked, you cannot perform format ting. RegistryInitialize FDrive SDrive RDrive(microSD) Execute Menu Press the【F2】key to display the submenu. ・All checks applied Mark all the checkboxes. All checks applied ・All checks removed All checks removed Unmark all the checkboxes. GTX-221-G User’s Manual... - Page 187 The items with their checkboxes marked will be formatted in < Format > sequence. RegistryInitialize FDrive SDrive RDrive(microSD) Formatting ③ Finish formatting. Press the【ENT】key to finish formatting. If the registry is initialized, the power will be turned OFF. Completed GTX-221-G User’s Manual...
-
Page 188: Clone: Creating A Copy
⑥Close the confirmation dialog box on the copy terminal and turn the power OFF to finish the operation. For Bluetooth communication and infrared communication (IrDA), refer to "Chapter r r r r e e e e f f f f 3 Communication Environment Settings (P.66). GTX-221-G User’s Manual... -
Page 189: Bluetooth/Irda
・IrDA ② Set whether the Handy Terminal is a master terminal or copy terminal. ・Master: When the product is a copy source XIT-2xx. < Clone > ・Copy: When the product is a copy destination XIT-2xx. 1:Master 2:Copy GTX-221-G User’s Manual... - Page 190 Set an item as needed. All checks applied ・All checks applied All checks removed Mark all the checkboxes. ・All checks removed Unmark all the checkboxes. ② Finish the Clone operation. Press the【ENT】key to finish the Clone operation. Completed GTX-221-G User’s Manual...
- Page 191 Basically, these are parameters unique to each terminal. Select this item if you want to make a copy including such parameters. ・FDrive Copy files stored in the F drive. Select this item if you want to copy application programs or the master file. GTX-221-G User’s Manual...
- Page 192 If you find on the master Please check that terminal that the transfer operation has not been completed, execute the master is completed. Clone again. Press the【ENT】key. GTX-221-G User’s Manual...
-
Page 193: Microsd
② Specify whether the Handy Terminal is on the export side or on the import side. ・Export: When the product is a copy source XIT-2xx. < Clone > ・Import: When the product is a copy destination XIT-2xx. 1:Export 2:Import GTX-221-G User’s Manual... - Page 194 Set an item as needed. All checks applied ・All checks applied All checks removed Mark all the checkboxes. ・All checks removed Unmark all the checkboxes. ② Finish the Clone operation. Press the【ENT】key to finish the Clone operation. Completed GTX-221-G User’s Manual...
- Page 195 Clone? ② Clone will be executed. Do not turn the power OFF during execution. Please do not remove a battery by any means! ③ Finish the Clone operation. Press the【ENT】key. The power is turned OFF. Shutdown GTX-221-G User’s Manual...
-
Page 196: Drive: Displaying Drive Information
In addition to defragmentation in Normal mode, reorganize the secured free regions so that they become contiguous. It may take several seconds to several minutes to complete defragmentation in Deep mode depending on the drive's condition. Normally, we recommend executing defragmentation in Normal mode. GTX-221-G User’s Manual... -
Page 197: Mothball: Settings When Not Using The Product For Long
① Resume is executed and the S drive is erased. An execution confirmation dialog box appears. < Mothball > Select [Yes] or [No]. The contents of resume and the Sdrive are deleted instead of suppressing consumption of a backup battery. GTX-221-G User’s Manual... - Page 198 Select [Yes] to execute the wizard to set WLAN communication. Select [No] to return to the previous screen. Start wizard? Communication set- ting can be done with guidance For details, refer to "■WLAN Communication Settings by Setting Wizard" (P.70). GTX-221-G User’s Manual...
-
Page 199: Os Update: Updating The Os Of Thehandy Terminal
Please wait ... ③ Restart the product. After the OS update has been completed, press any key. This turns the power OFF. OS update has been completed. Hit any key to start new OS. GTX-221-G User’s Manual... - Page 200 For how to set the time, refer to "4-3-2 Clock: Set the Time" (P.104). 2012/01/01(Sun) 00/00/00 1:Manual setting 2:Server setting ⑥ Defragmentation will be executed. Defragmentation will be executed and then the power will be turned < Defrag > OFF. Then, the OS update procedure will become complete. Please wait. GTX-221-G User’s Manual...
-
Page 201: Test: Testing Hardware Devices
Make a selection from the following items: < WLAN Test > 1:Configuration ・ Configuration: Configure the ping command execution conditions. 2:WLAN/ping test 3:AP Search ・ WLAN/ping test: Test WLAN communication using the ping command. ・AP Search: Search for access points in the neighborhood. GTX-221-G User’s Manual... -
Page 202: Configuration
Settable values: 1 to 255 seconds ・Trial count(Default=four times) Set the number of times to send the ping command. Settable values: 1 to 255 times When 0 is specified, continue to send the ping command until the 【C】key is pressed. GTX-221-G User’s Manual... -
Page 203: Wlan/Ping Test
・For PSK (TKIP/CCMP), an error message appears when authentication fails. ・The LnkQ indicator in the 6th line and the ASL indicator in the 8th line do not show radio signal strengths accurately. Consider them as approximate radio conditions. GTX-221-G User’s Manual... -
Page 204: Ap Search
When the access point is selected, a confirmation dialog box appears, so that you can set the SSID that is set to the access point into the Handy Terminal. Would you like to set SSID to XIT220? GTX-221-G User’s Manual... -
Page 205: Bluetooth: Testing Bluetooth Communication
When a key is pressed, the corresponding key data is sent and at < Bluetooth test > the same time, it is also displayed on the screen (local echo). 123456 When the data is received at the other end, it is highlighted on the screen. GTX-221-G User’s Manual... -
Page 206: Irda: Testing Infrared Communication
When a key is pressed, the corresponding key data is sent and at the same time, it is also displayed on the screen (local echo). When the data is received at the other end, it is highlighted on the screen. GTX-221-G User’s Manual... -
Page 207: Barcode
Option Press the【F1】key to alternate the display methods. ■Barcode Option Press the【F2】key to set barcode option items. < Barcode option > Note that the settings made here are enabled during barcode test 1:Check digit only. 2:JAN/EAN/UPC 3:Composite GTX-221-G User’s Manual... -
Page 208: Display: Testing The Lcd Screen
Test the LCD display condition. Each time a key other than【F4】and【PW】is pressed, the LCD screen changes its color one after another. Display test starts When you finish displaying all colors, you return to the previous Hit any key. operation. GTX-221-G User’s Manual... -
Page 209: Key: Testing Key Operations And Indicators
Voice (Seven) 【 】(【F8】) ○ × Voice (Eight) When the【C】key has been pressed twice or when every key has been pressed, the test becomes complete. Hint You cannot operate the【PW】key until you finish testing all the keys. GTX-221-G User’s Manual... -
Page 210: Chapter 5 Specification
Chapter Specification... -
Page 211: Product Specifications
Chapter 5 Specification 5-1 Product Specifications 5-1 Product Specifications 5-1-1 GTX-221-G Wireless Two-Dimensional Handy Terminal 32-bit RISC CPU μITRON Memory 32MB (User area 12MB or more) 64MB (User area 12MB or more) Scanner section Decoded barcodes NW-7, Code39, JAN-13/8, UPC-A/E,... - Page 212 Built in the main unit. *1 Transmission Maximum 10m distance Profile WLAN Complied interna- IEEE802.11b/g tional standards Complied domestic ARIB STD-T66/RCR STD-33A standards Communication Direct-sequence spread spectrum (DSSS) method Orthogonal frequency-division multiplexing (OFDM) Radio frequency 2.4GHz band GTX-221-G User’s Manual...
- Page 213 Indoor: maximum 75m, Outdoor: 200m distance IrDA IrDA Ver1.2 Physical Layer compliant Baud rate: maximum 115,200bps (SIR) Management function SNMP Agent Supported MIB MIB-Ⅱ(RFC1213), Welcat Enterprise MIB External con- microSD SD Memory Card Specification, Ver.1.1 nection terminal 58 (W) ×171 (D) ×45 (H)mm Dimensions Grip section 45 (W) ×29 (H)
- Page 214 *3 Hours of continuous use are an actual value under the following conditions: One second of barcode reading per 20 seconds, one WLAN transmission/reception LED ON, speaker ON, luminosity: level 2, vibrator OFF *4 A value obtained by testing, not a guaranteed value. GTX-221-G User’s Manual...
-
Page 215: Dimensions
Chapter 5 Specification 5-1 Product Specifications ■Dimensions GTX-221-G User’s Manual... -
Page 216: Single Charger
AC100 to 240V 50-60Hz 75VA Rated output DC5.5V 2.5A 13.75W Weight 180g (AC cable not included) AC adapter Dimensions 41.5 (W)×90 (D)×28 (H)mm (Power cable, DC cable not included) AC cord length 1.8m DC cord length 1.8m GTX-221-G User’s Manual... -
Page 217: Multi Charger
93 (W)×117.5 (D)×105.4 (H)mm Weight 215g USB cable length Infrared communication IrDA Ver.1.2 Physical Layer compliant Baud rate: maximum 115,200bps Communication External interface USB2.0 Full Speed section Connector: TYPE B Power supply USB BUS power Current consumption 100mA or less GTX-221-G User’s Manual... -
Page 218: Iu-004C Usb Communication/Charging Unit
180g (AC cable not included) AC adapter Dimensions 41.5 (W)×90 (D)×28 (H)mm (Power cable, DC cable not included) AC cord length 1.8m DC cord length 1.8m *Used to supply power to the communication function. Use the AC adapter for charging. GTX-221-G User’s Manual... -
Page 219: Scan Specifications
OFF. Aim ing p a ttern 5-2-2 Scan Depth Depending on the barcode type, the scannable distance may change. When scanning is difficult, change the distance between the barcode and the main unit and try again. GTX-221-G User’s Manual... -
Page 220: Barcode Skew And Scannable Angle
When scanning diagonally from the left or right in relation to a barcode, it may become difficult to perform a scan. In such a case, change the angle to scan a barcode. Bar co d e Scanning can be performed at all angles (360 degrees). GTX-221-G User’s Manual... -
Page 221: Characters To Output On Screen
( 0) ( 2) ( 3) ( 4) ( 5) ( 6) ( 7) ( 8) ( 9) ( 1) ・ f 0 8 0 f 0 9 0 f 0 a 0 f 0 b 0 f 0 c0 f 0 d 0 f 0 e0 E N T f0 f0 ■Single-Byte Characters GTX-221-G User’s Manual... - Page 222 Chapter FAQs and Answers...
-
Page 223: Faqs And Answers
Take the following procedure to start the system menu. 1. Remove the battery cover and battery pack. 2. Wait for 10 seconds, then attach the battery pack and battery cover. 3. Hold down the【PW】key for two seconds or longer while holding down the【SCAN】key. GTX-221-G User’s Manual... - Page 224 "1-2-4 Charging the Battery Pack" (P.43) <If the problem cannot be solved even after confirming the above> The battery pack may be faulty. Contact your dealer. Q: To check or correct the date... Refer to "4-3-2 Clock: Setting the Time" (P.104). GTX-221-G User’s Manual...
- Page 225 ■ Make sure that the scan distance is correct. (Refer to "5-2 Scan Specifications" (P.218).) ■ Make sure that the quality of the barcode label is good. ・ Otherwise, scanning may not be performed correctly. In any of the following cases, make GTX-221-G User’s Manual...
- Page 226 When a non- interfering channel is set, a maximum of four access points can be used in one area. ■ Make sure that no radio signal is generated that may cause trouble. Check that there is no device causing trouble such as a WEB camera, radio house- phone system, GTX-221-G User’s Manual...
- Page 227 ■ Make sure that the transfer utility BluePorter-V is installed in the PC to connect to. ■ Make sure that the BluePorter- V icon is displayed in the notification area at the far right of the Windows task bar on the screen. Otherwise, even if BluePorter- V is installed, it is GTX-221-G User’s Manual...
- Page 228 ■ Make sure that the access point (a device recommended by us) and the PC are connected correctly on the LAN----(refer to "4-4 WLAN: WLAN Communication Settings" P.114). ■ Make sure that the FTP settings are correct----("3-5-3 FTP: FTP Settings" (refer to P.136). GTX-221-G User’s Manual...
- Page 229 4-7 File: Executing, Uploading, and Deleting Files" (P.152) ■ Some application program processes defragmentation or backup before turning the power OFF. When replacing the battery pack, make sure that the power is turned OFF. GTX-221-G User’s Manual...
- Page 230 Turn the power ON again. Q: The microSD becomes inaccessible. ■ The Handy Terminal does not support the SDHC standard. Use microDS cards proved operable. For microSD cards proven operable, please contact your dealer. GTX-221-G User’s Manual...
-
Page 231: Consumables
• Backup battery The backup battery is maintenance-free, but when deeply charged repeatedly, its capacity may be significantly reduced. In such a case, the backup battery needs to be replaced. • Battery cover (water stop packing) These are consumables. GTX-221-G User’s Manual... - Page 232 Appendixes...
-
Page 233: Appendix-1 Factory Default List
Security, Attention Displayed, Not displayed Displayed Advanced, 11b Auto, 11bg Auto, 11g 9M, 11g 6M, 1M , 11b Auto Rate control 2M, 1 or 2M, 5.5M, 11M TCP/IP IP Address Any value in IP address format 000.000.000.000 GTX-221-G User's manual... - Page 234 No setting Specific case-sensitive DNS, Primary Any value in IP address format 000.000.000.000 DNS, Secondary Any value in IP address format 000.000.000.000 DNS, Advanced, 00001~65534 00053 erver port DNS, Advanced, 01 to 99 seconds 03 seconds Timeout time GTX-221-G User's manual...
- Page 235 Up to 16 hexadecimal characters (0- 9 and No setting PIN code A-F) Bluetooth, Remote Up to 30 alphanumeric characters and None registered Device 1-7, Device name case-sensitive Bluetooth, Remote Fixed as 12 hexadecimal characters (0-9 00:00:00:00:00:00 Device 1-7, BD Address and A-F) GTX-221-G User's manual...
- Page 236 Bluetooth, Remote device Up to 16 hexadecimal characters (0- 9 and No setting 1-7, PIN code A-F) Bluetooth, Remote device, 1~9 Search option Display, SetAlsSensor Enabled, Disabled Enabled Tone/Vibrator, Volume Level: 1-8 Level: 8 Tone/Vibrator, Click Yes, No Sound GTX-221-G User's manual...
-
Page 237: Appendix-2 Sample Barcodes
4 9 1 1 2 2 3 8 ● UPC-E 0 0 1 2 3 4 9 9 9 9 9 9 ● CODE39 (Check Digit added) * 1 2 3 4 5 F * * A B C D E H * GTX-221-G User's manual... - Page 238 5 6 7 8 9 0 c d : / + 7 8 9 d ● NW-7(HEX) a A B C D E F a b D E F A B C b ● ITF (Check Digit added) 1234567895 9876543215 GTX-221-G User's manual...
- Page 239 1 1 2 2 3 3 4 4 5 5 6 6 7 7 8 4 ● ITF (Add-on version ITF-6) 1 2 3 4 5 7 1 1 2 2 3 9 ● CODE128 (Code set A) GTX-221-G User's manual...
- Page 240 ( 0 6 ) 1 7 4 5 8 6 6 3 5 2 5 3 0 0 ( 1 4 3 ) 5 4 3 2 1 0 ● EAN128 (Code set C) ( 1 0 ) 1 3 5 8 9 6 4 5 1 2 3 0 0 4 ( 4 8 ) 4 6 8 1 2 5 GTX-221-G User's manual...
- Page 241 ● PDF417 The PDF417 barcode can store up to The PDF417 barcode can handle al- 2725 digits (numeric characters phanumeric and binary data. only), 1850 text characters (al- phanumeric characters only), or 1108 bytes (binary data only). GTX-221-G User's manual...
- Page 242 The QR code can handle alphanumeric, binary, and kanji data. The QR code can store up to 7089 digits (numeric characters only) 4296 text characters (alphanumeric characters only) 2953 bytes (binary data only) or 1817 kanji characters (kanji characters only). GTX-221-G User's manual...
-
Page 243: Appendix-3 Glossary
Remote device A Bluetooth device the local device connects to. Local device The Bluetooth device currently operated. When operating the Handy Terminal, the Handy Terminal is the local device. GTX-221-G User's manual... - Page 244 Wireless Two-dimentional Handy Terminal GTX-221-G User's Manual 3rd Edition, August 2011 Copyright©2012 Welcat Inc. http://www.welcat.co.jp/ info@welcat.co.jp M03XIT220G_EN GTX-221-G User's manual...
Need help?
Do you have a question about the GTX-221-G and is the answer not in the manual?
Questions and answers