Table of Contents
Advertisement
Quick Links
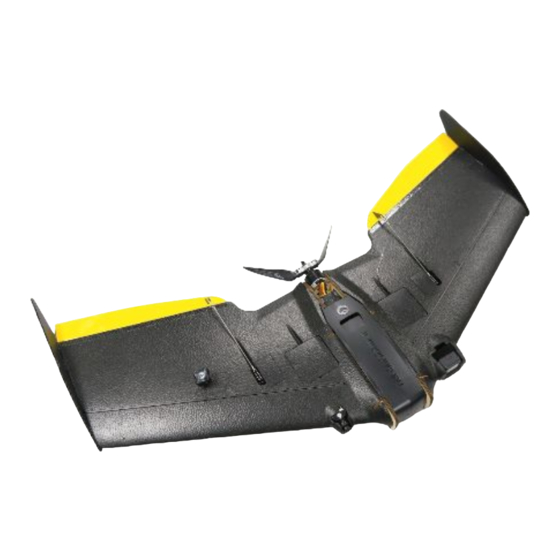
TBS CAIPIRINHA II Mini FPV Wing
Small, integrated, fly anywhere plane
The TBS CAIPIRINHA II is a gentle long range cruiser that turns into a fierce mountain diver with just a
slight push on your pitch stick.
The wing is based on the Wipeout by HappyFlyers from Switzerland! A polycarbonate battery bay top,
push-to-open equipment bays, a PDB with up to 3 battery inputs, wiring channels that stretch across the
entire wing, a huge 6mm-plywood-lined center section are just some of the innovations that make this
plane stand out from the rest. An ultra-sleek and aerodynamic finish ensure that no energy goes to waste,
and a very good glide slope makes thermalling or long distance sloping highly enjoyable.
We can confidently say it is going to be the only long range cruiser you will ever need, and the only flying
wing in its weight class with such a performance envelope.
Features
●
Small, lightweight, fly anywhere design
Ultimate in flight stability and endurance
●
●
Virtually indestructible EPP/Plywood construction
Pre-cut camera, servo, battery, R/C receiver and video transmitter slots
●
2x push-to-open equipment bays for R/C and FPV electronics
●
●
Pre-cut, sanded and covered ultra-lightweight elevons & pushrods
1
Revision 2018-01-18
Advertisement
Table of Contents

Summary of Contents for Team Blacksheep CAIPIRINHA II
- Page 1 The TBS CAIPIRINHA II is a gentle long range cruiser that turns into a fierce mountain diver with just a slight push on your pitch stick. The wing is based on the Wipeout by HappyFlyers from Switzerland! A polycarbonate battery bay top, ...
-
Page 2: Before We Begin
Before we begin Thank you for buying a TBS product! The TBS CAIPIRINHA II is a new FPV wing from Team BlackSheep (TBS) and features the best design practices available on the market to date, providing great flying duration and ... -
Page 3: Specifications
Specifications Type: Powered medium sized flying wing Airframe: Black molded EPP (Expanded Polypropylene) foam material Wingspan: 36.5 inch / 930mm Winglets: Symmetrical, 3mm corrugated lightweight board Battery: 4500mAh 4S, to 6600mAh 4S, 20C or higher Battery size: Suggested dimension W48 x H36 x L150 mm, 525g Max. -
Page 4: Part List
Part list Before building your TBS CAIPIRINHA II make sure the following items are included in your kit. 2x Wing halves and covers 2x Symmetrical winglets 1x Plastic cover and screws 2x Plywood lightweight elevons ... -
Page 5: Required Parts
Required parts To get in the air the following equipment and parts are needed for assembly. 1x 1000-1200kV 2200-class 1x 50A Speed controller 1x 4S 4500mAh 20C to 4S brushless motor 6600mAh 20C XT60 LiPo pack ... -
Page 6: Choosing The Right Setup
Use these suggested setups as a “shopping list” if you are just getting started. Any existing gear you already own (e.g. remote controls, chargers, batteries) can be used with the TBS CAIPIRINHA II. These setups, with the exception of the camera tripod, are available from Team BlackSheep. Remote ... - Page 7 TBS CAIPIRINHA setup for long range flights Expected flight time: 40-60 min ● ● Cost range: US$ 1,700 - US$ 2,000 ● Experience level: Expert Ideal for: Long, wide open fields, plains, coastlines and valleys or urban flying ●...
-
Page 8: Wing Assembly
Wing assembly Top assembly overview of a common wing setup, including TBS Wing Layer, TBS FPVision, TBS Crossfire Micro V2, TBS ZeroZero V2, Cobra 1050kV motor, HobbyWing 50A ESC, Aeronaut folding 10x6 propeller, and GoPro Hero Session 5. ... - Page 9 Underside of the wing assembly. 9 ...
- Page 10 Attach underside covers The wing halves come with underside covers that needs to be glued in place. These make up the internal wiring channels. Any custom routing layout can be done at this point in the assembly. ...
-
Page 11: Battery Bay
Battery bay The battery is kept in the middle of the wing and can be used to adjust the center of gravity. A plywood and support straps keeps the battery secure. Begin by assembling the plywood pieces. Follow the photos below to complete the build, be careful not to overbend the pieces. ... -
Page 12: Motor Mount
Wing halves assembly Roughen the main spar with a sandpaper, apply glue to one side of the spar and insert the spar into the side of the wing. Roughen and cover the surfaces of the battery bay, adjoining foam faces and the spar on the opposing side with PU glue, spray water to activate the glue. - Page 13 Hard top cover installation Put the hard top cover on top of the battery bay and align the front screw holes with the corresponding holes on the battery bay assembly. Add small drop of thread lock to the screws. ...
- Page 14 Install TBS gear The electronics bays on the wings are made to accomodate the TBS FPVision and TBS Wing layer. Assembly the stack and use the screw holes on the bottom to secure it to the wing. Look at the “Electronics installation”...
- Page 15 HD camera A GoPro session camera can be installed in the designated slot in the front of the wing. A support strap is used to keep the camera in place. Push-to-open bays To provide quick access to the electronics bay, the top bays have a retaining mechanism that can easily be engaged by pushing on both sides of the bay. ...
- Page 16 Tape elevons Attaching the lightweight elevons to the wing is done using flexible tape. Any thin tape will do, but it is recommended to use 3M Blenderm Hinge Tape or similar type. Add one long piece of tape to the inside of the elevon and attach it to the wing. Bend the elevon down to expose the topside.
- Page 17 Elevon horns and control link On the elevons, cut through the yellow film to open the pre-routed slot for the elevon horns. Add a decent amount of CA/superglue to the horn and in the slot, insert the horn and make sure it is perpendicular to the elevon and in-line with the servo horn. ...
- Page 18 Small foam cover pads For additional protection and completion, separate the three foam pieces and use hot glue to attach them to the servo compartment and motor mount. Attach winglets Use the supplied washer-head screws to attach the winglets to the wood frame on either side of the wing. The “deep side”...
-
Page 19: Electronics Installation
Electronics installation The TBS CAIPIRINHA II is designed to be flown light and with any FPV equipment, powertrain and battery system, while reducing the build time to a minimum when building it with TBS-designed. Several central cable channels keeps the wires neatly tucked away. ... -
Page 20: Power Distribution Board
Dry-fit and wiring Plan your setup and wiring in advance, draw it out and dry-fit or test everything on a table to make sure everything checks out. Longer wires translate to less range on a FPV system, so try to keep them short but do not overdo it! All cables longer than 10cm should be shielded (e.g. - Page 21 Receiver Place the R/C receiver in the designated left electronics compartment and feed all wires through either of the two channels - recommended to use the rear one. Feed the antenna coax through the outlet cut and tape it in place, or use the unused antenna hole for a more rigid antenna installation. ...
-
Page 22: Speed Controller
FPVision, Colibri iNav and CrossFire micro Same as previous, but with TBS Colibri flight controller with iNav ( h ttp://inavflight.com ) firmware and non-TBS GPS puck for autonomous flight including Return To Home with a predefined climb height, circle flight, and waypoints. ... -
Page 23: Brushless Motor
Brushless motor With the motor attached to the motor mount, feed the wires through middle of the mount. If needed, change the bullet-connectors to match the speed controller. Cover the wires with the small square foam piece. Plug in the wires to the ESC and remember to swap any two to change the direction of rotation, if needed. Propeller ... -
Page 24: Video Transmitter
Video transmitter The video transmitter should preferably be installed the right side of the wing, next to the electronics bay. If the bay is too small, outline the VTx and use a utility knife to remove the excessive foam. Mount the VTx and support antenna portion of the unit using hot-glue to prevent dislodging the RF connector on impact. ... - Page 25 HD camera TBS CAIPIRINHA II is designed to sport a full fledged GoPro HERO Session (any model) camera to record wonderful HD footage. Runcam 3 also fits, but it is not recommended because of poor video quality. ...
- Page 26 Center of Gravity optimization For perfect Center of Gravity (CG), pick equipment that in the end makes the wing balance around the indicated point. The CG is the point where the lateral and longitudinal axis balances. Put a finger on the CG point and begin to balance a fully loaded wing. Ideally, when holding the wing in the air at the CG spot it should be level and not dip to either side. ...
-
Page 27: First Flight
Flight First flight Make sure that the controls are working properly. Check that the trim on the transmitter is centered (zeroed). Pull the elevator control stick back and observe that both elevons move upward. Push the control stick to the right and observe the right elevon moves up and the left elevon moves down. The propeller should turn with the text facing forward and the straight sharp leading-edge cut into the air. ... -
Page 28: Spare Parts
Spare parts You can either get spare parts directly from us ( t eam-blacksheep.com ) or from one of our distributors and retailers near you. Our ever-growing list of retailers is published on the left at t eam-blacksheep.com/shop . -
Page 29: Good Practices
Good practices We have compiled a list of all of practices which have been tried and tested in countless environments and situations by the TBS crew and other experienced FPV pilots. Follow these simple rules, even if rumors on the internet suggest otherwise, and you will have success in FPV. ... - Page 30 Try to achieve as much separation of the VTx and R/C receiver as possible to lower the RF noise ● floor and EMI interference. Do not buy cheap equipment unless it is proven to work reliably (e.g. parts falling off, multitudes of ●...
Need help?
Do you have a question about the CAIPIRINHA II and is the answer not in the manual?
Questions and answers