Table of Contents
Advertisement
Advertisement
Table of Contents

Related Manuals for Cabrinha 1X

Summary of Contents for Cabrinha 1X
- Page 1 USER MANUAL ENGLISH 2018 CONTROL SYSTEM...
- Page 2 DO NOT USE THIS PRODUCT UNLESS YOU HAVE READ AND UNDERSTAND THESE WARNINGS, CAUTIONS, AND INSTRUCTIONS WHICH ARE FOR YOUR SECURITY AND PROTECTION. THIS INFORMATION MAY BE SUBJECT TO CHANGE AT ANY TIME. FOR CURRENT UPDATES, PLEASE VISIT OUR WEBSITE AT: WWW.CABRINHAKITES.COM IF YOU ARE BELOW THE AGE OF 18, YOU SHOULD HAVE YOUR PARENT OR GUARDIAN READ THESE WARNINGS, CAUTIONS AND INSTRUCTIONS AND...
- Page 3 • This product is designed and manufactured only for kiteboarding on water or snow. • Keep these warnings, cautions and instructions for future reference. • The following contains key security points to remember when operating your Cabrinha kite, and associated kiteboarding equipment on water, land or snow.
- Page 4 SNOW USE GENERAL GUIDELINES • The points listed under the Recommended Kiteboarding Practice also apply to the use of this product on the snow. Please read the previous paragraphs even if you intend to use this product primarily on the snow. •...
-
Page 5: Table Of Contents
Important Information Wind, Water, & Weather Conditions Know Your Ability Level/Kiteboarding Location Kite Care Beach Etiquette Area of Operation QUICKLOOP 1X WITH OVERDRIVE Fixed/Chaos Bar W/ Trimlite OVERDRIVE 1X W/ Recoil SETUP Check Your Line Lengths Line Length Corrections Downwind Launch Setup... -
Page 6: Introduction
INTRODUCTION Thank you for purchasing this Cabrinha product and welcome to the sport of kiteboarding. As you may know, the excitement of Kiteboarding is attracting people of all ages from all corners of the globe. It’s one of the most dynamic and fastest growing sports in the world. -
Page 7: Important Information
The following contains key points to remember when operating your Cabrinha kite. • Be familiar with the set up and use of the supplied security systems: Quickloop / Fireball 1x and all the Quick Release systems. -
Page 8: Wind, Water, & Weather Conditions
• Make certain that you are physically capable of operating the security Quick Release (QR) and 1X devices provided with this kite. This kite and control system has been designed around a typical rider weight of 40 to 110kg. -
Page 9: Know Your Ability Level/Kiteboarding Location
IMPORTANT INFORMATION KNOW YOUR ABILITY LEVEL KITEBOARDING LOCATION • Do NOT attempt kiteboarding without • Observe ALL local laws and regulations appropriate instruction. regarding this product and the usage area. • Do NOT kite alone. • Talk to the local riders about the •... - Page 10 IMPORTANT INFORMATION KITE & CONTROL SYSTEM CARE Due to the often extreme nature of kiteboarding, a thorough approach should be taken when caring for your kite and all its associated rigging, as well as your protective gear. PREPARING FOR YOUR SESSION down the finish properties of the material •...
-
Page 11: Beach Etiquette
IMPORTANT INFORMATION BEACH ETIQUETTE Here are some basic things to consider when sharing beaches and water accesses with other users: SAFETY • Follow ALL of the instructions outlined in this manual, other manuals and installation guides. • Follow the instructions and rules and regulations posted at the beaches you use. •... -
Page 12: Area Of Operation
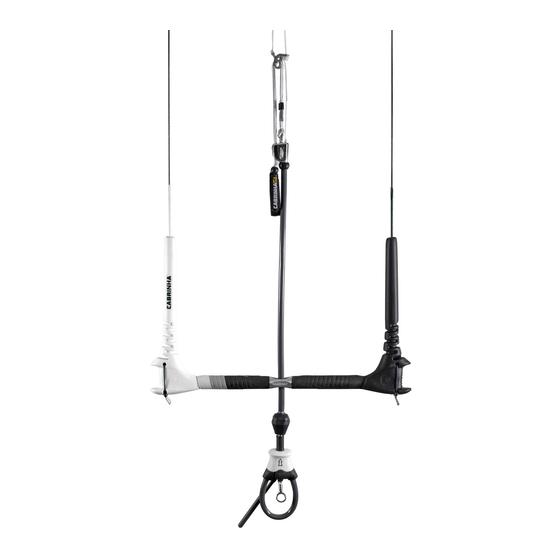
IMPORTANT INFORMATION AREA OF OPERATION This is the 100 meters of area with no obstacles to each side and downwind of the rider. Do not launch your kite if you do not have this distance between yourself and other people, or obstructions. PLANNING YOUR LAUNCH •... - Page 13 IMPORTANT INFORMATION 1X FIXED/CHAOS + TRIMLITE REFERENCE GUIDE 1) Rear Steering Lines 2) Color Coded PU Line Sleeve 3) EVA Floating Bar Ends 4) Line Winders 5) Quickloop Harness Loop 6) Removable Security Pin 7) Bypass Leash Connector 8) Quick Release (QRS)
-
Page 14: Overdrive 1X W/ Recoil
OVERVIEW OVERDRIVE + RECOIL REFERENCE GUIDE 1) Rear (Steering) Lines 2) Color Coded PU Line Sleeve 3) EVA Floating Bar Ends 4) Line Winders 5) QuickLoop Harness Loop 6) Removable Security Pin 7) Bypass Leash Connector 8) Quick Release (QRS) 9) Depower Mainline 10) Centreline Trim System 11) Trim Line... -
Page 15: Setup
The Cabrinha control bars come set up with the fl ying lines at- tached; however, it is wise to check your line lengths before going on the water, and after use To check the 1X line lengths use the method described below. -
Page 16: Line Length Corrections
SETUP Rear line Front line LINE LENGTH CORRECTIONS connector connector • The steering adjustments can be made on the front lines where they connect to the kite or on the rear lines in the bar float* (*Fixed bar Only). • If one of the front lines is too long, tie either an overhand knot (25mm adjustment) or a figure 8 knot (40mm). - Page 17 • Walk out the Center De-Power (center) lines. Attach the centre Line with the 1X Designation to the corresponding front Pigtail connector based on the side you wish to fl ag out the kite.
-
Page 18: Upwind Launch Setup
4 fl ying lines are completely even when the bar is sheeted in to full power. • From the inside of the kite, attach the centre Line with the 1X Designation to the corresponding front Pigtail connector based on the side you wish to fl ag out the kite. Connect to the Left side of the kite (same side of the bridle as the Red Rear Pigtail) if you want to fl ag the kite to the right. -
Page 19: Operation
(in the direction of the arrow) until it meets the bottom of the spinning handle (FIG 1). Activating this primary quick release (QR1) will still leave you attached to your kite via the 1X FIG 2 Security line. -
Page 20: Security Pin
OPERATION SECURITY PIN The harness loop is the rider’s primary connection FIG 1 to the depower system, as long as it is equipped with a security pin. This security pin is active only when the rider is hooked into the harness loop. Therefore, it is important that a secure connec- tion is made between the Harness Hook and the Harness Loop. - Page 21 OPERATION SECURITY PIN REMOVAL FIG 4 • Using a 2mm Allen Key loosen and remove the Security Pin Screw by rotating in a counter clockwise direction. (FIG 4) • Pull the Security Pin in a downwards motion (from the Quickloop Body), this may require some force and may need left to right move ment.
- Page 22 (FIG 1). Activating this primary quick release (QR1) will FIG 2 still leave you attached to your kite via the 1X Security line. For complete separation from your kite, you will need to activate Quick Release Handle on your bypass leash.
- Page 23 OPERATION FIREBALL FIG 1 AUTOLOCK™ The Fireball is the riders primary connection to the depower system, as long as it is connected to the Fireball Harness. It is important that a secure con- nection is made between the Fireball Harness and the Fireball.
-
Page 24: Bypass™ Leash
Connecting the Bypass™ Leash • The Carabiner end of the Bypass Leash must at all times, be attached to the Leash Con- nection Ring, that is attached to the bottom of the 1x Landing Line. (FIG 2) CAUTION: To disconnect yourself from the Bypass leash you must activate the QR at the end of the leash by pushing the QR away from your body (FIG 3-5). - Page 25 • Pull on the Black T Handle to re – power. REPOWER NOTE: The CAS is meant to provide a limited amount of trim and is not to be confused with, or used in place of the 1X depowering function (see next section). TRIM SYSTEMS. To Depower: •...
-
Page 26: Security Line
Bypass Leash attached to line to use it again. Stretch your lines out as if you the Leash Connection ring attached to the 1X were going to attach them to your kite. Separate Flagging Line. It is also important that you famil-... - Page 27 OPERATION FIG 1 FIG 2 FIG 3 FIG 4 2018 CONTROL SYSTEM USER MANUAL...
-
Page 28: Overdrive Bar Adjustment
OVERDRIVE CARE AND MAINTENANCE. • Wash the Overdrive 1X System frequently in fresh water. Do this by placing the complete bar in a bucket of fresh water and allow it to sit for 5 minutes. While in the fresh water rotate the Overdrive Harness Loop, and also operate the Overdrive Bar ends. -
Page 29: Steering
HOW TO STEERING This is a partial list of techniques to be remembered and applied. Be certain to always take instruction from a professional. KEY POINTS TO REMEMBER • When practicing steering a kite on land, always remember that your kite has extreme power. -
Page 30: Pause
IMPORTANT! PAUSE! FOR SETUP OF YOUR CABRINHA KITE, REFER TO YOUR SUPPLIED KITE USER MANUAL. IF YOU ARE UNSURE AS TO WHICH KITES ARE COMPATIBLE WITH THIS CONTROL SYSTEM, PLEASE REFER TO THE KITE/ CONTROL SYSTEM COMPATIBILITY CHART AVAILABLE ONLINE AT WWW.CABRINHAKITES.COM. -
Page 31: Launching
LAUNCHING LAUNCHING WITH A PARTNER 1. Before launching, re-familiarize yourself with your Quick Release System in the event that you must engage them. Make sure you have them properly set up. 2. Next, thoroughly check your lines, your gear, and your launching and landing sites; if all is okay, you are ready to launch your kite. -
Page 32: Landing
LANDING LANDING A KITE TO YOUR PARTNER 1. Prior to launching, make sure your partner has been instructed on how to land your kite properly. 2. Also, you should always determine adequate landing spots before you launch your kite. 3. Having done that, make sure that when you are heading toward shore, that your landing location is still un-crowded and un-obstructed. -
Page 33: Relaunching
RELAUNCHING IMPORTANT CAUTION: Proper inflation of the struts, especially the leading edge, is imperative for re- launchability of your kite. Make sure your kite struts are properly inflated before entering the water. • When your kite goes down on the water, know that the kite may re-launch on its own, often when you do not expect it to, so be prepared. -
Page 34: Tuning
TUNING TUNING THE KITE Proper tuning of your kite is essential for best performance. A properly tuned kite increases its effi ciency, speed, and allows the kite to de-power correctly. The following guidelines will help you to properly tune the kite to suit your style of riding. •... -
Page 35: Glossary
GLOSSARY FREQUENTLY USED KITEBOARDING & WIND TERMINOLOGY CENTERLINE ADJUSTMENT STRAP (CAS) Used to depower the kite by changing the relationship between the front and back line lengths. It is also used to position the bar closer to the rider. CONTROL BAR SPRINT TUBES The steering device the rider uses to steer the kite. - Page 36 GLOSSARY KITEBOARDING NEUTRAL POSITION The term used to describe the sport of power kiting on This is the position just above the rider’s head in the sky. If water or snow. the rider levels out the bar, the kite will gravitate to the neu- tral position.
- Page 37 2 stages of depower. SPRINT™ Single Point Rapid Inflation Technology. STAGE 2 DEPOWER Stage 2 Depower is a built in function of 1X which allows the rider to self land a kite on the water or land. 2018 CONTROL SYSTEM USER MANUAL...
Need help?
Do you have a question about the 1X and is the answer not in the manual?
Questions and answers