
Related Manuals for KSG G3

Summary of Contents for KSG G3
- Page 1 NATIONAL CHAMPIONS KSG Motorsports 319 1/2 Samlola Rd. Blountville, TN 37617 (423)-323-3494 www.ksgmotorsports.com © 2008 KSG Motorsports...
- Page 2 During this testing the car has won the Snowbirds and ROAR Nationals. The G3 has the unique ability to adjust the t-plate height. The chassis has slots to adjust the front wheel base, slotted front bumper, and slotted rear body post mounts. All components are precision CNC machined from only the best quality materials making the G3 the highest quality car you have ever purchased.
- Page 3 Your G3 is manufactured from woven carbon fiber sheet and cut out on a CNC milling machine to hold close tolerances. Remove the chassis and graphite components and wet sand the edges to remove any sharp burrs from the machining process. The battery tray edges should be filed to provide a smooth angled edge for the batteries and tape to sit against.
- Page 4 This helps to get the body centered over the front wheels. The two short body posts (KSG-1071) (Bag B) will be fastened to the bumper by two 4-40x3/8 BHCS. You can place the body post in any of the three provided holes. Also place one of the provided collars on each body post and secure each of them in place with the 4-40x1/8 set-screw (Fig.
- Page 5 Before you attach the top plate (KSG-1613) install the ball studs that were left from the previous steps. You will need to install them as follows, the center shock stud goes in the right most hole, the side shock studs go with one...
- Page 6 Make sure the pod moves freely from side to side. This completes attaching the pod to the chassis. Your G3 comes with Associated VCS side and Fig. 8 center shocks. Build the side shocks according to the instructions supplied by Associated.
- Page 7 Now slide spur gear onto axle. Next slide diff hub with diff ring onto axle and down against spur gear making sure that diff rings stay aligned. Slide diff cone (KSG- 1056) over outer end of axle with the small end toward the bearing. Secure with the 8-32 nylon lock- nut and tighten the nut so that there is a small amount of drag on spur gear (Fig 9-2, 9-3).
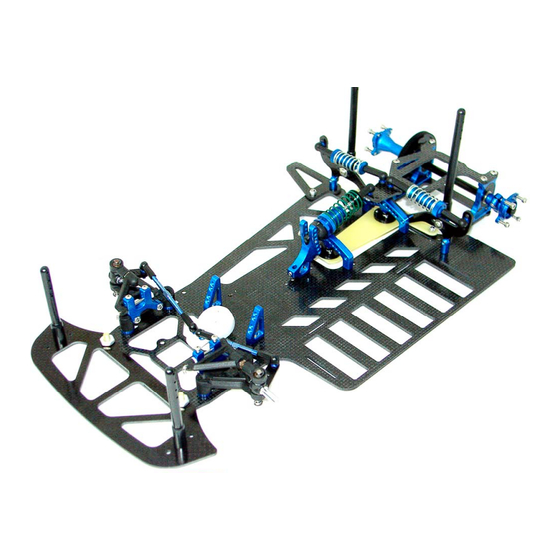
- Page 8 The only thing left to install is the electronics, motor, batteries, tires, and body. You are now ready to go racing. Below are some complete assembly photos. Good luck and we hope to see you in the winner’s circle.
- Page 9 Your kit has come with the Standard T-Plate Balls (KSG-1637). These are the optional T-Plate Balls that you can get. With these balls you can lower the t-plate in your car. The Medium Balls (KSG- 1638) are .050 longer than the standard ones that come with this kit. To use these balls you will need to remove one of the .050 t-plate spacers from each of the three screws that fasten the...
- Page 10 STEP 1 STEP 2 STEP 3 STEP 4 STEP 5...
- Page 11 XCS G3 Caster Block Spacers .050 Blue $7.49 KSG-1 654 XCS G3 Caster Block Spacers .1 00 $6.99 KSG-1 654B XCS G3 Caster Block Spacers .1 00 Blue $7.49 KSG-1 063 XCS Front End Kit $40.99 KSG-1 064 XCS 1 /8 Frt Brg $1 9.99...
- Page 12 We want to again thank you for buying our product. To thank you we want to introduce you to a special Friend of ours. He loves and cares for us and has given his all for us. You may already have met Him and know Him personally. If so I’m sure you would agree that there is no greater Friend to be found.
Need help?
Do you have a question about the G3 and is the answer not in the manual?
Questions and answers