Advertisement
Table of Contents
- 1 General Information
- 2 Product Description
- 3 Features
- 4 Operation & Configuration
- 5 Touchscreen Calibration
- 6 Video Screen Web Interface
- 7 User Settings
- 8 Camera Settings
- 9 Network Settings
- 10 System
- 11 Updating the Video Screen
- 12 IP Desktop Station Configuration
- 13 Station Mode and IP Settings
- Download this manual
Advertisement
Table of Contents

Related Manuals for Vingtor Stentofon 1408001635

Summary of Contents for Vingtor Stentofon 1408001635
- Page 1 IP Desktop Video Station with Touchscreen Display TECHNICAL MANUAL A100K11664 TECHNICAL MANUAL XXXXXXXXXXXX...
- Page 2 Contents General Information .................... 3 Document Scope ........................3 Document Log ........................3 Firmware Versions ......................... 3 Hardware Versions ........................ 3 Related Documentation ......................3 Product Description .................... 4 Overview ..........................4 Features..........................5 Operation & Configuration .................. 6 Connecting the IP Desktop Video Station ................6 Video Touchscreen Interface....................
-
Page 3: General Information
Document Scope This document describes the configuration of the Vingtor-Stentofon IP Desktop Video station with a 3.5” LCD touchscreen display. Product Item Number IP Desktop Video Station with Touchscreen Display & Handset 1408001635 Document Log Version Date Author Status/Comments 16.12.2013 Final draft 08.04.2014... -
Page 4: Product Description
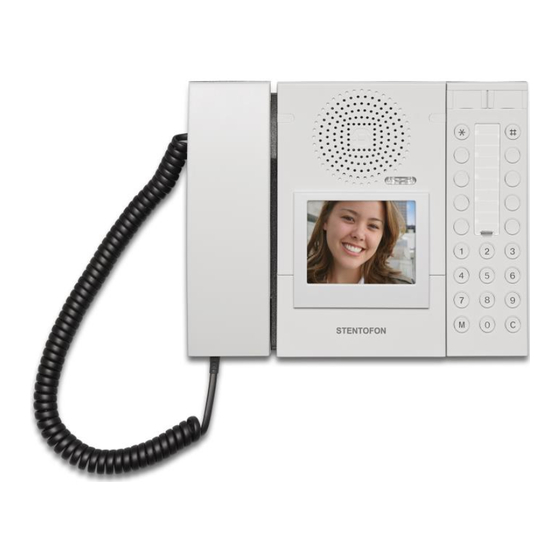
Product Description Overview The Vingtor-Stentofon IP Desktop Video station is an intercom unit designed to be used in a control room or similar type of environment. The station comes with a 3.5” LCD touchscreen display and the capability of streaming video from an IP video camera using AlphaCom, Pulse, or SIP station modes. -
Page 5: Features
Features General – Critical Communication over IP ® Designed to deliver CCoIP Call queue according to priority and time of call, 256 priority levels Ten DAKs provide single-touch access to stations, group calls, audio monitoring, public address zones, radio channels and phone lines. ... -
Page 6: Operation & Configuration
Operation & Configuration Connecting the IP Desktop Video Station There is a RJ45 port at the rear of the IP Desktop Video station for connecting via a network switch to the LAN network. To connect the IP Desktop Video station to the network: ... - Page 7 Splash Screen After startup the home screen is displayed. Home Screen The bar color on the display indicates the connection status: Red indicates that no network connection can be established. If an Ethernet cable is connected, the video screen should connect automatically during startup. ...
- Page 8 At the bottom of the touchscreen, there are four menu selection buttons. The menu options available are dependent on how these buttons are configured on the AlphaCom server. Tap anywhere on the screen and the Option Screen will be displayed for 10 seconds. Option Screen On the Option Screen there are four touch icons for executing the following functions: Camera Select...
- Page 9 Tap a label on the screen to show the camera stream for 60 seconds. Tap the screen during this 60 seconds to stop the stream and revert back to the Camera Select screen. There are three navigation buttons on the right of the screen for scrolling up/down or returning to the Option Screen If access to the cameras have been configured to require passcode authentication (see section 3.3.4), the following passcode entry screen will be displayed:...
-
Page 10: Touchscreen Calibration
3.2.2 Touchscreen Calibration The touchscreen calibration display is activated by pressing and holding the screen during startup when the splash screen is displayed or via the web interface under menu option System (see section 3.3.6.). Touch Calibration Screen When the calibration screen is shown, tap the displayed cross and another cross will be displayed. After tapping the second cross, the calibration process will be completed. -
Page 11: Video Screen Web Interface
Video Screen Web Interface 3.3.1 Login Procedure The video screen on the station has an integrated web interface which allows users to log in via a standard web browser. In order to log into the video screen for the first time with its default settings, proceed as follows: 1. -
Page 12: User Settings
3.3.2 User Settings Here you can change the username and password for access to the web interface. Click User User name : Enter a user name Password : Enter a password Repeat password : Type in the password again ... - Page 13 A100K11664 IP Desktop Touchscreen Configuration & Operation...
- Page 14 Screensaver Time until activation : Time until the touchscreen backlight is dimmed down Time until shutdown : Time from the touchscreen backlight is dimmed down until the touchscreen is switched off Maximum brightness : Level of the maximum brightness of the touchscreen backlight in normal operation (before the backlight is dimmed down) Minimum brightness : Level of the minimum brightness of the touchscreen backlight after it is dimmed down...
-
Page 15: Camera Settings
3.3.4 Camera Settings Here you can configure the camera settings for up to 80 cameras. Click Cameras A100K11664 IP Desktop Touchscreen Configuration & Operation... - Page 16 Passcode Passcode: Enter an up to 10 digit long numeric passcode to restrict access to the cameras via the Camera Select screen on the station. Camera Types Camera Types Baudisch and AXIS are already predefined. Name: The input fields on the left panel are for the camera names (e.g. TCIV for Turbine Video).
-
Page 17: Network Settings
3.3.5 Network Settings Here you can configure the network settings. Click Network IP settings Connection type DHCP : The IP Desktop Video Station automatically obtains its IP settings from a DHCP server DHCP with fallback : The IP Desktop Video Station automatically obtains its IP settings from a DHCP server. -
Page 18: System
3.3.6 System Here you can calibrate the touchscreen, do a factory reset, update the Desktop Video Station with the latest firmware, etc. Click System Camera Allocation Upload or download the camera allocation list. IP Desktop Touchscreen Configuration & Operation A100K11664... -
Page 19: Updating The Video Screen
Settings Upload or Download the settings (including the camera allocation). Calibrate Touch Screen Starts the touchscreen calibration. Factory Reset Resets the Desktop Video Station to factory settings. Firmware Update Updates the firmware. Updating the Video Screen 3.4.1 Updating the Firmware 1. -
Page 20: Ip Desktop Station Configuration
… 4. Click on the button and navigate to the folder containing the new file system, e.g. 20160216PL_FW_v21_RootFS_StentofonIPDesktopVideo 5. Select the folder of the new file system and click Ok 6. Click on the Erase File System button and wait for the station to reboot 7. - Page 21 4. Open a web browser on your PC 5. Enter the IP address 169.254.1.100 in the address bar 6. Select whether an encoded connection (HTTPS) or a non-encoded connection (HTTP) is to be used 7. Enter username: admin 8. Enter password: alphaadmin The Station Information will be displayed.
-
Page 22: Station Mode And Ip Settings
3.5.2 Station Mode and IP Settings Select Station Main > Main Settings Station Mode Select AlphaCom, SIP or Pulse modes Use Alphacom (this mode requires registration settings) Registration Settings AlphaCom IP-address Enter the IP address of the AlphaCom server in which the IP station is to be registered as a subscriber in the field. - Page 23 www.zenitel.com Zenitel Norway AS The WEEE Directive does not legislate that Zenitel, as a ‘producer’, shall collect ‘end of life’ WEEE. This ‘end of life’ WEEE should be recycled appropriately by the owner who should use proper treatment and recycling measures. It should not be disposed to landfill. Many electrical items that we throw away can be repaired or recycled.
Need help?
Do you have a question about the 1408001635 and is the answer not in the manual?
Questions and answers