Table of Contents
Advertisement
Quick Links
See also:
User Manual
Advertisement
Table of Contents

Subscribe to Our Youtube Channel
Related Manuals for powersoft DEVA


Summary of Contents for powersoft DEVA
-
Page 1: User Guide
DEVA The revolutionary multimedia unit: energetically self-sufficient, zero installation costs, solar power ready USER GUIDE © 2018 Powersoft Keep This Manual DO000147.00 Rev.4 For Future Reference... - Page 2 Data are subject to change without notice. For latest update please refer to the online version available on www.powersoft-audio.com.
-
Page 3: Welcome
(e.g. LED light, camera, etc.) enabling it to interact with the environment through the built in loudspeaker and audio/video capturing features. DEVA has been designed to be independent from any existing infrastructure, without the need for wiring and with virtually zero installation costs. DEVA... -
Page 4: Regulations And Warnings
Reorient or relocate the receiving antenna. accessories approved by Powersoft for use with this device. Please realize that batteries might cause f Increase the separation between the equipment damages like leaking, fire or explode when misuse and receiver. - Page 5 50018 Scandicci (FI), Italy EU declaration - WARNING to prevent injury, this apparatus must Powersoft hereby declares that the WiFi module be securely attached to the floor/wall in accordance contained in this/these product(s) is/are in compliance with the installation instructions.
- Page 6 15.2 Initialization in a wired LAN Optional 16 USB MP3 playback DEVA 17 AUX input 8 DEVA in a glance 17.1 AUX input activation via DEVA dashboard 18 9 Dashboard 18 Playback via Bluetooth 6 | DEVA | User Guide powersoft_DEVA_uguide_v4...
- Page 7 22.2 Players 26.4.2 Wall mounting kit assembly 23 Commanders and Triggers 27 Solar panel 23.1 Commanders 27.1 Plugging the solar panel 23.1.1 Live execution 28 DEVA passive 23.1.2 Time schedule 23.1.3 Events 29 UHF Microphone 23.1.4 USB key 23.2 Triggers Specifications...
-
Page 8: Unpacking & Checking
Pole and wall mounting kits f Tripod mounting clamp 6 Versions f Desk stand f Solar panel (Circular and Rectangular) The DEVA’s skin can be customized in many f DEVA Passive f UHF radio-microphone different colors; the core can be chosen among three versions:... -
Page 9: Deva
Motion detection Battery charge playing a audio file to streaming video. In systems with more than one DEVA, scheduled actions – such Network connectivity as playing audio files – can be synchronized to the Mechanical shocks Global Positioning System clock. -
Page 10: Dashboard
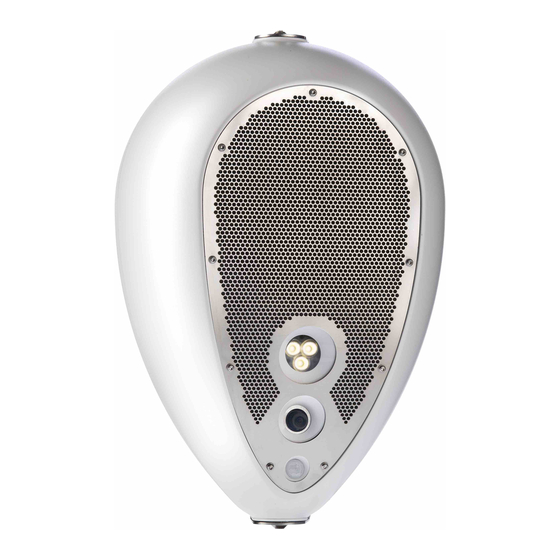
9 Dashboard The DEVA dashboard is located under the rear panel of the DEVA; it allows the user to access the main connections (i.e. solar panel, ethernet, etc), the power switch and other features (refer to the next chapters for further details). - Page 11 FIGURE 1: DEVA dashboard. DEVA | 11...
- Page 12 300 mm 220 mm 163 mm A. Built-in loudspeaker B. LED Light C. Front status RGB LED D. Built-in microphone E. Built-in camera F. Infrared motion detector G. Bracket FIGURE 2: Mechanical drawing 12 | DEVA | User Guide...
-
Page 13: Getting Started
10 Battery assembly Getting Started DEVA comes with a battery pack already installed into its battery compartment (ref. FIGURE 3). The battery pack shall be properly connected before Before proceeding to the placement of the operating. DEVA on site (ref. -
Page 14: Sim Card Assembly (Optional)
12.1 DEVA start-up without external power supply In case no power supply is available and DEVA is off, you can switch on the DEVA by means of the SIM card tray ON/OFF button (ref. FIGURE 1. -
Page 15: Shut Down
PDD must use a wired connection to the access point. Any further client on the wireless network can manage the network of DEVA: in order for the client to manage a DEVA it must connect to the PDD. Getting Started | 15... -
Page 16: Deva In A Wired Lan
Both the DEVA and the PDD must be connected to the switch. The DHCP on board of the router assigns a unique IP address to each DEVA and PDD so they belong to the same subnet. Through the DSM implemented in the PDD it... -
Page 17: Initialization
The initialization is performed by means of the PDD – Powersoft DEVA Director –, by connecting 7. Log in the DEVA System Manager: the the DEVA to the local network through a wired or wireless connection. administrator account has the following default... -
Page 18: Usb Mp3 Playback
The playback from the USB override any audio DEVA implements an auxiliary input, namely a playing on the DEVA: in order to start the playback secondary input that allow to stream audio through of the files from a USB device you have to press the DEVA built in loudspeaker. -
Page 19: Front Rgb Led
6) provide the following information: LED is triggered by the motion detector: the LED lights just when the sensor reveals the movement battery status of people in front of the DEVA. CHARGING SLOW BLINKING The color code refers to the battery state; the... -
Page 20: Actions And Players
Playlist MUTE FIGURE 8: DEVA can reproduce up to two fluxes of live stream > single file > FM radio > playlist audio simultaneously: in this example the playback of the playlist is muted whilst playing the audio file and >... -
Page 21: Commanders And Triggers
23.1.1 Live execution 23.2 Triggers The DEVA System Manager provides direct access to all actions on DEVA; through the DSM you can: Triggers are conditions that activate functions of Play audio the DEVA. The tool Events uses triggers. •... - Page 22 Page intentionally left blank 22 | DEVA | User Guide...
-
Page 23: Reset And Reboot
Both reset procedures preserve the data stored the DEVA dashboard to Infrastructure (default) into the DEVA. At the end of the reset procedure the or Access Point mode (ref. FIGURE 9 DEVA loses the connection with the PDD and shall 3. - Page 24 At the end of the hard-reset the DEVA’s network settings and firmware are factory default: in order to access the DEVA you have to follow the initialization procedure as described in Chapter “15 Initialization”.
-
Page 25: Accessories
DEVA is meant to be self sufficient: after the initialization and configuration procedures, DEVA can be installed on site and remotely managed. DEVA is provided with a bracket suiting a set of optional pole and wall mounting kits. During the first installation, loosen the top and bottom screws connecting the Deva to the bracket slightly. -
Page 26: Tripod Mounting Clamp
Ø 35 mm (1.34 inch) tripod or pole stands. surface, but the clamping system that hold the The tripod mounting clamp fits up to three DEVA. DEVA on place is always the same. In this section the clamping procedure is described. DEVA bracket... -
Page 27: Pole Mounting Kit Assembly
3. Insert the bolts in the fastening clamp, leaving them quite loose; them loose; 3. Position the DEVA bracket on the fastening 4. Position the DEVA bracket on the fastening clamp exploiting the eyelets at the bottom of clamp exploiting the eyelets at the bottom of the bracket;... -
Page 28: Solar Panel
27 Solar panel Powersoft provides three optional 35 W or 50 W, 18 V external solar panels: the best choice for making DEVA really self sufficient. 27.1 Plugging the solar panel 1. On the rear of the solar panel disc, open the connectors box and identify the positive and FIGURE 11: 40-85 mm pole diameter mounting kit. - Page 29 (ref. FIGURE 15). 10. Fasten the wire to the DEVA and secure the dashboard compartment. FIGURE 14: Leave the solar panel’s wire slightly loose. Accessories | 29...
-
Page 30: Deva Passive
(the AUX input has the higher priority). One DEVA can connect only one radio-microphone at a time: multiple DEVA can be connected to the same radio-microphone. Annoying interference will occur if more than one radio-microphone is active in range of the UHF connectivity of the DEVA. -
Page 31: Specifications
100 Hz - 16 kHz ±3dB Video resolution FULL HD (1920x1080) 2Mpx Max sound pressure level 115 dB SPL @ 1 m real-time H264 video compression Highly efficient Powersoft Class D Amplifier ONVIF compatible Streaming video circuitry RTSP - Real Time Streaming Protocol... - Page 32 Powersoft S.p.A. Via Enrico Conti, 5 50018 Scandicci (FI) Italy Tel: +39 055 735 0230 Fax: +39 055 735 6235 Sales & general inquiries: sales@powersoft.it Application & technical support: support@powersoft.it Service & maintenance: service@powersoft.it Compliance requests: compliance@powersoft.it powersoft-audio.com...
Need help?
Do you have a question about the DEVA and is the answer not in the manual?
Questions and answers