Advertisement
Quick Links
Advertisement

Related Manuals for Bellingham and Stanley Abbe 60


Summary of Contents for Bellingham and Stanley Abbe 60
- Page 1 Abbe 60 Refractometer User Guide...
-
Page 2: Declaration Of Conformity
Manufacturer's Address Longfield Road, Tunbridge Wells, Kent TN2 3EY United Kingdom declares that the product Product Name Abbe 60 Refractometer Model Number is designed to conform to the following Product Specifications: Safety BS EN 60950-1:2002 Emissions BS EN 61000-6-3:2007 Emission for residential,... - Page 3 Abbe 60 User Guide (Eng) B+S Code : 10-292 Issue 4B January 2008 © Copyright Bellingham + Stanley Ltd. 2008 Every effort has been made to ensure the accuracy of the contents of this manual. However, Bellingham + Stanley Ltd. can assume no responsibility for errors contained in the manual or their consequences.
- Page 4 Installing the instrument Carefully remove all of the packing material. It is recommended that the box and other packing materials are retained so that, should the need arise, the refractometer can be safely returned to the manufacturer. Remove the cable tie that secures the upper prism box during transit. Open the upper prism box and remove packing material from between the two prisms.
- Page 5 Positioning the system Place the instrument, and separate light source if used, on a flat and stable bench which is: • dry and indoors • away from draughty or hot equipment like fans or heaters • out of direct sunlight or strong ambient light •...
-
Page 6: Instrument Overview
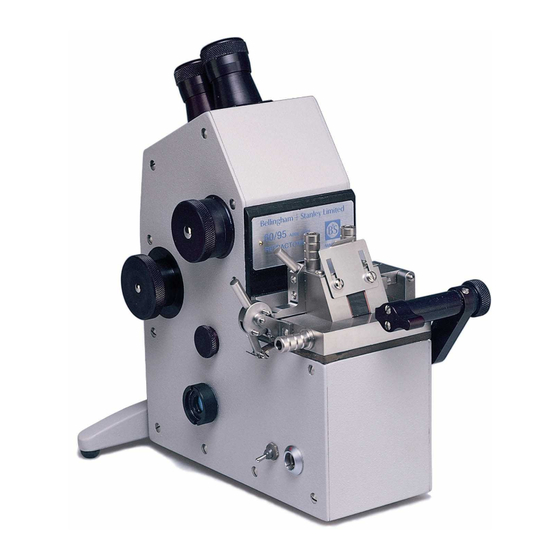
Instrument overview Abbe 60 refractometers can be used to measure the refractive index of liquid or solid samples for a wide range of applications. There are 2 versions of the instrument: Direct Reading models 60/95 Range 1.300 to 1.535 60/DR Range 1.300 to 1.740... - Page 7 Main parts & controls Dispersion drum (Direct Reading models) Micrometer drum Water nozzle Upper prism shutter Upper prism box Integral L.E.D. light source (Direct Reading models only) Lower prism box Water nozzle Toggle clamp Power switch Power (Fitted to early connector models only) Scale telescope...
- Page 8 The upper & lower prism boxes A liquid sample to be tested is placed on the measurement prism and the upper prism is clamped down onto it forming a thin layer of the sample. Light from the light source passes through upper prism, then is refracted through the sample layer and into the measurement prism.
- Page 9 Direct Reading instruments only The Direct Reading instruments have an integral L.E.D. (light emitting diode) light source for sample illumination. L.E.D. light source L.E.D. arm adjustments A dispersion drum is fitted to Direct Reading instruments to enable colours other than yellow originating from the L.E.D (or more significantly, an alternative white light source) to be removed from the field view.
- Page 10 Initial setting up Power supply All Abbe 60 refractometers are supplied with an external power supply, which should be plugged into the sealed power connector on the side of the instrument. The power supply itself is connected to the mains supply by a moulded mains lead, which is also supplied with the instrument.
- Page 11 To obtain the optimal borderline quality, both the light source position and the prism box shutter should be adjusted. Direct Reading models (Abbe 60/95, 60/DR) The L.E.D. light source has two adjustable joints, allowing the light to be easily positioned to provide the best borderline.
- Page 12 Determining the reading value Direct Reading models (60/95, 60/DR) Look through the scale telescope and read the measurement value directly from the scale in either refractive index or %sucrose (°Brix). High Accuracy models (60/ED, 60/LR) Turn the micrometer drum to the 0 position. Then whilst looking at the scale through the scale telescope, turn the micrometer drum until the previous scale division is straddled centrally by the two fiducial lines.
- Page 13 Using the Abbe Utilities software Every Abbe refractometer is supplied with an Instruction Manual CD (55-300), contained within this CD is a copy of the Abbe Utilities program, which runs on Microsoft Windows. It provides the ability to convert from Abbe scale reading to refractive index and other scales. Firstly, check that the Abbe Setup data matches that of your instrument and light source.
- Page 14 With the measurement taken, the prism can now be cleaned. Samples should be removed from the prism surfaces as soon as practical after measurement. Leaving sample between the prisms for long periods, and allowing it to dry, can cause the two prisms to stick together. The sample should be removed from both prisms using a suitable solvent;...
-
Page 15: Calibrating The Instrument
Calibrating the instrument The calibration of all Abbe 60 refractometers can be adjusted to accurately set the scale relative to a test piece with known refractive index. This adjustment should only need to be made at infrequent intervals, but it is recommended that the test piece be applied as a daily routine to check that all is in order and the instrument is reading correctly. - Page 16 Ensure that the borderline is accurately aligned with the cross wires in the field telescope. Unscrew and remove the Calibration Adjustment Cover. Direct Reading models (Abbe 60/95, 60/DR) Gently adjust the calibration screw using a large flat screw driver so that the correct reading is shown in the scale telescope.
- Page 17 0.00039 Scale reading of instrument 1.4864 Corrected reading 1.48679 High Accuracy models (Abbe 60/ED, 60/LR) Using the Abbe Utilities software Enter the measurement temperature in Abbe Setup and the correction will be carried out automatically. Using a Calibration Table Details for correction with temperature are shown at the end of the tables.
- Page 18 Temperature correction of the sample The refractive index of all samples will vary with temperature. If it is required to know the refractive index of the sample at 20°C, then either the instrument must be controlled at 20°C, as described below, or a correction value for the sample must be added to the scale reading. The correction value will vary considerably with the type of sample.
- Page 19 Scale reading °Brix -0.29 -0.30 -0.32 -0.33 -0.34 -0.35 -0.36 -0.37 -0.37 -0.38 -0.38 -0.38 -0.38 -0.38 -0.38 -0.38 -0.37 -0.37 -0.24 -0.25 -0.26 -0.27 -0.28 -0.28 -0.29 -0.30 -0.30 -0.30 -0.31 -0.31 -0.31 -0.31 -0.31 -0.30 -0.30 -0.30 -0.18 -0.19 -0.20 -0.20...
- Page 20 Temperature control from a circulator Both the fixed and hinged prism boxes are fitted with nozzles for water circulation in order to maintain the prisms and sample at known temperatures. By controlling the instrument to a constant temperature, the time necessary for the instrument to stabilise after applying a sample to the prism will be minimised and measurement conditions will be optimised for high accuracy work.
- Page 21 Measurement techniques Sample application Liquid samples It is recommended that liquid samples be transferred to the prism surface using a pipette rather than a stirring rod or pouring directly from a beaker. After taking up the sample, any drips adhering to the outside of the pipette should be wiped off then discharge a few drops from the pipette directly onto the prism surface and close the prism box.
- Page 22 Accessories Volatile Liquid Cell This comprises a rectangular glass block, with one side hollowed out to form a cavity. Two holes pass between the cavity and the opposite face of the block. To use the cell, first ensure that the prism surface and the cavity face of the block are clean.
- Page 23 Funnel Flowcell Attaching the flowcell to the prism box. • Remove the two hexagon headed bolts securing the prism box hinge to the lower prism box and completely remove the upper prism box. • Remove the two countersunk screws from either side of the toggle fastener and detach fastener.
- Page 24 bubble towards the rear end and flushed out with the addition of more sample. The number of flushes of the chamber between samples will depend upon the nature of the sample, and the difference in index between successive samples. It will be quickly established how much sample is required.
- Page 25 Spares and accessories Power supplies 55-104 Power supply 110 to 230V ~ ±10% 50 to 60Hz 61-191 UK mains lead (for use with 55-104) 61-193 Euro mains lead (for use with 55-104) 61-192 US mains lead (for use with 55-104) Cells 10-41 Stainless steel funnel flow cell for repetitive sampling...
- Page 26 External light sources 59-01 Free standing sodium lamp outfit 190/250v AC, 50/60 Hz 59-06 Free standing sodium lamp outfit 100/130v AC, 50/60 Hz 59-50 Spare sodium bulb (for use with 59-01 and 59-06) 59-20 Free standing spectral lamp outfit 190/250v AC, 50/60 Hz 59-25 Free standing spectral lamp outfit 100/130v AC, 50/60 Hz 59-37...
Need help?
Do you have a question about the Abbe 60 and is the answer not in the manual?
Questions and answers