Table of Contents
Advertisement
Advertisement
Table of Contents

Related Manuals for KONKA TELECOMMUNICATIONS U6


Summary of Contents for KONKA TELECOMMUNICATIONS U6
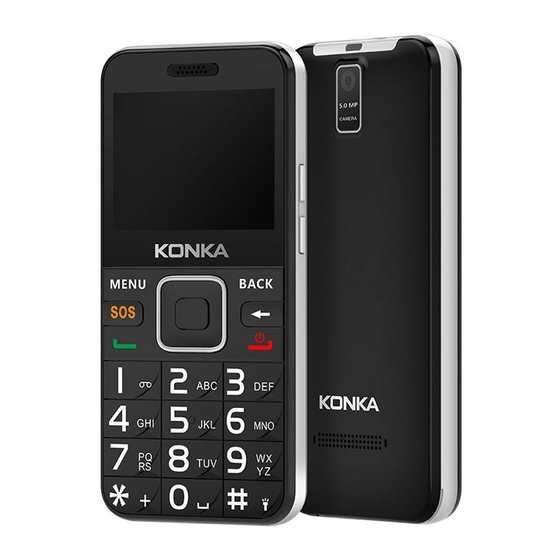
- Page 1 User Manual...
- Page 2 1 General Information........................1 Profile............................1 Safety Information ........................1 Safety Warning and Attentions....................1 Attentions ........................... 3 2 Get Started........................... 4 Install the SIM Card and the Battery..................4 Installing Micro SD Card......................7 Charging the Battery........................7 Power On/Off the Mobile Phone..................... 10 Connect to the Network......................11 Dialing Call..........................
- Page 3 Change Entry Methods......................13 Numeric Input.......................... 13 English Input ..........................14 Insert a Symbol.........................14 3 APPS ............................14 Multimedia..........................14 File Manager..........................16 Facebook..........................17 WhatsApp..........................17 Contacts............................18 Call History..........................19 Messaging..........................20 Camera............................. 23 SOS............................23 Pedometer..........................27...
- Page 4 Tools............................27 Settings............................. 29...
-
Page 5: General Information
1 General Information Profile Please read this pamphlet carefully to keep your phone in perfect condition. Our company may change this mobile phone without prior written notice and reserves the final right to interpret the performance of this mobile phone. Due to different software and network operators, display on your phone may be different, help refer to your phone for details. - Page 6 Switch off in aircraft Make sure you power off your device or enter airplane mode when flying in an aircraft. Switch off before entering risk areas Abide by the relevant laws, codes, and regulations strictly when using your mobile phones in risk areas.
-
Page 7: Attentions
Accessories and batteries Only use KONKA approved accessories and batteries to avoid voiding warranty. Emergency calls Make sure the phone is switched on and in service, enter the emergency number, 000, then press the Call key. Provide your location and state your situation briefly. Do not end the call until you are told to do so. -
Page 8: Get Started
Do not store the mobile phone in extreme cold places. This will cause moisture to be formed inside the mobile phone and may damage electronic circuits when the mobile phone is moved to a constant temperature place. Do not throw, knock or shock the mobile phone, as that may cause damage to the internal circuits and high-precision components of the mobile phone. - Page 9 Installation Press and hold the Power Key for a few seconds to power off the mobile phone. Lift the back cover from the bottom and remove it. Pull the left battery up and remove it. Insert the SIM card into the SIM card slot and make sure the gold plate of the card is facing downward.
- Page 10 -Enter the correct PUK according to the screen tips to unlock the SIM card. -Then enter the new PIN and press the ok key. -Enter the new PIN again and then press the ok key. -If the PUK is correct, the SIM card will be unlocked and the PIN will be reset. Note: The SIM card will be locked if you input the wrong PIN code three times.
-
Page 11: Installing Micro Sd Card
Installing Micro SD Card The micro SD card is a pluggable mobile storage card for the mobile phone. -To install the micro SD card, insert the card into the correct slot under the back cover. The Maximum support is 32G. -To remove the micro SD card, push down on the lock catch and slide the card out. - Page 12 A charging animation appears when the battery is being charged. When the charging is complete, the animation disappears. Using a travel adapter: Install the battery into the mobile phone before charge the battery. Connect the adapter of the travel charger with the charging port in the mobile phone. Ensure that the adapter is fully inserted.
- Page 13 Use the Battery The performance of a battery is subject to multiple factors: radio network configuration, signal strength, ambient temperature, chosen functions or settings, phone fittings, and the voice, data or other application mode you choose to use. To guarantee the optimal performance of your battery, please stick to the following rules: ...
-
Page 14: Power On/Off The Mobile Phone
Once the capacity cannot satisfy the normal usage, please purchase a standard KONKA battery. Using any poor-quality fittings will cause harm to your mobile phone and may be dangerous. Note: To guarantee your personal safety and protect the environment, be careful if disposing of the battery. -
Page 15: Connect To The Network
Power off the Mobile Phone Press and hold the Power key for a few seconds to power off the mobile phone. Locking / Unlocking the handset -To unlock the handset when in standby mode, press the menu soft key, followed immediately by the * asterisk key. - Page 16 Dialing an international call Long Press (hold the button in) the * key can and then input "+". Next, input the country code, the area code and the telephone number. Finally, press the Calling key. Dialing call from a contact To make a call from a contact, press the back button and select the right contacts by the "←"...
-
Page 17: Use The Headset
Use the Headset It will show the headset icon when you insert headset. Make sure you insert the headset to the bottom of the headphone jack so you can listen to audio files clearly. (do not force the headset into the headphone jack to avoid damage) Input Method This mobile phone provides multiple input methods, including English input and numeric input. -
Page 18: English Input
English Input Each key is used to represent multiple characters. Quickly and continuously press a key until the character you want appears. Input the next character after the cursor moves. Press the # key to switch input methods. ... - Page 19 Gallery You can view the pictures or images through this function. Music Use this function to play audio files. By pressing the direction key you can control the playing process of audio player: play/pause (OK key), switch to last song/next song (press left or right direction key).
-
Page 20: File Manager
Sound recorder After accessing the sound recorder, you can press the Menu key to perform the following operations: Voice quality: Select voice quality as High/Standard. Recording: select the mode of recordings; there is Normal/Meeting/lecture. Click the icon of the list to enter the recording file list. File Manager The phone provides a certain space for users to manage files and it also supports the Memory card. -
Page 21: Facebook
Facebook Mobile phone provides a Facebook function. You can register and log in Facebook to chat or talk with your contacts. After opening Facebook, you can open or close the mouse mode by pressing the Menu key. Under the mouse mode, when the mouse cursor is in the active content area of Facebook / WhatsApp, the volume side key can also be used to scroll the page up and down. -
Page 22: Contacts
Some interfaces do not support keyboard operation and you can use mouse to complete the operation. Whenmouse mode is on, Move the cursor to the text area, on some pages you can use the volume keys to scroll up or down. ... -
Page 23: Call History
Settings: Sort contact list by first name or last name. Call History In the standby interface, press the Call key to enter call history. All Calls You can view all the calls. Received Calls You can view the latest received calls. Choose Received calls and then select a received call to delete, dial, add to contacts or send a message to it. -
Page 24: Messaging
Messaging The phone supports Short Messaging Service (SMS) and Multimedia Message Service (MMS). You can send text messages and manage the messages that you send and receive. In the message, Press the menu key to see options for that message. ... - Page 25 Select message: Delete or Forward the selecting messages. Call: Call the number in the short message. Insert quick text: You can insert message templates. Add subject: Create the MMS title. Add to Contact: Add the number to phonebook. You cannot receive new messages if the memory for messages is full.
- Page 26 SMS storage location: Set to save short messages to the SIM card or to the phone. Please refer to Inbox for other operations. Multimedia Message(MMS) Group messaging: Use MMS to send a single message when there are multiple recipients. Request delivery report: Request a delivery report for each message you send.
-
Page 27: Camera
General You can set the message font size/show, email address/delete old messages, and so on. Camera After entering the camera, press the left and RIGHT ARROW key to select the camera or video, press confirm key to execute. When the SOS emergency mode is triggered, the Google location service will automatically start to work if it has been turned on. - Page 28 If Google location service fails to generate the coordinates for Google Map Link, due to the reason such as weak GPS signals or network connection failures. The SMS message (for example: Emergency! Need help!!!) Will still be sent, however, the Google map link will not be generated nor sent.
- Page 29 SOS mode setting: Select On / off to enable or disable the SOS function. Holding the SOS button for 5 seconds will trigger an outgoing call to the contacts in the set SOS numbers list. At the same time emergency information or location information will be sent in a short message to the first TWO emergency numbers.
- Page 30 Fall detection Sensitivity settings: You can set the fall detection sensitivity. The greater the percentage, the higher the sensitivity Note: Higher sensitivity may result in more false triggers, Lower sensitivity may not detect all falls/drops. Please adjust accordingly based on individual needs. ...
-
Page 31: Pedometer
Pedometer Pedometer mode: You can turn the pedometer on or off. Today’s steps: This shows you the number of steps in the day. Target: Show your current progress. Previous days: Show the records of your previous days. ... - Page 32 Calendar Once you enter this menu, there is a monthly-view calendar for you to keep track of important appointments, etc. Days with events entered will be marked. Calculator By pressing the direction key, you can add, subtract, multiply and divide. Press ok key to calculate.
- Page 33 Settings Power saving Turning on the power saving mode will reduce power consumption and increase the battery life. When this is on, in the absence of user operation, mobile data and Wi-Fi connection are turned off. Mobile data When you open the mobile data, you can use the Internet without Wi-Fi.
- Page 34 User profiles The mobile phone provides multiple User Profiles, so that you can customize some settings (ring tones, ring volume, key pad tones etc) to adapt to specific events and environments. Customize the user profiles according to your preference and then activate the user profiles. The user profiles fall into five scenarios: General, Silent, Meeting, Outdoor and Airplane mode.
- Page 35 Mobile networks You can open or off the Data connection. Set the data roaming,preferred networks, network mode,access point names and network operators. TTS Audio Settings You can set incoming call settings and dialing settings. Display Wallpaper: Users can set the wallpaper from Gallery / wallpapers. Brightness: Users can automatically adjust the screen brightness.
- Page 36 Battery Battery use: The user can view the display and usage. Battery indicator style: User selectable graphical / Percentage. Location You can choose to turn on or off the location service. Security You can set up the SIM card lock and make password. ...
- Page 37 About phone You can see some information about the phone, such as: wireless update/status/model number/build number and so on. – You can find your IMEI number here, if you need it for warranty return. Factory data reset Use this function to restore factory settings.
Need help?
Do you have a question about the U6 and is the answer not in the manual?
Questions and answers
You have to press menu then star to unlock the phone. Can this be disabled as a senior citizen My mother can't unlock