Table of Contents
Advertisement
Congratulations on your purchase of the Thule RideAlong
EN
rear bicycle child seat. This is a premium product with
every detail carefully designed for high safety and
easy use. We wish you and your child many enjoyable
moments together, exploring the world by bicycle.
Thule RideAlong – Rear Child Bike Seat
Advertisement
Table of Contents

Subscribe to Our Youtube Channel
Related Manuals for Thule RideAlong


Summary of Contents for Thule RideAlong
- Page 1 Congratulations on your purchase of the Thule RideAlong rear bicycle child seat. This is a premium product with every detail carefully designed for high safety and easy use. We wish you and your child many enjoyable moments together, exploring the world by bicycle.
-
Page 2: Product Overview
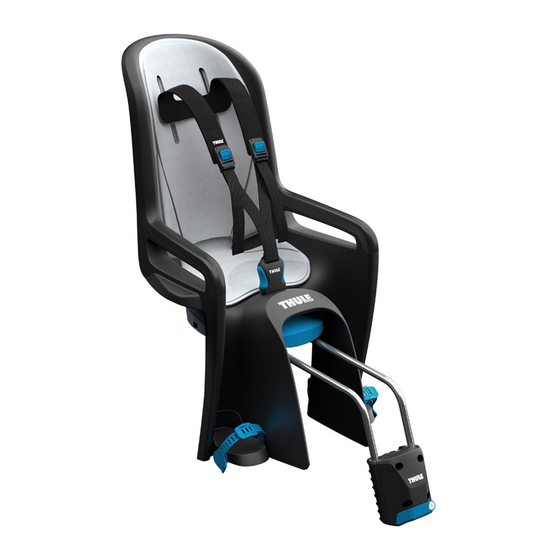
The Thule RideAlong is an adjustable rear bicycle child seat, approved for children from 9 months to 6 years with a maximum weight of 22 kg (48.5 lbs). Please read this manual carefully before installing or using the bicycle seat to learn about its functions and operation. - Page 3 Bicycle frame tube COMPATIBLE FRAMES diameter 27.2-40 mm diameter 1.07-1.57” 40x55 mm 1.57x2.16” NON-COMPATIBLE FRAMES square triangular carbon fibre Vierkant Dreieckig Carbon...
- Page 4 Comfortable harness Harness length adjuster Safety buckle Fold-down footstraps Footrest Tilt adjuster Washable padding Harness height adjuster Reflector Footrest height adjuster Thule RideAlong – Product Overview...
- Page 5 Carrier bar Bracket for many bicycle types Length adjuster Protective wing...
- Page 6 Please read the instructions carefully before mounting or using the Thule RideAlong rear bicycle child seat. We wish you and your child many pleasant experiences when you explore the world by bicycle. CAUTION are fully tightened, and check them frequently.
- Page 7 If any part of the child seat is make sure you fasten it correctly damaged or broken, please con- round the child. Ensure the harness tact your closest Thule dealer. and footstraps are not loose or could become trapped in moving WARNINGS parts such as wheels.
- Page 8 Before installing the Thule RideAlong rear bicycle child seat, please read these instructions carefully. Check that your bicycle type is compatible with the Thule RideAlong, and make sure you follow the installation instructions to give your child a safe and comfortable ride.
- Page 9 Turn the length adjuster to a vertical position and remove it. Insert the carrier bar fully, with the tips pointing down. Insert the length adjuster fully, and turn it to a horizontal position to lock the carrier bar 10. Thule RideAlong – Installation...
- Page 10 Fasten bracket to bicycle Place the bracket against the bicycle frame with the blue release button facing down 9. Fasten the bracket by screwing the four front-mounted screws 15, but do not tighten them fully yet, to allow the height to be adjusted later.
- Page 11 Bracket functionality The bracket has a blue button to release the carrier bars 16. The bracket includes a Thule One-Key system lock to prevent theft.
- Page 12 40 mm (1.57”) above. Tighten the screws firmly to 8 Nm (5,9 lb·ft) with the supplied Allen key (size 5). 40 mm Maximum width (1.57”) 80 mm of the luggage (3.14”) carrier is 155 mm (6.10”). Thule RideAlong – Installation...
- Page 13 The Thule RideAlong is an adjustable, rear bicycle child seat that can grow with your child. The seat adjusts for children of different heights, and can also be equipped with optional accessories such as coloured paddings, an extra bracket and a low saddle adaptor.
- Page 14 100 mm (3.94”) behind a point vertically above the rear wheel axle. Rotate the length adjuster back to its upward position. max 100 mm (3.94”) Thule RideAlong – Installation...
- Page 15 Footrest adjustment Adjust the height of the footrest by turning the adjuster on the back upwards 13. Position the footrest at the preferred height, and lock the adjuster by turning it downwards. Thule RideAlong – Installation...
- Page 16 Footstrap adjustment The footstraps can be rotated down to be flush with the footrest 5. To secure the foot, rotate the footstrap upwards over the foot and adjust it to fit the size of the foot.
- Page 17 Harness fastening Secure the harness by inserting the safety buckle until you hear a click. To release the harness, press the two buttons simultaneously and pull the safety buckle upwards. Thule RideAlong – Installation...
- Page 18 Harness adjustment The length of the harness is easily adjustable. Shorten the straps with a one- handed pull on the end of the strap 19. Lengthen the straps by pressing the blue button and pulling the straps upwards.
- Page 19 For best security and comfort, the harness should be positioned in level with the child’s shoulders. Turn the harness height adjuster upwards. Adjust the harness to the appropriate height, and then turn the adjuster downwards to secure the harness. Thule RideAlong – Installation...
- Page 20 Release the safety buckle, and the harness is disconnected from the seat. To fasten the harness, insert the strap lock from the front and secure it on the back plate. Thule RideAlong – Installation...
- Page 21 Padding The child seat is equipped with reversible and washable padding in two colours. To remove the padding, first release the harness from the seat, as described in step 11. Release the two locks on the backrest and bottom of the seat, and insert them all the way through.
- Page 22 Tilt to rest The child seat can be tilted backwards up to 20 degrees, to give a comfortable position for resting. Press the tilt adjuster 6, and adjust the seat to one of five different angles.
- Page 23 If the child seat is leant against a wall, the protective wing maintains a safe distance between the wall and the child’s hand to avoid trapping it. Never leave the bicycle parked unattended with a child in the seat. Thule RideAlong – Installation...
- Page 24 Drain holes Practical drain holes remove rainwater or any fluid spilled in the child seat. This lets the padding and seat dry out faster, for your child’s comfort.
- Page 25 Removal of bracket from bicycle Remove the bracket from the bicycle frame by unscrewing the four front- mounted screws 15. Thule RideAlong – Installation...
- Page 26 Rear Light Adapter Thule RideAlong – Installation...
- Page 28 Thule RideAlong – Installation...
- Page 30 Extra bracket Having an extra bracket makes it easy to move the child seat between two bicycles. This is the perfect solution for families where two people need to transport the child. Thule RideAlong – Installation...
- Page 31 Low saddle adaptor If your bicycle saddle is positioned too low to allow the child bicycle seat to be mounted safely, the low saddle adaptor is an optional accessory.
- Page 32 Extra padding The padding that comes with the bicycle seat is reversible, with different colours on each side. There is an optional extra padding if you need to replace the original padding, or if you would like to personalize the bicycle seat with a padding in another colour.
Need help?
Do you have a question about the RideAlong and is the answer not in the manual?
Questions and answers