
Related Manuals for Body Go Fitness Deluxe Motorised Treadmill 3.0HP

Summary of Contents for Body Go Fitness Deluxe Motorised Treadmill 3.0HP
- Page 1 INSTRUCTION MANUAL PLEASE READ THIS MANUAL CAREFULLY BEFORE USING AND SAVE IT FOR FUTURE REFERENCE. ALL PRODUCT DRAWING IS USED FOR REFERENCE ONLY, THE FINALLY CORRECT DETAILS PLEASE SEE REAL PRODUCTS.
- Page 2 Content Safety Precautions Assembly Steps Folding Steps Operation Instruction Tips for Stretching Maintenance Explosive drawing Part list...
-
Page 3: Safety Precautions
Safety Precautions Thank you for purchasing this treadmill, it has been designed and manufactured to give you many years of trouble free service. You may already be familiar with using a similar product but please take the time to read these instructions which have been written to ensure that you get the very best from your purchase. - Page 4 16. If you feel pain or dizziness while exercising, stop immediately and cool down. 17. The pulse sensor is not a medical device. Several things including user movement, may affect the accuracy of the sensor. The sensor is intended only as an exercise aid in determining general heart rate trends. 18.
-
Page 5: Assembly Steps
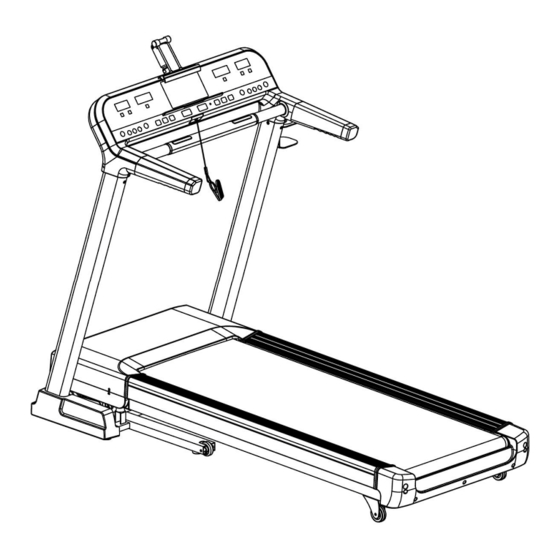
Assembly Steps Please check the package list carefully before assembly. Package list: Description Specification Description Specification Mainframe Right foam handlebar Monitor Safety key module iPad holder (optional) Left bottom cover Bottle holder Right bottom cover Cross solid wrench Bolt M8*15 5# Allen wrench Bolt M5*12... - Page 6 Step 1: Open the package and put the mainframe A on the floor. Attention: Don’t open the packing belt (P) before set up of the treadmill. Step 2: Lift up column A06,A07 first; Fix the column A06 to the mainframe A with bolt E13 and lock washer E32 by 5# Allen wrench B09 .
- Page 7 Step 3: Connect the monitor cable D03 with D04. Fix the monitor B to the left and right column A06\A07 with bolt E13 and lock washer E32 by 5# Allen wrench B09. Attention: Please make sure cables are well connected before fasten. Step 4: Please screw the ipad holder C into the monitor B by solid wrench B15.
- Page 8 Step 5: Fix the left and right foam handlebar C05\C06 to the monitor B with bolt E22 and big washer E39 by cross solid wrench B08 Step6 Fix the left and right bottom cover C14\C15 to the mainframe. Attention: the structure of left and right bottom cover is buckle design.
- Page 9 Step 7 Fix the bottle holder B01 to the right column A07 with bolt E22 by solid cross solid wrench B08. Step 8 Cut off belt P; Insert the safety key D07 into the monitor B. How to use safety key 1.
- Page 10 Step 9 Take apart the bolt M8*15 ( E13) in the bottom side of the steel cable (E) with 5# Allen wrench B09. Step 10 Take apart the bolt M8*15 ( E13) in the top side of the steel cable (E) with 5# Allen wrench B09. Then take away the steel cable from the bottom frame.
- Page 11 Folding steps Folding up Hold the running deck which showed in “F” position and then fold it up with the arrow direction until you hear a “bang” voice from the air cylinder. Attention: it is forbidden to fold up when the machine is in running or incline mode. Folding down Support place F with hand , kick the place E of air pressure bar, then the base frame will fall down...
- Page 12 Transport tips To tilt, start by placing one hand at position “F” to support the top end of the treadmill. Next, place one foot at position “D” to hold the bottom end of the treadmill steady. With your foot at “D”, slowly tilt the top of the treadmill downward towards the ground.
- Page 13 Operation introduction Icon Function description Pad/mobile phone holder Pad/mobile phone holder TFT color screen Inclination/calorie window window Generally it shows runner’s calories worked out. it will count from 0 to 999, when up to 999, it will Generally it shows runner’s calories worked out. it will count from 0 to 999, when up to 999, it will Generally it shows runner’s calories worked out.
-
Page 14: Quick Start
Press the MODE key continuously to choose “15:00”、“1.00”、“50.0”、“contest mode”、and “0:00” five mode (15:00 is time countdown mode, 1.00 is distance countdown mode, 50.0 is calorie countdown mode, 0:00 is manual mode). Play/pause key :to stop or restart the music or video. You can press this button to make choice around 3 entertainments in sequence: standby mode, audio mode and video mode . - Page 15 2. Homepage introduction There are four function modules in the homepage. They are mode, program, music and video. There are 3 kind of countdown modes , contest mode and manual mode under mode function. There are 24 preset programs, 3 manual programs, 2 HRC programs(optional) and 1 FAT test program under program function. Icon description Inclination Hold the pulse sensor for several seconds it shows your current pulse from 50-200/min.
- Page 16 3. function description “ Press the MODE key and enter into countdown mode. Press the MODE key continuously to choose 15:00”、“1.00”、“50.0”、 “contest mode”、and “0:00” five mode (15:00 is time countdown mode, 1.00 is distance countdown mode, 50.0 is calorie countdown mode, 0:00 is manual mode).
- Page 17 Contest mode Press MODE key continuously and enter into contest mode. ress MODE key continuously and enter into contest mode. There are 6 distance modes. They are 3.0km、5.0km 5.0km、10.0km、5.0km、 21.1km、42.19km Icon description Display the distance percentage of the computer Display the distance percentage of the computer C is short for computer The default speed of the computer is 9km/h.
- Page 18 Contest distance Default time 18:00 30:00 10km 01:00:00 15km 01:30:00 21.10km 02:06:35 42.19km 04:13:10 After finish exercising the system will judge your running performance automatically. Preset program Press PROG to enter into program mode. Press “PROG” key to select Program1-24、U1-U2-U3、HP1-HP2、FAT in sequence. There are 30 different kinds of preset program.
- Page 19 Press PROG key, the screen shows “Program 1-24” column graph. Select you favorite program. Meanwhile the default exercise time is 10:00. Press the “-INCLINE+” or “-SPEED+” key to change the time. Press the START key to begin exercise. Press the “-INCLINE+” or “-SPEED+” key to change the inclination or speed during exercise at each stage.
- Page 20 SPEED INCLINE SPEED INCLINE SPEED INCLINE SPEED INCLINE SPEED INCLINE SPEED INCLINE SPEED INCLINE SPEED INCLINE SPEED INCLINE SPEED INCLINE SPEED INCLINE SPEED INCLINE SPEED INCLINE SPEED INCLINE SPEED INCLINE...
- Page 21 Manual mode There are 3 user programs. They are user1, user 2, user3. Ÿ Press PROG continuously until user1 appeared. Ÿ Press incline or speed adjustment key to change the exercise time. Ÿ Press MODE key to set exercise data. Press incline or speed adjustment key to set the exercise time, speed, and incline for the first stage.
- Page 22 HRC program(optional function, as per order request) (optional function, as per order request) Press MODE key continuously until “Heart program1”or “Heart program2” Heart program1”or “Heart program2” appeared. HRC program introduction Ÿ Each HRC program is divided into 10 stages. ach HRC program is divided into 10 stages. Ÿ...
- Page 23 more than 10km/h in HP1 or 12km/h in HP2 and your current heart rate is still less than target heart rate, the system will increase the incline step by step automatically until your heart rate is more and more close to target heart rate. If there is no heart rate lasts for more than 30 seconds.
- Page 24 Body fat test Press PROG continuously to enter into FAT mode. ress PROG continuously to enter into FAT mode. Please set your sex, age, height, and weight first. A After that please hold the handle pulse for more than 8 seconds. At last the result will be showed on the right column of BMI. t last the result will be showed on the right column of BMI.
- Page 25 01-male 02-female female 10-99 height 100-200 weight 20-150 ≤19 Thin Thin =(20---25) Normal Normal =(26---29) A little weight A little weight ≥30 Too fat Too fat Local music Press the key to change the mode of music and video. to change the mode of music and video. Icon description Song1 The green words stand for the name of playing music and the size of the file.
- Page 26 Icon description ZY-VIDEO-3 The green words stand for the name of playing video and the size of the file. The green words stand for the name of playing video and the size of the file. 160.06MB The white words stand for the rest of the video and the size of the file. The white words stand for the rest of the video and the size of the file.
- Page 27 8. Simple Malfunction and Solution, Show in LED There is no signal when power on A、 First check whether the over load protector is open or not, if opened, please close it. B、 Make sure the wire of the switch, over load protector and driver are connected well. C、...
- Page 28 D. Check whether the PCB board is burnt or not, please replace the PCB board. E. The IGBT on the PCB board is short circuit, please check the IGBT is ok or not by multi-meter. Please replace the PCB board. The display shows “E08”...
-
Page 30: Pause Function
9. PAUSE FUNCTION During operation, press STOP, the machine will pause and keep your running data , the machine will pause and keep your running data. Then press START, the machine will move with Then press START, the machine will move with the lowest speed and the system will continue to calculate your running data the lowest speed and the system will continue to calculate your running data. - Page 31 Please use treadmill oil only. iii. After finish oil please press the START key lasts for 3 seconds and the tip will be swept off automatically. fter finish oil please press the START key lasts for 3 seconds and the tip will be swept off automatically. And then system fter finish oil please press the START key lasts for 3 seconds and the tip will be swept off automatically.
- Page 32 Tips for Stretching • Begin with gradual mobility exercises of all the joints, i.e. simply rotate the wrists, bend the arm and roll your shoulders. Begin with gradual mobility exercises of all the joints, i.e. simply rotate the wrists, bend the arm and roll your shoulders. Begin with gradual mobility exercises of all the joints, i.e.
- Page 33 Maintenance Warning: Before cleaning the machine, please make sure the power has been switched off. Cleaning: Wipe away the dust on the belt, running board and side footboard as excess dust may increase the frictional on the belt and cause damage to the machine. It is recommended to clean the machine once a month. Lubrication: Lubrication is needed per 300km.
- Page 34 Explosive drawing...
-
Page 36: Part List
Part list Description Specification Description Specification QTY Bottom frame Motor top cover Main frame Motor bottom cover Incline frame Left bottom cover Monitor frame Right bottom cover Handlebar pulse frame Rear protection cover Left column Side rail Right column Left side rail cap Motor seat Right side rail cap Bottle holder... - Page 37 NO. Description Specification QTY NO. Description Specification Lower wire of the handle pulse Bolt M8*35 Safety key module Bolt M6*55 Safety key rope Bolt M6*40 Magnetic sensor Bolt M6*25 AC single wire brown 350mm Bolt M6*20 AC single wire blue 350mm Screw ST4.2*15 Earth wire...
- Page 38 NO. Description Specification QTY NO. Description Specification USB mould Bluetooth mould Optional Screw ST2.9*8 Bluetooth connection wire Optional Speaker Screw ST2.9*6.0 Optional Screw Polar emitter Optional MP3 connection wire Heart rate receiver Optional Optional USB connection wire HRC connect wire...
Need help?
Do you have a question about the Fitness Deluxe Motorised Treadmill 3.0HP and is the answer not in the manual?
Questions and answers