TRAMEX PROFESSIONAL PTM 2.0 User Manual
For moisture measurement and detection in wood, wood by-products, drywall and other building materials
Hide thumbs
Also See for PROFESSIONAL PTM 2.0:
- Quick start manual (2 pages) ,
- Quick start manual (2 pages)
Table of Contents
Advertisement
Quick Links
Advertisement
Table of Contents

Related Manuals for TRAMEX PROFESSIONAL PTM 2.0


Summary of Contents for TRAMEX PROFESSIONAL PTM 2.0
- Page 1 user guide PTM 2.0 07/2016...
- Page 3 TABLE OF CONTENTS Introduction Summary of Features How it Works Operating Instructions Keypad Controls Main screen Mode & Settings Menu Mode Selection • Wood • WME (Ref) • Drywall Settings • Temperature Correction • ºC / ºF Scale • Brightness •...
-
Page 4: Introduction
INTRODUCTION Thank you for selecting the Tramex Professional PTM 2.0 meter for moisture measurement and detection in wood, wood by-products, drywall and other building materials. To get maximum benefit from your Professional PTM 2.0 meter it is suggested that you read these instruc-... -
Page 5: Summary Of Features
SUMMARY OF FEATURES The Professional PTM 2.0 is a hand-held, digital, pin-type resistance moisture meter designed to take precise measurements of moisture content in wood, to test the moisture conditions of drywall and give comparative WME (Wood Moisture Equivalent) readings in wood by-products and other building products. -
Page 6: How It Works
HOW IT WORKS The Professional PTM 2.0 moisture meter works on the principle of DC resistance. When the electrode pins are pressed or driven into the wood, the electrical resis- tance between the electrodes is measured. If the wood is dry, the resistance is high. If moisture is present in the wood the electrical resistance between the pins changes. -
Page 7: Keypad Controls
OPERATING INSTRUCTIONS Keypad Controls Below is an overview of the keypad functions. To select options on the left of the screen. To select the options on the right of the screen. To scroll up through the settings menu, the saved readings list, the list of species (see ‘Species Mode’... -
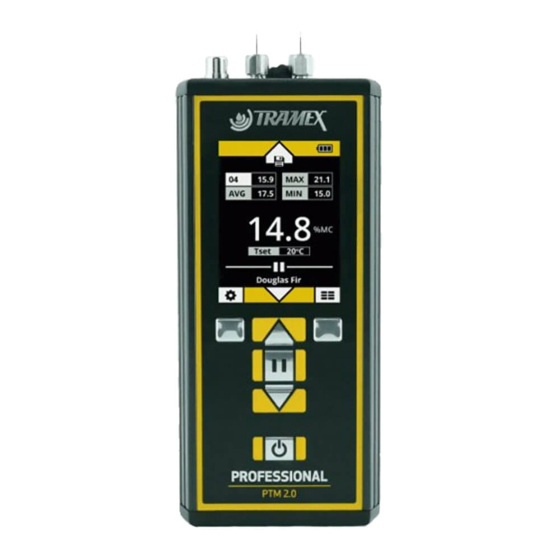
Page 8: Main Screen
MAIN SCREEN Below is an explanation of the Main Screen. 1. Last Saved & Average Readings 2. Max & Min Readings 3. Current Reading 4. Temperature setting 5. HOLD Indicator 6. Mode/Species 7. Settings (left key) 8. Saved Readings (right key) - Page 9 MODE & SETTINGS MENU From the Main Screen use the key to select the Mode and Settings menu page. The Mode and Settings menu page is colour-coded. On scrolling through the Mode and Settings menu, the selected item will be highlighted in blue. - MODE SELECTION •...
-
Page 10: Wood
3 Modes. Press the key to select the chosen mode. Having selected WOOD Mode the Professional PTM 2.0 will display the main screen and moisture readings can be taken and saved. From this screen a Wood Standard calibration setting for different regions may be chosen or a wide variety of species can be selected. - Page 11 BACK to return to the Main page without making any changes. Wood Standard: The Professional PTM 2.0 incorporates a number of standard calibration settings: • Fir, Douglas - USA • Fir, Douglas - AUS •...
- Page 12 Different species of wood can vary in density and conductivity, which can have an effect on the electrical resistance of the wood. The Professional PTM 2.0 has been programmed with 500+ species in order to give...
- Page 13 precise moisture content readings for each selected wood species. The selected wood species is indicated on the bottom of the screen. NOTE: Some of the wood species names in the list have been abbreviated. Please refer to the following key: Species Abbreviations Key East Island...
- Page 14 NOTE: The Professional PTM 2.0 will give readings in wood of 6% to 46%MC moisture content. It should be noted that readings above 27% (nominal value of the fibre saturation point) are indicative only. THE IMPORTANCE OF DETERMINING MOISTURE CONTENT OF WOOD...
-
Page 15: Wme (Ref)
WME (Ref) MODE From the Main Screen use the key to select the Mode and Settings menu page. Then press the key to scroll through the 3 Modes. Press the key to select the required mode. Having selected WME (Ref) Mode the Professional PTM 2.0 will display the main screen and moisture readings can be taken and saved. -
Page 16: Drywall
DRYWALL MODE From the Main Screen use the key to select the Mode and Settings menu page. Then press the key to scroll through the 3 Modes. Press the key to select the required mode. Having selected DRYWALL Mode the Professional PTM 2.0 will display the main screen and moisture readings can be taken and saved. -
Page 17: Settings
SETTINGS • Temperature correction • Temperature scale ºC / ºF • Brightness • Eco Mode • Check calibration • Clear memory The Mode and Settings menu page is colour-coded. As you scroll through the Mode and Settings menu, the selected item will be highlighted in blue. TEMPERATURE CORRECTION Meter readings can be affected by wood temperature. -
Page 18: Brightness
• Red = high Press the key to select the brightness level and return to the Main screen. NOTE: To save battery life, the Professional PTM 2.0 has an automatic backlight dimming ECO MODE that comes into effect when the battery is low. -
Page 19: Eco Mode
ECO MODE Eco Mode can be used to reduce battery consumption by functioning on the dimmest backlight level. Scroll to ‘ECO MODE’ in the Settings menu and press the keys to turn Eco Mode on or off. Press the key to select and return to the Main screen. Brightness level controls are disabled in Eco Mode. -
Page 20: Taking Moisture Readings
When taking readings in wood, align the pins parallel to the grain. The Professional PTM 2.0 can save up to 100 readings in its memory from any of the 3 Modes – Wood, WME (Ref) or Drywall. -
Page 21: Saving Readings
SAVING READINGS Take the reading by pressing the pins into the material being tested. Press the key to Hold the reading. When the reading is on Hold, the symbol (Save) appears on the top of the screen. Press the key to Save the reading. -
Page 22: Saved Readings List
SAVED READINGS LIST To view all of the saved readings press the to enter the Saved Readings Memory. Statistics In the Saved Readings Memory the Professional PTM 2.0 shows the maximum and the minimum saved readings as well as the average reading the standard deviation of the saved readings. -
Page 23: Selection Of Probes And Pins
SELECTION OF PROBES AND PINS Probes Code Length Pin Type Penetration SP - 200 200mm Straight 175mm (8”) insulated (7”) SP - 90 90mm Straight 72mm (3.5”) insulated (2.8”) SP - 52 52mm Straight 36mm (2”) insulated (1.5”) SP - 30 30mm Tapered 14mm... -
Page 24: Battery
Access to battery can be gained by unscrewing the bottom cap. To save battery life, the Professional PTM 2.0 has an automatic dimming function that comes into effect after 2 minutes of continuous non-use and automatic power down function that comes into effect after 4 minutes of continuous non-use. -
Page 25: Factors Affecting Moisture Readings
When measuring the moisture content in wood at different temperatures, the appropriate temperature should be selected to correspond to the temperature of the wood. The Professional PTM 2.0 will then automati- cally compensate to give more precise reading values. Chemical treatment or contamination... - Page 26 Surface Moisture Surface moisture due to wetting or condensation can affect readings when uninsulated pins are used. It is recommended that insulated pins such as SP-52 are used in conjunction with HA-21 Hammer Action elec- trode. As the pins are driven into the wood, readings can be taken at different depths unaffected by mois- ture on the surface.
-
Page 27: Calibration
In no event shall Tramex, its agents or distributors be liable to the customer or any other person, company or organisation for any special, indirect, or consequential... -
Page 28: Warranty
Sale of Goods and Supply of Services Act 1980. Warranty claims A defective product should be returned shipping prepaid, with full description of defect to your supplier or to Tramex at address shown on the back of this guide. -
Page 29: Product Development
PRODUCT DEVELOPMENT It is the policy of Tramex to continually improve and update all its products. We therefore reserve the right to alter the specification or design of this instrument without prior notice. SAFETY This Users Guide does not purport to address the safety concerns, if any, associated with this instrument or its use. - Page 30 Tramex Ltd. Unit F, Glencormack Business Park, Kilmacanogue, County Wicklow, Ireland. Email: sales@tramexmeters.com USA (toll free) & Canada: Tel: 1800-234-5849 EU & Rest Of World: Tel: +353 1 681 4450...
Need help?
Do you have a question about the PROFESSIONAL PTM 2.0 and is the answer not in the manual?
Questions and answers