Table of Contents
Advertisement
Quick Links
Advertisement
Table of Contents

Related Manuals for Warrior Winches C10000NH

Summary of Contents for Warrior Winches C10000NH
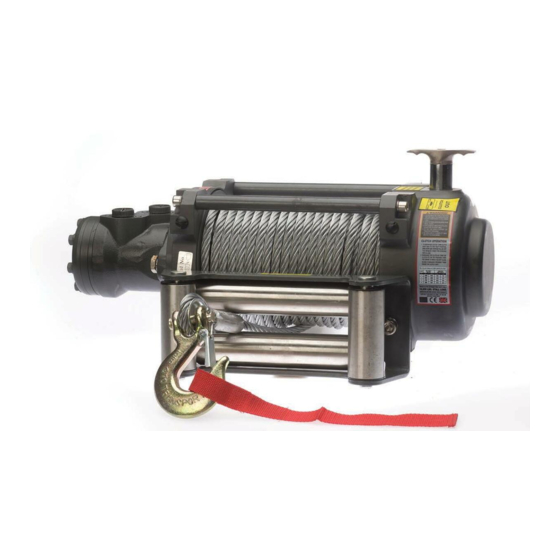
- Page 1 HYDRAULIC WINCH C10000NH C15000NH Assembly & Operating Instructions...
- Page 2 WINCH ACCESSORIES YOU WILL NEED ..........9 RIGGING TECHNIQUES .................9 LUBRICATION ..................10 CABLE ASSEMBLY REPLACEMENT ..........10 TROUBLE SHOOTING ................11 WINCH ASSEMBLY DRAWING ............1 2 WINCH PARTS LIST ................1 3 SPECIFICATION(C10000NH) ............... 1 4 SPECIFICATION(C15000NH) ............... 1 5...
-
Page 3: Introduction
INTRODUCTION We have developed a several new series that make up the current product line. Each series in our product line has unique design characteristics; many new patented technologies are integrated into our winches. This new technology has made winches the pinnacle in user convenience and reliability. -
Page 4: Safety Warnings And Precautions
SAFETY WARNINGS AND PRECAUTIONS WARNING: When using the tool, basic safety precautions should always be followed to reduce the risk of personal injury and damage to the equipment. Read all this instructions before using this tool! WARNING –Do not use winch to lift (vertically). WARNING –... -
Page 5: Winch Warnings And Precautions
a qualified technician. Do not use the tool if any switch does not turn “On” and “Off” properly. WARNING – Replacement parts and accessories. When servicing, use only identical replacement parts. Use of any other parts will void the warranty. Only use accessories intended for use this tool. -
Page 6: Unpacking
WARNING – Do not move your vehicle with the cable extended and attached to the load. You could easily exceed the winch rating and snap the cable. WARNING – Use gloves while handling cable. WARNING – When the vehicle is parked on an incline you should use wheel chocks. - Page 7 This will allow enough clearance for the winch to be placed in the channel without obstruction.) Mount winch to the vehicle using high strength cap screw. It should be aligned and secured to a solid part of the vehicle (front or rear) where the the full rated load will be evenly distributed.
- Page 9 Below is installation illustration with mounting channel: Caution: The hydraulic system needs a relief valve to ensure the system safety. The absence of such a valve could cause serious injury and damage the winch. Winch battery cables should be placed so that there is a small amount of slack in the cable.
-
Page 10: Operation
Test the winch for proper operation. Refer to the section below. OPERATION WARNING 1 Make sure clutch is totally engaged before starting any winch operation; 2 Stay clear and away from raised loads; 3 Stay clear of cable while pulling do not try to guide cable; 4 A min. -
Page 11: Winch Accessories You Will Need
Winch working demonstration: 1. Disengage the clutch by turning the clutch to the “CLUTCH OUT” position. 2. Grab the cable assembly and pull the cable to the desired length, then attach to item being pulled. Caution: Always leave at least five turns of cable on the drum; Review Winch Safety Warnings and Precautions on page 2、3 before continuing. -
Page 12: Lubrication
CAUTION Do not winch from an acute angle as the wire rope will pile up on one side of the drum causing damage to wire rope and the winch. Fig 3.2 Fig 3.2 Short pulls from an angle can be used to straighten the vehicle. Long pulls should be done with the wire rope at a 90°... -
Page 13: Trouble Shooting
Extend cable assembly to its full length. Note how the existing cable is connected to the drum. Remove old cable assembly and attach new one as the ld cable connected to the drum. Insert the end of the new rope and secure the screw being tightly screwed Turning clutch to the “CLUTCH IN”... -
Page 14: Winch Assembly Drawing 1
WINCH ASSEMBLY DRAWING... -
Page 15: Winch Parts List 1
WINCH PARTS LIST Part # Description Remark C100NH0100 Hydraulic Motor Used in C10000NH C150NH0100 Hydraulic Motor Used in C15000NH C100NH0001 Screw M12×30 C100NH0002 Lock Washer Ø12 C100NH0003 Screw M8×25 C100NH0004 Lock Washer Ø8 C100NH0005 Coupling plate C100NH0006 Front Bearing Used in C10000NH... -
Page 16: Specification(C10000Nh) 1
SPECIFICATION(C10000NH) Rated line pull 10000 lbs (4536 kgs) Motor displacement 65ml/r Oil flow 15~45L/min Pressure 12.5Mpa Gear reduction ratio 25.5:1 Cable (Dia.× L) Ø13/32"×83.7 ' (Ø10.2mm×25.5m) Drum size(Dia.× L) Ø2.8 "×8.6" (Ø72mm×219mm) Mounting bolt 10 "×4.5 " (254mm×114.3mm) 4-M12 pattern Overall dimensions 20.4"×8.1"×9.7"... -
Page 17: Specification(C15000Nh) 1
SPECIFICATION(C15000NH) Rated line pull 15000 lbs (6804 kgs) Motor displacement 80ml/r Oil flow 5~60L/min Pressure 13Mpa Gear reduction ratio 33.4:1 Cable (Dia.× L) Ø15/32"×87 ' (Ø12mm×26.5m) Drum size(Dia.× L) Ø3.5 "×8.5" (Ø89mm×217mm) Mounting bolt 10 "×4.5 " (254mm×114.3mm) 4-M12 pattern Overall dimensions 21.4"×8.9"×10.3"...
Need help?
Do you have a question about the C10000NH and is the answer not in the manual?
Questions and answers