NETGEAR WN3000RPv3 Installation Manual
N300 wifi range extender
Hide thumbs
Also See for WN3000RPv3:
- Installation manual ,
- User manual (46 pages) ,
- Quick start manual (21 pages)
Table of Contents
Advertisement
Quick Links
Download this manual
See also:
User Manual
Advertisement
Table of Contents

Related Manuals for NETGEAR WN3000RPv3


Summary of Contents for NETGEAR WN3000RPv3
- Page 1 Installation N300 WiFi Range Extender Model WN3000RPv3...
-
Page 2: Getting Started
Getting Started The NETGEAR WiFi Range Extender increases the distance of a WiFi network by boosting the existing WiFi signal and enhancing the overall signal quality over long distances. An extender repeats the signals from an existing WiFi router or access point. -
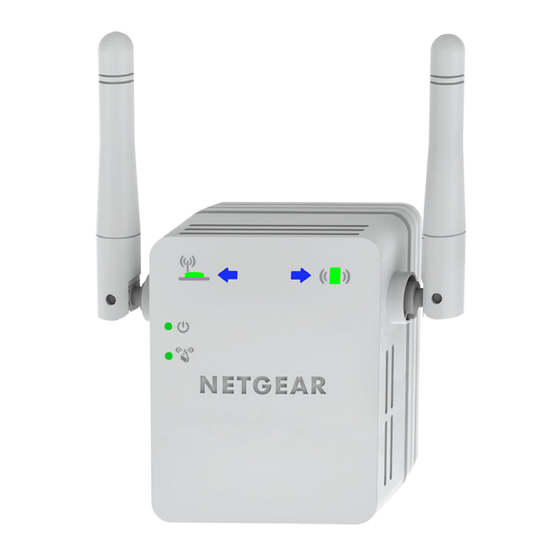
Page 3: Meet Your Extender
Meet Your Extender Before you install your extender, familiarize yourself with its LEDs, buttons, and port. Front Panel Device Router Arrow Arrow Router Link Client Link Power LED WPS LED... - Page 4 Side and Bottom Panels Power On/Of button WPS button Factory Reset button Ethernet port...
-
Page 5: Led Descriptions
LED Descriptions Router Link LED This LED indicates the connection between the extender and the router or access point. Solid green. Best connection. Solid amber. Good connection. Solid red. Poor connection. Of. No connection. Client Link LED This LED indicates the connection between the extender and a computer or mobile device. -
Page 6: Install The Wifi Extender
The browser takes you directly to the NETGEAR genie Smart Setup. If you are not automatically directed to NETGEAR genie, launch a web browser and type www.mywiiext.net in the address ield. Enter admin for the user name and password for the password. - Page 7 5. Select the WiFi Range Extender (Wireless) radio button and click the Continue button. The extender searches for WiFi networks in your area and displays a list. 6. Select a WiFi network to extend and click the Continue button.
- Page 8 7. When prompted, type the network password (also called passphrase or security key) in the Password ield, and click the Continue button. 8. In the Name ield, type the name (SSID) for your new extender WiFi network and click the Continue button. You can use the same security settings as your existing network by selecting the check box.
- Page 9 10. If the screen is still displayed on your computer or device, select the following check box and click the Continue button. A message displays conirming that the extender has connected to the WiFi network. 11. Click the Finish button. 12.
-
Page 10: Find The Best Location
Find the Best Location If the WiFi signal is weak, the irst time you join the extender network, an arrow LED blinks for two minutes. If this happens, adjust the position of the extender. • If the Router arrow blinks, move the extender closer to the router. -
Page 11: Connect An Ethernet-Enabled Device
Connect an Ethernet-Enabled Device Ater the extender is connected to your existing WiFi network, you can connect a wired device to the extender using an Ethernet cable. That device can then access your existing network through the WiFi connection. Blu-ray player WiFi router 1. -
Page 12: Install The Extender As An Access Point
2. Connect the extender to an existing WiFi network. For more information, see Connect to an Existing WiFi Network page 6 3. Plug the Ethernet cable from an Ethernet-enabled device in to the Ethernet port on the extender. Install the Extender as an Access Point You can use the extender as a WiFi access point, which creates a new WiFi hotspot within your local network. - Page 13 The browser takes you directly to the NETGEAR genie Smart Setup. If you are not automatically directed to NETGEAR genie, launch a web browser and type www.mywiiext.net in the address ield. Enter admin for the user name and password for the password.
-
Page 14: Log In To Access Extender Settings
Log In to Access Extender Settings Ater installation, you can log in to the extender to view or change the extender’s settings. 1. Connect a computer or mobile device to the extender’s network. 2. Launch a web browser and in the address ield, enter www.mywiiext.net or www.mywiiext.com. -
Page 15: Frequently Asked Questions
Frequently Asked Questions You can ind more information about your product in the user manual, which is available at http://support.netgear.com. The web browser setup guide keeps asking me for my network password (passphrase) or security key, and I am sure I have entered the correct password. - Page 16 I am connected to NETGEAR_EXT and launched a browser. Why can’t I see the web browser setup guide? Try these troubleshooting steps: • Make sure that your computer is set up to use DHCP (most are). • Make sure that the Device Link LED is green and that you have a valid IP address.
- Page 17 When the wireless device connects through the extender to your router, the MAC address of the wireless device shown on the router is translated to another MAC address. If your router’s MAC ilter is enabled, the wireless device connects to the extender but cannot get an IP address from the extender and cannot access the Internet.
-
Page 20: Technical Support
Trademarks NETGEAR, the NETGEAR logo, and Connect with Innovation are trademarks and/or registered trademarks of NETGEAR, Inc. and/or its subsidiaries in the United States and/or other countries. Information is subject to change without notice. © NETGEAR, Inc. All rights reserved.
Need help?
Do you have a question about the WN3000RPv3 and is the answer not in the manual?
Questions and answers