
Related Manuals for Invitrogen Evos XL


Summary of Contents for Invitrogen Evos XL
- Page 1 EVOS XL Imaging System ™ For Transmitted Light Applications Catalog Number AME3300 Publication Number MAN0007987 Revision A.0 For Research Use Only. Not for use in diagnostic procedures.
- Page 2 Information in this document is subject to change without notice. DISCLAIMER: TO THE EXTENT ALLOWED BY LAW, THERMO FISHER SCIENTIFIC AND/OR ITS AFFILIATE(S) WILL NOT BE LIABLE FOR SPECIAL, INCIDENTAL, INDIRECT, PUNITIVE, MULTIPLE OR CONSEQUENTIAL DAMAGES IN CONNECTION WITH OR ARISING FROM THIS DOCUMENT, INCLUDING YOUR USE OF IT.
-
Page 3: Table Of Contents
Contents About this guide......................... 3 1. Product information ......................4 Product description ................................4 Standard items included ..............................4 Instrument exterior components and mechanical controls ................5 Onscreen controls ................................6 2. Installation ........................... 7 Operating environment ..............................7 Transport the EVOS ™... - Page 4 Appendix A: Troubleshooting ....................35 Image quality issues...............................35 Software interface issues ..............................36 Mechanical issues ................................36 Appendix B: System specifications ..................37 Appendix C: Controls glossary....................38 On screen controls ................................38 Mechanical controls ...............................42 Appendix D: Safety ........................44 Safety conventions used in this document......................45 Symbols on instruments ...............................46 Safety labels on instruments ............................48 General instrument safety............................49...
-
Page 5: About This Guide
About this guide Audience This user guide is for laboratory staff operating, maintaining, and analyzing data using the EVOS ™ XL Imaging System. User attention Two user attention words appear in Thermo Fisher Scientific user documentation. Each word implies a particular level of observation or action as described below. words Note: Provides information that may be of interest or help but is not critical to the use of the product. -
Page 6: Product Information
1. Product information Product description EVOS XL Imaging ™ ™ The Invitrogen EVOS XL Imaging System (Cat. No. AME3300) is a fully ™ automated, digital, inverted imaging system. The system is designed for a broad System range of transmitted light applications including time-lapse imaging, manual- assist cell counting, and image review. -
Page 7: Instrument Exterior Components And Mechanical Controls
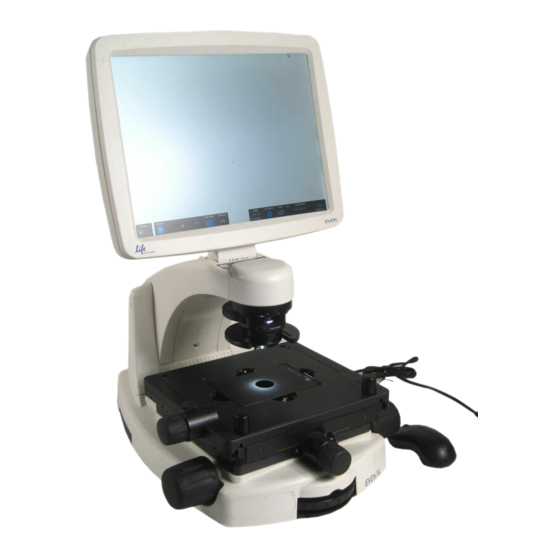
Instrument exterior components and mechanical controls Power switch Objective selection wheel Power input jack Focus knobs USB and DVI ports Stage Y-axis knob Coarse stage positioning knobs Phase annuli selector Stage X-axis knob Condenser slider slot EVOS XL Imaging System User Guide ™... -
Page 8: Onscreen Controls
Onscreen controls Login button Scale bar and toolbar options Light ON/OFF button Settings control button Illumination slider Save image button Capture image button QuickSave option Color adjustment button Selected objective Note: See “Appendix C: Controls glossary” on page 38 for more details about onscreen and mechanical controls. -
Page 9: Installation
2. Installation Operating environment • ™ Place the EVOS XL Imaging System on a level surface away from vibrations from other pieces of equipment. • Allow at least 5 cm (2 in) free space at the back of the instrument to allow for proper ventilation and prevent overheating of electronic components. -
Page 10: Unlock Mechanical Stage
Unlock mechanical stage Remove stage lock Before using the mechanical stage for the first time, remove the stage lock pin from the back right-hand corner of the stage plate. Pull firmly to remove this pin. Note: Always secure the mechanical stage with the stage lock pin before moving the instrument. -
Page 11: Condenser Shield
Condenser shield This shield can help reduce the effects that overhead lighting might have on your image. EVOS XL Imaging System User Guide ™... -
Page 12: Install The Evos ™ Xl Imaging System In A Cell Culture Hood
Install the EVOS XL Imaging System in a cell culture hood ™ EVOS ™ XL Imaging System’s small footprint and simple power connection allow it to be installed quickly to be conveniently used in a cell culture hood. Dimensions ™ The EVOS XL Imaging System will fit in cell culture hoods that are at least 20½... -
Page 13: Basic Operation
3. Basic operation The EVOS ™ XL Imaging System uses both mechanical and software controls for operation. Mechanical controls include the stage X-Y axis knobs, focus knobs, and the objective selection wheel. Software controls are located in the control bars the bottom of the screen. - Page 14 Turn the phase annuli selector to the position that corresponds to the selected objective and contrast method. Insert the appropriate condenser slide into the slot on the condenser assembly. Note: A Diffuser slider can be used for low magnification (2× or 4×) brightfield applications to improve flat field illumination.
- Page 15 12. To enter the file name, click in the Save File Name field The virtual keyboard opens. 13. Enter the file name, then click the Accept button 14. Choose the file type and click the Save button Note: See “Save images and manage files” (page 16) for more information. EVOS XL Imaging System User Guide ™...
-
Page 16: Advanced Operation
Log in with an Click the Login button at the bottom left of the screen (this is the Invitrogen logo with the current user profile). existing profile Login dialog opens. Select the desired user profile, then click OK. - Page 17 Change the default The default user login is Guest; to set the default login as the last active user, go to the Basic tab of the Settings dialog and uncheck the Default to Guest on login startup option. Note: For multiple users, we recommend leaving the “Default to Guest on startup”...
-
Page 18: Save Images And Manage Files
Save images and manage files Save images Click Save to open the “Save file” dialog. In the “Save Folder list” and the “Saved files list”, selected items appear blue. Note: If a USB keyboard is installed, the virtual keyboard does not appear. Pressing the Enter key on a physical keyboard is equivalent to clicking the Save button in the Save file dialog. - Page 19 Click in the Save File Name field to enter a file name. If you are using the virtual keyboard, click Accept after entering the text. The “Save As confirmation dialog” opens. To overwrite a file, simply select the name of the file from the saved files list instead of clicking on the Save File Name field.
-
Page 20: Use The Quicksave Option To Save Multiple Images
Use the QuickSave option to save multiple images QuickSave allows you to save multiple images under a single base file name. When you specify the settings and select the QuickSave option, the EVOS ™ Imaging System saves each image with a single click of the Save button. Click Settings to open the “Settings dialog”, then select the QuickSave tab. - Page 21 Note: Click the Date button anywhere within a field to automatically insert the current date (MM-DD-YYYY) wherever the cursor is in that field. Click OK to accept QuickSave settings. In the right control bar, select the QuickSave option. After acquiring an image with Capture, click Save. The image will be saved as specified in the QuickSave settings.
-
Page 22: Record Time Lapse Images
Record time lapse images Time lapse tool With the Time lapse tool, you can set up your cells and program the EVOS ™ Imaging System to record time lapse images. Start a time lapse Once the sample is focused and ready, tighten the stage brakes session to prevent the stage from drifting... - Page 23 11. Click Start to begin the time lapse session. The system displays the Time Lapse Progress dialog as long as the session is active. Note: The Review slider lets you review the images already captured during the current session. Click Play to view all images in sequence. Pause and restart a In the Time Lapse Progress dialog, click Pause to suspend the time lapse session.
- Page 24 Abort a time lapse In the time lapse progress dialog, click Abort. A new dialog opens and gives you the option to delete or keep the files already saved. session To resume the session, click Cancel to return to the time lapse progress dialog. EVOS XL Imaging System User Guide ™...
-
Page 25: Count Cells
Count cells Count tool The Count tool streamlines cell counting by marking items with up to six labels onscreen. As you tag items, the system keeps a running tally of counts with percentages for each label assigned. You can document your results by saving the tagged image with the Count tool displaying the totals. -
Page 26: Review Images
Review images Image review tool The Image review tool allows you to review still images or play video files from the USB drive or network connection. You can also use this tool to rename or delete saved files. Review images Open the Toolbar, then expand the Image review tool. -
Page 27: Use Digital Zoom
Use digital zoom The EVOS ™ XL Imaging System can zoom in the image onscreen, allowing you a closer look. Double-click live or captured images to zoom in to them. In the images below, the numbered arrows indicate the click points. Note that the zoom factor display appears over the selected objective indicator. - Page 28 Zoom in on Double-click the area of interest in the image onscreen. The screen displays the zoomed in at 2× and centered on the clicked point. captured images Captured image at 40× magnification, with scale bar Captured 40× image zoomed 2× In the enlarged image, double-click again on any point to double the digital zoom level.
- Page 29 Continue double-clicking to double the digital zoom value as desired. It is possible to zoom in to the pixel level of the digital image. Captured 40× image zoomed 8x Right-click to restore the view to unzoomed magnification. Note: Capturing and saving a zoomed image results in a file showing the actual magnification, not the zoomed magnification.
-
Page 30: Connect The Evos ™ Xl Imaging System To A Network
Be sure you are logged in under your own EVOS ™ user ID. The current user ID is displayed above the Invitrogen logo in the bottom left corner of the screen. See “Manage users” (page 14) for more information. Click the Settings button to open the Settings dialog, then select the Network tab. - Page 31 The upper list box of the Network page will display the top level (available domains) of the Windows/SMB network file tree. Click the triangle icon, or double-click the domain name, to expand a domain and display the available servers. Note: If a domain, server, or shared file appears on the file tree without a triangle icon, and you are not able to expand or open it, your permission to access that item is restricted.
- Page 32 Select a shared folder, then click Add to include it in the list of possible file destinations. Alternatively, type in the file path, then click Add. The folder should appear on the list box below the Add button. If it does not, contact your network administrator for help.
-
Page 33: Update The Software
Update the software Periodically, Thermo Fisher Scientific adds functionality and other improvements to the EVOS ™ user interface. We recommend keeping your EVOS ™ XL Imaging System up to date with the latest software. If you have any questions about ™... - Page 34 After file verification, the update confirmation dialog opens. Verify the revision details, then click Yes to start the update. The screen displays the update progress. When the update is complete, the ™ main EVOS screen reappears. IMPORTANT! Do not power off the instrument, unplug the USB flash drive, or add or remove any devices during the update.
-
Page 35: Care And Maintenance
5. Care and maintenance General care • When cleaning optical elements, use only optical-grade materials to avoid scratching soft lens coatings. • Use the appropriate cleaning solutions for each component, as described in the “Decontamination procedures” (page 34). • If liquid spills on the instrument, turn off the power immediately and wipe dry. •... -
Page 36: Decontamination Procedures
Decontamination procedures To decontaminate the EVOS ™ XL Imaging System, follow these procedures: Turn power OFF. Clean the LCD display. Use a soft, dry, lint-free cloth to wipe off any dust from the screen. Clean the LCD display with a non-alcohol based cleaner made for flat- panel displays. -
Page 37: Appendix A: Troubleshooting
Appendix A: Troubleshooting Note: For additional technical support, contact your local EVOS ™ distributor. If you do not have your distributor information, you can look it up at the thermofisher.com/evos or contact Technical Support (page 55). Image quality issues Problem Possible solutions •... -
Page 38: Software Interface Issues
Software interface issues We recommend keeping your EVOS ™ instrument up to date with the latest software. See “Update the software” (page 31) for more information. Problem Possible solutions • Click the LIGHT ON button to return to live observation (note Image does not respond to that a red USB icon on the Save button indicates there is an changes in focus or stage position... -
Page 39: Appendix B: System Specifications
Appendix B: System specifications Note: System specifications are subject to change without notice. Go to the EVOS ™ XL Imaging System product page (thermofisher.com/evosxl) to download the latest production information. Infinity-corrected optical system; RMS-threaded objectives with 45 mm parfocal Optics distance ™... -
Page 40: Appendix C: Controls Glossary
Appendix C: Controls glossary On screen controls Note: This glossary is not alphabetized. On screen controls are listed from left to right. Login button The Login button (Thermo Fisher Scientific logo, bottom left) allows you to log in and create or change user profiles. - Page 41 View: Scale bar option The Scale bar option (right control bar) is a toggle button that displays or hides the Scale bar tool. This option is only available after an image is captured. To move the Scale bar, click and drag it. View: Toolbar option The Toolbar option (right control bar) includes the Time Lapse, Count, and...
- Page 42 Settings: Basic tab • This EVOS ™ section displays the serial number and software version. • Login section controls default Guest login. • Display section controls the following options: • Highlight saturated pixels in red indicates overexposed areas onscreen; • Reset Scale bar Location moves the Scale bar back to its default position in the lower right corner of the screen;...
- Page 43 Save File dialog The Save File dialog allows you to name and save captured image files. The following options are available in the Save File dialog: • Save File Name field: Click to enter a file name. • New Folder button: Click to enter a folder name and date (optional).
-
Page 44: Mechanical Controls
Mechanical controls Power switch Objective selection wheel Power input jack Focus knobs USB and DVI ports Stage Y-axis knob Coarse stage positioning knobs Phase annuli selector Stage X-axis knob Condenser slider slot Power input jack Plug the power adapter into the power input jack. Power switch Set the power switch to “—”... - Page 45 Stage Y-axis knob Use the stage Y-axis knob for fine front-back movements to position the sample within the field of view, particularly at high magnifications. To secure the stage in place for time-lapse image captures, tighten the Y-axis stage brake. Focus knobs Use the focus knobs to bring the sample into focus.
-
Page 46: Appendix D: Safety
Appendix D: Safety This section includes the following topics: • Safety conventions used in this document • Symbols on instruments • Safety labels on instruments • General instrument safety • Chemical safety • Chemical waste safety • Electrical safety • Physical hazard safety •... -
Page 47: Safety Conventions Used In This Document
Safety conventions used in this document Safety alert words Four safety alert words appear in Thermo Fisher Scientific user documentation at points in the document where you need to be aware of relevant hazards. Each alert word–IMPORTANT, CAUTION, WARNING, DANGER–implies a particular level of observation or action: Definitions IMPORTANT! Provides information that is necessary for proper instrument... -
Page 48: Symbols On Instruments
Symbols on instruments Electrical symbols The following table describes the electrical symbols that may be displayed on Thermo Fisher Scientific instruments. on instruments Symbol Description Indicates the On position of the main power switch. Indicates the Off position of the main power switch. Indicates a standby switch by which the instrument is switched on to the Standby condition. - Page 49 Safety symbols The following table describes the safety symbols that may be displayed on Thermo Fisher Scientific instruments. Each symbol may appear by itself or in combination with text that explains the relevant hazard (see “Safety labels on instruments”, page 48). These safety symbols may also appear next to DANGERS, WARNINGS, and CAUTIONS that occur in the text of this and other product- support documents.
-
Page 50: Safety Labels On Instruments
Safety labels on instruments The following CAUTION, WARNING, and DANGER statements may be displayed on Thermo Fisher Scientific instruments in combination with the safety symbols described in the preceding section. Hazard English Français symbol CAUTION! Hazardous chemicals. Read the ATTENTION! Produits chimiques dangereux. Safety Data Sheets (SDSs) before handling. -
Page 51: General Instrument Safety
General instrument safety WARNING! PHYSICAL INJURY HAZARD. Use this product only as specified in this document. Using this instrument in a manner not specified by Thermo Fisher Scientific may result in personal injury or damage to the instrument. Moving and lifting CAUTION! PHYSICAL INJURY HAZARD. -
Page 52: Chemical Safety
Chemical safety Chemical hazard WARNING! CHEMICAL HAZARD. Before handling any chemicals, refer to warning the Safety Data Sheet (SDS) provided by the manufacturer, and observe all relevant precautions. WARNING! CHEMICAL HAZARD. All chemicals in the instrument, including liquid in the lines, are potentially hazardous. Always determine what chemicals have been used in the instrument before changing reagents or instrument components. -
Page 53: Chemical Waste Safety
Chemical waste safety Chemical waste CAUTION! HAZARDOUS WASTE. Refer to Safety Data Sheets (SDSs) and hazard local regulations for handling and disposal. Chemical waste To minimize the hazards of chemical waste: safety guidelines • Read and understand the Safety Data Sheets (SDSs) provided by the manufacturers of the chemicals in the waste container before you store, handle, or dispose of chemical waste. -
Page 54: Electrical Safety
Electrical safety DANGER! ELECTRICAL SHOCK HAZARD. Severe electrical shock can result from operating the EVOS ™ XL Imaging System without its instrument panels in place. Do not remove instrument panels. High‐voltage contacts are exposed when instrument panels are removed from the instrument. Fuses WARNING! FIRE HAZARD. -
Page 55: Physical Hazard Safety
Physical hazard safety Moving parts WARNING! PHYSICAL INJURY HAZARD. Moving parts can crush and cut. Keep hands clear of moving parts while operating the instrument. Disconnect power before servicing the instrument. Biological hazard safety WARNING! BIOHAZARD. Biological samples such as tissues, body fluids, and blood of humans and other animals have the potential to transmit infectious diseases. -
Page 56: Safety And Electromagnetic Compatibility (Emc) Standards
Safety and electromagnetic compatibility (EMC) standards This section provides information on: • U.S. and Canadian safety standards • European safety and EMC standards • Australian EMC standards U.S. and Canadian The CSA C/US Mark signifies that the product meets applicable U.S. and Canadian standards, including those from CSA, CSA America, ANSI, ASME, Safety Standards ASSE, ASTM, NSF and UL. -
Page 57: Documentation And Support
Documentation and support Obtaining support Technical support For the latest services and support information for all locations, visit www.thermofisher.com. At the website, you can: • Access worldwide telephone and fax numbers to contact Technical Support and Sales facilities • Search through frequently asked questions (FAQs) •... - Page 58 thermofisher.com/support | thermofisher.com/askaquestion thermofisher.com 09 October 2017...
Need help?
Do you have a question about the Evos XL and is the answer not in the manual?
Questions and answers