Table of Contents

Summary of Contents for Bimmer Tech BMW F30
-
Page 1: Installation Instructions
Installation Instructions for the BIMMERTECH Multi Media Interface with HDMI inputs and additional video sources like front/rear cameras and SmartView mirroring devices BMW F30/F80 BimmerTech Phone: +1(646) 439-7920 • www.bimmer-tech.net... - Page 2 Introduction Thank you for purchasing Bimmer Tech products! We strive to deliver the most functional, reliable and high quality BMW retrofit upgrades on the market. Our kits are do it yourself friendly, but if you're not fond of working on your car don't worry. You can always take your kit along with these installation instructions to one of our recommended installers or to any other professional installer in your area.
-
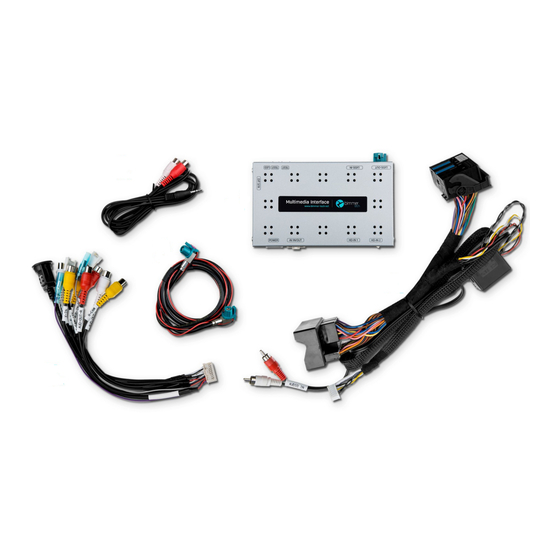
Page 3: Kit Contents
Kit Contents 1. 3.5mm stereo minijack to 2x RCA cable 2. MMI HD 3. Video output cable from MMI to BMW screen 4. PnP Harness 5. RCA harness DIP Switches on the side of the MMI Module: Rear view camera extension cable + Rear View Camera (RVC) embedded in the trunk handle: BimmerTech Phone: +1(646) 439-7920 •... - Page 4 Rear View Camera and Extension cable Front view camera + adaptor cable + tap-in connectors...
- Page 5 SmartView HD (based on a modified Apple TV) SmartView HD FLEX BimmerTech Phone: +1(646) 439-7920 • www.bimmer-tech.net...
- Page 6 Front View Camera installation tools • BimmerTech Trim Tool Kit (Highly Recommended) • T-20, T-25, and T-30 Bits • Phillips Head Screw Driver • Drill with an 8mm or 5/16 Drill Bit • Electrical Tape • Zip Ties • Pliers •...
- Page 7 Setting the DIP switches on the MMI The Multi Media Interface (MMI) included in your kit is the central piece equipment that allows to transfer additional video signals different from the original iDrive display to your BMW's factory screen. In order for the MMI module to work correctly in your vehicle along with the various video feeds coming from the additional video sources you will have to set up the DIP switches according to your vehicles screen type and additional video input sources being connected (e.g cameras and SmartView).
- Page 8 DIP switch 2 corresponding to input HDMI-2: set to OFF if you will be installing a second HDMI device set to ON if you will not be installing a second HDMI device DIP switch 3 corresponding to input AV IN: set to OFF if you will be installing a SmartView device (without HDMI) set to ON if you will not be installing a SmartView device (without HDMI) DIP switch 4 has no function.
- Page 9 Installing the MMI Begin the installation by disconnecting the negative battery terminal of the car battery to reduce the risk of damage to electrical components. Head Unit Removal Remove the trim surrounding the factory head unit and vents, using a trim tool, being careful to not scratch any components.
- Page 10 Unplug the two connections, located behind the hazard button and climate control dial. Remove the lower compartment by gently prying rom the top down, with one of your trim tools. Disconnect the cable from the small map light.
- Page 11 Remove the 4 T20 screws, as shown below and remove the radio and climate control faceplate. Be sure to unplug the connection, which will be located on the right hand side. Remove the 2 T20 screws and Gently slide the head unit out. Unscrew the two T20 screws located beneath the iDrive screen.
- Page 12 Once the iDrive screen is out, gently remove the video cable by pressing on the tab and sliding the clip off. Feed this wire down behind the factory head unit. Plug this cable into the Multimedia Interface where it is labeled “LCD In”. Clip the new included video cable into the iDrive and clip the other end into the Multimedia Interface under “LCD Out”...
- Page 13 Remove the large square harness by pressing down on the clip. Once the clip is pressed, the square connector will begin to slide out. Remove the Fiber Optic cable by pushing the securing tab outward. Take this optic cable and slide it into the same slot in the new harness.
- Page 14 Carefully reinsert the head unit, being careful of the new harness and reinsert the securing screws. Connect the Power plug from the PnP harness to the MMI module, and also connect the RCA harness to the module. Connect the Audio out RCA plugs from the RCA harness to the Audio In RCA plugs on the PnP harness.
- Page 15 If your head unit is larger than the one in the above picture you can install the MMI module in a space between the glove box and head unit as shown in the following video: https://www.youtube.com/watch?v=7h_b8z7qxGk BimmerTech Phone: +1(646) 439-7920 • www.bimmer-tech.net...
- Page 16 Installing the Front View Camera (FVC) Once again the F30 video installation guide will offer you invaluable information on the front camera installation process: https://youtu.be/SksfQZnKILg?t=11m57s Drop the plastic area shown below, by removing the two 10mm nuts, as pictured below. Once the nuts are removed, use a trim tool to gently pry down and pop the remaining clips.
- Page 17 dot), so that the plastic clip will easily fit through, while being extremely careful not to make contact with any other wires. Once you’ve drilled through the grommet, use a sturdy wire or a thin hanger to route the wire through the grommet.
- Page 18 Since your vehicle has a mesh grille, simply unscrew the camera and install it through the grille mesh from the inside and screw it back together. Then connect the camera to the extension cable and heat shrink the connection. You should be able to do this without removing the bumper cover. Please remember the battery must be disconnected –...
- Page 19 Installing the Rear View Camera (RVC) Attached are instructions how to take apart the trunk lid. You have to replace the factory trunk handle with the new one (in the process move the switch from your original trunk handle to the new one) and then run the camera cable all the way to the dashboard under various trim pieces, through the rear seats and under the door sills.
- Page 21 BimmerTech Phone: +1(646) 439-7920 • www.bimmer-tech.net...
- Page 23 BimmerTech Phone: +1(646) 439-7920 • www.bimmer-tech.net...
- Page 25 Manual transmission cars only Change the screen mode to HDMI-1 by pressing and holding the iDrive controllers MENU button for 3s (DIP switch number 1 will have to be set to OFF to enable this). Next enter the Factory Menu by pressing and holding the iDrive controllers BACK button for 3s. Then go to PARK →...
- Page 27 Installing the SmartView HD or HD FLEX SmartView HD https://www.youtube.com/watch?v=7h_b8z7qxGk Plug the AppleTV USB cable into the USB socket on the MMI harness Connect the supplied HDMI cable from the AppleTV to HDMI-1 on the MMI Place the AppleTV IR sensor in the center console area possibly just aside the new screen to provide good visual connectivity to the Apple Remote.
- Page 28 WiFi network shown on the Welcome Screen and activate AirPlay/Miracast mode on your smart device to mirror your iPhone or Android phone to your iDrive screen. If we delivered a dedicated wiring harness for the SmartView HD Flex please do not use it as the HDMI and microUSB cables are all that is needed to operate it.
- Page 29 Final tests and settings Once all of cables have been connected as described you can reconnect the earth lead to the negative battery terminal, power up the car and set the system up according to the check if everything works before you reassemble your car. If you installed the rear view camera and set up the DIP switch 7 to ON the rear camera is going to engage soon after inserting reverse gear.
- Page 30 Front Camera setup and operation To engage and disengage the front view camera input onto the screen manually you will have to adjust a setting in the MMI's factory menu. You can access it by entering one of the MMI modules auxiliary video inputs like the rear view camera mode or HDMI/AV by pressing MENU on your iDrive controller for 3s (a black screen will appear if you do not have an HDMI signal source plugged into the MMI –...
- Page 31 Differences between iDrive controllers If your vehicle has an iDrive controller with arrows in 4 directions it is recommended to set the I- DRV TYPE setting in the MMI factory menu to HIGH. By default it is set to LOW. This setting changes which iDrive controller arrows are responsible for selecting the front camera.
Need help?
Do you have a question about the BMW F30 and is the answer not in the manual?
Questions and answers