Table of Contents
Advertisement
Advertisement
Table of Contents

Subscribe to Our Youtube Channel
Related Manuals for Q Acoustics M2


Summary of Contents for Q Acoustics M2
- Page 1 Q m 2 M ANUAL...
-
Page 3: Table Of Contents
Product description Use scenarios Features Top panel Front Rear panel Remote control Operating Q Acoustics Unit On / In / Wall EQ Power and standby Intelligent Pre-Amplifier (IPA ™ Auto On / Off Auto On / Off Times Auto source select Low source gain (LSG ™... -
Page 4: Important Safety Information And Warnings
This transmitter must not be co-located or operated in conjunction with any other antenna or transmitter. CAUTION! Any changes or modifications made to this device that are not expressly approved by Q Acoustics may void the user’s authority to operate the equipment. - Page 5 • To prevent injury,this apparatus must be securely attached to the floor/wall in accordance with the installation instructions. • Never install this product in a confined space. Always leave a space or at least four inches around the product for ventilation. •...
-
Page 6: Introduction
Introduction Thank you for purchasing Q Acoustics. This manual is intended to take you through the setup and installation of the M2. It will help provide a trouble free setup and optimum performance from the product. Please read the instructions, important safety information and warnings carefully before installation and use, to ensure the safe and satisfactory operation of this product. -
Page 7: Feature Summary
DVC – Dual Voice Coil subwoofers are Q Acoustics subwoofer driver of choice, it has two voice coils in one driver for greater flexibility of design and improved bass control. -
Page 8: Product Description
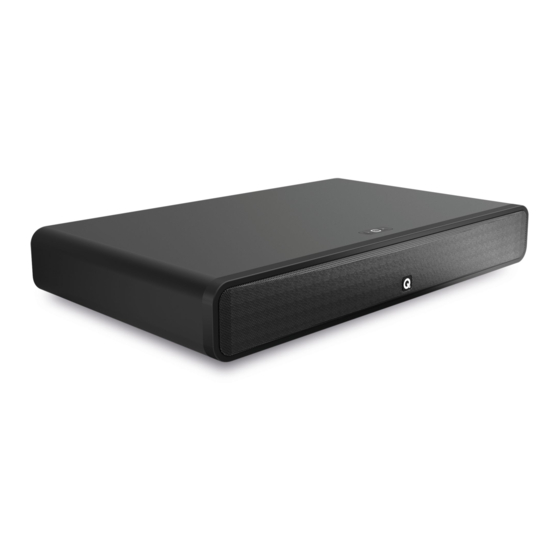
Product description The Qm2 is simplicity redefined; where beautifully engineered sound meets beautiful design. This is an elegantly compact soundbar with a big heart to fill your living room without the clutter of a full Hi-Fi system or even a soundbar with a large external subwoofer. Q Acoustic’s new Intelligent Pre-Amplifier (IPA ) is designed to seamlessly integrate into your home setup. -
Page 9: Use Scenarios
Use scenarios Important Cautions: Q Acoustics accepts no liability for damages caused by incorrect assembly, installation or improper use. • If you choose to place your TV ontop of this soundbar please do so with caution. The TV base must not •... -
Page 10: Features
Features 1. Top Panel a. Deep standby / Standby / Source select d. Status LED 5s press / 2s press / 1s press See LED indications below b. Volume Down e. NFC Pairing Position Single press / press and hold Removable sticker c. -
Page 11: Rear Panel
Analogue Line In 1 a. Bluetooth Pair Button ® The Bluetooth Pair button is used to manually drop any current Bluetooth connection and make the ® ® Unit Discoverable by a new device. Device Settings MY DEVICES Q M2 Connected... - Page 12 b. HDMI (ARC) HDMI (ARC) is for connection to the Audio Return Channel (ARC) output on a TV or other source. If there ™ is a choice between HDMI or Optical connection to the Unit choose HDMI to enable Consumer Electronic ™...
- Page 13 d. Analogue Inputs Line In 1 The Unit has two options for Analogue audio connection. The Status LED will be GREEN when an Analogue input is in use. AUDIO OUT Headphones e. Analogue Inputs Line In 2 Connect the RCA L&R audio output from a TV or other source to the LINE IN 2 sockets using a Phono RCA cable.
- Page 14 f. AC Mains Input Universal power connector automatically selects AC voltage for a given region. Connect to the included AC Mains Cable for your country. Important Note: Always remove the AC Mains Cable when making connections to the Rear Panel. AC MAINS Regional mains cable g.
-
Page 15: Remote Control
4. Remote control a. Power Press this button to turn the Unit STANDBY ON/OFF. b. Source select Press this button to manually select the audio input source. The status LED will change colour accordingly. Important Note: When the Source button is used, the Unit will stay on the selected source and disable the Intelligent Pre- Amplifier (IPA) automatic source selection. -
Page 16: Operating Q Acoustics Unit
Simply select the placement that best fits your living environment using the switch on the Rear Panel, and let Q Acoustics handle the rest. ON = On a cabinet IN+ = In a large cabinet IN- = In a small cabinet 2. -
Page 17: Auto Source Select
During our extensive testing we found that on a number of manufacturer’s equipment the digital signal output level is lower than the expected Full Scale (FS). To allow our users to get the best audio experience from the Q Acoustics Unit we have included a LSG switch. -
Page 18: Source Volume Control
Connected. ® 5. From within the music player on your device, select ‘Q M2’ as the audio output and press Play. Unless the remote has been used to manually select another source and override the IPA , or a higher priority ™... -
Page 19: Lip Sync
® 10. MoviEQ ™ MoviEQ is Q Acoustics’ preferred balance to maximize the excitement and drama from your TV and ™ Movie viewing. MoviEQ is simply toggled On or Off by pressing the Remote Control EQ button. The LED will indicate ™... -
Page 20: Cable / Satellite Remote Control
Cable / satellite remote control The Q Acoustics system has been designed for easy integration into your home entertainment system as it has the ability to be controlled by many types of PROGRAMMABLE REMOTE CONTROL. This may include the remote control for your SATELLITE and CABLE system if it has PUNCH THROUGH capability. Punch through is the common term for being able to program your remote control to send IR codes to both a TV and an AV Preamplifier/Processor. - Page 21 TYPE 2 (CABLE) • Press the “TV” button (top right of remote). • Point remote away from receiver, press and hold “Clear + Vol ”. • The remote’s LED will flash green twice. • Enter “1247”. The remote’s LED will flash green twice to confirm correct code.
-
Page 22: Specification
Specification Product Streamlined Bluetooth Soundbar Type ® Amplifier 80W (2 x 20W + 40W) RMS Output Power <1.00% THD (at rated power) 20Hz – 20kHz Frequency Response ±0.5dB -85dB S/N ratio (A Weighting) 100~240V – 50~60Hz – 100W Mains Power Acoustics Mid-High BMR 58mm x 58mm... -
Page 23: Warranty
Q Acoustics Media products are warranted free of defects in materials and workmanship for a period of 1 year from the date of purchase. During the warranty period Q Acoustics will, at its option, repair or replace any product found to be faulty after inspection by the company or its appointed distributor or agent. - Page 24 Q A C O U S T I C S . C O M Q16341-IS-EN_r1...
Need help?
Do you have a question about the M2 and is the answer not in the manual?
Questions and answers