Advertisement
Quick Links
Advertisement

Related Manuals for Cadence CEQ735

Summary of Contents for Cadence CEQ735
- Page 1 CE7088 65-C1382-MA 尺寸:185*140mm 颜色:一专一黑 Pantone 021C...
- Page 3 The CEQ735 is intended for those who value the acoustic bene ts of a multi-band graphic equalizer coupled with the power of controlling four ampli er channels and two independent sub woofer channels directly from the automobile dash board.
-
Page 4: Specifications / Features
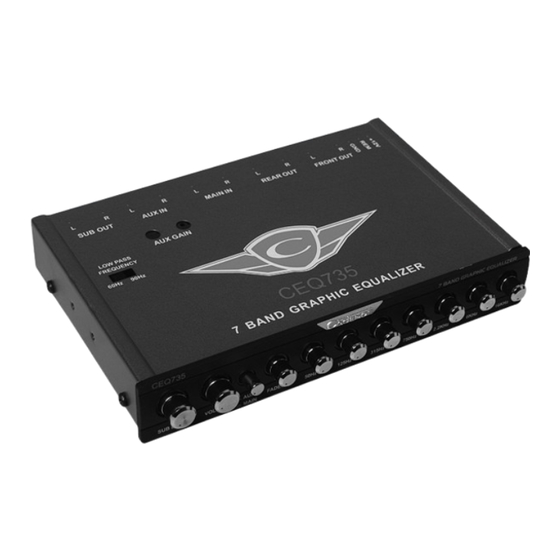
SPECIFICATIONS / FEATURES • 7 Band Graphic Equalizer with Subwoofer Output • Equalizer Line Driver • Front/Rear Outputs with Fader Control • Separate Subwoofer Frequency and Level Controls • RCA Input and Output Connectors • Independent L & R Input Gain Adjustments •... -
Page 5: Back Panel Connections
BACK PANEL CONNECTIONS 1. POWER: After connecting the Ground, Remote and Power wires, plug in the Power Lock connector here. 2. FRONT OUTPUT: Plug in the RCA cables to your front channel ampli er here. 3. REAR OUTPUT: Plug in the RCA cables to your rear channel ampli er here. - Page 6 CONTROLS CEQ735 7 BAND GRAPHIC EQUALIZER VOLUME FADER 50Hz 125Hz 315Hz 750Hz 2.2KHz 6KHz 16KHz SUB LEVEL MAIN 1. SUB LEVEL: Independent level control for subwoofer output. 2. VOLUME CONTROL: This control adjusts the output level. 3. FADER CONTROL: Controls the output level to front and rear.
- Page 7 WIRING DIAGRAMS / ELECTRICAL CEQ735 7 BAND GRAPHIC EQUALIZER...
- Page 8 CEQ735 7 BAND GRAPHIC EQUALIZER...
-
Page 9: Final System Check
7. Restart the system and increase the volume of the CEQ735 to your desired listening pleasure. 8. The CEQ735 should be able to run the system even with the ampli er gains set to minimum. If you can not reach your desired listening level you may raise the ampli er gains. -
Page 10: Installation
INSTALLATION 1. Select the location to mount the unit under the dash board. 2. Drill (4) 4.2 mm diameter holes. Fix the mounting bracket to the location with (4) 4 x 15 mm tapping screw. Be careful when drilling so as not to damage existing wiring under the dash board. 3. - Page 11 NOTES...
Need help?
Do you have a question about the CEQ735 and is the answer not in the manual?
Questions and answers