Advertisement
Available languages
Available languages
Quick Links
Clock Radio
Bluetooth Wireless
CAUTION
RISK OF ELECTRIC SHOCK
DO NOT OPEN
CAUTION: TO REDUCE THE RISK OF ELECTRIC SHOCK, DO NOT REMOVE COVER (OR BACK). NO USER-SERVICEABLE
PARTS INSIDE. REFER SERVICING TO QUALIFIED SERVICE PERSONNEL.
DANGEROUS VOLTAGE:
The lightning flash with arrowhead symbol within an equilateral triangle is
intended to alert the user to the presence of uninsulated dangerous voltage within the product's enclosure
that may be of sufficient magnitude to constitute a risk of electric shock to persons.
ATTENTION:
The exclamation point within an equilateral triangle is intended to alert the user to the
presence of important operating and maintenance (servicing) instructions in the literature accompanying
the appliance.
WARNING:
Users of this product are cautioned not to make modifications or changes that are not
approved by MEM-CE, LLC., doing so may void the compliance of this product and may result in the loss
of the user's authority to operate the equipment.
CAUTION: TO PREVENT ELECTRIC SHOCK, MATCH WIDE BLADE OF PLUG TO WIDE SLOT AND FULLY INSERT.
This device complies with part 15 of the FCC Rules. Operation is subject to the following two conditions: (1) This
device may not cause harmful interference, and (2) this device must accept any interference received, including
interference that may cause undesired operation.
NOTE: This equipment has been tested and found to comply with the limits for a Class B digital device, pursuant to part 15
of the FCC Rules. These limits are designed to provide reasonable protection against harmful interference in a residential
installation. This equipment generates, uses and can radiate radio frequency energy and, if not installed and used in
accordance with the instructions, may cause harmful interference to radio communications. However, there is no guarantee
that interference will not occur in a particular installation. If this equipment does cause harmful interference to radio or
television reception, which can be determined by turning the equipment off and on, the user is encouraged to try to correct
the interference by one or more of the following measures:
• Reorient or relocate the receiving antenna.
• Increase the separation between the equipment and receiver.
• Connect the equipment into an outlet on a circuit different from that to which the receiver is connected.
• Consult the dealer or an experienced radio/TV technician for help.
CAUTION: Any changes or modifications not expressly approved by the party responsible for compliance could void the
user's authority to operate the equipment.
SURGE PROTECTORS: It is recommended to use a surge protector for AC connection. Lightning and power surges
ARE NOT covered under warranty for this product.
WARNING: TO PREVENT FIRE OR SHOCK HAZARD, DO NOT EXPOSE THIS UNIT TO RAIN OR MOISTURE.
IMPORTANT SAFETY INSTRUCTIONS
1.
Read these Instructions.
11. Only use attachments/accessories specified by the
manufacturer.
2.
Keep these Instructions.
12. Unplug this apparatus during lightning storms or when
3.
Heed all Warnings.
unused for long periods of time.
4.
Follow all Instructions.
13. Refer all servicing to qualified service personnel.
5.
Do not use this apparatus near water.
Servicing is required when the apparatus has been
6.
Clean only with a dry cloth.
damaged in any way, such as power-supply cord or
plug is damaged, liquid has been spilled or objects
7.
Do not block any of the ventilation openings. Install
in accordance with the manufacturer's instructions.
have fallen into the apparatus, the apparatus has
been exposed to rain or moisture, does not operate
8.
Do not install near any heat sources such as
normally, or has been dropped.
radiators, heat registers, stoves, or other apparatus
14. WARNING: To reduce the risk of fire or electric shock,
(including amplifiers) that produce heat.
do not expose this apparatus to rain or moisture. Do
9.
Do not defeat the safety purpose of the polarized
not place objects filled with water, such as a vase, on
or grounding-type plug. A polarized plug has two
the apparatus.
blades with one wider than the other. A grounding-
type plug has two blades and a third grounding
15. The AC mains plug is used as the power disconnect
device and it should remain readily accessible and
prong. The wide blade or the third prong are
operable during intended use. In order to completely
provided for your safety. When the provided plug
disconnect the apparatus from power, the mains plug
does not fit into your outlet, consult an electrician
for replacement of the obsolete outlet.
should be completely removed from the AC outlet
socket.
10. Protect the power cord from being walked on
or pinched particularly at plugs, convenience
receptacles, and the point where they exit from the
apparatus.
PRECAUCIONES SOBRE LAS BATERÍAS
Siga estas precauciones cuando use baterías en este dispositivo:
1. Precaución: peligro de explosión si las baterías se cambian incorrectamente. Cambie las baterías solamente por baterías iguales o de
tipo equivalente.
2. Utilice únicamente baterías del tipo y del tamaño especificados.
3. Asegúrese de mantener la polaridad correcta cuando instale las baterías, según se indica en el compartimiento de las baterías. Si la
batería se coloca al revés, puede causar daños en el dispositivo.
4. No mezcle distintos tipos de baterías (por ejemplo, alcalinas, recargables o de carbono zinc) ni baterías viejas con nuevas.
5. Si el dispositivo no va a utilizarse durante un período de tiempo largo, extraiga las baterías para evitar daños o lesiones por posibles
fugas de las baterías.
6. No intente recargar una batería que no sea recargable; puede sobrecalentarse y romperse. (Siga las indicaciones del fabricante de las
baterías).
7. Extraiga las baterías rápidamente si se agotan.
8. Limpie los contactos de las baterías y del dispositivo antes de instalar las baterías.
I'll Wake You Up
HOW TO USE THE MEMOREX MC3533
Congratulations on your purchase of the Memorex Bluetooth
The MC3533 with its dual alarms and sleep function allow you the customized sleep you
deserve and the effective rousing from your slumber to your favorite tunes.Wirelessly
stream your music from your smartphone or tablet, and recharge from the USB port
to power your device while you sleep. Bring it on! Please follow these operational
instructions carefully. Save them for future reference.
POWER CONNECTION
1. Plug the AC-DC adapter into an AC Outlet by connecting the adapter's DC output plug
to the DC In Jack of the clock radio.
2. This unit is equipped with a battery backup system; it requires a 3V flat lithium
"CR2032" battery (not included). Insert the battery into the battery compartment,
making certain that the positive and negative (+ and –) markings correspond on the
plate of the battery compartment.
3. If an AC power failure occurs, the clock automatically switches to the battery power
supply and the clock and timer memory continue running. When the AC power
resumes, the clock switches back to AC again.
SETTING THE TIME
1. With the radio OFF, press and hold the SET/MEMORY button W; "24 Hr" will blink.
Press the SKIP NEXT :
or SKIP BACK 9
button to set the unit to the 12-hour
y
x
(12 Hr) mode or 24-Hour (24 Hr) mode. Press the SET/MEMORY button
and the hours will blink.
2. Press the SKIP NEXT :
or SKIP BACK 9
button to set the current hour, then
y
x
press the SET/MEMORY
button again to confirm the hour; the minute digits will
W
blink. Press the SKIP NEXT :
or SKIP BACK 9
y
x
minutes.
3. When done, press SET/MEMORY
button once again; the current time will
W
then be set.
SETTING THE ALARM
1. Press the ALARM 1 button
OR ALARM 2 button
U
V
2. While the display is showing the alarm time, press and hold the ALARM button (AL.1 /
AL.2) for 3 seconds and the hours will blink.
3. Press the SKIP NEXT :
or SKIP BACK 9
button to set the Alarm Hour.
y
x
4. Press the ALARM button (AL.1 / AL.2) again; the minute digits will blink. Press the
SKIP NEXT :
or SKIP BACK 9
button to set the Alarm Minutes.
y
x
5. When finished, press the ALARM button "AL.1"
/ "AL. 2"
U
mode (Buzzer or Radio) for each alarm.
ENABLING/DISABLING THE ALARM
1. Press and hold the ALARM button "AL.1"
/ "AL. 2"
U
alarm. Once the alarm is activated, the LED next to the Bell Symbol for AL1 and/or
AL2 will be illuminated.
2. To disable the alarm setting, hold the ALARM button "AL.1"
The alarm icon will disappear to indicate the alarm is deactivated.
3. To turn the active alarm off, press the ALARM OFF
X
SNOOZE FUNCTION
1. When Alarm rings, press Snooze button
to suspend the alarm for 9-minute intervals.
u
You may repeat the Snooze cycle several times.
2. To disable the Snooze function and stop alarm completely, press the ALARM OFF
button X.
WAKE UP AND MOOD LIGHTS
1. Select the source (buzzer or radio station) to wake to using the Source button v.
2. Select optional Mood Lights
to correspond with your Alarm settings. Press and hold
ak
the MOOD LIGHT ON-OFF button
for 3 seconds to turn the Mood Lig
X
hts on or off.
SLEEP FEATURE
1. When listening to the radio, press Sleep button
to enter sleep mode.
u
2. Adjust the sleep timer from 10 to 120 minutes by pressing the Sleep button u. The
unit will automatically turn off after the selected time.
DIMMER CONTROL
In Standby mode, press the Dimmer button
to set the brightness of the LED display to
u
high or low levels.
LISTENING TO THE RADIO
1. Turn the unit on by pressing the POWER button X. The LED will indicate Red.
2. Manually search for stations by tapping the SKIP NEXT :
button or auto search by pressing and holding the button for 2 seconds; the next
strong FM station will tune in.
3. Press the POWER button
to turn the radio OFF.
X
TO SET/RECALL THE RADIO PRESETS
1. Turn the unit on by pressing the POWER button X. The LED will indicate Red.
2. Tune a station using the SKIP NEXT :
or SKIP BACK 9
y
3. Press the Set/Memory. button W; "P01" will blink in the display.
HOW TO USE THE MEMOREX MC3533
4. Press the Set/Memory. button
®
Wireless Clock Radio!
W
5. Repeat steps 2 through 4 to set more presets. The unit can preset 10 FM stations.
6. When "P01-P10" is blinking, press the SKIP NEXT :
select the preset number.
7. When recalling preset stations, press the Memory Up/Play/Pause Button/Pair button
to select the preset number in cycle.
w
Nota: Unravel the FM Antenna for best FM reception.
Pair a Bluetooth-Enabled Mobile Device:
1. Ensure that your Bluetooth-enabled device is turned on. Refer to the device user
manual for details.
2. Place the clock radio and the external device no more than 30 feet apart.
3. Turn the unit on by pressing the POWER button X.
4. Press the Source button
to switch to Bluetooth mode. Bluetooth mode is indicated
v
by "BT" on the display. The pair indicator will flash quickly.
5. Using the controls on your Bluetooth device, select the "MRX-MC3533" in your
Bluetooth settings to pair. If your device requests a password, enter the default
password "0000". Refer to the user's manual for your specific device for instructions
on pairing and connecting Bluetooth devices.
6. Select and confirm the pairing on your device; the connection will be completed in
a few seconds and the radio will produce a confirmation tone. When successfully
to confirm
W
paired and connected, the pair indicator will flash slowly on the clock radio. After initial
pairing, the unit will stay paired unless unpaired manually by the user or erased due to
a reset of your device. You can now start streaming music wirelessly from your device.
button to set the current
Listen to Music:
1. When the Bluetooth-enabled device is paired, use the device to Play and Pause
music. The sound will be heard through the speaker.
2. Adjust the speaker volume level either by pressing the "+"
buttons along the bottom of the speaker, or by using the volume controls on your
mobile device.
once.
Listen to Music Using the Line-In Source
1. Turn the unit on by pressing the POWER button X. The LED will indicate Red.
2. Insert one end of the audio cable (included) into the Line Out Jack (or Headphone
Jack) on your external audio device and the other end into the Line-In Jack on this
clock radio.
to change the sound
V
3. Press the Source button
to select the Aux mode.
v
4. Use the connected external audio device to play and pause music. Sound will be
heard through the speaker.
5. Adjust the speaker volume level either by pressing the "+"
to enable (or disable) the
buttons along the bottom of the speaker, or by using the volume controls on the
V
mobile device.
Notes:
/ "AL. 2"
to turn off.
U
V
• The Bluetooth connection will not terminate when switching between Bluetooth and
Line-in Sources.
button.
• There will be no audible tone effects when connected to a Line-In source.
• The MC3533 will revert to the last volume level setting.
• To maximize audio quality and minimize sound distortion, set your personal digital
music device volume to high and use the volume buttons on the MC3533 speaker to
adjust the listening level when connected to a Line-In source.
MAINTAINING YOUR SYSTEM FOR CONTINUED ENJOYMENT
• When not in use, turn the clock radio off. To extend the battery life of your external
audio/mobile device, turn off the Bluetooth signal when not in use.
• Keep the unit away from direct sunlight and excessive heat.
• Clean durable rubberized exterior with a damp soft cloth.
• Protect your furniture when placing the unit on wood and lacquered finishes.
MODE
LED EFFECT
OFF
OFF
ON (Volume keys being pressed) Blinks 3x Blue
Pairing
Blinking Blue
ON (Connected)
Solid Blue
ON (Pairing Fail/Disconnect)
Blinking Blue
Max/Min Volume Reached
Solid Blue
TROUBLESHOOTING
Sound not clear or no sound
• Sound not clear or no sound
or SKIP BACK 9
y
x
• Check volume levels on both MC3533 speaker and connected device.
• Check distance between speaker and connected device. Music does not transfer
from external device to MC3533
• Make sure you are using a Bluetooth-enabled device.
• Select the MC3533 as your speaker device, disconnect speaker and device from
pairing with all other devices.
• Check if both devices are connected.
button.
• Restart the MC3533 and auto connect with the Bluetooth-enabled device. LED will
x
not illuminate
• Check power is on.
Please read these instructions completely before operating this product.
again to set the preset.
or SKIP BACK 9
to
y
x
or "–"
Volume
V
U
1.
Snooze/Sleep/Dimmer Button
2.
Source Button
3.
Memory Up/Play/Pause Button/Pair
Button
4.
Skip 9 Back/Tuning Down Button
5.
Skip : Next/Tuning Up Button
6.
Volume Down/Alarm 1 On-Off Set
Button
or "–"
Volume
V
U
7.
Volume Up/Alarm 2 On-Off Set Button
8.
Set/Memory Button
Power Adapter ....................................................................................... Input AC 100-240V / 50- 60Hz
Power Consumption / Standby Consumption .......................................................................... 5W / <1W
Battery Back Up ..........................................................3V (CR2032 Flat Lithium battery x 1) not included
LED INDICATOR
Weight .......................................................................................................................................... 52g
Dimensions ................................................................................................................ 45 x 45 x 54mm
MODE
LED EFFECT
Compatibility ..............................Compatible with Bluetooth v2.1 + EDR (Enhanced Rate) or 2.1 Standard
Volume Button still being pressed Solid Blue
Radio Frequency ............................................................................................... FM: 87.5MHz–108MHz
Low Battery
Blinking Blue
Accessories ....................................................................................... USB Cable, Line-In Cable, Manual
every 30 sec.
Charging
Blinking Blue
Line-In Audio source in use
Solid Red
LIMITED WARRANTY
MEM-CE, LLC. warrants this product against defects for 90 days from the date of original purchase. MEM-CE, LLC. shall
not be responsible for any lost data or other incidental or consequential damages related to this product. Some jurisdictions
do not allow limitations on how long an implied warranty lasts, or the exclusion or limitation of incidental or consequential
damages, so the above limitations or exclusions may not apply to you. This limited warranty gives you specic legal rights, and
you may have other rights which may vary from one state, province or country to another.
PLEASE KEEP ALL PACKAGING MATERIAL FOR AT LEAST 90 DAYS IN CASE YOU NEED TO RETURN THIS PRODUCT TO YOUR
PLACE OF PURCHASE OR MEM-CE, LLC.
FOR ADDITIONAL SET-UP OR OPERATING ASSISTANCE, PLEASE VISIT OUR WEBSITE AT: WWW.MEMOREX-CE.COM
OR CONTACT CUSTOMER SERVICE: For customers calling within the United States and Canada, call 1-877-363-6673
MEM-CE, LLC. 11485 Valley View Road, Eden Prairie, MN 55344 USA MEMOREX-CE.COM
Memorex and the Memorex logo are trademarks of Imation Corp and its affiliates. The Bluetooth
registered trademarks owned by Bluetooth SIG, Inc. and any use of such marks by Imation Corp is under license. All other
trademarks are the property of their respective owners.
For additional setup, operating assistance or an electronic version of this user manual, please visit MEMOREX-CE.COM
User Guide
MEMOREX-CE.COM
MC3533
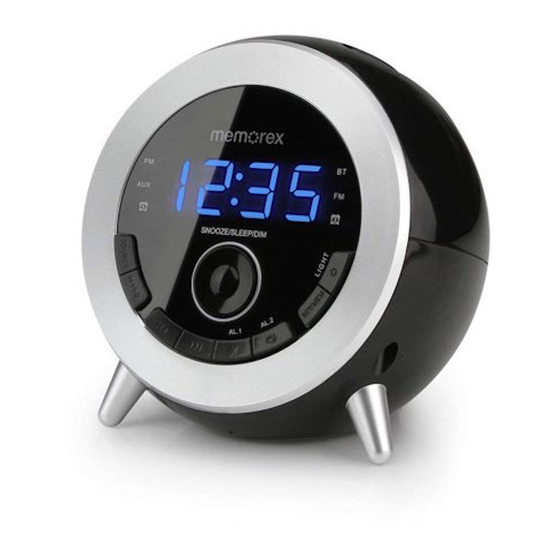
LOCATION OF CONTROLS
9.
Power On-Off/Mood Light On-Off /
Alarm Off Button
10. Display
11. Mood Light
12. USB Charging Socket
13. FM Antenna
14. Battery Compartment
15. Rating Label
16. DC In Jack
17. Aux In Jack
18. Speaker
SPECIFICATIONS AND COMPATIBILITY
Output DC 5V 1500mA
®
word mark and logos are
Advertisement

Related Manuals for Memorex MC3533


Summary of Contents for Memorex MC3533
- Page 1 Wireless Clock Radio! RISK OF ELECTRIC SHOCK The MC3533 with its dual alarms and sleep function allow you the customized sleep you 5. Repeat steps 2 through 4 to set more presets. The unit can preset 10 FM stations. DO NOT OPEN deserve and the effective rousing from your slumber to your favorite tunes.Wirelessly...
- Page 2 4. No mezcle distintos tipos de baterías (por ejemplo, alcalinas, recargables o de carbono zinc) ni baterías viejas con nuevas. Memorex y el logotipo de Memorex son marcas comerciales de Imation Corp y sus afiliados. Todas las demás marcas comerciales 5. Si el dispositivo no va a utilizarse durante un período de tiempo largo, extraiga las baterías para evitar daños o lesiones por posibles LED se iluminará...
Need help?
Do you have a question about the MC3533 and is the answer not in the manual?
Questions and answers