KERN EWJ 300-3 Operating Instructions Manual
Precision balances ewj series
Hide thumbs
Also See for EWJ 300-3:
- Operating manual (40 pages) ,
- Operating instructions manual (77 pages)
Table of Contents
Advertisement
Available languages
Available languages
Quick Links
Betriebsanleitung Präzisionswaagen
Operating instructions Precision balances
Mode d'emploi Balances de précision
KERN EWJ
Version 1.5
09/2016
KERN & Sohn GmbH
Ziegelei 1
D-72336 Balingen
E-Mail: info@kern-sohn.com
Tel: +49-[0]7433- 9933-0
Fax: +49-[0]7433-9933-149
Internet: www.kern-sohn.com
EWJ-BA-def-1615
Advertisement
Chapters
Table of Contents

Related Manuals for KERN EWJ 300-3


Summary of Contents for KERN EWJ 300-3
- Page 1 KERN & Sohn GmbH Ziegelei 1 Tel: +49-[0]7433- 9933-0 D-72336 Balingen Fax: +49-[0]7433-9933-149 E-Mail: info@kern-sohn.com Internet: www.kern-sohn.com Betriebsanleitung Präzisionswaagen Operating instructions Precision balances Mode d’emploi Balances de précision KERN EWJ Version 1.5 09/2016 EWJ-BA-def-1615...
- Page 2 Weitere Sprachversionen finden Sie online unter www.kern-sohn.com/manuals Další jazykové verze najdete na webu pod adresou www.kern-sohn.com/manuals Más versiones de idiomas se encuentran online bajo www.kern-sohn.com/manuals Vous trouverez d’autres versions de langue online sous www.kern-sohn.com/manuals Muut kieliversiot löytyvät osoitteesta www.kern-sohn.com/manuals Further language versions you will find online under www.kern-sohn.com/manuals Trovate altre versioni di lingue online in www.kern-sohn.com/manuals...
-
Page 3: Table Of Contents
KERN EWJ Version 1.5 09/2016 Betriebsanleitung Präzisionswaage Inhaltsverzeichnis Technische Daten ..................4 Geräteübersicht ..................... 7 Tastaturübersicht ........................9 Anzeigenübersicht ........................10 Grundlegende Hinweise ................11 Bestimmungsgemäße Verwendung ..................11 Sachwidrige Verwendung ......................11 Gewährleistung ......................... 11 Prüfmittelüberwachung ......................12 Grundlegende Sicherheitshinweise ............12 Hinweise in der Betriebsanleitung beachten ................ - Page 4 Menü ......................30 Navigation im Menü ........................30 Einstieg ins Technikmenü......................31 Übersicht........................... 32 Schnittstellen ....................35 Technische Daten ........................35 Drucker Betrieb (RS 232) ......................36 Ausgabeprotokoll (Kontinuierliche Ausgabe) ................37 Wartung, Instandhaltung, Entsorgung ............37 10.1 Reinigen............................ 37 10.2 Wartung, Instandhaltung ......................
-
Page 5: Technische Daten
1 Technische Daten KERN EWJ 300-3 EWJ 300-3H EWJ 3000-2 Ablesbarkeit (d) 0,001 g 0,001 g 0,01 g Wägebereich (Max) 300 g 300 g 3000 g Reproduzierbarkeit 0,001g 0,001g 0,02 g Linearität ±0,003 g ±0,003 g ±0,05 g Kleinstes Teilegewicht bei... - Page 6 KERN EWJ 600-2M EWJ 600-2SM Ablesbarkeit (d) 0,01 g 0,01 g Wägebereich (Max) 600 g 600 g Reproduzierbarkeit 0,01 g 0,01 g Linearität ± 0,03 g ± 0,03 g Eichwert (e) 100 mg 100 mg Eichklasse Mindestgewicht (min) 500 mg...
- Page 7 KERN EWJ 6000-1M EWJ 6000-1SM Ablesbarkeit (d) 0,1 g 0,1 g Wägebereich (Max) 6000 g 6000 g Reproduzierbarkeit 0,1 g 0,1 g Linearität ± 0,3 g ± 0,3 g Eichwert (e) Eichklasse Mindestgewicht (min) Kleinstes Teilegewicht bei 20 mg 20 mg Stückzählung...
-
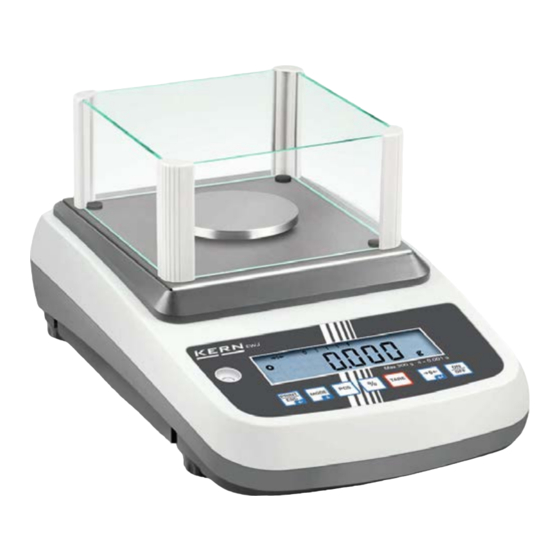
Page 8: Geräteübersicht
2 Geräteübersicht Beispiel EWJ 300-3 / EWJ 600-2M: Windschutz Wägeplatte Fußschraube Libelle Tastatur Anzeige RS-232 Anschluss Netzgerät 10. Akkufach 11. Transportsicherungen 12. Justierschalter EWJ-BA-d-1615... - Page 9 Beispiel EWJ 300-3H: 1. Windschutz 2. Wägeplatte 3. Anzeige 4. Libelle 5. Tastatur 6. Fußschraube 7. RS-232 8. USB 9. Anschluss Netzgerät 10. Akkufach 11. Transportsicherungen 12. Justierschalter EWJ-BA-d-1615...
-
Page 10: Tastaturübersicht
2.1 Tastaturübersicht Taste Funktion Funktion im Menü Wägedaten über Schnittstelle Menü verlassen / zurück in den übermitteln Wägemodus Wägeeinheit umschalten Im Menü vorwärts blättern Stückzählen Summenspeicher löschen Prozentbestimmung Interne Justierung starten (langer Tastendruck) Tarieren Nullstellen Gewählte Einstellung übernehmen Ein-/Ausschalten EWJ-BA-d-1615... -
Page 11: Anzeigenübersicht
2.2 Anzeigenübersicht Nullanzeige Der angezeigt Gewichtswert ist ein Netto-Gewichtswert Kapazitätsanzeige Die Bargraph-Anzeige läuft von links nach rechts und schreitet in gleichem Maße voran, wie die Waage belastet wird. Seine volle Breite erreicht er bei Höchstlast. Damit wird die aktuelle Belegung des Wägebereiches analog angezeigt. -
Page 12: Grundlegende Hinweise
Die Waage darf nicht konstruktiv verändert werden. Dies kann zu falschen Wägeergebnissen, sicherheitstechnischen Mängeln sowie der Zerstörung der Waage führen. Die Waage darf nur gemäß den beschriebenen Vorgaben eingesetzt werden. Abweichende Einsatzbereiche/Anwendungsgebiete sind von KERN schriftlich freizugeben. 3.3 Gewährleistung Gewährleistung erlischt bei •... -
Page 13: Prüfmittelüberwachung
überprüft werden. Der verantwortliche Benutzer hat hierfür ein geeignetes Intervall sowie die Art und den Umfang dieser Prüfung zu definieren. Informationen bezüglich der Prüfmittelüberwachung von Waagen sowie der hierfür notwendigen Prüfgewichte sind auf der KERN- Homepage (www.kern-sohn.com) verfügbar. In seinem akkreditierten DKD- Kalibrierlaboratorium können... -
Page 14: Auspacken, Aufstellung Und Inbetriebnahme
Arbeitsplatz aufstellen. Überprüfen, ob alle Teile des Lieferumfangs vorhanden und unbeschädigt sind. 6.2.1 Lieferumfang / Serienmäßiges Zubehör: • Waage, s. Kap. 2 • Netzadapter • Arbeitsschutzhaube • Betriebsanleitung • Transportsicherung • Glaswindschutz nur Modelle EWJ 300-3, EWJ 300-3H, EWJ 600-2M, EWJ 600-2SM EWJ-BA-d-1615... -
Page 15: Aufstellen/Transportsicherung Entfernen
6.2.2 Aufstellen/Transportsicherung entfernen Zur Genauigkeit der Wägeresultate von hochauflösenden Präzisionswaagen trägt der richtige Standort entscheidend bei (s. Kap. 6.1). Schraube bis auf Anschlag nach links drehen Wägeplatte und ggf. Windschutz installieren. EWJ-BA-d-1615... - Page 16 Wägeplatte wie folgt montieren: Modelle EWJ-300: Halterung Wägeplatte aufsetzen Schraube mit Innensechskant vorsichtig eindrehen und Halterung Wägeplatte damit fixieren Wägeplatte aufsetzen EWJ-BA-d-1615...
- Page 17 Modelle EWJ-600-2M_EWJ-3000-2: Halterung Wägeplatte aufsetzen Schraube mit Innensechskant vorsichtig eindrehen und Halterung Wägeplatte damit fixieren Wägeplatte aufsetzen EWJ-BA-d-1615...
- Page 18 Modelle EWJ-6000: Wägeplatte aufsetzen Darauf achten dass die schräge Seite nach vorne zeigt Schraube mit Innensechskant vorsichtig eindrehen und Wägeplatte damit fixieren Die Waage mit Fußschrauben nivellieren, bis sich die Luftblase in der Libelle im vorgeschriebenen Kreis befindet. Nivellierung regelmäßig überprüfen EWJ-BA-d-1615...
-
Page 19: Netzanschluss
6.3 Netzanschluss Die Stromversorgung erfolgt über das externe Netzgerät. Der aufgedruckte Spannungswert muss mit der örtlichen Spannung übereinstimmen. Nur KERN-Originalnetzgeräte verwenden. Die Verwendung anderer Fabrikate bedarf der Zustimmung von KERN. 6.4 Akkubetrieb (Option) Der Akku sollte vor der ersten Benutzung mindestens 12 Stunden über das Netzteil geladen werden. -
Page 20: Justierung
6.7 Justierung Da der Wert der Erdbeschleunigung nicht an jedem Ort der Erde gleich ist, muss jedes Anzeigegerät mit angeschlossener Wägeplatte – gemäß dem zugrunde liegenden physikalischen Wägeprinzip – am Aufstellort auf die dort herrschende Erdbeschleunigung abgestimmt werden (nur wenn das Wägesystem nicht bereits im Werk auf den Aufstellort justiert wurde). -
Page 21: Automatische Interne Justierung
6.7.2 Automatische interne Justierung Die automatische Justierung wird durchgeführt: • wenn die Waage aus- und eingeschaltet wird. • nach Ablauf eines Zeit-Intervalls Nach Ablauf eines im Menü (F5 HoUr, s. Kap. 8.3) festgelegten Zeitintervalls (wählbar 1 – 8 Std.) wird die interne Justierung automatisch gestartet. ... -
Page 22: Eichung
6.8 Eichung Allgemeines: Nach der EU-Richtlinie 90/384/EWG oder 2009/23EG müssen Waagen geeicht sein, wenn sie wie folgt verwendet werden (gesetzlich geregelter Bereich): a) Im geschäftlichen Verkehr, wenn der Preis einer einer Ware durch Wägung bestimmt wird. b) Bei der Herstellung von Arzneimitteln in Apotheken sowie bei Analysen im medizinischen und pharmazeutischen Labor. -
Page 23: Betrieb
7 Betrieb 7.1 Einschalten drücken. Die Anzeige leuchtet auf und das Motorengeräusch des Ladesystems für das interne Justiergeweicht ist hörbar. Die Waage führt einen Selbsttest durch, die Höchstlast und Software Version werden ebenfalls kurz angezeigt, gefolgt von der internen Justierung. Während dieses Vorgangs erscheint „CAL“... -
Page 24: Prozentbestimmung
7.5 Wägen mit Tara Leeren Wägebehälter auflegen. Stabilitätsanzeige abwarten, dann drücken. Die Nullanzeige erscheint. Das Gewicht des Gefäßes ist nun intern gespeichert. Wägegut einwiegen, das Nettogewicht wird angezeigt. • Die Waage kann immer nur einen Tarawert speichern. • Bei entlasteter Waage wird der gespeicherte Tarawert mit negativem Vorzeichen angezeigt. -
Page 25: Stückzählen
7.7 Stückzählen Bevor die Waage Teile zählen kann, muss sie das durchschnittliche Stückgewicht, die so genannte Referenz kennen. Dazu muss eine bestimmte Anzahl der zu zählenden Teile aufgelegt werden. Die Waage ermittelt das Gesamtgewicht und teilt es durch die Anzahl der Teile, die so genannte Referenzstückzahl. Auf Basis des berechneten durchschnittlichen Stückgewichts wird anschließend die Zählung durchgeführt. -
Page 26: Manuelles Summieren
7.8 Manuelles Summieren Mit dieser Funktion werden die einzelnen Wägewerte durch Drücken von in den Summenspeicher addiert und bei Anschluss eines optionalen Druckers ausgegeben. Die Summierfunktion ist bei Menüeinstellung „SALE-Mode no“ aktiv, s. Kap. 8.2. • Menüeinstellungen, s. Kap. 8.2: „F3 COM“... - Page 27 Wägegut B auflegen, z. B. 200 g. Stabilitätsanzeige abwarten, dann drücken. Der Gewichtswert wird in den Summenspeicher addiert und ausgegeben. Die Anzahl Wägungen gefolgt vom Gesamtgewicht werden 2 s lang angezeigt. Danach wird der aktuelle Gewichtswert angezeigt. Nach Bedarf weiteres Wägegut wie vorhergehend beschrieben summieren. Darauf achten, dass das Wägesystem zwischen den einzelnen Wägungen entlastet werden muss.
- Page 28 Gesamtgewicht werden 2 sec. lang angezeigt und bei Anschluss eines optionalen Druckers ausgegeben Summenspeicher löschen: Bei Anzeige „Summe „Total““ drücken. Die Daten im Summenspeicher werden gelöscht. Ausdruckbeispiel (KERN YKB-01N): 100.00 g Erste Wägung 100.00 g 200.00 g Zweite Wägung 200.00 g...
-
Page 29: Automatisches Summieren
7.9 Automatisches Summieren Mit dieser Funktion werden die einzelnen Wägewerte ohne Drücken von automatisch beim Entlasten der Waage in den Summenspeicher addiert und bei Anschluss eines optionalen Druckers ausgegeben. Die Summierfunktion ist bei Menüeinstellung „SALE-Mode no“ aktiv, s. Kap. 8.2. •... - Page 30 Wägegut abnehmen. Der Wägewert wird in den Summenspeicher addiert und bei Anschluss eines optionalen Druckers ausgegeben. Die Anzahl Wägungen gefolgt vom Gesamtgewicht werden 2 sec. lang angezeigt. Nach Bedarf weiteres Wägegut wie vorhergehend beschrieben summieren. Darauf achten, dass das Wägesystem zwischen den einzelnen Wägungen entlastet werden muss.
-
Page 31: Menü
8 Menü 8.1 Navigation im Menü Waage einschalten und während des Selbsttests Menü aufrufen drücken. Der erste Menüpunkt „F1 Unt„ wird angezeigt. Menüpunkt anwählen Mit lassen sich die einzelnen Menüpunkte der Reihe nach anwählen. Einstellung anwählen Ausgewählten Menüpunkt mit bestätigen. -
Page 32: Einstieg Ins Technikmenü
8.2 Einstieg ins Technikmenü Der Zugang zum Technikmenü „tECH“ ist mit der Tastenkombination gesperrt. Bei Waagen mit Bauartzulassung muss bei Anzeige „tECH“ die Siegelmarke zerstört der Justierschalter betätigt werden. Position des Justierschalters s. Kap. 6.11 Achtung: Nach Zerstörung der Siegelmarke muss die Waage durch eine autorisierte Stelle neu geeicht und eine neue Siegelmarke angebracht werden, bevor es wieder in eichpflichtige Anwendungen verwendet werden darf. -
Page 33: Übersicht
8.3 Übersicht Werkseinstellungen sind mit * gekennzeichnet. Menüblock Menüpunkt Verfügbare Einstellungen / Erklärung F1 Unt Nicht dokumentiert Wägeeinheiten Automatische Hinterleuchtung nur bei Belastung EL AU* der Wägeplatte oder Tastendruck. F2 bl Hinterleuchtung der Anzeige ständig Hinterleuchtung EL on eingeschaltet der Anzeige EO oFF Hinterleuchtung der Anzeige ausgeschaltet F3 Com... - Page 34 Fernsteuerbefehle P ASK Befehl Funktion Stabiler Wägewert für das Gewicht wird über Schnittstelle gesendet Wägewert für das Gewicht (stabil oder instabil) wird über Schnittstelle gesendet Es werden keine Daten gesendet, die Waage führt die Tara-Funktion aus. Es werden keine Daten gesendet, die Null- Anzeige erscheint.
- Page 35 SALE m Sale mode no SALE n EWJ 300-3: EWJ 600-2M: EWJ 6000-1M: d = 0.001 g d = 0.01 g d = 0.1 g Sale mode yes SALE y EWJ 300-3: EWJ 600-2M: EWJ 6000-1M: d = 0.01 g d = 0.1 g...
-
Page 36: Schnittstellen
PC-Software (z. B. KERN Balance Connection) erkannt und angesprochen wird. Wir empfehlen das USB-Schnittstellen-Set KERN DBS A02 (Lieferumgang: USB-Kabel, Treiber CD, Software Balance Connection.) Informationen sind auf der KERN- Hompage (www.kern-sohn.com) verfügbar. Für die Kommunikation zwischen Waage und Peripheriegeräte müssen folgende Bedingungen erfüllt sein:... -
Page 37: Drucker Betrieb (Rs 232)
9.2 Drucker Betrieb (RS 232) Ausdruckbeispiele (KERN YKB-01N) 1. Menüeinstellung F3 COM „P Prt“ Bruttogewicht 300.00g Nettogewicht 100.0g Prozentbestimmung PERC: 50.01 % Stückzählen 20PCS 5.00027g 100g 49.99g Summieren 49.99g 49.99g 49.99g 149.99g 149.99g 299.97g 2. Menüeinstellung F3 COM „P Cont“... -
Page 38: Ausgabeprotokoll (Kontinuierliche Ausgabe)
Lose Probenreste/Pulver können vorsichtig mit einem Pinsel oder Handstaubsauger entfernt werden. Verschüttetes Wägegut sofort entfernen. 10.2 Wartung, Instandhaltung Das Gerät darf nur von geschulten und von KERN autorisierten Servicetechnikern geöffnet werden. Vor dem Öffnen vom Netz trennen. 10.3 Entsorgung Die Entsorgung von Verpackung und Gerät ist vom Betreiber nach gültigem... -
Page 39: Kleine Pannenhilfe
11 Kleine Pannenhilfe Bei einer Störung im Programmablauf sollte die Waage kurz ausgeschaltet und vom Netz getrennt werden. Der Wägevorgang muss dann wieder von vorne begonnen werden. Hilfe: Störung Mögliche Ursache Die Gewichtsanzeige leuchtet nicht. • Die Waage ist nicht eingeschaltet. •... -
Page 40: Konformitätserklärung
12 Konformitätserklärung Die aktuelle EG/EU-Konformitätserklärung finden Sie online unter: www.kern-sohn.com/ce Bei geeichten Waagen (= konformitätsbewerteten Waagen) ist die Konformitätserklärung im Lieferumfang enthalten. EWJ-BA-d-1615... - Page 42 KERN EWJ Version 1.5 09/2016 Operating manual Precision balance Contents Technical data ....................4 Appliance overview ..................7 Keyboard overview ........................9 Overview of display ........................10 Basic Information (General) ................ 11 Proper use ..........................11 Improper Use ..........................11 Warranty ...........................
- Page 43 Menu ......................30 Navigation in the menu ......................30 Access to technology menu...................... 31 Overview ........................... 32 Interfaces ...................... 35 Technical data .......................... 35 Printer operation (RS 232)......................36 Output log (continuous output) ....................37 Servicing, maintenance, disposal .............. 37 10.1 Clean ............................
-
Page 44: Technical Data
1 Technical data KERN EWJ 300-3 EWJ 300-3H EWJ 3000-2 Readability (d) 0.001 g 0.001 g 0.01 g Weighing range (max) 300 g 300 g 3000 g Reproducibility 0.001g 0.001g 0.02 g Linearity ±0.003 g ±0.003 g ±0.05 g Smallest part weight for... - Page 45 KERN EWJ 600-2M EWJ 600-2SM Readability (d) 0.01 g 0,01 g Weighing range (max) 600 g 600 g Reproducibility 0.01 g 0,01 g Linearity ± 0,03 g ± 0,03 g Verification value (e) 100 mg 100 mg Verification class Minimum weight (min)
- Page 46 KERN EWJ 6000-1M EWJ 6000-1SM Readability (d) 0.1 g 0,1 g Weighing range (max) 6000 g 6000 g Reproducibility 0.1 g 0,1 g Linearity ± 0.3 g ± 0,3 g Verification value (e) Verification class Minimum weight (min) Smallest part weight for...
-
Page 47: Appliance Overview
2 Appliance overview Example EWJ 300-3 / EWJ 600-2M: Windshield Weighing pan Levelling screw Bubble level Keyboard Display RS-232 Terminal power supply unit 10. Battery compartment 11. Transportation locks 12. Adjustment switch EWJ-BA-e-1615... - Page 48 Example EWJ 300-3H: 1. Windshield 2. Weighing pan 3. Display 4. Bubble level 5. Keyboard 6. Levelling screw 7. RS-232 8. USB 9. Terminal power supply unit 10. Battery compartment 11. Transportation locks 12. Adjustment switch EWJ-BA-e-1615...
-
Page 49: Keyboard Overview
2.1 Keyboard overview Function Function in Menu Calculate weighing data via Exit menu / back to weighing mode. interface Switch-over weighing unit Scroll forward in menu Parts counting Delete total added memory Percent determination Start internal adjustment (longer pressing of the button) Taring Zeroing Take over selected setting... - Page 50 2.2 Overview of display Zero indicator The displayed weighing value is a net weighing value Capacity display The bar graph display moves from the left to the right and proceeds equally to the weight loaded onto the weighing balance. Its full width is reached at maximum load.
-
Page 51: Basic Information (General)
The balance may only be used according to the described conditions. Other areas of use must be released by KERN in writing. 3.3 Warranty Warranty claims shall be voided in case •... -
Page 52: Monitoring Of Test Resources
Information is available on KERN’s home page (www.kern-sohn.com with regard to the monitoring of balance test substances and the test weights required for this. In KERN's accredited DKD calibration laboratory test weights and balances may be calibrated (return to the national standard) fast and at moderate cost. -
Page 53: Unpacking, Setup And Commissioning
6.2.1 Scope of delivery / serial accessories: • Balance, see chap. 2 • Mains adapter • Protective cover • Operating manual • Transport Securing • Glass wind shield only models EWJ 300-3, EWJ 300-3H, EWJ 600-2M, EWJ 600- EWJ-BA-e-1615... -
Page 54: Installing / Removing Transport Fittings
6.2.2 Installing / removing transport fittings The right place is decisive for the accuracy of the weighing results of high-resolution precision balances (see chap. 6.1). Turn the screw to the stop to the left Install weighing plate and wind shield if necessary. EWJ-BA-e-1615... - Page 55 Install weighing plate as follows: Models EWJ-300: Put holder weighing plate Screw screw with hexagon socket carefully and fix holder weighing plate so Attach the weighing plate EWJ-BA-e-1615...
- Page 56 Models EWJ-600-2M_EWJ-3000-2 Put holder weighing plate Screw screw with hexagon socket carefully and fix holder weighing plate so Attach the weighing plate EWJ-BA-e-1615...
- Page 57 Models EWJ-6000: Attach the weighing plate Ensure that the slanted side faces forward Screw screw with hexagon socket carefully and fix pan so Level balance with foot screws until the air bubble of the water balance is in the prescribed circle.
-
Page 58: Mains Connection
Before connecting or disconnecting of additional devices (printer, PC) to the data interface, always disconnect the balance from the power supply. With your balance, only use accessories and peripheral devices by KERN, as they are ideally tuned to your balance. -
Page 59: Adjustment
6.7 Adjustment As the acceleration value due to gravity is not the same at every location on earth, each display unit with connected weighing plate must be coordinated - in compliance with the underlying physical weighing principle - to the existing acceleration due to gravity at its place of location (only if the weighing system has not already been adjusted to the location in the factory). -
Page 60: Automatic Internal Adjustment
6.7.2 Automatic internal adjustment Automatic adjustment takes place: • when the balance is switched off and on. • at the end of a time interval After a set time interval (selectable 1 – 8 hrs.) in the menu (F5 HoUr, see chap. 8.3) the internal adjustment is automatically started. -
Page 61: Verification
6.8 Verification General introduction: According to EU directive 90/384/EEC or 2009/23EG balances must be officially verified if they are used as follows (legally controlled area): a) For commercial transactions if the price of goods is determined by weighing. b) For the production of medicines in pharmacies as well as for analyses in the medical and pharmaceutical laboratory. -
Page 62: Operation
7 Operation 7.1 Start-up Press The display is shining and the motor noise of the loading system for the internal adjustment weight can be heard. The balance carries out a selftest, the maximum load and software version will also be shortly displayed, followed by the internal adjustment. During this process „CAL“... -
Page 63: Percent Determination
7.5 Weighing with tare Deposit empty weighing container. Wait for stability display, then press Zero display appears. The weight of the container is now internally saved. Weigh the material, the net weight will be indicated. • The balance is able to only store one taring value at a time. •... -
Page 64: Parts Counting
7.7 Parts counting Before the balance can count parts, it must know the average part weight (i.e. reference). Proceed by putting on a certain number of the parts to be counted. The balance determines the total weight and divides it by the number of parts, the so- called reference quantity. -
Page 65: Manual Totalizing
7.8 Manual totalizing With this function the individual weighing values are added into the summation memory by pressing and edited, when an optional printer is connected. The totalizing function is active at menu setting „SALE-Mode no“, see chap. 8.2. • For menu settings, see chapter 8.2: „F3 COM“... - Page 66 Place item to be weighed B, e.g. 200 g. Wait for stability display, then press . The weight value will be added to the summation memory and edited. Number of weighings, followed by the total weight will be displayed for 2 sec. After that the current weighing value is displayed. ...
- Page 67 2 sec and printed if an optional printer is connected. Delete total added memory: When display „Sum „Total““ appears, press . The data in the summation memory are deleted. Printout example (KERN YKB-01N): 100.00 g First weighing 100.00 g 200.00 g Second weighing 200.00 g...
-
Page 68: Automatic Adding-Up
7.9 Automatic adding-up With this function the individual weighing values are automatically added into the summation memory when the balance is unloaded without pressing and edited, when an optional printer is connected. The totalizing function is active at menu setting „SALE-Mode no“, see chap. - Page 69 Remove the weighed good. The weighing value is added to the summation memory and printed if an optional printer is connected. Number of weighings, followed by the total weight will be displayed for 2 sec. Add more weighed goods as described before. Please note that the weighing system must be unloaded between the individual weighing procedures.
-
Page 70: Menu
8 Menu 8.1 Navigation in the menu Call up menu Switch-on balance and during the selftest press The first menu item „F1 Unt„ is displayed. Select menu item With help of , the individual menu items can be selected one after the other. -
Page 71: Access To Technology Menu
8.2 Access to technology menu The access to the technology menu „tECH“ is locked by the key combination When on balances with type approval „tECH“ is displayed, the seal mark must be destroyed and the adjustment switch be actuated. Position of adjustment switch see chap. -
Page 72: Overview
8.3 Overview Factory settings are marked by *. Menu block Menu item Available settings / explanation F1 Unt Not documented Weighing Units Automatic background illumination on when EL AU* F2 bl weighing pate is loaded or key pressed. Display Background lighting of display is switched on EL on background permanently... - Page 73 Mask loading status display „Recharg.battery“ P6 bAtt bAtton Display loading status display „Recharg.battery“ SALE m Sale mode no: d= 0.1g SALE n EWJ 300-3: EWJ 600-2M: EWJ 6000-1M: d= 0.001 g d= 0.01 g d= 0.1 g Sale mode yes: d= 0.01 g...
- Page 74 Technology menu, see chap. 8.2 tECH At „Pin“ display press subsequently the first menu block „P1 Lin“ will be displayed. P1 Lin Linearisation (not documented) P2 CAL Adjustment (not documented) XXXXX P3 Cnt Display internal resolution P4 A 2n A2 oFF Automatic zero point correction switched off 0.5d Automatic zero point correction (Autozero) by...
-
Page 75: Technical Data
PC software (e.g. KERN balance connection). We recommend the USB interface set KERN DBS A02 (scope of supply: USB cable, driver CD, software balance connection.) For further information please go to KERN-Homepage (www.kern-sohn.com). -
Page 76: Printer Operation (Rs 232)
9.2 Printer operation (RS 232) Printout examples (KERN YKB-01N): 1. Menu setting F3 COM „P Prt“ Gross weight 300.00g Net weight 100.0g Percent determination PERC: 50.01 % Parts counting 20PCS 5.00027g 100g 49.99g Totalization 49.99g 49.99g 49.99g 149.99g 149.99g 299.97g 2. -
Page 77: Output Log (Continuous Output)
Spilled weighing goods must be removed immediately. 10.2 Servicing, maintenance The appliance may only be opened by trained service technicians who are authorized by KERN. Before opening, disconnect from power supply. 10.3 Disposal Disposal of packaging and appliance must be carried out by operator according to valid national or regional law of the location where the appliance is used. -
Page 78: Instant Help
11 Instant help In case of an error in the program process, briefly turn off the balance and disconnect from power supply. The weighing process must then be restarted from the beginning. Help: Fault Possible cause The displayed weight does not glow. -
Page 79: Declaration Of Conformity
12 Declaration of conformity To view the current EC/EU Declaration of Conformity go to: www.kern-sohn.com/ce The scope of delivery for verified weighing balances (= conformity- rated weighing balances) includes a Declaration of Conformity. EWJ-BA-e-1615... - Page 80 KERN EWJ Version 1.5 09/2016 Notice d’utilisation Balance de précision Table des matières Caractéristiques techniques ................. 4 Aperçu de l’appareil ..................7 Vue d’ensemble du clavier ......................9 Vue d’ensemble des affichages ....................10 Indications fondamentales (généralités) ........... 11 Utilisation conforme aux prescriptions ..................11 Utilisation inadéquate .......................
- Page 81 Menu ......................31 Navigation dans le menu ......................31 Accès au menu technique ......................32 Aperçu ............................33 Interfaces ...................... 36 Caractéristiques techniques ..................... 36 Fonctionnement de l’imprimante (RS 232) ................37 Protocole d’édition (édition en continu) ..................38 Maintenance, entretien, élimination ............38 10.1 Nettoyage ..........................
-
Page 82: Caractéristiques Techniques
1 Caractéristiques techniques KERN EWJ 300-3 EWJ 300-3H EWJ 3000-2 Lisibilité (d) 0,001 g 0,001 g 0,01 g Plage de pesée (max) 300 g 300 g 3000 g Reproductibilité 0,001g 0,001g 0,02 g Linéarité ±0,003 g ±0,003 g ±0,05 g Plus petit poids des pièces en... - Page 83 KERN EWJ 600-2M EWJ 600-2SM Lisibilité (d) 0,01 g 0,01 g Plage de pesée (max) 600 g 600 g Reproductibilité 0,01 g 0,01 g Linéarité ± 0,03 g ± 0,03 g Echelon d’étalonnage (e) 100 mg 100 mg Classe d’étalonnage...
- Page 84 KERN EWJ 6000-1M EWJ 6000-1SM Lisibilité (d) 0,1 g 0,1 g Plage de pesée (max) 6000 g 6000 g Reproductibilité 0,1 g 0,1 g Linéarité ± 0,3 g ± 0,3 g Echelon d’étalonnage (e) Classe d’étalonnage Poids minimum (min) Plus petit poids des pièces en...
-
Page 85: Aperçu De L'appareil
2 Aperçu de l’appareil Exemple EWJ 300-3 / EWJ 600-2M: Pare-brise Plateau de pesée Vis des pieds Bulle d’air Clavier Afficheur RS-232 9. Branchement du bloc d’alimentation secteur ompartiment à piles rechargeables 11. Cales de transport 12. Interrupteur d’ajustage EWJ-BA-f-1615... - Page 86 Exemple EWJ 300-3H: 1. Pare-brise 2. Plateau de pesée 3. Afficheur 4. Bulle d’air 5. Clavier 6. Vis des pieds 7. RS-232 8. USB 9. Branchement du bloc d’alimentation secteur 10. Compartiment à piles rechargeables 11. Cales de transport 12. Interrupteur d’ajustage EWJ-BA-f-1615...
-
Page 87: Vue D'ensemble Du Clavier
2.1 Vue d’ensemble du clavier Touche Fonction Fonction dans le menu Rechercher les données de pesée Quitter le menu / rentrer dans le par l’interface mode de pesée Commutation de l’unité de pesée Feuilleter en avant dans le menu Comptage de pièces Effacer la mémoire de sommes Détermination du pourcentage Démarrer l’ajustage interne... -
Page 88: Vue D'ensemble Des Affichages
2.2 Vue d’ensemble des affichages Affichage du zéro La valeur pondérale affichée est une valeur de pesée nette Affichage de capacité L’affichage du barographe s’effectue de gauche à droite et évolue en même temps que la balance est chargée. Il atteint sa largeur maximale sous charge maximale. -
Page 89: Indications Fondamentales (Généralités)
La balance ne doit être utilisée que selon les prescriptions indiquées. Les domaines d´utilisation/d´application dérogeant à ces dernières doivent faire l´objet d´une autorisation écrite délivrée par KERN. 3.3 Garantie La garantie n´est plus valable en cas de •... -
Page 90: Vérification Des Moyens De Contrôle
à cette opération sont disponibles sur le site KERN (www.kern-sohn.com). Grâce à son laboratoire de calibrage accrédité DKD, KERN propose un calibrage rapide et économique pour les poids d´ajustage et les balances (sur la base du standard national). -
Page 91: Déballage, Installation Et Mise En Service
6.2.1 Etendue de la livraison / accessoires de série : • Balance, voir au chap. 2 • Adaptateur réseau • Capot de protection de travail • Notice d’utilisation • Cale de transport • Brise-vent en verre uniquement sur les modèles EWJ 300-3, EWJ 300-3H, EWJ 600-2M, EWJ 600-2SM EWJ-BA-f-1615... -
Page 92: Mise En Place / Retirer La Cale De Transport
6.2.2 Mise en place / Retirer la cale de transport La précision des résultats de pesée sur des balances de précision à haute définition dépend de façon décisive du lieu d’implantation correct (cf. au chap. 6.1). Tourner la vis jusqu'à la butée vers la gauche ... - Page 93 Installez le plateau de pesée de la manière suivante: EWJ-300: Mettez le pan de plateau de pesée Vis à vis à six pans creux avec soin et fixer un panoramique afin Fixer le plateau de pesée EWJ-BA-f-1615...
- Page 94 EWJ-600-2M_EWJ-3000-2: Mettez le pan de plateau de pesée Vis à vis à six pans creux avec soin et fixer un panoramique afin Fixer le plateau de pesée EWJ-BA-f-1615...
- Page 95 EWJ-6000 Fixer le plateau de pesée Assurez-vous que le côté incliné tourné vers l'avant Vis à vis à six pans creux avec soin et fixer un panoramique afin Procéder à la mise à niveau de la balance à l´aide des vis des pieds, jusqu´à ce que la bulle d´air du niveau se trouve dans le cercle prescrit.
-
Page 96: Branchement Secteur
N´utilisez avec votre balance que des accessoires et des périphériques livrés par KERN, ces derniers étant adaptés de manière optimale à votre balance. 6.6 Première mise en service Pour obtenir des résultats exacts de pesée avec les balances électroniques, elles doivent avoir atteint leur température de service (voir temps d’échauffement chap. -
Page 97: Ajustage
6.7 Ajustage Etant donné que la valeur d´accélération de la pesanteur varie d´un lieu à l´autre sur la terre, il est nécessaire d´adapter chaque appareil d’affichage avec plateau de pesée branché – conformément au principe physique fondamental de pesée – à l´accélération de la pesanteur du lieu d´installation (uniquement si le système de pesée n´a pas déjà... -
Page 98: Ajustage Automatique Interne
6.7.2 Ajustage automatique interne L’ajustage automatique est réalisé: • quand la balance est mise en marche et à l’arrêt. • après écoulement d’un intervalle de temps Après l’écoulement d’un intervalle de temps (à choix 1 – 8 hrs.) défini dans le menu (F5 HoUr, voir chap. -
Page 99: Etalonnage
6.8 Etalonnage Généralités: D´après la directive UE 90/384/CEE ou 2009/23CE, les balances doivent faire l´objet d´un étalonnage officiel lorsqu´elles sont utilisées tel qu´indiqué ci-dessous (domaine régi par la loi): a) Dans le cadre de relations commerciales, lorsque le prix d´une marchandise est déterminé... - Page 100 Position du timbre et de l’interrupteur d‘ajustage: 1. Marque scellée autodétruisant 2. Rondelle en matière plastique pour recouvrir l’interrupteur d’ajustage 3. Interrupteur d’ajustage 4. Plomb 5. Fil 6. Vis EWJ-BA-f-1615...
-
Page 101: Exploitation
7 Exploitation 7.1 Mise en route Appuyer sur L’affichage s’allume et le bruit du moteur du système de charge pour le poids d’ajustage interne est audible. La balance exécute un auto-test, la charge maximale et la version du logiciel sont également brièvement affichées, suivies de l‘ajustage interne. -
Page 102: Détermination Du Pourcentage
7.5 Pesée avec tare Poser le récipient de pesée vide. Attendez l’affichage de la stabilité puis appuyez sur la touche . L’affichage du zéro eapparaissent. Ceci indique que l’enregistrement interne du poids du récipient a eu lieu. Peser les matières à peser, le poids net est affiché. •... -
Page 103: Comptage De Pièces
7.7 Comptage de pièces La balance, avant de pouvoir compter les pièces, doit connaître le poids unitaire moyen ce qu’il est convenu d’appeler la référence. A cet effet il faut mettre en chantier une certaine quantité des pièces à compter. La balance détermine le poids total et le divise par le nombre de pièces ce qu’il est convenu d’appeler la quantité... -
Page 104: Totalisation Manuelle
7.8 Totalisation manuelle Par cette fonction sont additionnées les valeurs de pesées individuelles par appel de dans la mémoire totalisatrice et éditées sur une imprimante raccordée en option. La fonction de totalisation est activement que dans le réglage de menu „SALE-Mode no“, voir chap. - Page 105 Poser sur la balance le produit à peser B, p. ex. 200 g. Attendre l’affichage de la stabilité, puis appuyer sur . La valeur pondérale est ajoutée à la mémoire totalisatrice et éditée. Le nombre de pesées suivi du poids total s’affiche pendant 2 sec.
- Page 106 Effacer la mémoire de sommes: Lorsque „Somme „Total““ est affiché, appuyer sur . Toutes les données dans la mémoire de totalisation sont effacées. Exemple d’édition (KERN YKB-01N): 100.00 g Première pesée 100.00 g 200.00 g Deuxième pesée 200.00 g...
-
Page 107: Totalisation Automatique
7.9 Totalisation automatique Par cette fonction sont automatiquement additionnées les valeurs de pesées individuelles sans appel de dans la mémoire totalisatrice lors du délestage de la balance et éditées sur une imprimante raccordée en option. La fonction de totalisation est activement que dans le réglage de menu „SALE-Mode no“, voir chap. - Page 108 Retirez l’objet à peser. La valeur pondérale est additionnée à la mémoire totalisatrice et éditée en cas de branchement d’une imprimante en option. Le nombre de pesées suivi du poids total s’affiche pendant 2 sec. Le cas échéant ajoutez pour la totalisation d’autres objets à peser comme décrit précédemment.
-
Page 109: Menu
8 Menu 8.1 Navigation dans le menu Mettre en marche la balance et pendant le test Appel du menu automatique appuyer sur Le premier point de menu „F1 Unt“ est affiché. Appel du point de Sur peuvent être appelés successivement les menu différents points de menu. -
Page 110: Accès Au Menu Technique
8.2 Accès au menu technique L’accès au menu technique „tECH“ est bloqué par la combinaison de touches Lorsque dans les balances avec homologation de type „tECH“ est affiché, le cachet doit être détruit et actionné l’interrupteur d’ajustage. Position de l’interrupteur d’ajustage voir chap. -
Page 111: Aperçu
8.3 Aperçu Les réglages d’usine sont caractérisés par *. Bloc de menu Point du menu Réglages disponibles / Explication F1 Unt Non documenté Unités de pesage Eclairage automatique du fond de l’écran EL AU* uniquement en cas de chargement de la plaque F2 bl de pesée ou suite à... - Page 112 P6 bAtt bAtton Afficher statut de chargement „Accu“ SALE m Mode de vente n°: d = 0.1g SALE n EWJ 300-3: EWJ 600-2M: EWJ 6000-1M: d = 0.001 g d = 0.01 g d = 0.1 g Mode de vente oui: d = 0.01 g...
- Page 113 Menu technique, voir chap. 8.2 tECH Dans l’affichage „Pin“ appuyer successivement sur Broche , le premier bloc de menu „P1 Lin“ est affiché. P1 Lin Linéarisation (non documentée) P2 CAL Ajustage (non documenté) XXXXX P3 Cnt Affichage définition interne P4 A 2n A2 oFF Correction automatique du point zéro à...
-
Page 114: Interfaces
Nous recommandons le kit d’interface USB KERN DBS A02 (fourniture: Câble USB, entraîneur CD, logiciel branchement de la balance.) De plus amples informations sont disponibles sur le site internet de KERN (www.kern-sohn.com).. Les conditions suivantes doivent être réunies pour la communication entre la balance et les appareils périphériques:... -
Page 115: Fonctionnement De L'imprimante (Rs 232)
9.2 Fonctionnement de l’imprimante (RS 232) Exemples d’éditions (KERN YKB-01N) 1. Affichage de menu F3 COM „P Prt“ Poids brut 300.00g Poids net 100.0g Détermination de PERC: 50.01 % pourcentage Comptage de pièces 20PCS 5.00027g 100g 49.99g Totalisation 49.99g 49.99g 49.99g... -
Page 116: Protocole D'édition (Édition En Continu)
Retirer immédiatement les matières à peser renversées sur la balance. 10.2 Maintenance, entretien L´appareil ne doit être ouvert que par des dépanneurs formés à cette fin et ayant reçu l´autorisation de KERN. Avant d´ouvrir l´appareil, couper ce dernier du secteur. 10.3 Mise au rebut L´élimination de l´emballage et de l´appareil doit être effectuée par l´utilisateur selon... -
Page 117: Aide Succincte En Cas De Panne
11 Aide succincte en cas de panne En cas d´anomalie dans le déroulement du programme, la balance doit être arrêtée pendant un court laps de temps et coupée du secteur. Le processus de pesée doit alors être recommencé depuis le début. Aide: Panne Cause possible... -
Page 118: 12 Déclaration De Conformité
12 Déclaration de conformité Vous trouvez la déclaration de conformité CE- UE actuelle online sous: www.kern-sohn.com/ce Dans le cas de balances étalonnées (= de balances à la conformité évaluée) la déclaration de conformité est comprise dans les fournitures. EWJ-BA-f-1615...
Need help?
Do you have a question about the EWJ 300-3 and is the answer not in the manual?
Questions and answers