
Related Manuals for Rayto RT-7200

Summary of Contents for Rayto RT-7200
- Page 1 RT-7200 Auto Hematology Analyzer User’s Manual Copyright: Rayto Life and Analytical Sciences Co., Ltd. Address: C&D/4F, 7 Xinghua Industrial Bldg, Nanhai Rd, Nanshan, Shenzhen 518067, P.R. China Rev: 1.0e...
-
Page 2: How To Use This Manual
In order to get best test result, before doing clinical test, you shall be familiar with this analyzer and its performance. This user’s manual is the using guidline of RT-7200 Auto Hematology Analyzer from Rayto, including installation, daily test, QC and daily maintenance. -
Page 3: Main Graphical Representations Used On This Instrument
RT-7200 Auto Hematology Analyzer User’s Manual Main graphical representations used on this instrument Temperature limitation Fragile articles The fragile articles are contained in the transport package, so it should be handled with care when being transported Upwards It indicates that the transport package shall be kept vertically... -
Page 4: Warnings And Security Attentions
If the smoke, peculiar smell and sound appears while using, the power supply must be immediately cut off. Meanwhile, the inspection apply shall be immediately presented towards the distributors or agents of Rayto company. If the instrument continues to be used under this circumstance, the misfire, electric shock or casualties of personnel might be caused. - Page 5 RT-7200 Auto Hematology Analyzer User’s Manual If the hands or skins are touched with the reagents, they shall be immediately washed to be clean using a large amount of clear water. The waste products such as used test tubes, other instruments and consumables, etc shall be appropriately handled as the medical waste products or infectious waste products.
-
Page 6: Table Of Contents
RT-7200 Auto Hematology Analyzer User’s Manual Contents How to use this manual ..............2 Main graphical representations used on this instrument ....3 Warnings and security attentions ............4 1 Instrument Introduction..............9 1.1 Product introduction ..................9 1.1.1 Product name: Auto Hematology Analyzer ............9 1.1.2 Model: RT-7200 .................... - Page 7 RT-7200 Auto Hematology Analyzer User’s Manual 4 Quality Control................21 4.1 L-J QC ...................... 21 4.1.1 L-J QC setting ...................... 21 4.1.2 L-J QC run ......................22 4.1.3 L-J QC list ......................22 4.1.4 L-J QC chart......................23 4.2 X-B QC ..................... 24 4.2.1 X-B QC setting .....................
- Page 8 RT-7200 Auto Hematology Analyzer User’s Manual 10.1.1 Startup and shutdown process ................45 10.1.2 Automatic rinse ....................45 10.1.3 Clean instrument surface ................... 45 10.2 Maintenance program ................45 10.2.1 Back flush ......................45 10.2.2 High voltage pulse....................45 10.2.3 Drain chambers....................45 10.2.4 Drain pipeline .....................
-
Page 9: Instrument Introduction
RT-7200 Auto Hematology Analyzer User’s Manual 1 Instrument Introduction 1.1 Product introduction 1.1.1 Product name: Auto Hematology Analyzer 1.1.2 Model: RT-7200 1.1.3 Test items This analyzer is using impedance principle (colorimetry for hemoglobin measurement) to categorize and count blood cells in blood. Test items are shown in Table 1-1. -
Page 10: Front View
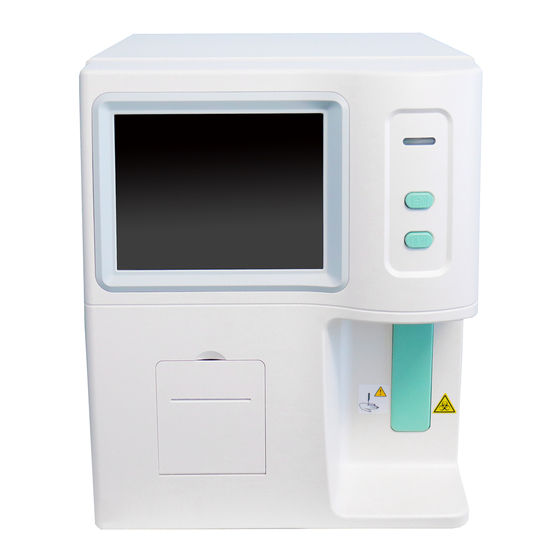
RT-7200 Auto Hematology Analyzer User’s Manual 1.3.1 Front view Fig.1-1 Front view ① Display screen: Display the software interface ② Indicator light: green at startup, turn red when starting sample test, turn green after test. ③ Feed key: built-in printer feeds paper outward ④... - Page 11 RT-7200 Auto Hematology Analyzer User’s Manual Mouse interface: PS/2 mouse interface VGA interface 10) Power interface: to connect with external power supply 11) Waste port 12) Diluent port 13) Power switch: switch instrument power...
-
Page 12: Installation
2.2 Installation environment In order to ensure instrument work normally, please choose working place compliant with following condition to place RT-7200 Auto Hematology Analyzer: No direct sunlight; No massive dust or powder; No strong electromagnetic radiation;... -
Page 13: Reagent
RT-7200 Auto Hematology Analyzer User’s Manual 2.4 Reagent The instrument needs to use Lyse, cleanser, diluents for measurement and maintenance. To ensure accuracy of test result, please use reagents accompanied with instrument. 2.4.1 Connection of Lyse and cleanser From reagent packing carton, take out lyse and cleanser respectively, open the bottle lids, and place them in instrument reagent booth horizontally. -
Page 14: Sample Test
Check whether built-in or external printer paper is sufficiently installed in right position. 3.2 Startup Switch on the RT-7200, indicator light is on, system begins to check component status, transfer parameter needed by front end, run blank tests, as shown in figure below: Fig.3-1 Startup program... -
Page 15: Blood Sample Collection
RT-7200 Auto Hematology Analyzer User’s Manual Parameter Reference R nge ≤ 0.2 × 10 ≤ 0.03 × 10 ≤ 2 g / L ≤0.5 % ≤ 10 × 10 If blank test result exceeds this range, operator has to repeat above test steps until test result is acceptable. -
Page 16: Sample Data Edit
RT-7200 Auto Hematology Analyzer User’s Manual operation in Chapter 4 “Quality Control”. Warning: Instrument test object is blood sample; aspiration of other substance may lead to instrument malfunction. 3.4.1 Sample data edit In sample analysis, you can modify sample no. or input sample data. Modification after test has to be done in “History Data”... -
Page 17: Blood Sample Counting
RT-7200 Auto Hematology Analyzer User’s Manual Fig.3-4 System soft keyboard When soft keyboard is used, the cursor has to be moved into input box, then click to input. “Caps” is to toggle between uppercase and lowercase, click “Close” to close soft keyboard. -
Page 18: Parameter Prompt Message
RT-7200 Auto Hematology Analyzer User’s Manual Fig.3-6 Blood sample counting screen If “Print instantly” setting is selected, the instrument will print analysis result automatically after test ends. If ”Transmit instantly” setting is selected, the instrument will transfer analysis result to the computer by RS-232 serial port after test ends. -
Page 19: Histogram Prompt Message
RT-7200 Auto Hematology Analyzer User’s Manual less than minimum of normal value. 3.4.4 Histogram prompt message LF1: prompts that region on the left side of lymphocyte peak is abnormal, possibly because of: platelet coagulation, giant platelet, plasmodium, nucleated red blood cell, non-lysed red blood cell, abnormal lymphocyte, cryoglobulin. -
Page 20: Print
RT-7200 Auto Hematology Analyzer User’s Manual result. 3.4.6 Print Before sample test, please set up printer and print format in system setting module, see detail in Chapter 7 “System Setting”. Click “Print” to print this test result. Warning: During test, please do not replace reagent. -
Page 21: Rt-7200 Auto Hematology Analyzer User's Manual
RT-7200 provides three QC methods, L-J QC, X-B QC and X-R QC. 4.1 L-J QC In main screen, click “QC” button, choose 20 QC files of “L-J QC”. The system can control 20 parameters at a time. -
Page 22: L-J Qc Run
RT-7200 Auto Hematology Analyzer User’s Manual connect RT-7200 to equipment ready to receive data, start up and set up receiver software parameters. For setting of instrument transferring terminal parameter, please refer to Chapter 7 “System Setting”. Exit: return to main screen. -
Page 23: L-J Qc Chart
RT-7200 Auto Hematology Analyzer User’s Manual The instrument will display 20-parameters QC result, if some parameters are not controlled, the corresponding column shall be blank. Send function can transfer part or all of the L-J QC data to external equipment. Use mouse to click list column, select one group of QC data. -
Page 24: X-B Qc
Send: use instrument RS-232 serial port to transfer X-B QC setting data to designated receiver. Before sending, please use RS-232 serial port cable to connect RT-7200 to equipment to receive data, start up and set up receiver software parameters. For instrument transfer terminal parameter setting, please refer to Chapter 7 “System... -
Page 25: X-B Qc Chart
RT-7200 Auto Hematology Analyzer User’s Manual Fig.4-8 X-B QC list The instrument displays 20-parameter QC result, if some parameters are not controlled, the corresponding column shall be blank. Upper limit of QC data columns of X-B QC list shown at a time is 200, if data are more than 200 columns, they can be viewed by switching using “... -
Page 26: X-R Qc
Send: use instrument RS-232 serial port to transfer QC data of currently selected QC file to designated receiver. Before sending, please connect RT-7200 to equipment to receive data with RS-232 serial port cable, start up and set up receiver software parameters. -
Page 27: X-R Qc List
RT-7200 Auto Hematology Analyzer User’s Manual Fig.4-11 X-R QC run Have QC sample ready, press Aspiration key to start test. After test, QC results will be shown under current QC number column. If there is fault alarm in test, this test result may be inaccurate. You can click “Delete” shortcut key to delete this test result, eliminate related fault, before next test. - Page 28 RT-7200 Auto Hematology Analyzer User’s Manual points in chart will randomly distributed on both sides of centerline, the farther from centerline, the nearer to upper/lower control limits, there will be fewer points. Graphic screen is as follows: Fig.4-13 X-R QC chart Lot No.: lot number of QC object...
-
Page 29: Calibration
Commercial calibration sample can be used to calibrate this instrument. All mathematic calculations related with calibration can be done by instrument automatically, calibration coefficient is automatically saved. RT-7200 has three sets of calibration coefficients, anti-coagulating whole blood, anti-coagulating peripheral blood and pre-diluted peripheral blood;... -
Page 30: Auto-Calibration
RT-7200 Auto Hematology Analyzer User’s Manual Fig.5-1 Manual calibration Manual calibration procedure is as follows: In Sample Test menu, use calibration sample to test several times (at least three). Record the tested data. Calculate new calibration coefficient Calculate new calibration coefficient as per formula below: ×... - Page 31 RT-7200 Auto Hematology Analyzer User’s Manual Fig.5-2 Auto-calibration At first, calibration sample is to be set up, click “Setting” button, open auto-calibration setting menu, as shown below: Fig.5-3 Auto-calibration setting Lot No.: lot number of calibration sample, input and save, on next logon, you can select from dropdown list, check or modify data of this lot no.
- Page 32 RT-7200 Auto Hematology Analyzer User’s Manual Have calibration sample ready, press Aspiration key to start test. After test, calibration result will be shown in current test number column. Repeat test, the instrument allows 20 runs at most. Statistic results and new calibration coefficient will be shown in table below frame after each test automatically.
-
Page 33: History Data
RT-7200 Auto Hematology Analyzer User’s Manual 6 History Data After test of each sample, the system automatically saves test data; RT-7200 can save parameter test values and histograms of at most 50000 samples. User can check parameter test data and histograms of all samples, print, delete, modify and retrieve sample data of designated condition. - Page 34 RT-7200 Auto Hematology Analyzer User’s Manual “Send” button, open transfer dialog box as follows: Fig.6-3 Data transfer Select data to send, click “send”. Search Search function allows user to search required record according to designated condition, click “Search” button, open search dialog box as follows: Fig.6-4 Search condition...
- Page 35 RT-7200 Auto Hematology Analyzer User’s Manual Fig.6-5 Sample history data This menu displays sample basic message, test value and histogram, click “Previous item”, “Next item” buttons to check sample. To adjust histogram, run as per 3.4.5. To modify sample basic message, click “Data” button, go to Data Edit menu, see detail in “3.4.1 Sample data edit”.
-
Page 36: System Setting
RT-7200 Auto Hematology Analyzer User’s Manual 7 System Setting System setting is used to set up system parameters, in main screen, click “Setting”, and go to System Setting menu as follows: Fig.7-1 System setting 7.1 General setting Serial number: machine serial number, used to identify one instrument. -
Page 37: Other
RT-7200 Auto Hematology Analyzer User’s Manual 5. Standby time(mn): in this box, input stand by time, when idle time of instrument exceed this value on the sample test window, the instrument will stand by. If it is set zero, it will not stand by. -
Page 38: Normal Limits
RT-7200 Auto Hematology Analyzer User’s Manual Fig.7-4 other setting Click “Log off” button, the user identity will be changed to common user. 7.2.2 Normal limits Click “Normal Limits” button, open setting menu as follows: Fig.7-5 Normal value setting Reference range of each parameter has been set before delivery of instrument, to modify parameter reference range, you can select blood type and population category, and fill in parameter lower limit and upper limit blanks, click “Save”... -
Page 39: Units
RT-7200 Auto Hematology Analyzer User’s Manual Fig.7-6 Panic limits Reference range of each parameter has been set before delivery of instrument, to modify parameter reference range, you can select blood type and population category, and fill in parameter lower limit and upper limit blanks, click “Save” button. -
Page 40: Department Information
RT-7200 Auto Hematology Analyzer User’s Manual Fig.7-8 Communication setting Instrument default values are: Baud rate: 115200, data digit: 8, calibration digit: None, stop digit: 1. to modify setting, click dropdown box, select other different value, click “OK” button. 7.2.6 Department information... - Page 41 RT-7200 Auto Hematology Analyzer User’s Manual Fig.7-10 Doctor setting Append: click “Append” button to add one row of blank column, input name in name column, select department, sender, tester and checker from dropdown list. Set up department in department message type, “N” in sender, tester and checker boxes indicates that the doctor is not of this identity;...
-
Page 42: System Information
RT-7200 Auto Hematology Analyzer User’s Manual 8 System Information System message provides several types of message about system; user can check system status through system message function module. 8.1 System status On system message menu of main screen, click “System Info” key, the click “system status”, go to system status menu as follows: Fig.8-1 system status... - Page 43 RT-7200 Auto Hematology Analyzer User’s Manual running time, in system message menu of main screen, click “Statistic”, it will go to statistic information menu as below: Fig.8-3 Statistic information...
-
Page 44: Shutdown
RT-7200 Auto Hematology Analyzer User’s Manual 9 Shutdown After work every day, you must run shutdown program before turning off instrument power. During shutdown, the instrument will perform routine maintenance and rinse test tubing. In main screen, click “Shut down” button, the system will pop up confirmation dialog box as below: Fig.9-1 Shut down confirmation... -
Page 45: Service
RT-7200 Auto Hematology Analyzer User’s Manual 10 Service RT-7200 Fully-automatic Hematology Analyzer is a clinical precision analyzer; in order to maintain good instrument condition, get reliable test result, and reduce instrument fault rate, the instrument shall be maintained routinely, this chapter introduces related maintenance operation. -
Page 46: Prime
While component is moving, carefully watch whether component movement is smooth and uniform, if there is still anomaly after repeated tests, please contact Rayto customer service department. Click “Valve” button, open solenoid valve test screen as shown below:... -
Page 47: Debug
For the engineer to test and debug the instrument. 10.2.11 Engineering For the engineer to sets up system parameters. Warning: Engineers not trained by Rayto Company are refrained from using this function, otherwise test result accuracy will be affected, or even normal test can not be performed. -
Page 48: Replace Reagent
RT-7200 Auto Hematology Analyzer User’s Manual In “Service” menu, select “Stop Use”, complete operations according to the message given by system, when screen displays it’s ready to shut down, shut off instrument power. For the remaining diluent, cleanser, Lyse, cover the bottles and turn tight, store as per reagent instruction. -
Page 49: Troubleshooting
RT-7200 Auto Hematology Analyzer User’s Manual 11 Troubleshooting This chapter describes common faults of instrument and their solutions, if failing to eliminate faults as per tips in this chapter or needing more detailed data, please contact Rayto customer service department. Fault... -
Page 50: Appendix Name And Concentration Of Toxic And Hazardous
RT-7200 Auto Hematology Analyzer User’s Manual Appendix Name and concentration of toxic and hazardous substance or element in product Toxic / hazardous substance or element Component name Hexavalent Polybrominated Lead Mercury Cadmium Polybrominated chromium diphenyl ethers (Pb) (Hg) (Cd) biphenyls (PBB)
Need help?
Do you have a question about the RT-7200 and is the answer not in the manual?
Questions and answers