Advertisement
Advertisement
Table of Contents

Related Manuals for Motion Foldalite Trekker

Summary of Contents for Motion Foldalite Trekker
- Page 1 Instruction Booklet...
-
Page 2: Table Of Contents
Contents T ab le of Contents Introduction Features Setup Guide Installation Operation Guide Braking Battery Safety Troubleshooting Safety Symbols Warranty... -
Page 3: Introduction
I f you hav e a prob lem in comprehending the warning s and instructions contained in this manual, please contact your distrib utor, or your prov ider or the manufacturer. We, at Motion H ealthcare, striv e to enrich your life! -
Page 4: Features
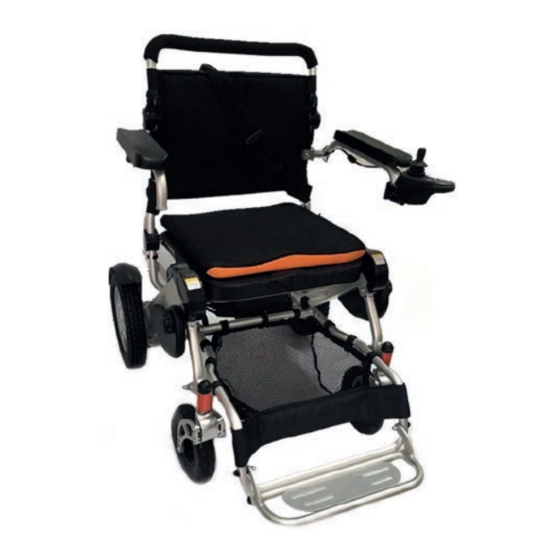
Features Safety Belt Armrest Backrest J o int J o ystick Lithium Battery Storage Basket Leg Guard Footrest Control P anel Folding Release Cable Clip Lever Control P anel Connector Electromagnetic Brake Levers Anti-Tip Wheels K ick Stand... -
Page 5: Setup Guide
Setup Guide Q uick S etup G uide: • P ull out the chair by holding the position as shown. • Unfold the footrest. • Rotate the two armrests into position. • P ull the backrest to the rear edge of the seat cushion until the two folding levers reach the red line, as shown. - Page 6 Mount the j oystick on the req uired side (can be set up on left or right hand side) and plug in the 4– pin control cable. (For further details please see page 8). • Fully set up Foldalite Trekker.
- Page 7 Setup Guide Folding : • Remove the control panel. (Reverse actions shown on page 8) • P ress the anti-tip wheel extension button and retract the anti-tip wheels. • P ress the backrest adj usting button and turn the back rest. •...
-
Page 8: Installation
Installation Guide K ick S tand: The kick stand is located at the bottom of the rear frame. N o t e : O n l y a f t e r f o l d i n g t h e w h e e l c h a i r c a n t h e k i c k s t a n d b e s e t u p r i g h t . B e f o r e u n f o l d i n g CA U T I O N : Do not adj ust kick stand leng th. - Page 9 Installation Guide Mounting the Joystick: The control panel can be mounted on the right or left armrest. P ut the q uick release clamp of the j oystick control panel onto the metal grab bar and lock the q uick release handle tightly and securely.
-
Page 10: Operation Guide
Operation Guide Joystick Controller The j oystick controller comprises the following: Number Function Description Horn P ress horn to sound. Speed Button Increase the speed of the chair. Power-On Button P ressing this button will power on the chair. With 5 LED lights on, the chair is at its max. speed. Speed Indicator 1 LED light on, the chair is at its lowest speed. - Page 11 Operation Guide O perating the Joystick: gently and gradually pushing the control j oystick forward. Familiarise yourself with controlling the speed and start and stop of the chair. Do not make sharp turns at high speeds. The chair will lose its balance and tip over causing serious bodily inj ury and damage.
- Page 12 Operation Guide Movement Control Lever Operation Forward P ush the control lever forward. Backward P ull the control lever backward. Right P ush the control lever to the right. Left P ush the control lever to the left. Release the control lever gradually. Stop (The chair will slow down to stop safely)
-
Page 13: Braking
Braking T o b ring the Foldalite T rekker to a stop simply release the j oystick controller to the centre, with no pressure on it in any direction. Electromag netic Brake S ystem: The chair has 2 braking modes which can be selected by pushing the brake levers to “ Lock” or “... -
Page 14: Battery
Battery Battery S afety: Do not use batteries with different amp-hour (Ah) capacities. Do not mix old and new batteries. Always replace both batteries at the same time. K eep tools and other metal obj ects away from battery terminals. If contacted, short-circuit or electric shock may occur and cause inj ury. - Page 15 Battery Battery Maintenance: The battery’s life and performance may be affected by temperature, condition of the battery, and can reduce the battery’s service life. It is recommended that you do not charge the battery for the fully activate the battery. Always check if the battery is fully charged before use.
- Page 16 Battery Mounting the Battery: • Hold the battery grip and plug in the battery with the battery bottom aligned to the mouth of the battery holder. When a click sound is heard, the battery has been mounted correctly. Charg ing the Battery: The battery can be charged with normal AC power (AC 110-220 V, 50-60 Hz).
- Page 17 O v er- Current P rotector: The Foldalite Trekker is also eq uipped with an over-current protector. If the current supplied to the motor is too high, the over-current protector will cut off the supply. If ascending over a slope over 12º, or the load is over 330lbs, or the motor rotation is j ammed, the over-current protector will be activated and the chair’s control will cut off the circuit to prevent overcurrent and overheating of the motor.
-
Page 18: Safety
Familiarise yourself with the Foldalite Trekker and its capabilities. • • Always be aware of any potential hazards while using the Foldalite Trekker. • When the power wheelchair is not in use, turn off the power, charge the battery and store in a clean and dry place. - Page 19 The Foldalite Trekker is designed optimally for dry level surfaces, such as concrete and indoor ground Do not use the Foldalite Trekker on sand, uneven or loose surfaces, tall grass or rough road surfaces to prevent the wheels, bearings, axis, motor and other parts from being damaged or loosened.
- Page 20 G etting O n/ O ff: Whenever transferring to or from the Foldalite Trekker, it is recommended to have a supporting point that is higher than the seat cushion. To reduce the chance of falling, please be aware of the following: •...
- Page 21 Safety L eaning or R eaching while S eated: Reaching out your hands or leaning your body in the chair may adversely affect the chair’s balance. If you do not position yourself correctly, you may fall off or tip over the chair. •...
- Page 22 G etting U p/ Down S tairs and Escalators: The Foldalite Trekker is not designed for long j ourneys or getting up and down stairs, and escalators. CA U T I O N : I t is prohib ited to mov e or use the Foldalite T rekker on stairs and escalators.
-
Page 23: Troubleshooting
Troubleshooting The j oystick control panel will display a number of possible fault conditions by means of the LED light. When the LED light is green, the chair is trouble-free. When a problem occurs, the LED light causes and solutions. If you cannot determine the cause of the trouble condition, please contact your provider or distributor for assistance. - Page 24 Troubleshooting Electromag netic b rake: Number Possible Cause Solution When the power is off, and the electromagnetic brake lever is in Contact the authorised dealer to replace the “ Lock” position, the motor wheels electromagnetic brake. cannot move. When the power is on, and the electromagnetic brake lever is in Contact the authorised dealer to replace the “...
-
Page 25: Safety Symbols
The following symbols are used to identify warnings, mandatory actions and prohibited actions. It is essential that you fully understand and completely familiarise yourself with these symbols before operating the Foldalite Trekker for the first time. Read and follow the instructions provided in this manual. - Page 26 Technical Specifications General Dimensions (Unfolded): L x W x H 41.33x 27.1x 38.97in / 1050 x 690 x 990 mm Dimensions (Folded): L x W x H 7.32 x 27.1 x 35.03 in / 440x 690x 840 mm Maximum user weight Max: 330lbs (150kg) GW / NW 72.75b (33kg) with battery / 63.93lb (29kg) without battery...
-
Page 27: Warranty
Thank you for purchasing the Foldalite Trekker. Motion Healthcare disclaims all responsibility for any personal inj ury or property damage as a result of improper or unsafe use of this chair. If you have any q uestions about the Foldalite Trekker and its safe operation, please feel free to contact your authorised provider.
Need help?
Do you have a question about the Foldalite Trekker and is the answer not in the manual?
Questions and answers
Hi I'm getting a warning triangle with an exclamation mark in the middle on the joystick screen with error code 111 any suggestions please.