Table of Contents
Advertisement
Owner's Manual & Safety Instructions
Save This Manual
operating, inspection, maintenance and cleaning procedures. Write the product's serial number in the
back of the manual near the assembly diagram (or month and year of purchase if product has no number).
Keep this manual and the receipt in a safe and dry place for future reference.
Email our technical support at: productsupport@harborfreight.com
When unpacking, make sure that the product is intact
and undamaged. If any parts are missing or broken,
please call 1-888-866-5797 as soon as possible.
©
Copyright
2017 by Harbor Freight Tools
No portion of this manual or any artwork contained herein may be reproduced in
any shape or form without the express written consent of Harbor Freight Tools.
Diagrams within this manual may not be drawn proportionally. Due to continuing
improvements, actual product may differ slightly from the product described herein.
Tools required for assembly and service may not be included.
Keep this manual for the safety warnings and precautions, assembly,
Visit our website at: http://www.harborfreight.com
®
. All rights reserved.
Read this material before using this product.
Failure to do so can result in serious injury.
SAVE THIS MANUAL.
17g
Advertisement
Table of Contents

Related Manuals for Harbor Freight Tools Cobra 63842

Summary of Contents for Harbor Freight Tools Cobra 63842
- Page 1 No portion of this manual or any artwork contained herein may be reproduced in Failure to do so can result in serious injury. any shape or form without the express written consent of Harbor Freight Tools. Diagrams within this manual may not be drawn proportionally. Due to continuing SAVE THIS MANUAL.
-
Page 2: Table Of Contents
Table of Contents Safety ............2 Manual Recording ........14 Specifications ........... 5 Video Motion Detection ......14 Set up - Before Use: ......... 6 Using Intercom ......... 15 Receiver Components and Controls..6 Playback and Delete......... 16 Remote Viewing via MyCam View ™ app . 17 Camera Components and Controls ... -
Page 3: Installation Precautions
These carry important safety information. If unreadable or missing, contact 2. Use as intended only. Harbor Freight Tools for a replacement. 3. Do not modify. Electrical Safety 1. power Adapter plug must match 3. - Page 4 2. Use supplied Power Adapter only. information. If unreadable or missing, contact 3. Do not expose the power Adapter or Harbor Freight Tools for a replacement. Receiver to rain or wet conditions. Water entering the Power Adapter or Receiver 6. People with pacemakers should consult their will increase the risk of electric shock.
-
Page 5: Specifications
Specifications Receiver Screen 7" TFT LCD Modulation GFSK Data Rate 4 Mbps Resolution 800H x 480V RGB Built-in Microphone Audio Speaker Scheduled Recording Manual Motion Detection Power Rating 5VDC / 2A Operating Temperature 14° - 104°F Camera Capacity Memory SD Card - 256 GB max (not included) Cameras Lens 3.6mm... -
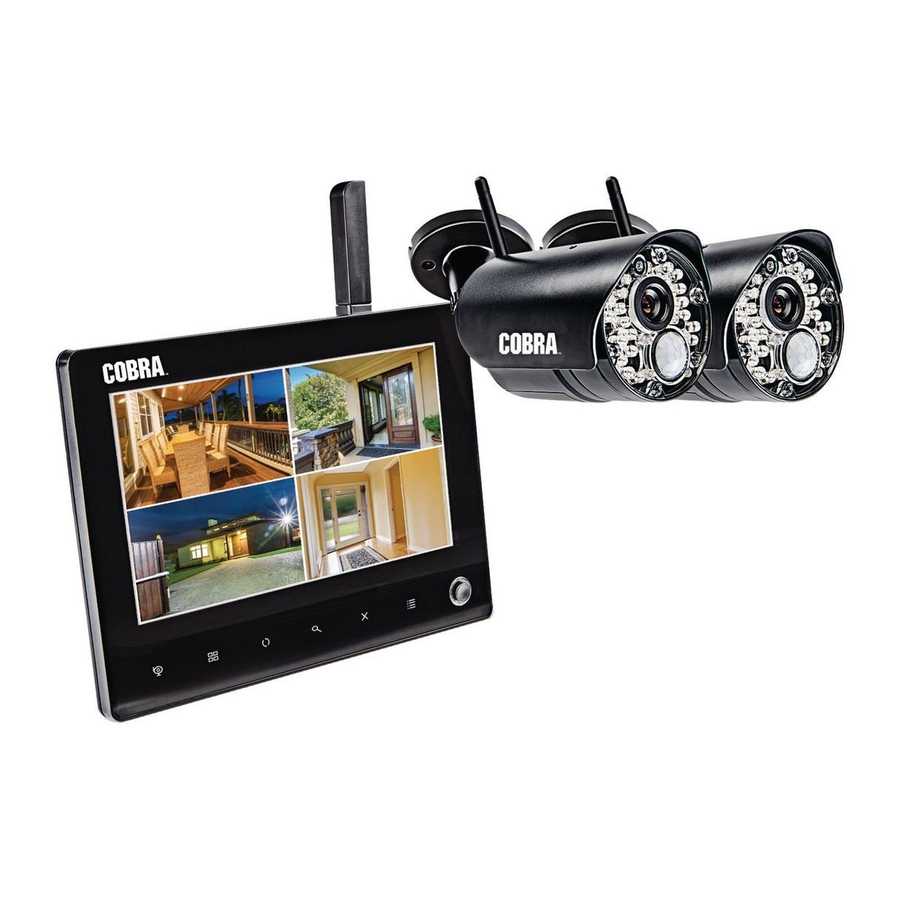
Page 6: Set Up - Before Use
Set up - Before Use: Read the ENTIRE IMpORTANT SAFETy INFORMATION section at the beginning of this manual including all text under subheadings therein before set up or use of this product. Receiver Components and Controls Back Motion Intercom Recording Activation Record Button Volume... - Page 7 Connect power 1. Connect the Power Adapter’s cord to the back of the Receiver. 2. Plug the Power Adapter into a 120VAC outlet. 3. Turn the Power Switch to the ON position. 120VAC power Adapter Figure C Item 63842 For technical questions, please call 1-888-866-5797. Page 7...
-
Page 8: Camera Components And Controls
Camera Components and Controls Mounting Antenna Bracket Microphone 9VDC power Adapter Lens Infrared Sensor Mounting Speaker Hardware Back of Camera Antenna Connector pair Figure D Button Assembly Thread the Antenna into the Antenna Connector on the back of the Camera. Before Mounting 1. - Page 9 d. Check the Camera's signal strength. 3. Low signal adjustment: Toggle Joystick to check Camera 1. a. Adjust the Camera and or/Receiver antenna(s). Note: Toggle Joystick again to check other Camera(s). b. Reposition the Camera and/or Receiver. 4. When the mounting location has been chosen: a.
-
Page 10: Viewing Modes
Viewing Modes • Quad/Sequence Viewing - Automatic cycling • Single Camera - View one Camera at a time. between Cameras. Touch to switch between Cameras. Touch to toggle between Quad mode (up • Zoom - Push the button on the to 4 channels) and Auto Sequence mode. - Page 11 a. Select a day to schedule, then click the Joystick. a. Select yes to overwrite previously recorded files when the SD card is full. b. Enter Start Time and End Time for the desired camera, then click Save. Note: After selecting yes, will display while in Auto Sequence mode.
-
Page 12: Operating Instructions
Operating Instructions Read the ENTIRE IMpORTANT SAFETy INFORMATION section at the beginning of this manual including all text under subheadings therein before set up or use of this product. Receiver Functions Icons Menu Channel Select Joystick Quad/Sequence Viewing • Scroll Up/Down/Left/ Right through menus Scan Mode •... -
Page 13: Display Functions
Display Functions cam1 2 017 / 0 6 / 0 7 11 : 5 9 : 10 Date and Time Stamp Excellent Camera Signal 2 017 / 0 6 / 0 7 11 : 5 9 : 10 Time is in 24 hour format. Overwrite Indicator Good Camera Signal •... -
Page 14: Manual Recording
Video Motion Detection Note: Video Motion Detection overrides Scheduled and Manual Recording. To record all Cameras, touch to set viewing Mode to 4 Camera. To record the Camera that has been activated, set viewing Mode to Camera Sequence. 4. When motion has been detected, recording will 1. -
Page 15: Using Intercom
Using Intercom Allows audio communication between the Receiver and the Cameras. Setting Receiver Volume Note: The Camera volume cannot be adjusted. Note: indicates Receiver volume is off. Touch to increase volume. Touch to decrease volume. Speaking through Intercom 1. Go to Single Camera mode for the individual 2. -
Page 16: Playback And Delete
playback Files on Receiver When there is a new recording, NEw will display and will flash. To view Recordings: a. Toggle Down then back Up to stop and go back to the beginning of the recording. 1. In Live View Mode, click the Joystick to view the Recording File List. -
Page 17: Remote Viewing Via Mycam View App
Remote Viewing Via MyCam View App TO CONNECT ON AN IpHONE OR IpAD: TO CONNECT ON AN ANDROID: 1. Connect the included Ethernet cable from the 1. Connect the included Ethernet cable from the Ethernet port on the LCD receiver to your wireless Ethernet port on the LCD receiver to your wireless router. -
Page 18: Maintenance Instructions
Maintenance Instructions procedures not specifically explained in this manual must be performed only by a qualified technician. Camera Maintenance TO pREVENT SERIOUS INJURy FROM ELECTRIC SHOCk: Unplug the power Adapter from its electrical outlet before inspection, maintenance, or cleaning. 1. pERIODICALLy, inspect the general 2. -
Page 19: Fcc Notice
FCC NOTICE: This device complies with part 15 of the FCC Rules. Operation is subject to the following two conditions: (1) This device may not cause harmful interference, and (2) this device must accept any interference received, including interference that may cause undesired operation. NOTE: this equipment has been tested and found to comply with the limits for a Class B digital device, pursuant to part 15 of the FCC Rules These limits are designed to provide reasonable protection against harmful interference in a residential installation. -
Page 20: Limited 90 Day Warranty
Limited 90 Day warranty Harbor Freight Tools Co. makes every effort to assure that its products meet high quality and durability standards, and warrants to the original purchaser that this product is free from defects in materials and workmanship for the period of 90 days from the date of purchase. This warranty does not apply to damage due directly or indirectly, to misuse, abuse, negligence or accidents, repairs or alterations outside our facilities, criminal activity, improper installation, normal wear and tear, or to lack of maintenance.
Need help?
Do you have a question about the Cobra 63842 and is the answer not in the manual?
Questions and answers
Why won’t it connect to the internet
The Harbor Freight Tools part number 63842 may not connect to the internet if the Network settings are not properly configured. You must set the Network Setting, including IP Address, Subnet Mask, and Default Gateway. If using a static IP, select Static IP and enter the correct values. Also, ensure the device is connected to a network and that the firmware is up to date.
This answer is automatically generated
Does anyone know the UID number. Mines worn off
The UID number for Harbor Freight Tools part number 63842 is printed below the QR code on the back of the receiver.
This answer is automatically generated
Can i change the wifi setting of a camera
Yes, the WiFi (Network) settings of the Harbor Freight Tools camera with part number 63842 can be changed. In the Settings menu, you can access Network settings to review network information, reset the password, assign a static IP address, and set the IP Address, Subnet Mask, and Default Gateway.
This answer is automatically generated
How close do you need to be to camera to pair
The Harbor Freight Tools Cobra 63842 camera has a wireless range of 150 feet indoors and 450 feet outdoors. This indicates that the camera should be within these distances from the receiver for proper pairing and operation.
This answer is automatically generated
Need to change my password and it won’t let me
Idon't have router have hot spot &wifi
How do I hook up a tv for montering
Hi. I need a couple replacement cameras for my Cobra receiver serial number 374001836. Where can I purchase them please?
How to shut the volume off while it's recording.
How I can get a new cámaras