Table of Contents
Advertisement
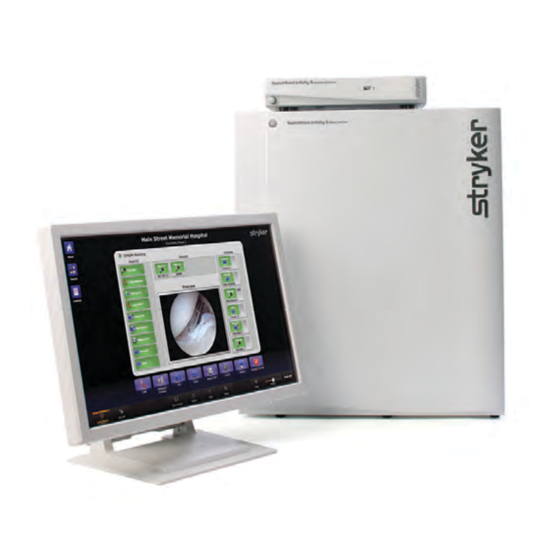
S S w w i i t t c c h h P P o o i i n n t t I I n n f f i i n n i i t t y y ® ® 3 3 a a n n d d S S w w i i t t c c h h P P o o i i n n t t I I n n f f i i n n i i t t y y 3 3 - - L L i i t t e e
R R o o u u t t e e r r a a n n d d C C o o n n t t r r o o l l S S y y s s t t e e m m
O O p p e e r r a a t t i i o o n n s s a a n n d d M M a a i i n n t t e e n n a a n n c c e e M M a a n n u u a a l l
0678001000
0678003000
Advertisement
Table of Contents
Troubleshooting

Subscribe to Our Youtube Channel
Related Manuals for Stryker SwitchPoint Infinity 3

Summary of Contents for Stryker SwitchPoint Infinity 3
- Page 1 S S w w i i t t c c h h P P o o i i n n t t I I n n f f i i n n i i t t y y ® ® 3 3 a a n n d d S S w w i i t t c c h h P P o o i i n n t t I I n n f f i i n n i i t t y y 3 3 - - L L i i t t e e R R o o u u t t e e r r a a n n d d C C o o n n t t r r o o l l S S y y s s t t e e m m O O p p e e r r a a t t i i o o n n s s a a n n d d M M a a i i n n t t e e n n a a n n c c e e M M a a n n u u a a l l 0678001000...
-
Page 3: Table Of Contents
E E q q u u i i p p m m e e n n t t C C o o n n n n e e c c t t i i o o n n s s ........................................1 1 4 4 Connectors Used by the SwitchPoint Infinity 3 Control System......14 Connections Overview .................... - Page 4 SORN Support....................20 6.3.4 Help ........................21 6.3.5 Suite Power..................... 22 6.3.6 Private......................22 6.3.7 Home and Presets Buttons..................23 Home Button ....................23 6.4.1 Presets Button ....................23 6.4.2 Screensaver......................... 23 R R o o u u t t i i n n g g V V i i d d e e o o ................................................2 2 4 4 Simple Routing ......................
- Page 5 R R e e m m o o t t e e D D e e v v i i c c e e C C o o n n t t r r o o l l ........................................6 6 5 5 1 1 7 7 Stryker Digital Capture (SDC) ................. 65 17.1 O O b b s s e e r r v v a a t t i i o o n n R R o o o o m m .
- Page 6 Pretest Offsite Connections ................ 76 25.1.3 Practice In Advance ..................76 25.1.4 Video Routing Tips..................76 25.1.5 Troubleshooting the SwitchPoint Infinity 3 ............78 25.2 Router Drawings................... 78 25.2.1 Troubleshooting Steps ................81 25.2.2 Connecting External Video Devices ............86 25.2.3...
- Page 7 Damage Claims and Service................... 99 27.6 Damage Claims .................... 99 27.6.1 Service ......................100 27.6.2 E E U U L L A A T T e e r r m m s s ............................................... . 1 1 0 0 1 1 2 2 8 8 W W E E E E E E P P a a s s s s p p o o r r t t , , S S P P I I 3 3 - - L L i i t t e e .
-
Page 9: Intended Use
The users are instructed to test all equipment with the wireless microphone system to ensure that no interference exists prior to the use of Stryker SwitchPoint Infinity 3 Control System. -
Page 10: Warnings
Identify any medical devices located within the SwitchPoint Infinity 3 Control System’s communication range (Theoretical maximum of 91.5m [300’]). b. Test each device for compatibility with the SwitchPoint Infinity 3 Control System: Power on the medical devices. -
Page 11: Cautions
Perform a variety of functions with the SwitchPoint Infinity 3 Control System, such as speaking through the microphone and powering on and off the microphones. c. Reposition devices as necessary to maintain electromagnetic compatibility, or disable the wireless microphone. This device complies with Part 15 of the FCC Rules. Operation is subject to the conditions that this device does not cause harmful interference. - Page 12 ������� ������ ���������� The following symbols may be found on the SwitchPoint Infinity equipment: Follow instructions for use. The book symbol is intended to refer the user to important safety operating and maintenance (service) instructions in the literature accompanying the product. An exclamation mark within a triangle is intended to alert the user to the presence of important operating and maintenance (service) instructions in the literature accompanying the product.
-
Page 13: Emc Precautions
Note: The device does not contain any hazardous materials. Legal regulations may include specifications regarding the disposal of this product. We request that you contact Stryker when you plan to withdraw this device from service for discard. Denotes the device contains more than .002% cadmium. - Page 14 W W a a r r n n i i n n g g : : • The use of accessories, transducers, or cables other than those specified, with the exception of those sold by Stryker, may result in increased electromagnetic emissions or decreased immunity of the equipment or system. •...
-
Page 15: An Integrated Voice, Video, And Data Router And Conferencing Interface
Router (SPI3-Lite). Throughout this manual, unless otherwise specified, “SwitchPoint Infinity refers to both SPI3 and SPI3-Lite. SwitchPoint Infinity 3 was designed to work with Stryker devices as well as other devices. Contact Stryker to determine if a device is compatible with SwitchPoint Infinity 3. -
Page 16: Connectors Used By The Switchpoint Infinity 3 Control System
Infinity 3 Control System connection panel. When connected to a “loop-thru” video device, the SwitchPoint Infinity 3 Control System will route the source to the device input and receive the output signal from the device for further routing to a monitor (if selected). -
Page 17: Audio Inputs
5.2.3 Audio Inputs There are 10 audio inputs available on the front panel of the SwitchPoint Infinity 3 Router: • Two mic level inputs • Eight line level inputs There are four audio inputs available on the front panel of the SwitchPoint Infinity 3-Lite Router: •... -
Page 18: Sidne ® Voice Activation System Or Sdc3 Voice Package
® Voice Activation System or SDC3 Voice Package The SwitchPoint Infinity 3 Control System can be configured to communicate with the Sidne Voice Activation System or SDC3 Voice Package with an optional upgrade to the Sidne or SDC3 system. The SwitchPoint Infinity 3 Control System and Sidne are connected via Ethernet through an Ethernet switch. -
Page 19: T T O O U U C C H H P P A A N N E E L L I I N N T T E E R R F F A A C C E
����� ����� ��������� W W a a r r n n i i n n g g : : The SwitchPoint Infinity 3 Control System interface can be displayed on up to two Touch Panels. The Touch Panels are not sterile devices. -
Page 20: Control Section
F F i i g g u u r r e e 1 1 . . H H o o m m e e P P a a g g e e Title Bar Quick Button Bar Menu Buttons Global Taskbar Control Section 6.1 Control Section The Control Section is the main area of the screen. -
Page 21: Global Taskbar
Infinity 3 Control System and the Video Network Hub, if present. If the Sidne Voice Activation System or SDC3 Voice Package is configured to work with the SwitchPoint Infinity 3 Control System, its configuration screen will be accessible when the Setup button is pressed. -
Page 22: Save Preset
Presets menu ( 6.3.4 SORN Support The SORN button allows you to go to the Technical Support Notification page where you can send a complaint or help message directly to Stryker Enterprise Tech Support ( 22 SORN Support, page 72... -
Page 23: Help
The Help screen uses multimedia to instruct you on how to operate different functions of the system, such as how to route video, make a call, or control room cameras. The Stryker Communications Technical Support contact information can be found on the bottom of the page. -
Page 24: Suite Power
The Private button provides control over the ability to view or remotely monitor the room where the SwitchPoint Infinity 3 Control System is located. The Private button toggles on and off and stays highlighted in orange when Private is On. -
Page 25: Home And Presets Buttons
6.4 Home and Presets Buttons 6.4.1 Home Button Pressing the H H o o m m e e button returns the Control Section to it’s home state, showing the Simple Routing screen. 6.4.2 Presets Button Pressing the P P r r e e s s e e t t s s button opens the Presets menu. F F i i g g u u r r e e 6 6 . -
Page 26: Simple Routing
OR to devices or monitors connected to the SwitchPoint Infinity 3 Control System. This screen can be used to select which video source to direct to a remote room or offsite location using the Video Network Hub or SuiteLink. -
Page 27: Viewing A Source On A Display
F F i i g g u u r r e e 7 7 . . S S i i m m p p l l e e R R o o u u t t i i n n g g M M a a i i n n S S c c r r e e e e n n Sources Displays Devices... -
Page 28: Viewing And Recording A Source On A Display
F F i i g g u u r r e e 8 8 . . V V i i e e w w i i n n g g a a S S o o u u r r c c e e o o n n a a D D i i s s p p l l a a y y R R o o u u t t i i n n g g T T w w o o S S u u i i t t e e S S t t r r e e a a m m s s If two SuiteStreams are configured, these can be used to route two independent channels of video during a Room Call. -
Page 29: Using Sidne Or Sdc3 Along With Viewing And Recording A Source On A Display
F F i i g g u u r r e e 9 9 . . V V i i e e w w i i n n g g a a n n d d R R e e c c o o r r d d i i n n g g a a S S o o u u r r c c e e o o n n a a D D i i s s p p l l a a y y 7.1.3 Using Sidne or SDC3 along with Viewing and Recording a Source on a Display... -
Page 30: Visual Routing
N N o o t t e e : : • • T T h h e e D D e e v v i i c c e e C C o o n n t t r r o o l l P P a a c c k k a a g g e e o o n n t t h h e e S S D D C C 3 3 m m u u s s t t b b e e i i n n s s t t a a l l l l e e d d b b e e f f o o r r e e S S P P I I w w i i l l l l s s h h o o w w S S I I D D N N E E d d e e v v i i c c e e s s . -
Page 31: Creating A Visual Route
sections: the top section shows the current route in progress (Item 1); the lower left section shows a list of all available sources, devices, and displays (Item 3); the lower right corner displays the video preview pane (Item 4). 7.2.1 Creating a Visual Route To create a video route using the Visual Routing option, perform the following steps: 1. -
Page 32: Creating A New Text Route
F F i i g g u u r r e e 1 1 1 1 . . T T e e x x t t R R o o u u t t i i n n g g To begin a new route using the Text Routing option, perform the following steps: 1. -
Page 33: Pip
The Picture-in-Picture (PIP)/Picture-by-Picture (PBP) Generator is intended to be used with the SwitchPoint Infinity 3 Control System, but can be used as a stand alone PIP in the OR. This feature enables the user to view two images simultaneously on one monitor. -
Page 34: Swap Images
8.1.3 Swap Images The S S w w a a p p I I m m a a g g e e s s button swaps the position of the images on the screen. Pressing this button cycles the image in position 1 to position 2 and vice versa. Select Destinations The “Select Destination”... -
Page 35: Selecting Images
8.2.1 Selecting Images The “Select Image” drop down menus are used to select which images will appear in the screen layout. 8.2.2 Screen Layout The three buttons located in the Screen Layout section are used to select the image orientation. 8.2.3 Select Destinations The “Select Destination”... -
Page 36: Recalling Presets
Presets menu, press the P P r r e e s s e e t t s s button on the top left side of the screen. The SwitchPoint Infinity 3 Control System supports up to 48 presets in each of the six potential preset groups. - Page 37 F F i i g g u u r r e e 1 1 5 5 . . S S a a v v e e P P r r e e s s e e t t s s S S c c r r e e e e n n 2.
-
Page 38: Previewing Presets
9.3 Previewing Presets The P P r r e e v v i i e e w w button, located on the right side of any given preset, allows you to preview the options associated with the particular preset before selecting it for use. To view a preset, press the P P r r e e v v i i e e w w button. - Page 39 Gateway calls using either the Stryker Video Network Hub or a locally connected Codec. The SwitchPoint Infinity 3 Control System also can “wait” for an incoming Codec call from any available Codec, meaning that when a call comes from a specified Codec, the call will be automatically connected, whereas all other calls will need to be accepted before a connection is complete.
-
Page 40: Manual Dial Tab
F F i i g g u u r r e e 1 1 8 8 . . C C a a l l l l s s S S c c r r e e e e n n Before making a video call to another Stryker endpoint, prepare an image to send out of the room. -
Page 41: Campus Status
10.2 Campus Status The Campus Status screen allows you to view the status of all registered Stryker endpoints, and provides the ability to call any available endpoint using one-touch dialing. Available endpoints are shown as “Idle.” Endpoints that are set to Private status are shown as “Private.”... -
Page 42: Room-To-Room Call
1. Select Campus Codec from the “Connection Type” drop down menu. F F i i g g u u r r e e 2 2 0 0 . . M M a a k k i i n n g g a a R R o o o o m m - - t t o o - - R R o o o o m m C C a a l l l l 2. - Page 43 F F i i g g u u r r e e 2 2 2 2 . . M M a a k k i i n n g g a a R R o o o o m m - - t t o o - - R R o o o o m m C C a a l l l l N N o o t t e e : : •...
-
Page 44: Active Call
10.5 Active Call F F i i g g u u r r e e 2 2 3 3 . . A A c c t t i i v v e e C C a a l l l l S S c c r r e e e e n n Near and Far Buttons Hang Up Button Camera Control... -
Page 45: Active Call Status
The “Where you see it” drop down menu contains a list of all devices and displays on which incoming video can be displayed. Touch the preview screen to expand the preview window to a larger size. Press the red X X in the top right corner of the preview window to return to the normal user interface. -
Page 46: Private
The P P r r i i v v a a t t e e button, located in the bottom left corner of the Global Taskbar, provides control over who can view or remotely monitor the room where the SwitchPoint Infinity 3 Control System is located. -
Page 47: Call Groups
The Call Groups tab provides call-specific presets for call types available from the SwitchPoint Infinity 3 Control Interface. Once a Preset is stored in the Call Groups section, the call can be placed using one-touch dialing from the Call Groups tab. -
Page 48: Storing A Speed Dial Call Setting
5. Press D D o o n n e e . The SwitchPoint Infinity 3 Control System supports up to 50 speed dial call settings in each of the four call groups. If more than four speed dial call settings have been configured, a scroll bar will appear on the right side of the screen. -
Page 49: Offsite (Codec) Calls
10.10Offsite (Codec) Calls Offsite or Codec calls can be initiated from the Manual Dial screen as well as the Last 10 Dialed and Call Groups interfaces. F F i i g g u u r r e e 2 2 8 8 . . M M a a k k i i n n g g a a C C o o d d e e c c C C a a l l l l Up to six different types of offsite calls are available, depending on the options available on the Codec and whether there is a local Codec or one or more Video Network Hub Codec(s) available. -
Page 50: Making A Codec Gateway Call
. . 10.11.3Waiting for an Offsite Call The SwitchPoint Infinity 3 Control System can wait for an incoming Codec call from a specific Codec connected to the system. -
Page 51: Managing Suiteview Functionality
10.12Managing SuiteView Functionality The SwitchPoint Infinity 3 Control System allows room-to-room connectivity for IP video conferencing using Stryker SuiteLink and a Campus Codec. In addition, IP broadcasting to the desktop is supported using Stryker SuiteView. N N o o t t e e : : I I f f y y o o u u r r s s y y s s t t e e m m i i s s n n o o t t e e q q u u i i p p p p e e d d w w i i t t h h a a S S u u i i t t e e L L i i n n k k S S e e r r v v e e r r t t h h e e C C a a l l l l s s m m e e n n u u a a n n d d P P r r i i v v a a t t e e b b u u t t t t o o n n s s w w i i l l l l b b e e g g r r a a y y e e d d o o u u t t a a n n d d n n o o t t a a c c c c e e s s s s i i b b l l e e . -
Page 52: Advanced Call Types
Endpoints can also choose to participate in a broadcast call already in progress by using the View call feature. Every endpoint connected to the Stryker hub can view a Broadcast call. -
Page 53: View Only
The Meeting Room call feature is only available on an ORIS equipped with a Video Network Hub that has the Meeting Room option installed. If these features are available within the ORIS, the SwitchPoint Infinity 3 Control System is automatically capable of using them, and no additional configuration is necessary. - Page 54 A Codec can be added to the Meeting Room call by selecting a Codec Call type from the “Connection Type” drop down menu and dialing a Codec call. For information on dialing Codec calls, see 10.10 Offsite (Codec) Calls, page 47 A Meeting Room call can be disconnected by pressing the red H H a a n n g g U U p p button from the Active Call interface.
-
Page 55: Surgical Timeout Procedure
�������� ������� Surgical Timeout provides the opportunity for all members of the operating room team to review the case of the patient before a surgical procedure begins. The timeout checklist assists in identifying any inconsistencies and helps prevent errors in the operating room. Additionally, it improves overall communication between members of the team. - Page 56 3. Once the Y Y e e s s button has been pressed, the S S t t a a r r t t button in Step 2 will become active. Press it to commence the timeout. All of the active displays in the OR will display the count down screen, which will count down from three before displaying the Verification Screen.
- Page 57 N N o o t t e e : : • • I I t t i i s s n n o o t t p p o o s s s s i i b b l l e e t t o o l l e e a a v v e e a a n n a a n n s s w w e e r r b b l l a a n n k k . . E E a a c c h h q q u u e e s s t t i i o o n n m m u u s s t t b b e e a a n n s s w w e e r r e e d d t t o o p p r r o o c c e e e e d d t t o o t t h h e e n n e e x x t t .
- Page 58 7. Should the checklist need to be aborted at any time, press the red X X at the top right corner of the screen. A confirmation screen will appear. F F i i g g u u r r e e 3 3 6 6 . . A A b b o o r r t t S S c c r r e e e e n n 8.
- Page 59 The Control Panel displays all PC Controls, Device Controls, and Advanced Controls devices that are connected to the SwitchPoint Infinity 3 Control System. For example, the A A d d v v a a n n c c e e d d R R o o u u t t i i n n g g button controls all of the routing functions within the room while the R R o o o o m m C C a a m m e e r r a a button sets up and operates the pan/tilt/zoom cameras located within the room.
- Page 60 The SwitchPoint Infinity 3 Control System interface can be configured with one-touch buttons for a Picture Archiving and Communication System (PACS) PC, a Navigation (NAV) PC, and an Auxiliary (AUX) PC. Press the button on the SwitchPoint Infinity 3 Control System Home screen for the target PC to be controlled.
-
Page 61: Speaker Controls
The Input Levels tab on the Audio Level screen provides the ability to change the audio input levels, such as the surgeon’s wireless microphone. The SwitchPoint Infinity 3 Control System router supports up to 10 audio inputs, and the SPI3-Lite router supports up to four inputs. -
Page 62: Output Levels
The Output Levels screen provides the ability to change the audio output levels. The SwitchPoint Infinity 3 Control System router supports up to 10 audio outputs and the SPI3-Lite router supports up to four outputs, including two outputs for the speakers. To access the Output Levels screen, press the A A u u d d i i o o L L e e v v e e l l s s button on the Quick Button Bar and press the Output Levels sub tab. - Page 63 F F i i g g u u r r e e 4 4 0 0 . . O O u u t t p p u u t t L L e e v v e e l l s s S S c c r r e e e e n n...
- Page 64 ������� The Displays screen shows all of the configured displays in one location. Each tab on the Displays screen represents a display in the OR. From each tab you can turn on or off the display, as well as select the image you want to view on that display. F F i i g g u u r r e e 4 4 1 1 .
- Page 65 ���� ������ The Room Camera screen directs the operation of the wall-mounted pan/tilt/zoom cameras in the OR. This screen allows the user to adjust the pan/tilt/zoom functions as well as focus the camera to frame the action. Each camera can be panned left or right, tilted up and down, and zoomed in and out.
-
Page 66: Advanced
Use the “Set Camera Display” drop down menu to choose a display on which the camera video will appear. 16.1 Advanced From the Advanced Room Camera screen the exposure of the image viewed on the room camera can be adjusted. F F i i g g u u r r e e 4 4 3 3 . -
Page 67: Stryker Digital Capture (Sdc)
������ ������ ������� 17.1 Stryker Digital Capture (SDC) SwitchPoint Infinity 3 provides the ability to control the SDC, even without the presence of a Sidne device. This feature requires SDC Ultra with software version 5.0 or higher or SDC3. The SDC can still be controlled through the Sidne integration. The SDC3 may be configured with integrated device control. - Page 68 F F i i g g u u r r e e 4 4 4 4 . . O O b b s s e e r r v v a a t t i i o o n n R R o o o o m m S S c c r r e e e e n n To access the Observation Room screen From SwitchPoint Infinity 3, press the O O b b s s e e r r v v a a t t i i o o n n R R o o o o m m button under the Advanced Controls section of the Control Panel.
-
Page 69: Routing Video
F F i i g g u u r r e e 4 4 5 5 . . O O b b s s e e r r v v a a t t i i o o n n R R o o o o m m S S c c r r e e e e n n F F r r o o m m S S w w i i t t c c h h P P o o i i n n t t I I n n f f i i n n i i t t y y 3 3 To prevent the Observation Room PC from viewing the OR room cameras, press the D D i i s s a a b b l l e e button. - Page 70 ���� ������ The Room Lights screen directs the operation of the Lutron Lights control. To access this screen press the R R o o o o m m L L i i g g h h t t s s button under the Advanced Controls section of the Controls Screen.
- Page 71 ����������� ��� ����� ����� N N o o t t e e : : C C a a l l i i b b r r a a t t i i o o n n i i s s n n o o t t r r e e q q u u i i r r e e d d f f o o r r A A l l l l - - I I n n - - O O n n e e s s y y s s t t e e m m s s . . R R u u n n n n i i n n g g c c a a l l i i b b r r a a t t i i o o n n f f o o r r A A l l l l - - I I n n - - O O n n e e s s y y s s t t e e m m s s i i s s f f o o r r a a s s e e c c o o n n d d a a r r y y t t o o u u c c h h p p a a n n e e l l o o n n l l y y .
- Page 72 F F i i g g u u r r e e 4 4 8 8 . . F F i i n n a a l l C C a a l l i i b b r r a a t t i i o o n n S S c c r r e e e e n n...
- Page 73 ������� ��� ���� ��� ���� To set the date and time for the system: 1. Press the clock icon located in the bottom right corner of the screen. N N o o t t e e : : T T h h i i s s s s c c r r e e e e n n c c a a n n a a l l s s o o b b e e r r e e a a c c h h e e d d b b y y p p r r e e s s s s i i n n g g t t h h e e E E d d i i t t b b u u t t t t o o n n o o n n t t h h e e S S u u r r g g i i c c a a l l T T i i m m e e o o u u t t s s c c r r e e e e n n .
- Page 74 2. Press the S S O O R R N N button on the task bar. The message, “Note: Pressing the Done button submits a request for Stryker Technical Global Support to call you at the phone number you entered. Stryker Technical Support will call you within 24 hours,”...
- Page 75 4. Once all of the required information has been entered, press the D D o o n n e e button. The following message will be displayed, “Thank you. Stryker Technical Support will contact you shortly.” Press the O O K K button to submit the request.
- Page 76 �������� ���� ��� ����������� �������� � To shut down the SwitchPoint Infinity system, do the following: 1. Press the S S e e t t u u p p button on the task bar. 2. Press the S S h h u u t t d d o o w w n n button that appears in the bottom right corner of the Setup screen.
- Page 77 ��������� ��������� W W a a r r n n i i n n g g : : The SwitchPoint Infinity 3 is designed with backup video. The purpose of the backup video is to deliver a backup video signal to the display in the event the system is unable to deliver the primary care video to the display.
-
Page 78: Useful Tips
( ( M M o o n n - - F F r r i i : : 6 6 a a m m t t o o 6 6 p p m m C C S S T T ) ) o o r r e e - - m m a a i i l l c c o o m m m m . . t t e e c c h h s s e e r r v v i i c c e e s s @ @ s s t t r r y y k k e e r r . . c c o o m m . . 25.1.5 Video Routing Tips The most important tip for using the SwitchPoint Infinity 3 Control System is to remember that nothing can be broken by routing a signal. - Page 79 F F i i g g u u r r e e 5 5 2 2 . . E E x x a a m m p p l l e e R R o o u u t t e e s s...
-
Page 80: Troubleshooting The Switchpoint Infinity 3
25.2 Troubleshooting the SwitchPoint Infinity 3 25.2.1 Router Drawings F F i i g g u u r r e e 5 5 3 3 . . S S P P I I 3 3 R R o o u u t t e e r r... - Page 81 External Amp Output Power Supply DVI-D Input* RS232 Port DVI-I Input Control System Port Optical DVI-D Input USB Port Video Processing Module KVM Port * If the SDC or All-In-One Control System controls the router, this will be a DVI-I input. ** This output will be a VPM card for All-In-One Control Systems.
- Page 82 Video Processing Module Mouse Video Output** KVM Ports DVI-I Output * If the SDC or All-In-One Control System controls the router, this will be a DVI-I input. ** This output will be a VPM card for All-In-One Control Systems. † Connects to a potential equalization conductor.
-
Page 83: Troubleshooting Steps
* Connects to a potential equalization conductor. The resulting medical electrical system shall follow all applicable IEC 60601-1 requirements. ** The 42” touch panel is only compatible with SPI3 software or higher, or SPI3-Lite. F F i i g g u u r r e e 5 5 7 7 . . A A I I O O C C o o n n t t r r o o l l S S y y s s t t e e m m F F r r o o n n t t F F i i g g u u r r e e 5 5 8 8 . - Page 84 • Calibrate the Touch Panel by pressing CTRL+ALT+C and follow the on-screen instructions Touch doesn’t work when The SDC may not be properly calibrated; Contact Stryker trying to control the SDC Technical Support Picture color is unusual or Check the tightness of the “in and out” connections of the...
- Page 85 P P o o w w e e r r Control System will not • Check to see if power cable is firmly connected power up • Ensure front power switch is ON Touch panel will not power • Check to see if power cable is firmly connected •...
- Page 86 Image on monitor does not Verify the monitor is set on DVI/Digital RGB change when new video is routed Video distorted or noisy • Check video cables for secure connections and proper routing • Confirm that the input device is functioning properly No video on monitor •...
- Page 87 P P I I P P / / Q Q u u a a d d PIP/Quad inset does not Ensure the PIP/Quad option is turned ON show up Missing images in PIP/ • Try turning PIP/Quad OFF and then ON Quad view •...
-
Page 88: Connecting External Video Devices
, , “ “ T T h h i i s s d d e e v v i i c c e e i i s s a a l l r r e e a a d d y y i i n n t t h h e e p p a a t t h h . . ” ” 25.2.3 Connecting External Video Devices Most SwitchPoint Infinity 3 Control System installations have extra inputs and outputs for video. Some are terminated on the boom for easy access. One of the more common devices connected is the fluoroscope or C-arm. - Page 89 Rooms Not Connecting Check “link” lights on Ethernet switch for solid illumination Codec Troubleshooting Call Stryker Communications Technical Support Hotline at 1-866-841-5663 for U. S. and 1-972-410-7601 for international or comm.techservices@stryker.com Codec Won’t Connect with offsite Location Verify the phone or IP number for the...
-
Page 90: Spi3 Environmental Specifications
�������� ��� ���������� �������������� 26.1 SPI3 Environmental Specifications Operating Conditions 10° – 40°C (50° to 104°F) 30% – 75% relative humidity 70 kPA – 106 kPA Storage Conditions Dry-Bulb Temperature: -20° C to 50° C (-4° to 122°F) Relative Humidity: 10% to 90 % (Non-Condensing) Maximum Elevation: 3050 m (10,006.5 ft) 26.2 SPI3 Electrical and Physical Specifications... -
Page 91: Spi3-Lite Environmental Specifications
** Weight and dimensions include video router, typical pallet, all packaging, and accessories. Stryker Communications guarantees that all SwitchPoint Infinity 3 equipment including accessories, packaging material, labels, pouches, or other similar items do not contain latex. -
Page 92: Spi3 Control System Electrical And Physical Specifications
24”) 26.7 Required Equipment Using accessories or cables other than those approved by Stryker may cause harm to the user and/or device failure. G G u u i i d d a a n n c c e e a a n n d d M M a a n n u u f f a a c c t t u u r r e e r r ’ ’ s s D D e e c c l l a a r r a a t t i i o o n n - - E E l l e e c c t t r r o o m m a a g g n n e e t t i i c c E E m m i i s s s s i i o o n n s s The SwitchPoint Infinity®... - Page 93 E E m m i i s s s s i i o o n n s s T T e e s s t t C C o o m m p p l l i i a a n n c c e e E E l l e e c c t t r r o o m m a a g g n n e e t t i i c c E E n n v v i i r r o o n n m m e e n n t t - - G G u u i i d d a a n n c c e e RF emissions...
- Page 94 Mains power quality should be that of a Voltage <5% UT 5% UT typical commercial or hospital dips, short (>95% dip in (95% dip in interruptions UT) for 0,5 UT) for 0,5 environment. If the user of the and voltage cycle cycle SwitchPoint Infinity®...
- Page 95 The SwitchPoint Infinity® 3 Control System is intended for use in the electromagnetic environment specified below. The customer or the user of the SwitchPoint Infinity® 3 Control System should assure that it is used in such an environment. I I m m m m u u n n i i t t y y E E l l e e c c t t r r o o m m a a g g n n e e t t i i c c e e n n v v i i r r o o n n m m e e n n t t - - I I E E C C 6 6 0 0 6 6 0 0 1 1 C C o o m m p p l l i i a a n n c c e e...
-
Page 96: Separation Distances
electromagnetic environment due to fixed RF transmitters, an electromagnetic site survey should be considered. If the measured field strength in the location in which the SwitchPoint Infinity® 3 Control System is used exceeds the applicable RF compliance level above, the SwitchPoint Infinity® 3 Control System should be observed to verify normal operation. - Page 97 Field strengths from fixed transmitters, such as base stations for radio (cellular/ cordless) telephones and land mobile radios, amateur radio, AM and FM radio broadcast and TV broadcast cannot be predicted theoretically with accuracy. To assess the electromagnetic environment due to fixed RF transmitters, an electromagnetic site survey should be considered.
-
Page 98: Periodic Maintenance Schedule
����������� 27.1 Periodic Maintenance Schedule W W a a r r n n i i n n g g : : To ensure proper operation of the SwitchPoint Infinity 3, maintenance should be performed by the end user periodically. M M a a i i n n t t e e n n a a n n c c e e A A c c t t i i v v i i t t y y... - Page 99 Touch Panel. There are no user-serviceable parts inside the Touch Panel. Remember to unplug the Touch Panel from the power outlet before cleaning. Annually Schedule Preventative Call Stryker Technical Support (see Maintenance with Stryker Section 30 for contact information)
-
Page 100: Preventative Maintenance Restart
The device must be disposed of according to local laws and hospital practices. Local regulations may include specifications regarding the disposal of this product. We request that you contact Stryker when you plan to withdraw this device from service with the intention of discarding it. -
Page 101: Replacing The Wireless Microphone Batteries
It is recommended that the SwitchPoint Infinity 3 be sent to the waste treatment facility. Refer to the WEEE Passports for the SwitchPoint Infinity 3 and SwitchPoint Infinity 3-Lite for recycling instructions. The Batteries Directive 2006/66/EC introduces new requirements from September 2008 on removability of batteries from waste equipment in EU Member States. -
Page 102: Service
27.6.2 Service If service is needed either during or after the warranty period: 1. Prior authorization is required for the return of any Stryker Communications equipment. Contact Stryker Communications at 1-877-789-8106 or 1-972-410-7100. 2. Each item will be assigned a Return Merchandise Authorization (RMA). Shipments without an RMA will be refused. - Page 103 ���� ����� You have acquired a device (“DEVICE”) that includes software licensed by Stryker Communications from Microsoft Licensing Inc. or its affiliates (“MS”). Those installed software products of MS origin, as well as associated media, and “online” or electronic documentation (“SOFTWARE”) are protected by international intellectual property laws and treaties.
- Page 104 PERFORMANCE OF THE SOFTWARE. THIS LIMITATION SHALL APPLY EVEN IF ANY REMEDY FAILS OF ITS ESSENTIAL PURPOSE. IN NO EVENT SHALL MS BE LIABLE FOR ANY AMOUNT IN EXCESS OF U.S. TWO HUNDRED FIFTY DOLLARS (U.S. $250.00). Limitations on Reverse Engineering, Decompilation, and Disassembly. You may not reverse engineer, decompile, or disassemble the SOFTWARE, except and only to the extent that such activity is expressly permitted by applicable law notwithstanding this limitation.
- Page 105 ���� ��������� ��������� R R e e c c y y c c l l i i n n g g G G u u i i d d e e...
- Page 106 0 0 6 6 7 7 8 8 - - 0 0 0 0 3 3 - - 0 0 0 0 0 0 , , P P K K G G , , S S W W I I T T C C H H P P O O I I N N T T I I N N F F I I N N I I T T Y Y 3 3 L L I I T T E E N N o o t t e e : : T T h h e e S S P P I I 3 3 - - L L i i t t e e s s y y s s t t e e m m s s h h i i p p s s w w i i t t h h e e i i t t h h e e r r a a 1 1 9 9 - - i i n n c c h h o o r r 2 2 2 2 - - i i n n c c h h t t o o u u c c h h p p a a n n e e l l m m o o n n i i t t o o r r .
- Page 107 0 0 6 6 7 7 8 8 - - 0 0 0 0 3 3 - - 0 0 0 0 0 0 , , P P K K G G , , S S W W I I T T C C H H P P O O I I N N T T I I N N F F I I N N I I T T Y Y 3 3 L L I I T T E E Q Q t t y y I I m m p p o o r r t t a a n n t t I I n n f f o o r r m m a a t t i i o o n n I I t t e e - - C C o o m m p p o o - -...
- Page 108 0 0 6 6 7 7 8 8 - - 0 0 0 0 3 3 - - 0 0 0 0 0 0 , , P P K K G G , , S S W W I I T T C C H H P P O O I I N N T T I I N N F F I I N N I I T T Y Y 3 3 L L I I T T E E attached with acrylic- based adhesives Decals...
- Page 109 0 0 6 6 7 7 8 8 - - 0 0 0 0 3 3 - - 0 0 0 0 0 0 , , P P K K G G , , S S W W I I T T C C H H P P O O I I N N T T I I N N F F I I N N I I T T Y Y 3 3 L L I I T T E E Q Q t t y y I I m m p p o o r r t t a a n n t t I I n n f f o o r r m m a a t t i i o o n n I I t t e e - - C C o o m m p p o o - -...
- Page 110 0 0 6 6 7 7 8 8 - - 0 0 0 0 3 3 - - 0 0 0 0 0 0 , , P P K K G G , , S S W W I I T T C C H H P P O O I I N N T T I I N N F F I I N N I I T T Y Y 3 3 L L I I T T E E Q Q t t y y I I m m p p o o r r t t a a n n t t I I n n f f o o r r m m a a t t i i o o n n I I t t e e - - C C o o m m p p o o - -...
- Page 111 0 0 6 6 7 7 8 8 - - 0 0 0 0 3 3 - - 0 0 0 0 0 0 , , P P K K G G , , S S W W I I T T C C H H P P O O I I N N T T I I N N F F I I N N I I T T Y Y 3 3 L L I I T T E E Q Q t t y y I I m m p p o o r r t t a a n n t t I I n n f f o o r r m m a a t t i i o o n n I I t t e e - - C C o o m m p p o o - -...
- Page 112 0 0 6 6 7 7 8 8 - - 0 0 0 0 3 3 - - 0 0 0 0 0 0 , , P P K K G G , , S S W W I I T T C C H H P P O O I I N N T T I I N N F F I I N N I I T T Y Y 3 3 L L I I T T E E Control- Power Electrolytic Caps...
- Page 113 0 0 6 6 7 7 8 8 - - 0 0 0 0 3 3 - - 0 0 0 0 0 0 , , P P K K G G , , S S W W I I T T C C H H P P O O I I N N T T I I N N F F I I N N I I T T Y Y 3 3 L L I I T T E E Q Q t t y y I I m m p p o o r r t t a a n n t t I I n n f f o o r r m m a a t t i i o o n n I I t t e e - - C C o o m m p p o o - -...
- Page 114 0 0 6 6 7 7 8 8 - - 0 0 0 0 3 3 - - 0 0 0 0 0 0 , , P P K K G G , , S S W W I I T T C C H H P P O O I I N N T T I I N N F F I I N N I I T T Y Y 3 3 L L I I T T E E Q Q t t y y I I m m p p o o r r t t a a n n t t I I n n f f o o r r m m a a t t i i o o n n I I t t e e - - C C o o m m p p o o - -...
- Page 115 0 0 6 6 7 7 8 8 - - 0 0 0 0 3 3 - - 0 0 0 0 0 0 , , P P K K G G , , S S W W I I T T C C H H P P O O I I N N T T I I N N F F I I N N I I T T Y Y 3 3 L L I I T T E E Available installation in slots 1- 9 on LEFT(input side) Q Q t t y y I I m m p p o o r r t t a a n n t t I I n n f f o o r r m m a a t t i i o o n n...
- Page 116 0 0 6 6 7 7 8 8 - - 0 0 0 0 3 3 - - 0 0 0 0 0 0 , , P P K K G G , , S S W W I I T T C C H H P P O O I I N N T T I I N N F F I I N N I I T T Y Y 3 3 L L I I T T E E Housing Plastic Removes by two (2)
- Page 117 0 0 6 6 7 7 8 8 - - 0 0 0 0 3 3 - - 0 0 0 0 0 0 , , P P K K G G , , S S W W I I T T C C H H P P O O I I N N T T I I N N F F I I N N I I T T Y Y 3 3 L L I I T T E E polycarbonate decal attached with acrylic based adhesive.
- Page 118 0 0 6 6 7 7 8 8 - - 0 0 0 0 3 3 - - 0 0 0 0 0 0 , , P P K K G G , , S S W W I I T T C C H H P P O O I I N N T T I I N N F F I I N N I I T T Y Y 3 3 L L I I T T E E Panel Steel, zinc coated •...
- Page 119 0 0 6 6 7 7 8 8 - - 0 0 0 0 3 3 - - 0 0 0 0 0 0 , , P P K K G G , , S S W W I I T T C C H H P P O O I I N N T T I I N N F F I I N N I I T T Y Y 3 3 L L I I T T E E Only in slot 9on LEFT (input side) Q Q t t y y I I m m p p o o r r t t a a n n t t I I n n f f o o r r m m a a t t i i o o n n...
- Page 120 0 0 6 6 7 7 8 8 - - 0 0 0 0 3 3 - - 0 0 0 0 0 0 , , P P K K G G , , S S W W I I T T C C H H P P O O I I N N T T I I N N F F I I N N I I T T Y Y 3 3 L L I I T T E E Q Q t t y y I I m m p p o o r r t t a a n n t t I I n n f f o o r r m m a a t t i i o o n n I I t t e e - - I I t t - -...
- Page 121 0 0 6 6 7 7 8 8 - - 0 0 0 0 3 3 - - 0 0 0 0 0 0 , , P P K K G G , , S S W W I I T T C C H H P P O O I I N N T T I I N N F F I I N N I I T T Y Y 3 3 L L I I T T E E Video Panel Steel, zinc coated...
- Page 122 1-972-410-7100 For international service locations, refer to the Stryker website at the following URL: w w w w w w . . s s t t r r y y k k e e r r . . c c o o m m .
- Page 124 Flower Mound, Texas 75028 1-866-841-5663 U.S. Patents: www.stryker.com/ patents Stryker Corporation or its divisions or other corporate affiliated entities own, use or have applied for the following trademarks or service marks: t t h h e e S S t t r r y y k k e e r r L L o o g g o o , , S S w w i i t t c c h h P P o o i i n n t t I I n n f f i i n n i i t t y y , , E E n n d d o o S S u u i i t t e e O O R R , , i i S S u u i i t t e e , , S S u u i i t t e e L L i i n n k k , , S S u u i i t t e e V V i i e e w w .
Need help?
Do you have a question about the SwitchPoint Infinity 3 and is the answer not in the manual?
Questions and answers