
Summary of Contents for SoundLogic BCRU-12/0137
- Page 1 2016.04.2 9 14:10:06 +08'00' Bluetooth Wireless Alarm Clock Radio with Built-in 2.1A USB Charging Port BCRU-12/0137 INSTRUCTION MANUAL PLEASE READ ALL INSTRUCTIONS CAREFULLY AND RETAIN FOR FUTURE USE...
-
Page 2: Getting Started
Getting started Remove the product from the box. Remove all packaging from the product. Please retain all packaging until you have checked and counted all the parts and the contents against the parts list. Packaging Contents Bluetooth Alarm Clock Radio Power Adapter ... -
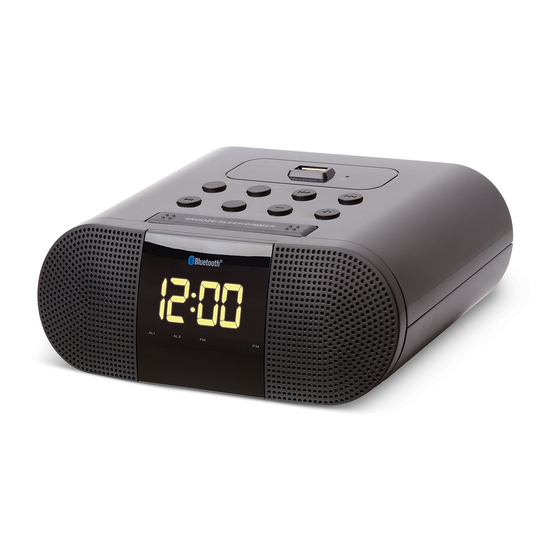
Page 3: Description Of Parts
Description of Parts FM Antenna CH MODE Button AUX-IN Port LED Display DC-IN Power Port SNOOZE/SLEEP/DIMMER Button 2.1A USB Charging Port Skip Backward Button MICROPHONE Skip Forward Button MEMORY/SET Button VOLUME +/AL1 Button POWER/FUNCTION Button VOLUME -/AL2 Button MFB Button Back-Up Battery Compartment (Phone/Mono/Stereo/Play/Pause) -
Page 4: Led Display
LED Display AL1 indicator is ON when Alarm 1 is on. AL2 indicator is ON when Alarm 2 is on. PM indicator is ON when time is in PM time. FM indicator is ON when using radio function. INSTRUCTIONS FOR USE This unit requires AC/DC Power Adaptor (included). -
Page 5: Setting The Time Manually
SETTING THE TIME MANUALLY 1. To set the hour, press and hold the MEMORY/SET button until the hour digits flash. 2. While the hour digits are flashing, repeatedly press the button to adjust the correct hour. 3. Press the MEMORY/SET button to confirm the hour setting and the minute digits will flash to prompt for adjusting. -
Page 6: Alarm Operation
Alarm Operation The unit provides two alarms setting: AL1 and AL2. You can choose to use them independently or simultaneously: SETTING THE ALARM(S) 1. Press and hold POWER/FUNCTION button to turn off the unit. 2. Press and hold the VOLUME +/AL1 (or VOLUME -/AL2) button until the hour digits blinks. -
Page 7: Bluetooth Operation
NOTE: / Play/Pause buttons can only work in Bluetooth Operation. b. If there is no sound, or the sound is not loud enough, you can increase the volume from your source device. Bluetooth Operation Pairing with Bluetooth devices (phone or music device) 1. -
Page 8: Sleep Timer
Talking using the Bluetooth Speaker Function Please ensure that your cell phone is paired with the Bluetooth Speaker Function to use the below functions. Function Operation Button Answer Incoming Incoming Call Short press the MFB button to answer an Call incoming call. -
Page 9: Specifications
Specifications Bluetooth specification Bluetooth V2.1+EDR Operating distance 33 Feet, Class II Power Source AC/DC Power Adapter Input: 100-240V~50/60Hz 0.5A Output: 5V 2500mA Centre Positive Speaker 2 x 1W FM radio frequency 87.5 to 108MHz Dimensions 6-1/8” x 5” x 2-1/2” Weight (not including Power Adaptor) 12 oz Troubleshooting Problem... - Page 10 Care and Maintenance Clean the unit with a soft, damp cloth. Never use chemicals or hard abrasives. Keep this unit away from wet or damp surroundings. The crossed out wheelie bin symbol on this item indicates that this product needs to be disposed of in an environmentally friendly way when it becomes of no further use or has worn out.
-
Page 11: Limited Warranty
Limited Warranty This manufacturer's product warranty extends to the original consumer purchaser of the product. Neither the retailer nor any other company involved in the sale or promotion of this product is a co-warrantor of this manufacturer warranty. WARRANTY DURATION: All materials and workmanship are warranted to the original consumer purchaser for a period of ninety (90) days from the original purchase date.