Table of Contents
Advertisement
Quick Links
Advertisement
Table of Contents

Related Manuals for Cocoon HE170703


Summary of Contents for Cocoon HE170703
- Page 1 INSTRUCTION MANUAL MODEL NUMBER: HE170703 VERSION 1 ISSUED 04/08/17...
- Page 3 IMPORTANT Getting the most out of your ModelMaker 3D Printer: Read the manual carefully It will help you set up with ease Visit https://cocoonproducts.com.au We have additional support videos and guides Call After Sales Support - 1300 663 907 Available Monday - Friday, 8:30am - 6:00pm AEST Email customercare@winplus.com.au We’re always happy to help WARRANTY NOTE...
-
Page 4: Warranty Details
You are also entitled to have the goods repaired or replaced if the goods fail to be of acceptable quality and the failure does not amount to a major failure. AFTER SALES SUPPORT 1300 663 907 customercare@winplus.com.au YEAR WARRANTY MODEL: HE170703 PRODUCT CODE: 59101 11/2017... -
Page 5: Safety Instructions
Before you get started, please read these important safety instructions. CAUTION: The Cocoon Create ModelMaker 3D Printer generates high temperatures and includes moving parts that can cause injury. Never reach inside of the ModelMaker 3D Printer while it is in operation, and allow time for the printer to cool down after operation. -
Page 6: Table Of Contents
4.8 Storage 4.9 Creating and Printing your Own Models 4.9.1 Saving Files to MicroSD Card 4.9.2 Creating a GCODE File Using Cura 4.9.3 Installing Cura 4.9.4 Adding your Cocoon Create 3D Printer to Cura 4.9.5 Loading a 3D Design into Cura... - Page 7 Maintenance Disposal of Packaging Disposal of Product Troubleshooting 10.1 Troubleshooting 10.1.1 Printing Problems 10.1.2 Connectivity Problems 10.1.3 Other Problems 10.2 Useful Terms Appendix References Repair and Refurbished Goods or Parts Notice AFTER SALES SUPPORT 1300 663 907 CUSTOMERCARE@WINPLUS.COM.AU MODEL: HE170703...
-
Page 8: Parts List
PARTS LIST 1 x 3D Printer 1 x Hex Key Set 1 x Getting Started Guide 1 x Filament Spool Stand 2 x Cable Ties (Not Shown) 1 x Power Cable 4 x 10m PLA Filament 1 x Warranty Card 1 x USB Cable 2 x Spare Print Bed Mats (Not Shown) -
Page 9: Technical Specifications
Single Extruder Extruder Diameter: 0.4mm Print Speed: 10mm/s - 70mm/s Travel Speed: 10mm/s - 70mm/s Supported Print Materials: Cocoon Create Branded PLA, PLA Wood Temperature Ambient Operating Temperature: 15°C – 30°C Operational Extruder Temperature: 170°C - 250°C Software Slicer Software:... -
Page 10: Introduction
INTRODUCTION 1.1 What is 3D Printing? 3D Printing is a process whereby a real object is created from a 3D Design. Fused Filament Fabrication (FFF) is one of the most common technologies used by 3D Printers to achieve this. FFF works on an ‘additive’... - Page 11 3D Printed Object Once the printer has completed all the layers, you will have a 3D Printed Object. The results are certainly worth it, with 3D models ranging from simple to complex. AFTER SALES SUPPORT 1300 663 907 CUSTOMERCARE@WINPLUS.COM.AU MODEL: HE170703...
-
Page 12: Product Overview
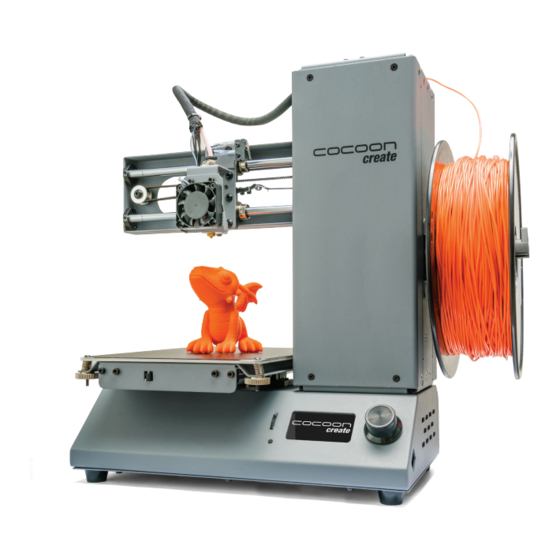
PRODUCT OVERVIEW 2.1 Printer Front View 1. Filament Tube 5. Print Bed 9. Tower Frame 2. X-Axis Frame 6. Front Thumbwheels 10. Spool Holder 3. Cooling Fan 7. Control Panel 4. Nozzle 8. Filament Clamp... -
Page 13: Printer Rear View
PRODUCT OVERVIEW 2.2 Printer Rear View 1. Power Switch 3. Rear Thumbwheels 2. Plug Socket 4. Extruder Assembly AFTER SALES SUPPORT 1300 663 907 CUSTOMERCARE@WINPLUS.COM.AU MODEL: HE170703... -
Page 14: Control Panel
PRODUCT OVERVIEW 2.3 Control Panel 1. MicroSD Card Slot 3. LCD Display Screen 5. USB Port 2. Restart Button 4. Dial Button... -
Page 15: Product Assembly & Initial Setup
PRODUCT ASSEMBLY & INITIAL SETUP 3.1 Unboxing and Assembly Your Cocoon Create ModelMaker 3D Printer is carefully packed to avoid damage in transit. Take your time unpacking it. The printer is pre-assembled and requires only minimal set up before powering on. -
Page 16: Home Screen
SETUP 3.2 Home Screen 3D Printer ready. Elapsed Time 00:00 Speed Progress 100% • Printer Status: Current printer status or memory card status if removed or inserted • Elapsed Time: Length of time the current model has been printing (if applicable) •... -
Page 17: Menu Tree
00:00 Speed Progress 100% Main Menu back Print File Level bed Quick Settings Advanced Quick Settings Move Change Filament Disable Steppers Preheat Cooldown Advanced Settings back Temperature Save Setting Factory Reset AFTER SALES SUPPORT 1300 663 907 CUSTOMERCARE@WINPLUS.COM.AU MODEL: HE170703... -
Page 18: Adding Filament
SETUP 3.5 Adding Filament Place your roll of filament on the Filament Spool Holder Turn on the 3D Printer with the Power Switch located at the back of the Printer Push the Dial Button to access the Main Menu and navigate to Quick Settings Change Filament Add Filament. -
Page 19: Manually Levelling The Bed
If you are new to 3D Printing we highly recommend that you visit our website to review our video tutorial on levelling the print bed at https://cocoonproducts.com.au AFTER SALES SUPPORT 1300 663 907 CUSTOMERCARE@WINPLUS.COM.AU MODEL: HE170703... -
Page 20: Printing And Removing Models
PRINTING AND REMOVING MODELS 4.1 Printing a File The ModelMaker only accepts and prints GCODE files. The included MicroSD Card has sample model GCODEs available to get you started. See section 4.9 Creating and Printing Your Own Models on page 25 to load your own models. -
Page 21: Good 3D Printing Practices
Carefully remove 3D Object. Never use the Scraper towards your body. Keep Scraper evenly flat when scraping to avoid damaging the Print Bed. Damaged Print Beds / mats may affect adhesion for future prints Store 3D printer in a clean, dry environment AFTER SALES SUPPORT 1300 663 907 CUSTOMERCARE@WINPLUS.COM.AU MODEL: HE170703... -
Page 22: Removing 3D Objects From The Bed
PRINTING AND REMOVING MODELS 4.3 Removing 3D Objects from the Bed Once the ModelMaker has completed printing your 3D printed object follow these steps to remove it from the Print Bed. Once the print is completed, wait for the Extruder to cool and then turn off your 3D Printer Using the supplied Scraper, carefully ‘wedge’... -
Page 23: Quick Settings
• Preheat PLA conf: Adjusts the default PLA heating temperature Save Setting: Saves the current settings NOTE: You must save settings after every change. Unsaved settings will be lost after restart Factory Reset: Restores default factory settings AFTER SALES SUPPORT 1300 663 907 CUSTOMERCARE@WINPLUS.COM.AU MODEL: HE170703... -
Page 24: Filament
SETUP 4.7 Filament The Cocoon Create ModelMaker 3D Printer is designed to be only used with PLA (Polylactic Acid BioPlastic) Filament. Only use genuine Cocoon Create filaments as using generic filaments may damage your 3D Printer and may void your warranty. Extra filament including multiple colours and PLA types are available from the online store at https://cocoonproducts.com.au/... -
Page 25: Storage
A GCODE file provides the essential temperature settings and movement information for your Cocoon Create 3D printer. A number of ‘Slicer’ software programs exist which convert a 3D model file into a series of 3D printable layers. Cura is free Open Source slicer software released on the AGPLv3 license. -
Page 26: Adding Your Cocoon Create 3D Printer To Cura
Change Nozzle size to 0.4mm Ensure Heated Print Bed is not ticked Select ‘Finish’ For the latest optimized / recommended Cura settings for your Cocoon Create ModelMaker 3D Printer, visit https://cocoonproducts.com.au 4.9.5 Loading a 3D Design into Cura Clear the platform using File Clear platform…... -
Page 27: Servicing
WARNING: The extruder is preheated and hot Remove the drill bit from the nozzle, twisting while removing Repeat steps ‘2’ and ‘3’ three times, then follow the steps in Quick Settings Change Filament Add Filament AFTER SALES SUPPORT 1300 663 907 CUSTOMERCARE@WINPLUS.COM.AU MODEL: HE170703... -
Page 28: Routine Component Check
SERVICING 5.1.3 Routine Component Check Motor Connectors Loose motor connections could cause a 3D print to fail. It’s a good habit to routinely check for any damage to the connectors or the black cables. Axis Lubrication Regular lubrication of the X and Y Axis rods is important for the longevity and smooth running of your printer. -
Page 29: Finishing
TIP: Spraying a primer filler will also help to reduce the layer lines on the 3D Object. This can then be sanded away and repeated, until the desired smoothness is achieved AFTER SALES SUPPORT 1300 663 907 CUSTOMERCARE@WINPLUS.COM.AU MODEL: HE170703... -
Page 30: Surface Coating
FINISHING 6.1.4 Surface Coating Finally, to make your models more presentable, follow these steps; Ensure that safety goggles and a mask are worn for protection Ensure that your 3D object is clean and free from dust Spray your model using an acrylic based primer, following the directions of your primer Allow appropriate time to dry before applying additional coats Spray your model using an acrylic based paint of your colour. -
Page 31: Disposal Of Packaging
Observe any local regulations regarding the disposal of electrical consumer goods and dispose of it appropriately for recycling. Contact your local authorities for advice on recycling facilities in your area. AFTER SALES SUPPORT 1300 663 907 CUSTOMERCARE@WINPLUS.COM.AU MODEL: HE170703... -
Page 32: Troubleshooting
TROUBLESHOOTING 10.1 Troubleshooting If having any troubles when using the ModelMaker 3D Printer, please refer to the troubleshooting guide below, or call customer support on 1300 663 907. You can also visit https://cocoonproducts.com.au for support videos and advanced tutorials. 10.1.1 Printing Problems Clicking sound from one of the stepper motors One of your stepper motors may not be connected properly. -
Page 33: Connectivity Problems
• Please ensure your MicroSD Card is formatted as FAT32 • Navigate to SD Card, select Unmount SD Card, then select Mount SD Card. Your MicroSD card should now appear in the menu. AFTER SALES SUPPORT 1300 663 907 CUSTOMERCARE@WINPLUS.COM.AU MODEL: HE170703... -
Page 34: Other Problems
If you require more filament, visit our online store, https:// cocoonproducts.com.au to purchase various colours. What brand of filament should I buy? We recommend using only Cocoon Create branded filament. Lower quality generic filaments can damage your ModelMaker 3D Printer and potentially void your warranty. -
Page 35: Useful Terms
DC motors that move in discrete steps. This allows for precise positioning and/or speed control .stl A common file format for 3D Designs/Models USB Cable The Cocoon Create ModelMaker 3D Printer allows USB communication only for firmware updates AFTER SALES SUPPORT 1300 663 907 CUSTOMERCARE@WINPLUS.COM.AU... -
Page 36: Appendix
APPENDIX References Some of the 3D Models used in this manual and other included materials were sourced from the below:... -
Page 37: Repair And Refurbished Goods Or Parts Notice
Please telephone us on 1300 663 907 or write to us at: Winplus Australasia PO Box 537 Bayswater Business Centre, Victoria, Australia 1300 663 907 - Hours: Mon-Fri 8:30am - 6:00pm AEST customercare@winplus.com.au AFTER SALES SUPPORT 1300 663 907 customercare@winplus.com.au YEAR WARRANTY MODEL: HE170703 PRODUCT CODE: 59101 11/2017...
Need help?
Do you have a question about the HE170703 and is the answer not in the manual?
Questions and answers