
Related Manuals for Zoom ARQ AR-48

Summary of Contents for Zoom ARQ AR-48
- Page 1 Aero RhythmTrak Operation Manual © 2017 ZOOM CORPORATION Copying or reprinting this manual in part or in whole without permission is prohibited.
-
Page 2: Table Of Contents
Contents REC/PLAY area Usage and Safety Precautions .......3 Introduction ............6 REC/PLAY area overview ......70 Explanation of terms ........8 Motion sequences ........72 Capturing audio ........... 74 Overview Automatic saving .........78 Names of parts ..........9 EFFECT area Using the ..........12 The 4 Base Station areas ......13 EFFECT area overview .........79 STEP key overview........14 Selecting and setting effects ......80... -
Page 3: Usage And Safety Precautions
AC adapter before moving the unit. Operation using an AC adapter Volume Never use any AC adapter other than a ZOOM AD- Do not use at a loud volume for a long time. Do not do anything that could exceed the ratings Usage Precautions of outlets and other electrical wiring equipment. - Page 4 Recording from copyrighted sources, including CDs, records, tapes, live performances, video works and broadcasts, without permission of the copyright holder for any purpose other than personal use is prohibited by law. Zoom Corporation will not assume any responsibility related to infringements of copyrights.
- Page 5 FCC regulation warning (for U.S.A.) This equipment has been tested and found to comply with the limits for a Class B digital device, pursuant to Part 15 of the FCC Rules. These limits are designed to provide reasonable protec- tion against harmful interference in a residential installation.
-
Page 6: Introduction
Introduction ● Use as a MIDI controller possible Thank you very much for purchasing a ZOOM Aero RhythmTrak . The has the The Ring Controller can be independently following features. used as a multifunction MIDI controller when connected to a computer or other device by ●... - Page 7 ● Use up to two effects simultaneously You can use an effect on individual instru- ments, as well as a master effect at the same time. This vastly increases sound design possibilities. ● Inputs for electronic instruments and audio devices You can perform while listening to the input from a connected device and capture input sounds to use as sound sources.
-
Page 8: Explanation Of Terms
Explanation of terms Pattern Sequence This is a short musical part of several bars. A sequence is performance data that records Patterns are made of sequences (performance the timing when various sounds are played. information) and oscillators (sounds). You can With the you can input sequences one also save parameters controlled by the Ring... -
Page 9: Names Of Parts
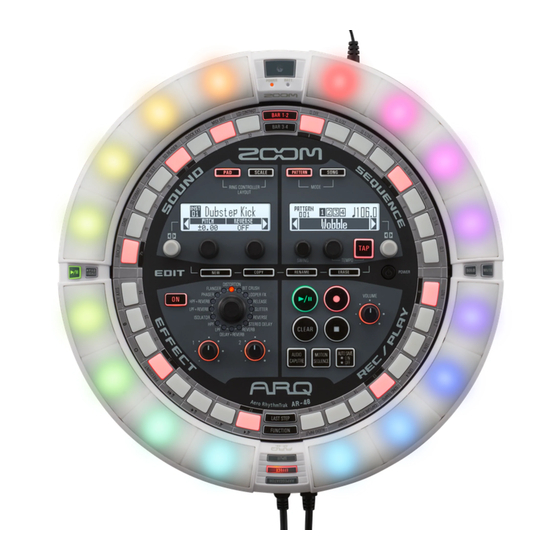
Overview Names of parts Base Station ■ Top BAR 1-2 button SEQUENCE area SOUND area BAR 3-4 button PATTERN button SCALE button SONG button PAD button Display Display SWING knob Sound parameter TEMPO knob knob 2 TAP button Sound parameter Selection encoder knob 1 Selection encoder... - Page 10 Names of parts (continued) ■ Back Power MIDI OUT OUTPUT AUDIO INPUT connector jack jacks jack ■ Front BTA-1 SD card Ring Controller Headphone connector slot connection port jack port...
- Page 11 Ring Controller (Side) Power button GRIP button Touchpads POWER LED BATT LED (Side) BTA-1 connector PAD/SCALE button SOLO button PLAY/PAUSE button MUTE button EFFECT SPLIT button button ARPEGGIATOR button (Side) USB port...
-
Page 12: Using The
Using the consists of a Base Station and a Ring Controller. Ring Controller Base Station With the Base Station, you can create and save patterns, songs and other musical pieces, as well as edit tones, for example. Use the Ring Controller for input when creating music. Since the Ring Controller can be detached from the Base Station, you can hold it in your hand and play it like an instrument. -
Page 13: The 4 Base Station Areas
The 4 Base Station areas The Base Station is divided into four areas according to use. SOUND SEQUENCE area area EFFECT REC/PLAY area area SOUND area: Use to control the parameters of instruments assigned to pads. Parameters related to the instrument are shown on the display. SEQUENCE area: Use to set the tempo and other sequence parameters. -
Page 14: Step Key Overview
STEP key overview The Base Station has 32 STEP keys that can be used to input sequences, for example. You can input instruments one step at a time to create patterns. Sequence steps … … 30 31 32 Playback position During playback of a pattern or song, for example, the STEP key LEDs light green at the step currently playing. -
Page 15: Ring Controller Overview
Ring Controller overview Ring Controller surface has 16 pressure-sensitive touchpads. Using these pads, you can input and edit patterns and songs and perform in real-time, for example. Touchpad locations Pressure-sensitive touchpads with multicolor LED indicators Assignment of functions Various functions are assigned to the Ring Con- Example: In SONG mode, different patterns can troller pads according to the operation status be assigned to each pad, allowing you to tap the... - Page 16 Ring Controller overview (continued) Grip area Accelerometer You can set a grip area that does not respond Using the accelerometer built into the Ring Con- to touch in order to prevent pads from being troller, you can control arpeggiator timing, instru- pressed unintentionally when using the Ring ments and effect parameters by tilting it.
-
Page 17: Connecting Other Devices
Connecting other devices Mixer, audio system or other playback device Audio source Sound module, OUTPUT for capture synthesizer or other MIDI device AUDIO INPUT MIDI OUT DC IN AC adapter Computer Headphones (USB connection) -
Page 18: Switching Modes
Switching modes With the , you can create patterns and Use SONG mode to create songs. combine multiple patterns to create songs. · In SONG mode, create songs by playing and changing patterns in real-time and recording has two main modes for creating the results. -
Page 19: Instrument Overview
Instrument overview can use up to 16 sound sources in a single pattern. Each of these is called an instrument and produces sound from waveform data, such as a drum hit, from a WAV file loaded from an SD card, or from the built-in synthesizer. In addition to its sound (oscillator), each instrument has various settings. -
Page 20: Preparations
Preparations Turning the power on and off Base Station power Ring Controller power ■ When connected by USB Connect the included AC adapter When the Ring Controller is connected to the Base Station or a computer by USB, it will to the Base Station. - Page 21 Turning the power on and off (continued) ■ Turning the Ring Controller on Ring Controller underside Remove Press W for at least 2 seconds. This turns on the Ring Controller. Unlock ■ Turning the Ring Controller off Press W for at least 2 Install the batteries.
-
Page 22: Loading Sd Cards
Loading SD cards ■ Loading and removing SD cards Turn the power off. Open the SD card slot cover on the Base Station. Insert the SD card into the slot. To eject an SD card: Push the card further into the slot and then pull it out. -
Page 23: Character Input Screen Use
Character input screen use ■ Changing characters To end editing, turn to select OK, and press Turn to underline the charac- ter to change. HINT • The following characters can be used. (space) ! # & ' ( ) + , - 0 1 2 3 4 5 6 7 8 9 ; = @ A B C D E F G H I J K L M N O P Q R S T Press to confirm the character... -
Page 24: Pattern Mode
PATTERN mode PATTERN mode overview Use PATTERN mode to create patterns. You can input patterns in two ways: real-time input and step input. Real-time input You can tap pads to perform as you like. You can also record performances in real-time to create patterns. - Page 25 PATTERN mode overview (continued) Creating patterns in PAD layout After starting real-time input, tap pads for an instrument to input it. The pattern will start loop playback, and you can overdub as many times as you like. Instruments Bar 1 Bar 2 Instrument 1 Instrument 2...
- Page 26 PATTERN mode overview (continued) Step input With STEP input, you can create patterns by inputting them one step at a time. Using this input method, each step key on the Base Station corresponds to one step. 31 32 Step Bar 2 Step Bar 1 Bar 2...
- Page 27 Press a to brightly light the pads on the Ring Controller for the instruments recorded at that step and play those instrument sounds. Press a during playback to start the sequence from that position. Creating patterns in PAD layout The Ring Controller pads correspond to different instruments. While pressing a pad that corresponds to an instrument, use the Base Station keys to input the sequence for that instrument.
- Page 28 PATTERN mode overview (continued) Screen overview SOUND display SEQUENCE display Number of currently Pattern number selected instrument Name of currently Currently playing bar selected instrument Parameter 1 Parameter 2 Pattern name...
-
Page 29: Operation Overview
Operation overview Enter PATTERN mode Press to enter PATTERN mode. Select a pattern Turn in the SEQUENCE area to select the pattern number. Confirm the instruments Tap the pads on the Ring Controller if you want to listen to the sounds of the input instruments. When a pad is tapped, its instrument becomes "selected"... - Page 30 Operation overview (continued) Preparations " to adjust sound ■ Enter the mode parameters. Press HINT • Editing sounds ( → P. 48) • One pattern can use up to 16 instruments. ■ Select a pattern Select a pattern to use for input. ■ Set the tempo Turn in the SEQUENCE area...
-
Page 31: Real-Time Pattern Input
Real-time pattern input Input a pattern Instruments → Notes → Press lights, showing that recording PAD layout SCALE layout standby has started. Press This starts the precount. After the precount completes, you can input HINT instruments. • By setting quantization, input can automati- cally be corrected if it varies from the rhythm. -
Page 32: Pattern Step Input
Pattern step input Pattern input To clear an input step, tap that ■ Select an instrument and input a again. pattern The step will be cleared and the LED will become unlit. Press to select NOTE This method can be used when playing back the bars to input. - Page 33 ■ Select steps and input a pattern To clear an input instrument, tap the pad again. Press to select The tapped pad will light dimly. the bars to input. NOTE This method can only be used when playback is stopped. Press for the step to be input.
-
Page 34: Playing Back Patterns
Playing back patterns Press Playback starts and lights. Press again to pause. Playback pauses and blinks. Press to stop playback. becomes unlit when playback stops. HINT • When a pattern has 3 or more bars, will automatically switch during playback. •... -
Page 35: Clearing Parts Of Patterns
Clearing parts of patterns Press The pattern plays back. Press and hold lights, and the SEQUENCE display will appear as shown below. CONTROLLER While the part you want to clear is playing back: In PAD layout, press and hold the pad for the instrument you want to clear. -
Page 36: Arpeggiator
Arpeggiator This function can be used to make an instru- Turn to change the arpeggiator ment play automatically when triggered by a pad. Pressing multiple pads will trigger multiple style. instruments in order. The STYLE can be set to REPEAT, By pressing chord tones in SCALE layout, the SEQUENCE, UP, DOWN, UP&DOWN, or notes in the chord can be played back one at a... - Page 37 Arpeggiator parameter list Parameter 2 Parameter 3 Style Effect (use to set) (use to set) Repeat Pressed pads will sound repeatedly. Pattern Number of note If multiple pads are pressed, they This sets the timing of the In addition to the note of the arpeggiator.
-
Page 38: Clearing Patterns
Clearing patterns Clearing entire sequences HINT • Select "All Instruments" to clear the entire sequence. Press to stop sequence • In SCALE layout, notes will be cleared. Select "All Notes" to clear the entire SCALE layout playback. sequence. • If an instrument is cleared in PAD layout, notes input in SCALE layout will also all be Press cleared. -
Page 39: Other Settings
Other settings Metronome settings ■ Changing the metronome volume Make settings related to the metronome that To lower the volume, while press- plays back as a guide during recording. , press -19. ■ Turning METRONOME OUTPUT To raise the volume, while pressing on/off , press -20. - Page 40 Other settings (continued) Setting the pad splits When PAD layout is selected, you can change the number of instruments assigned to the Ring Controller. By default, you can play 16 instruments with the Ring Controller. You can, however, also reduce the number of instruments to make it easier to play when performing with it in hand.
-
Page 41: Making Pattern Settings
Making pattern settings Pattern settings include Auto Save, Quantize, Quantization setting Bar length, and Swing, as well as Ring Controller This sets the shortest note length that can be Accelerometer parameters. input into the sequence. These settings are saved separately for each This sets timing correction during real-time input pattern. - Page 42 Making pattern settings (continued) 1 bar 2 bars Quantize set to 1/32 Quantize set to 1/16 8 steps = 1 beat 4 steps = 1 beat 1 cycle = 1 bar 1 cycle = 2 bars 1 bar 2 bars Quantize set to 1/16T Quantize set to 1/8T 6 steps = 1 beat...
- Page 43 Soloing Muting You can solo the playback of just the selected You can mute just the selected instrument. instrument. While pressing M, CONTROLLER CONTROLLER While pressing S, tap the pad for the instrument to tap the pad for the instrument to be muted.
-
Page 44: Pattern Management
Pattern management Copying and swapping Copying/swapping patterns instruments Turn in the SEQUENCE area CONTROLLER Tap the pad for the to select the pattern to copy/swap. instrument to be copied or swapped. Press The destination for copying/swapping the pattern appears on the SEQUENCE Press display. - Page 45 Erasing instruments Erasing patterns CONTROLLER Tap the pad for the Turn in the SEQUENCE area instrument to erase. to select the pattern to erase. Press Press The instrument to erase appears on the The pattern to erase appears on the SOUND display.
- Page 46 Pattern management (continued) Changing instrument names Changing pattern names CONTROLLER Tap the pad for the Turn in the SEQUENCE area instrument with the name to to select the pattern with the name change. to change. Press Press The instrument with the name to change The pattern with the name to change appears on the SOUND display.
- Page 47 Creating new patterns Press The name of a new pattern appears on the SEQUENCE display and can be edited. To change the name, use in the SEQUENCE area to select the character to change, and press Press to cancel and return to the Home Screen.
-
Page 48: Editing Sounds
Editing sounds Sound editing overview " in the SOUND area to edit instruments and change their sounds. The instruments are made of the following blocks, which can each be specifically set. Oscillator Insert SCALE layout Noise Effect Filter settings Set the scale and This sets the basic Noise can be Sounds can be... - Page 49 Sound editing overview (continued) Volume Effect LED settings MIDI settings envelope Output mixer send amount This sets how This sets the These set the This sets the pad Use this to set the quickly sound starts panning (stereo amounts sent to color and lighting MIDI channel used when a pad is...
-
Page 50: Editing Instruments
Editing instruments Common operations Making SCALE layout settings You can set, for example, the octave, scale CONTROLLER Tap the pad for the and whether only a single sound (monophonic) or multiple sounds (polyphonic) can be output instrument to be edited. when the Ring Controller is in SCALE layout. - Page 51 ■ Setting the glide (Glide) Oscillator When a different note is triggered, the pitch can This sets the basic instrument sound. change instantly or gradually over time accord- ing to this setting. • Press in the SOUND area, and use This can be set from 0 to 100.
- Page 52 Editing instruments (continued) Noise HINT • Files that meet the following conditions can Noise can be added to the sound. be used as oscillators. – WAV format files that have been recorded ■ Type of noise (Type) as 16/24-bit PCM audio with 44.1kHz sampling frequency You can change the type of noise.
-
Page 53: Insert Effects
Insert effects ■ Lo-Fi (LO-FI) This effect intentionally lowers the fidelity of the Sounds can be altered with effects. sound. ■ Compressor (COMP) HINT The compressor reduces volume variation. • See "Instrument parameter lists" in the appendix for details about each insert effect. ■ Pumper (PUMPER) ( →... - Page 54 Editing instruments (continued) Filter Volume envelope (ADSR) The frequency and other parameters can be set This sets how quickly the sound starts and how for the filter. quickly it becomes silent, for example. ■ Type (TYPE) ■ Attack (Attack) You can change the filter type. This changes how fast the sound starts.
- Page 55 Output mixer (OUTPUT) Effect send amount This sets the panning (stereo position) and level. The amount of sound sent to the master effect can be changed. ■ Panning (Pan) ■ Send amount (Amount) The left and right output level balance can be changed.
-
Page 56: Midi Settings
Editing instruments (continued) LED settings MIDI settings You can set the color used by the Ring Control- Use this to set the MIDI channel for playing ler LEDs, as well as how pads light when a pad instrument sounds by USB MIDI and for output- is tapped. -
Page 57: Song Mode
SONG mode SONG mode overview In SONG mode, you can combine multiple patterns that you have created into one complete song. Playback order → Song … Pattern A Pattern B Pattern C … You can create songs in two ways: real-time input and step input. ■ Real-time input The pads on the Ring Controller are assigned 16 patterns. - Page 58 SONG mode overview (continued) ■ Step input With step input, you can set which patterns to play and how long to play them in order. Use Base Station to add patterns for playback in order starting with Add the first pattern for playback Add the next pattern for playback Pattern 2 will play Pattern 1 will play...
- Page 59 assigned to currently Song number Tempo selected pad Screen overview ■ When song stopped ■ When song playback stopped Parameter 1 Parameter 2 Song name SOUND display SEQUENCE display Number of currently selected pad Name of pattern assigned to currently Song number Tempo selected pad...
-
Page 60: Operation Overview
Operation overview Enter SONG mode Press to enter SONG mode. Select a song Turn in the SEQUENCE area to select a song. Select a pattern to play back Tap the pad on the Ring Controller for the pattern to play back, and check it. -
Page 61: Creating Songs
Creating songs Preparations Real-time input ■ Enter the mode Press Press This starts the count. ■ Selecting songs CONTROLLER Tap a pad to select Select a song to input. a pattern to play. Turn in the SEQUENCE area The tapped pad will light according to the to select a song. - Page 62 Creating songs (continued) Step input In SONG mode, the timing of pattern changes is handled in step intervals. For example, if patterns 1–4 are added in order, the song sequence will have four steps, and the pat- terns will be assigned to -1, 2, 3 and 4.
- Page 63 Page 2 : Set the playback length in Page 2 : Set the playback length in beats (BEAT) beats (BEAT) " " Page 2 : Set the playback length in Page 2 : Set the playback length in ticks (smallest sequence time ticks (smallest sequence time unit, equal to 1/96 beat) unit, equal to 1/96 beat)
- Page 64 Creating songs (continued) Playing back songs Clearing song sequences Press Press to stop sequence This starts song playback. playback. that corresponds to the playing pattern will light green. Press A confirmation message appears on the display and lights. Press to pause. will blink.
-
Page 65: Song Settings
Song settings Setting tempo synchronization Making settings for patterns assigned to pads Set whether each pattern uses its own tempo setting or all patterns use the same tempo when ■ Assigning patterns to pads playing a song. CONTROLLER Tap a pad. Press Press in the SOUND area,... - Page 66 Song settings (continued) ■ Setting the pattern switching timing ■ Setting the pattern LED animation type CONTROLLER Tap a pad. CONTROLLER Tap a pad. Press in the SOUND area, Press in the SOUND area, and turn to open the quantize and turn to open the LED selection screen.
-
Page 67: Managing Songs
Managing songs Copying/swapping patterns Copying/swapping song assigned to pads sequences CONTROLLER Tap the pad with Turn in the SEQUENCE area the pattern to be copied/swapped. to select the song to copy/swap. Press Press The destination for copying/swapping the The destination for copying/swapping pattern appears on the SOUND display. - Page 68 Managing songs (continued) Erasing songs Changing song names Turn in the SEQUENCE area Turn in the SEQUENCE area to select the song to erase. to select the name to change. Press Press The song to erase appears on the The song with the name to change SEQUENCE display.
- Page 69 Creating new songs Press The name of a new song appears on the SEQUENCE display and can be edited. To change the name, use in the SEQUENCE area to select the character to change, and press in the SEQUENCE area to change the character, and press Press...
-
Page 70: Rec/Play Area
REC/PLAY area REC/PLAY area overview Use the REC/PLAY area to control sequences, including playback and recording. The following are the main operations that can be made here. REC/PLAY area Motion sequences Clearing You can adjust the parameters of instruments to clear sequence data, for example. and effects while playing back a created pattern and record these changes in real time. - Page 71 REC/PLAY area overview (continued) Capturing audio Volume can capture (record) as audio data to adjust the OUTPUT and headphone the sound of patterns and songs it plays back as volume. well as sounds input through the AUDIO INPUT jack. NOTE Captured audio data can be used as an The OUTPUT and headphone volumes are instrument.
-
Page 72: Motion Sequences
Motion sequences You can adjust the parameters of instruments Recording motion sequences and effects and record these changes in in real time sequences. You can record changes in real time while a pattern is playing as well as record parameter Select the pattern for which you setting values step-by-step. - Page 73 Recording motion sequences Clearing motion sequences step by step Press to stop pattern Stop or pause pattern playback. playback. Press Press The sequence clearing screen appears on the SEQUENCE display. Press the for the position Press again to cancel this operation. where you will change parameters.
-
Page 74: Capturing Audio
Capturing audio Capturing overview Setting the auto stop function can capture (record) audio it is You can set capturing to automatically stop a set playing back and audio input through its AUDIO time after starting. INPUT jack in every mode. While pressing Captured audio can be used for instruments. - Page 75 Switching between stereo and Capturing audio recordings mono Play the pattern, song or other Captured audio can be saved as stereo or mono. sound that you want to capture, or Audio capture is possible for up to 6 minutes in connect the instrument or other stereo or 12 minutes in mono.
- Page 76 Capturing audio (continued) " After the audio has been captured, in the SOUND area press to set the range of the captured You can adjust the captured recording audio assigned to the pad. and save it on the Capture Setting screen : Start point that opens.
- Page 77 HINT If you want to change the name of You cannot assign captured audio if it exceeds the length that can be used as an instrument. If the captured audio, turn in the you try to do so a message will appear. To make more time available, remove already assigned SEQUENCE area to select captured recordings and other audio files, or...
-
Page 78: Automatic Saving
Automatic saving You can set whether or not changes made to instruments and effects are saved automatically to patterns. When AUTO SAVE is set to OFF, the results of changes to instruments and effects will not be saved to patterns. Changes made will be discarded when you switch to SONG mode or select a different pattern. -
Page 79: Effect Area
EFFECT area EFFECT area overview In the EFFECT area, a master effect can be applied to the overall output during the playback of pat- terns and songs. EFFECT area... -
Page 80: Selecting And Setting Effects
Selecting and setting effects A variety of types of master effects are available. Turning the effect ON/OFF Changing the effect type Press lights when the effect is ON. to change the effect The effect stays ON even after type. released. The LED for the selected effect will light. -
Page 81: Changing Parameters
Changing parameters The effect parameters can be adjusted. The parameters that can be set depend on the type of effect. HINT See the "Effect list" appendix for details about effect parameters. ( → P. 117) Turn to adjust the desired parameters. The current setting values are shown on the SOUND display. -
Page 82: Ring Controller Performance
Ring Controller Performance Controlling parameters with the Ring Controller Using the Ring Controller accelerometer, you can ■ Assigning parameters control arpeggiator timing and the parameters of instruments and effects. Parameters can be While pressing , press changed by the movement and tilt of the Ring -24. - Page 83 Controlling parameters with the Ring Controller (continued) Turn in the SOUND area to Remove the Ring Controller from select the parameter. the Base Station. You can select from the following If the effect or arpeggiator has a parame- parameters. ter assigned, enable that function. Parameter Explanation None...
-
Page 84: System Settings
System settings Changing various settings Setting the audio input and Setting the clock mode effect send levels Set whether the internal clock or an external clock is used when connected to other MIDI When a signal is being input through the AUDIO devices by USB. -
Page 85: Checking The Software Version
Changing various settings (continued) Setting the display contrast Checking the software version The display contrast can be adjusted. The Base Station software version is shown on the display when the starts up. While pressing NOTE press -32. The Ring Controller software version can only be checked on the Ring Controller update The SOUND and SEQUENCE displays screen. - Page 86 Changing various settings (continued) Restoring default settings ■ Ring Controller The Base Station and the Ring Controller can be While pressing restored to their factory default settings. press -22. ■ Base Station A confirmation message appears on the SEQUENCE display. NOTE Restoring settings to their defaults will erase everything you have created including pat-...
-
Page 87: Outputting Midi Messages From The Base Station
Outputting MIDI messages from the Base Station The Base Station can send MIDI messages from ■ PAD 1-16 the USB port and MIDI OUT jack when the Ring MIDI Ch Message Type Number Controller pads and Base Station knobs and –... - Page 88 Outputting MIDI messages from the Base Station (continued) ■ Knobs (selection encoders, sound parameters, SWING, TEMPO, effect type) MIDI Ch Type CC Number Minimum/Dec Number Maximum/Inc Number – – Absolute (send the knob rotation 0-127 (Minimum) 0-127 (Maximum) position as an absolute value) 1-16 0-127 Relative (when the knob is turned,...
-
Page 89: Backing Up Data
Backing up data The data for patterns and songs created can be Input the backup file name. backed up to SD cards. Moreover, when saving and loading data, you can manage all the data at once or choose only some data. HINT Backing up data Character input operations ( →... -
Page 90: Loading Data
Backing up data (continued) Loading data SOUND display While pressing press -26. SEQUENCE display The backup type to load appears on the SOUND display, and a confirmation message appears on the SEQUENCE display. SOUND display in the SEQUENCE area to select Yes, and press The data will be loaded. -
Page 91: Sd Card Management
SD card management Managing SD card open space Formatting SD cards While pressing While pressing press -27. press -27. The SD card space used is shown on the A confirmation message appears on the SOUND display. SEQUENCE display. in the SEQUENCE area to select Yes, and press This formats the SD card. - Page 92 SD card management (continued) Testing SD card performance ■ Full testing You can test whether an SD card can be used • Turn in the SOUND area to select with the . A basic test can be done FULL. quickly, while a full test examines the entire SD •...
- Page 93 Exchanging data with ■ Disconnecting computers Disconnect on the computer. By connecting the with a computer, you Windows: can check and copy data on the SD card loaded Select from "Safely Remove in it. Hardware". Mac OS: ■ Connecting Drag the icon to the Trash and drop it.
- Page 94 SD card management (continued) SD card folder structure Captured audio files and files used as instrument oscillators AR-48 Capture PCM file AR-48_SD UserPCM_001.WAV UserPCM_002.WAV Backup files (all data for patterns and songs) DATA0001.ARD Data DATA0002.ARD Backup files (data for single patterns) [pattern name]1.PAT [pattern name]2.PAT...
-
Page 95: Ring Controller Settings
Ring Controller settings Ring Controller and Base Install 2 AA batteries in the Ring Station connection and Controller ( → P. 21), and turn on disconnection both the Base Station and Ring ■ Connection methods Controller. The Base Station and a Ring Controller use a After the Ring Controller starts up, an USB connection to communicate. - Page 96 Ring Controller settings (continued) ■ Disconnecting a Ring Controller Connecting a Ring Controller to a computer by USB. and Base Station The Ring Controller can be used as a MIDI Press controller. ■ Connecting to a computer by USB Press -23.
- Page 97 Connecting the Ring Controller Open the Audio MIDI Setup appli- to a Mac or iOS device using cation on the Mac Bluetooth LE You can connect the Ring Controller directly to Select "Window" in the menu bar, a Mac or iOS device by Bluetooth LE using a BTA-1 (sold separately), and use it as a MIDI and then "Show MIDI Window".
- Page 98 Ring Controller settings (continued) ■ Connecting to an iOS device using Grip area Bluetooth LE You can set a grip area that does not respond to touch in order to prevent pads from being Install 2 AA batteries in the Ring pressed unintentionally when using the Ring Controller separately from the Base Station.
- Page 99 After the grip area is set, the LED lighting of the Ring Controller returns to its pre- vious state, except the LEDs in the grip area become unlit showing that they will not respond to use. HINT • If a grip is detected and 1 second passes, it will be set automatically.
- Page 100 Ring Controller settings (continued) Ring Controller function ■ Aftertouch settings This aftertouch sensitivity of pads when they are pressed. Setting Function While pressing , press High sensitivity (reacts easily to chang- ON (HIGH) es in pad pressure) -22. ON (MID) Standard This opens the Ring Controller Setting Low sensitivity (does not react easily...
- Page 101 ■ Setting the master compressor In addition to the master effect, there is a master compressor that can be used to increase sound pressure. While pressing press -15. When -15 is lit, the master compres- sor is enabled. NOTE The master compressor setting is saved sepa- rately for each pattern.
-
Page 102: Updating The Firmware
If you connect a Ring Controller that is using old Update files for the latest versions can be down- firmware to a Base Station, an update alert will loaded from the ZOOM website (www.zoom. appear on its display. co.jp). If this occurs, follow the procedures below to update the Ring Controller. - Page 103 After the update completes, press in the SEQUENCE area. in the SEQUENCE area The Ring Controller will automati- to select YES, and press cally restart and operate with the new This will start the update. firmware. SOUND display ■ Updating the Ring Controller SEQUENCE display manually Manually updating is possible if an update notifi-...
-
Page 104: Troubleshooting
■ There is a lot of noise • Confirm that nothing is wrong with the audio cables. • Use a genuine ZOOM AC adapter. ■ Effects are not working • Confirm that the effect send levels of instru- ments are set correctly. -
Page 105: Product Specifications
Product specifications Base Station Connector type Stereo mini jack (unbalanced) Input AUDIO INPUT Input gain +10 to −65 dB Input impedance 10 kΩ Connector type Standard mono phone jacks (unbalanced) OUTPUT L/R Output impedance 100 Ω Outputs Connector type Stereo mini jack (20mW × 2 into 32Ω load) PHONES Output impedance 10 Ω... -
Page 106: Appendix
Appendix Oscillator list Category Instrument name LOOP Category Instrument name LOOP 2Step Kick 2Step RS BigBeat Kick 2Step Snare Blubber Kick BigBeat RS BreakBeat Kick BigBeat Snare Breaks Kick Breaks RS Classic Kick Breaks Snare Cyber Kick Chicago Snare DeepDark Kick DeepHouse Snare DeepHouse Kick DeepHouse RS... - Page 107 Oscillator list (continued) Category Instrument name LOOP Category Instrument name LOOP Gangsta Snare Minimal OpenHH South Snare HR&HM CloseHH TechHouse RS HR&HM OpenHH TechHouse Snare Jazz CloseHH Kit707 Snare Jazz OpenHH Kit808 Snare London Hat SNARE Kit808 RS Milano Hat Kit909 Snare NY Hat Instrument color: 31...
- Page 108 Oscillator list (continued) Category Instrument name LOOP Category Instrument name LOOP 80's Tom Riq Pa Acoustic Tom 1 Riq Tak Acoustic Tom 2 Shaker 1 DoubleElectroTom Shaker 2 FrenchHouseTom Shaker Hit Ind. Tribe Tom ShortData Industry Tom ShortGuiro Long Tom ShortPercussion Instrument color: 2 NewWave Tom...
- Page 109 Category Instrument name LOOP Category Instrument name LOOP AngerBass LowTech DeepBass MetalicPad DubstepDirtBass PartyChord FlatRicBass PlasticTube GarageFatBass PumpChord ParisBass RaggaTone PCM SYNTH PulseButtomBass RaveLead SubspenseBass RaveStabLead Instrument color: 14 VoiceBass SimpleChord WarmSawBass StringBreath AirCloud SubyChord Alarm SyncLift AlienWarning TechChord Arpness TightAnalog5ths BeatBang AltoSax...
-
Page 110: Instrument And Parameter Lists
Instrument and parameter lists ■ SCALE layout block Page Parameter 1 Parameter 2 OCTAVE SCALE -1 – 7 Scale name list ( → P. 116) MONO/POLY GLIDE* MONO, POLY 0 – 100 KEY* — C, C#, D, D#, E, F, F#, G, G#, A, A#, B —... - Page 111 ■ Oscillator pitch modulation (OSC PITCH MOD) block Page Parameter 1 Parameter 2 SOURCE DEPTH* OFF, LFO1, LFO2, ADSR, PRESS -100 – +100 *This is not shown in some parameter combinations. Page Parameter 1 Parameter 2 TYPE RATE ♪ SAW, SQUARE, PULSE, SINE, TRI, RANDOM 1 –...
- Page 112 Instrument and parameter lists (continued) ■ Insert effect (EFFECT) block Type name Page 1 Parameter 2 Page 2 Parameter 1 Page 2 Parameter 2 — — — — — — SENSE ATTACK TONE COMP 0 – 10 SLOW, FAST 0 – 10 DEPTH RATE —...
- Page 113 ■ FILTER block Page Parameter 1 Parameter 2 TYPE FREQ OFF, PEAKING, 24dB HPF, 12dB HPF, 24dB BPF, 12dB BPF, 20Hz – 20000Hz 24dB LPF, 12dB LPF RESO LEVEL 0 – 100 0 – 100 ■ Filter frequency modulation (FILTER FREQ MOD) block (This is shown when the FILTER block TYPE is not set to OFF.) Page Parameter 1...
- Page 114 Instrument and parameter lists (continued) ■ Volume modulation (AMP MOD) block Page Parameter 1 Parameter 2 SOURCE DEPTH* OFF, LFO1, LFO2, ADSR, PRESS -100 – +100 *This is not shown in some parameter combinations. Page Parameter 1 Parameter 2 TYPE RATE ♪...
- Page 115 ■ Effect send amount (FX SEND) block Page Parameter 1 Parameter 2 AMOUNT — 0 – 100 — ■ LED setting block Page Parameter 1 Parameter 2 COLOR ANIMATION OFF, 1 – 32 OFF, MOIRE, FIREWORK, CROSS, CIRCUIT, RAINBOW ■ MIDI setting block Page Parameter 1 Parameter 2...
- Page 116 Instrument and parameter lists (continued) ■ Scale name list Display name Scale Display name Scale CHROMATC Chromatic RAGA 3 Raga 3 MAJOR Major (Ionian) ARABIC Arabic MINOR 1 Harmonic Minor SPANISH Spanish MINOR 2 Melodic Minor GYPSY Gypsy MINOR 3 Dorian MinGYPSY Minor Gypsy (Hungarian Minor)
-
Page 117: Effects Lists
Effects lists ■ Master effects Parameter 1 Parameter 2 Category Type name Parameter name Setting values Parameter name Setting values FREQUENCY 20 – 20000 RESONANCE 0 – 100 FREQUENCY 20 – 20000 RESONANCE 0 – 100 Filter ISOLATOR 0 – 100 0 –... -
Page 118: Arpeggiator Parameter Lists
Arpeggiator parameter lists ■ NOTE Number of note Pad note +5th +1 Oct +1 Oct + 5th +2 Oct +2 Oct + 5th +3 Oct +3 Oct + 5th ● Down ● ● UpDown Random Down ● ● ● UpDown Random Down ●... - Page 119 ■ Pattern Beat 1 Beat 2 Beat 3 Beat 4 Pattern 1/16 1/32 1/8Tri 1/16Tri Seq 1 Seq 2 Seq 3 Seq 4 Seq 5 Seq 6 Seq 7 Seq 8 Seq 9 Seq 10 Seq 11 Seq 12 Seq 13 Seq 14 Seq 15 Seq 16...
-
Page 120: Setting Pad Led Colors From A Computer
Setting pad LED colors from a computer ■ How to specify pad LED colors when the Ring Controller is connected to a computer or other device Pad colors can be specified by sending MIDI messages to the Ring Controller when it is connected to a computer or other device. -
Page 121: Midi Implementation Charts
MIDI implementation charts ■ Base Station [Aero RhythmTrak] Model: AR-48 Base Station Date: 12 May 2017 MIDI Implementation Chart Version: 1.00 Transmitted Recognized Remarks Function... Basic Default 1 - 16 1 - 16 Channel Changed 1 - 16 *1 *2 1 - 16 Default Mode... - Page 122 MIDI implementation charts (continued) ■ Ring Controller [Aero RhythmTrak] Model: AR-48 Ring Controller Date: 12 May 2017 MIDI Implementation Chart Version: 1.00 Transmitted Recognized Remarks Function... Basic Default 1, 16 Channel Changed 1 - 16 1 - 16 Default Mode Messages Altered ******************...
- Page 124 ZOOM CORPORATION 4-4-3 Kandasurugadai, Chiyoda-ku, Tokyo 101-0062 Japan www.zoom.co.jp Z2I-3031-01...
Need help?
Do you have a question about the ARQ AR-48 and is the answer not in the manual?
Questions and answers