Hawking HMPS1U Quick Installation Manual
1 port usb print server
for multifunction printers
Hide thumbs
Also See for HMPS1U:
- User manual (72 pages) ,
- Quick installation manual (21 pages) ,
- Specifications (2 pages)
Table of Contents
Advertisement
Quick Links
Download this manual
See also:
User Manual
Advertisement
Table of Contents

Related Manuals for Hawking HMPS1U


Summary of Contents for Hawking HMPS1U
- Page 1 1 PORT USB PRINT SERVER for MULTIFUNCTION PRINTERS HMPS1U website www.hawkingtech.com e-mail techsupport@hawkingtech.com © COPYRIGHT 2011 HAWKING TECHNOLOGIES,INC. ALL RIGHTS RESERVED.
-
Page 2: Getting Started
GETTING STARTED Check Package Contents for: 1.) One 1-Port USB 2.0 Print Server for Multifunction Printers (HMPS1U) 2.) Setup CD with Print Control Center Software 3.) One DC 12V/1A Power Adaptor 4.) One Quick Installation Guide (QIG) System Requirements: - Windows 2000 / XP / 2003 / Vista / 7 What You Will Need to Get Started: 1.) One USB Printer/All-in-One/Multifunction Printer or USB Scanner or Storage... -
Page 3: Product Overview
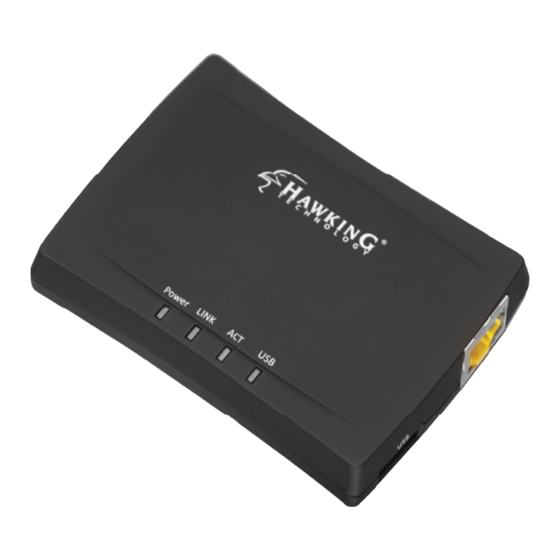
PRoDucT oVERVIEw LEDs: 1.) Power: Lit when powered on 2.) Link: Lit when server is linked to a Top View network 3.) Act: Blinks to indicate network activity 4.) USB: Lit when USB device is connected to USB port 1 2 3 4 5.) Power Adaptor Connector: DC IN 12V/1A adaptor Left Side... -
Page 4: Hardware Installation
Step 2: Connecting Your Server to a Network 1.) Use the Ethernet cable and connect one end to the “LAN” port of the HMPS1U Print Server. Connect the other end to an available LAN Port on your network router. See Fig. 1 and 2 2.) Connect the HMPS1U Server to your All-in-... -
Page 5: Software Installation
SofTwARE INSTALLATIoN Step 3: Installing Software Utility 1.) Insert Hawking software Setup CD (included in package) to desired client computer and run CD . 2.) When the auto-load page appears, click Setup Wizard. See Fig. 3. If the autoload page does not appear, click Start-->... -
Page 6: Server Configuration
1.) Open the Hawking Technologies HMPS1U Server Control Center from the desktop icon. While the program is running, a Hawking icon should also be displayed in your system tray (See Fig. 6) if software installation was successful. Once open, it will automatically search for the existing server and display its status. - Page 7 SERVER coNfIGuRATIoN Step 4: Configuring Your HMPS1U Print Server 3.) Click on “Config if you need to put 2.) Double click on the device on the in settings. You will be prompted control center and it will open a web to put in a username/password.
- Page 8 SERVER coNfIGuRATIoN Step 4: Configuring Your HMPS1U Print Server Cont’d 4.) For general usage, the print server is set to obtain an IP address automatically from your network. Under the “General” tab, in the TCP/IP section, make sure it is set to “Automatically get IP by DHCP”.
- Page 9 How To: PRINT Step 5: Setting up a Printer 1.) (Optional) If your printer’s driver is not already installed, you need to install your printer first. (Figure 11) If you know that printer driver is already on your computer, please skip to step 5.2 Refer to your printer installation instrucitons 1a.) Insert the printer’s CDROM into the CD drive and run the “install program”.
-
Page 10: How To Print
On Windows, it should be located under start, programs, Hawking, Multifunc- tion Print Server. (see Fig. 12) 1d.) In the Hawking Print Server” soft- Figure 12 ware, select the HMPS1u that has the desired USB device attached. - Page 11 How To: PRINT Step 5: Printing with Your HMPS1U Print Server 2.) Beginning in the Server Setup software, click on the HMPS1U Print Server. The connected printer should show up be- neath the Server. See Fig. 14 Figure 14 3.) Highlight the printer that shows up by clicking on it once and then click the “Connect”...
- Page 12 How To : PRINT Step 5: Printing with Your HMPS1U Print Server NOTE: To allow more computers in your network to access the shared printer, you must first dis- connect your computer from the Server by manually pressing the Disconnect button in the setup software, as it can only serve one computer at a time.
- Page 13 How To : AccESS ScANNER Step 6: Scanning with Your HMPS1U Print Server In the Setup Software, click on the HMPS1U Print Server. The Multifunction Printer/Scanner that is connected to it Figure 19 should appear beneath it. See Fig. 19 2.) Click on the desired Multifunction Printer/...
- Page 14 How To: AccESS ScANNER Step 6: Scanning with Your HMPS1U Print Server 3.) Click the Network Scanner button. The following window will appear. See Fig. 21 4.) Choose either the TWAIN or WIA item. Click OK. The following window will appear. See Figure 21 Fig.
- Page 15 How To: AccESS ScANNER Step 6: Scanning with Your HMPS1U Print Server NOTE: To allow more computers in your network to access the scanner, you must first disconnect your computer from the server by pressing the Disconnect button, as it can only serve one computer at a time.
- Page 16 NetUSB Mode under the Supported Protocols tab in the Setup Software. To check this setting, double click the HMPS1U Print Server and log into the setup software. Username: admin and Password: admin.
- Page 17 How To: AccESS uSB SToRAGE Step 7: Accessing USB Storage 3.) In the Control Center, click on the HMPS1U Print Server. The USB storage device attached should appear beneath it. 4.) Select the desired USB storage device by clicking on it once and Figure 24 then click the Connect button.
- Page 18 How To: AccESS uSB SToRAGE Step 7: Accessing USB Storage 7.) After you finish the disk operations, click the storage icon in the system tray and choose “Eject USB Mass Storage Device”. See Fig. 26 Figure 26 8.) In the setup software, click the Disconnect button to disconnect the USB storage device.
- Page 19 How To: AccESS uSB SToRAGE Step 7: Accessing USB Storage as a Shared Network Drive NOTE: To allow multiple computers in your network to access the shared USB storage, you must first disconnect your computer from the server by pressing the Disconnect button in the Setup Software as it can only serve one computer at a time in NetUSB Mode.
-
Page 20: Default Parameters
DEfAuLT PARAmETERS EfaulTS Some of the important default parameters for your HMPS1U are shown below. Administrator: admin Password: admin Server Name: HMPS1U Workgroup: WORKGROUP Static IP: 192.168.1.100... -
Page 21: Technical Support
For additional information or troubleshooting help regarding the advanced usage and configuration of your device, please refer to the User’s Manual on the Setup CD. If you have technical difficulties using the product, Hawking Technologies offers free technical support to assist you.
Need help?
Do you have a question about the HMPS1U and is the answer not in the manual?
Questions and answers