Table of Contents
Advertisement
Advertisement
Table of Contents

Related Manuals for Benelli ZAFFERANO 250EFI


Summary of Contents for Benelli ZAFFERANO 250EFI
- Page 1 P U R E P A S S I O N S I N C E 1 9 1 1...
-
Page 2: Table Of Contents
TABLE OF CONTENTS Preface..................2 Battery....................24 Scooter Safety Guidelines............2 Air Filter Maintenance..............27 Scooter Serial Number............4 Storage Guide................28 Name of Each Part..............5 Specifications and Technical Parameters........28 Meters and Indicators.............6 Daily Maintenance Schedule............29 Operation of Each Part............7 Electrical Diagram................30 1. Key................7 2. Power Lock.............7 3. -
Page 3: Preface
Specially trained personnel are available at any authorized Warning: refers to events involved with the personnel safe- Benelli/SSR Dealer to provide you with service, parts and acces- sories. With the persistent pursuit of quality tenet – “making ty of the driver, injury may be caused if it is ignored. - Page 4 2. The scooter should be ridden only by a rider who has Warning passed the required rider safety course and has obtained an applicable driving license. The vehicle should not be operated Wear a Safety Helmet by any person(s) not in possession of an applicable driving The helmet is the most important piece of motorcycle/scooter license.
-
Page 5: Scooter Serial Number
• The max. load of front loading box is: 3.3 lbs.; • The max. load of rear luggage rack is: 6.6 lbs.; • The max. load of helmet container is: 22 lbs.; Motorcycle Serial Number The Frame No. and Engine No. are used for the registration of the scooter. -
Page 6: Name Of Each Part
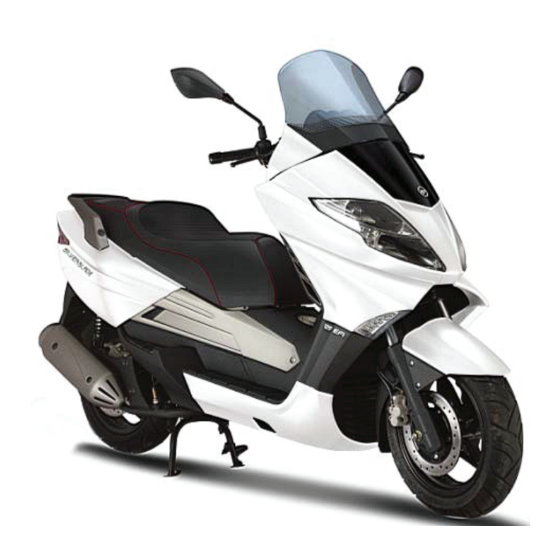
Name of Each Part (1) Rear Brake Lever (2) Left Handlebar Switch (3) Instrument Cluster (4) Right Handlebar Switch (5) Front Brake Lever (6) Throttle Grip (7) Ignition Switch (8) Front Loading Box (9) Underseat Storage (10) Air Filter (11) Center Stand (12) Side Stand (13) Passenger Grab Rail (14) Storage Battery... -
Page 7: Meters And Indicators
(1) Speedometer Meters and Indicators The speedometer indicates the driving speed. The outer circle refers to kilometers per hour while the inner circle refers to miles per hour. (2) Fuel Indicator Lamp When the fuel level is less than 0.5 gallons, the amber fuel indica- tor lamp starts to blink, when this happens, please refuel in time to ensure the normal operation of your vehicle. -
Page 8: Operation Of Each Part
(7) Engine Tachometer (13) Water Temperature Indicator The tachometer indicates the speed of the engine as revolu- This indicates the temperature of the cooling liquid. When the tions per minute. pointer is in between C and H, the temperature is normal. You should pull over and discontinue use if the indicator reaches over (8) Engine Oil Indicator Lamp the H mark. -
Page 9: Switches For Right Handle
“ON”..when the key is turned to the ”ON” position, power is on, the engine can be started, and the key cannot be re- moved; “OFF”..when the key is turned to the “OFF” posi- tion, power is off, the engine cannot be started, and the key can be removed. -
Page 10: Switches For Left Handle
(2) Hazard Light Switch headlights will be on, to warn a pedestrian or other vehicle. The “ ”..when the switch is turned to the “ ” position, all high beam headlight will go off when the button is released. four turn signal lights will turn on; “●”..when the knob for light switch is moved to the “●”... -
Page 11: Front Loading Box
be opened. It can be locked by lowering the seat cushion and 7. Battery slightly pressing the rear of the seat. Attention: The load of the helmet container shall NOT exceed 22 lbs. DO NOT put goods, food with low heat-resistance, or inflammable items into the con- tainer, due to the high temperature of engine. - Page 12 “Free Play” refers to a travel distance of the end of brake (4) Brake Pads handle. The brake handle should be provided with proper free The brake pads shall be play and operated smoothly with instant response. inspected periodically to check if the wear reaches the wear limit.
- Page 13 Start the engine and allow it to idle for a few minutes to warm up the engine oil, then turn off the engine and allow it to sit for one Warning: minute: The engine should be turned off, ignition switch in the off position, and away from heat sources and fire during ①...
- Page 14 The oil replacement procedure is as follows: (the replacement Special Attention should be performed after the engine has warmed up) The valve clearance should be checked and adjusted (1) Support the scooter using the center stand on level ground; when the initial mileage reaches 200mi. The final drive oil (2) Remove the engine oil dipstick once the engine has been doesn’t need to be changed often, it should be changed every shut off;...
- Page 15 8. Tire Pressure Check appropriate, you should be able to clearly see objects behind Check the pressure of the front and rear tires. you, and check if the mirrors are damaged or contaminated. Normal pressure (single rider): Front wheel: 36 ±1 psi; 13.
-
Page 16: Starting Your Scooter
Coolant is critical to your liquid cooled scooter engine. If there is no coolant in the engine during operation it may 1. The fuel, engine oil, and coolant levels should be checked prior cause sever damage to the engine. The piston, cylinder and to the engine being started and the fuel quantity should be suf- cylinder head could all become damaged if the engine is ficient to satisfy the driven mileage planned. -
Page 17: Riding Your Scooter
Warning: Warning: Before riding your scooter, check the position of the side Improper starting may pose a safety risk. When stand carefully. If the side stand is not returned to the original starting the engine if the scooter is not on the center stand position it may touch the ground when making a left hand turn, it may rush forward. - Page 18 Warning: Rotate the throttle rearward and the engine Braking distances are proportional to the speed traveled. will accelerate. Rotate the throttle slowly You must estimate the distance between vehicles in front of you to accelerate smoothly and slowly. and keep a safe distance to allow enough room for braking. Inex- ●...
- Page 19 c. If the fuel injector works normally, the ignition system should be ● When parking checked. Turn off the turn signal, turn the ignition switch to the “ “ d. Remove the spark plug and touch it to the metal body of the position.
-
Page 20: Periodical Check
In order to keep your scooter in optimum operational condi- done check if the gear drive box has any oil leakage. tion please perform periodical inspection and maintenance. Any authorized Benelli dealership can provide you with any Attention: service or maintenance needs you will have. For the time Add gear oil via the oil filler. -
Page 21: Oil Pipe
(5) Throttle cable Y (6) Front brake lever pivot bolt Z Attention: The above lubrication items with the “u” sign should be performed by an authorized Benelli/SSR motorcycle dealership. 3. Airbox Drain The airbox blow-by drain should be check periodically. If oil is... -
Page 22: Fuel Injector And Fuel System
then readjust the electrode clearance and measure it with a Please use the diagram below when reconnecting the fuel injec- gap gauge to ensure the clearance is between 0.5 ~ 0.7mm. tion system hoses. This picture shows the connections between The spark plug should be replaced every 5,000 miles of use. -
Page 23: Tires
Caution: Warning: The engine idle speed should only be adjusted once Tire pressure and wear state are very important for motor- the engine has been properly warmed up. cycle function and safety. Please check the measurement of tread depth and pressure condition. ●... -
Page 24: Headlight Beam Adjustment
9. Headlight Beam Adjustment The headlight beam can be adjusted up and down in the vertical direction. The headlight beam adjustment bolts are located in the top left corner and top right corner of the glove box. To adjust, open the glove box and using a screwdriver turn the screw to adjust the headlight beam. -
Page 25: Battery
③. If the fuse blows instantly it indicates that there is a When reinstalling the battery, make sure that the battery short circuit or overload. Return to an authorized Benelli deal- terminals are connected properly. If the battery wires are con- ership for inspection and repair. - Page 26 b. Remove the electrolyte container from the plastic bag, re- move the black plastic cap from the electrolyte container and set f. Once the battery is completely filled, use the black plastic cap it aside. Attention: DO NOT remove or pin prick the sealing film we removed earlier from the electrolyte container and affix it to on the liquid electrolyte container.
-
Page 27: Air Filter Maintenance
Air Filter Maintenance The air filter is installed near the left side of the rear wheel. If the air filter is dirty, it will increase intake resistance which will in turn reduce output power from the engine, meanwhile fuel consumption will also increase. To achieve the best filtration the air filter should be maintained as follows: a.) Remove the left side cover (1), then remove the 10 screws securing the airbox lid to the airbox (2);... -
Page 28: Storage Guide
Storage Guide Specifications and Technical Parameters For long-term storage, clean all parts of the scooter, and BJ169MM-5A single cylinder, 4 Engine remove the battery. If storage is to exceed one month, add stroke, liquid cooled about 15ml of oil into the cylinder and turn over the engine Displacement 249.8cc several times with the spark plug removed to spread the oil... - Page 29 4,000mi 6,000mi 8,000mi or replacement is required Fuel Lines C: Cleaning Throttle Operation R: Replacement *: shall be inspected by an authorized Benelli Air Filter (Remark 2) dealer. Spark Plug **: For safety reasons, we recommend these Engine Oil 2,000mi/per: R...
-
Page 30: Daily Maintenance Schedule
WIRING DIAGRAM QJ250T-8 EFI Circuit Diagram LED Headlight 2W Fuel Gauge On/Off Speed Indicator 2W×2 Switch Right Turn Signal 3W Turn Signal PUMP RELAY Horn Brake Brake Temp. LIGHT SWITCH Fuel LH Turn Signal 3W Switch Switch Switch Switch Gauge Water Temp.
Need help?
Do you have a question about the ZAFFERANO 250EFI and is the answer not in the manual?
Questions and answers
What is the price and how I can finance it
Que aceite lleva 250 zafferano