Table of Contents
Advertisement
Quick Links
Advertisement
Table of Contents

Subscribe to Our Youtube Channel
Related Manuals for UDP Technology IPN100HD

Summary of Contents for UDP Technology IPN100HD
- Page 1 IPN100HD Installation Guide DC12V ETHERNET...
-
Page 2: Information To User
INFORMATION TO USER CAUTION RISK OF ELECTRIC SHOCK, DO NOT OPEN CAUTION: TO REDUCE THE RISK OF ELECTRIC SHOCK, DO NOT REMOVE COVER (OR BACK). NO USER SERVICEABLE PARTS INSIDE. REFER SERVICING TO QUALIFIED SEERIVCE PERSONEL. This symbol is intended to alert the user to the presence of un-insulated “dangerous voltage”... -
Page 3: Table Of Contents
IPX/IPN Series IPN100HD Installation Guide Table of Contents 1. FEATURES ......................4 2. PACKAGE CONTENTS..................... 5 3. PART NAMES ......................6 4. INSTALLATION ...................... 8 4.1. Lens Position ........................9 4.2. Setting the Image Attribute ....................9 5. CONNECTIONS ....................10 5.1. -
Page 4: Features
IPX/IPN Series IPN100HD Installation Guide 1. FEATURES Camera Indoor Cube IP Camera HD720 (1280 x 720) streaming 1/4” 720p CMOS Improvement of color rolling suppression Streaming Dual streaming mode Burnt-in text supported Unicast supported Video/Audio ... -
Page 5: Package Contents
IPX/IPN Series IPN100HD Installation Guide 2. PACKAGE CONTENTS Unpack carefully and handle the equipment with care. The packaging contains: Camera DC power adaptor Screws and Anchor blocks 4 Pin terminal block DC12V ETHERNET Quick Installation Guide Package contents are subject to change without prior notice. -
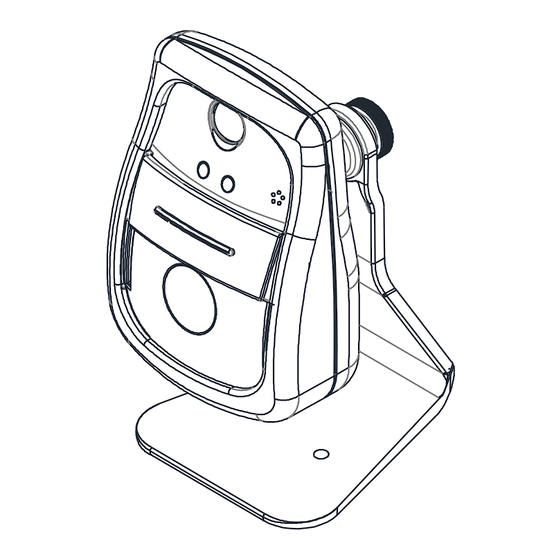
Page 6: Part Names
IPX/IPN Series IPN100HD Installation Guide 3. PART NAMES ① ⑦ ○ ② ③ ⑧ ④ ⑩ DC12V ⑨ ⑤ ETHERNET ⑪ ⑥ * Models herein and their appearance are subject to change without any prior notice. ① PIR sensor Detects movement of objects ②... - Page 7 IPX/IPN Series IPN100HD Installation Guide ⑪ 4 pin terminal block for D/I, D/O 4 pin terminal block for D/I and D/O ⑫ Micro SD Card Socket Memory card slot for external storage. Supports up to 32GB. 01A.00 UDP Technology Ltd.
-
Page 8: Installation
IPX/IPN Series IPN100HD Installation Guide 4. INSTALLATION Drill two holes on the desired position of installation and insert anchor blocks into the holes. Position the mount bracket to anchor blocks. Fasten the mount bracket with screws. Manually position the camera to area where it will be monitored. -
Page 9: Lens Position
IPX/IPN Series IPN100HD Installation Guide 4.1. Lens Position IPN100HD’s lens is prepositioned. While installing with wall-mount bracket, position the camera body where images will be captured. 4.2. Setting the Image Attribute Image attributes can be configured through the web interface. (Microsoft® Internet Explorer recommended) The menu of image attribute can be found under Setup >... -
Page 10: Connections
IPX/IPN Series IPN100HD Installation Guide 5. CONNECTIONS 5.1. Connectors ① ② DC12V ETHERNET ① Sensor (DI) connection The camera provides 1 channel D/I. It can be connected to either a voltage type sensor or a relay type sensor as the following figures. It can be selected by software. - Page 11 IPX/IPN Series IPN100HD Installation Guide Do not exceed the maximum relay rating. Caution Internal Device Relay Type 01A.00 UDP Technology Ltd.
-
Page 12: Configuration
IPX/IPN Series IPN100HD Installation Guide 6. CONFIGURATION 6.1. Set up network environment The default IP address of the device is 192.168.XXX.XXX. Users can identify the IP address of the device from converting the MAC address’s hexadecimal numbers, which is attached to the device. -
Page 13: Custom Ip Environment
IPX/IPN Series IPN100HD Installation Guide 6.1.2. Custom IP Environment IPAdminTool is provided with SDK at the following SDK path. {SDK root}\BIN\TOOLS\AdminTool\ IPAdminTool is a management tool, which automatically scans all of the network products for users to perform administrative tasks, which includes network configurations, firmware update, device reboot, and device organizations. -
Page 14: View Video On Web Page
IPX/IPN Series IPN100HD Installation Guide 6.2. View video on web page Type the proper IP address to view the live streaming images through a web browser. The default username and password is root / pass. The browser asks to install the ActiveX. Click Allow. -
Page 15: Reset
IPX/IPN Series IPN100HD Installation Guide Follow the instructions of the dialog boxes and complete the installation. Once the installation is complete, start the web browser again and check if video stream is displayed in the main view frame. Depends on Microsoft® Internet Explorer version, the web browser might need to be refreshed or restart. -
Page 16: Appendix (A): Specifications
IPX/IPN Series IPN100HD Installation Guide APPENDIX (A): SPECIFICATIONS Summary Camera Module Image Sensor 1/4” 720p CMOS Effective Pixels 1280 x 720 Scanning System Progressive scanning AGC Control Auto Minimum Illumination Color : 1.0 lux, BW : 0.001 lux(Sens-up 32X) Lens 2.7mm F2.0 Megapixel... -
Page 17: Functional Features
IPX/IPN Series IPN100HD Installation Guide Functional Features Digital Input and Output 1 / 1 PIR Sensor Supported 10 / 100 Base-T Network Wi-Fi Supported (11b/g/n) TCP/IP, UDP/IP, HTTP, RTSP, RTCP, RTP/UDP, RTP/TCP, SNTP, Protocol mDNS, UPnP, SMTP, IGMP, DHCP, DDNS, SSL v2/v3, IEEE 802.1X, SNMP v2/v3... -
Page 18: Appendix (B): Dimensions
IPX/IPN Series IPN100HD Installation Guide APPENDIX (B): DIMENSIONS DC12V ETHERNET (Unit: mm) 01A.00 UDP Technology Ltd. -
Page 19: Appendix (C): Hexadecimal-Decimal Conversion Table
IPX/IPN Series IPN100HD Installation Guide APPENDIX (C): HEXADECIMAL-DECIMAL CONVERSION TABLE Refer to the following table when you convert the MAC address of your device to IP address. 01A.00 UDP Technology Ltd. -
Page 20: Revision History
IPX/IPN Series IPN100HD Installation Guide REVISION HISTORY MAN# DATE(M/D/Y) Comments 01A.00 08/21/2012 Initial release version 01A.00 UDP Technology Ltd. -
Page 21: User Information
User Information This device may generate or use radio frequency energy. Changes or modifications to this equipment may cause harmful interference unless the modifications are expressly approved in the instruction manual. The user could lose the authority to operate this equipment if an unauthorized change or modification is made. This device should be operated with minimum 20Cm between this device and user to comply with the RF exposure limits.
Need help?
Do you have a question about the IPN100HD and is the answer not in the manual?
Questions and answers