Table of Contents
Advertisement
Quick Links
Download this manual
See also:
User Manual
Advertisement
Table of Contents

Related Manuals for audioscan VERIFIT VF-1


Summary of Contents for audioscan VERIFIT VF-1
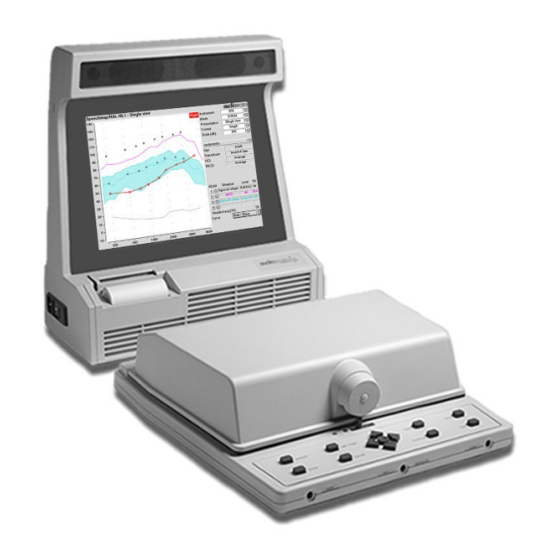
- Page 1 ® Verifit VF-1 ® VERIFIT VF-1 REAL-EAR HEARING AID ANALYZER USER’S GUIDE Version 2.8 © November 2006...
-
Page 2: Table Of Contents
Table of Contents About Verifit ........................7 Section overview ........................7 New in this software release .....................8 Electronic user’s guide......................8 Warranty, Trademarks, Acknowledgements................9 Notices for the European Community..................9 Declaration of EMC compliance for the European Community..........10 Getting Started.........................11 Section overview ........................11 Unpacking and connecting......................11 CD-ROM installation.......................12 Microphone connection......................13 Microphone care........................14... - Page 3 Network printer setup......................29 Printing to a network file ......................30 Data storage to a network file ....................30 Data storage using NOAH ......................31 6.10 NOAH 3 module use.......................32 Hearing Instrument Tests Setup..................33 Section overview ........................33 HIT single or dual view ......................33 Graph or table format......................34 Output or gain scale .......................34 Hide or Show HIT curves......................34 1996 or 2003 ANSI standard....................34...
- Page 4 9.12 Sound level meter using manual control..................55 Real-Ear Measurement Setup..................56 10.1 Section overview ........................56 10.2 External REM speaker setup ....................57 10.3 REM calibration facts......................58 10.4 Calibration of REM probe microphone ..................58 10.5 Calibration check for probe module..................59 10.6 Max TM SPL setup .........................60 10.7 ABR nHL to eHL setup ......................60 10.8...
- Page 5 17.7 SII calculation in Insertion gain ....................80 17.8 CROS fitting using Insertion gain ....................81 Speechmap ® .......................82 18.1 Section overview ........................82 18.2 Speechmap facts........................82 18.3 DSL 5.0 in Speechmap......................83 18.4 DSL 5.0 changes........................84 18.5 NAl-NL1 in Speechmap ......................84 18.6 Using Speechmap ........................85 18.7 Screen tour - unaided screen....................86 18.8...
- Page 6 21.12 Barcode scanner malfunction.................... 105 Technical Specifications ...................106 Glossary........................107 References........................111 Appendix 1: AudioNote 2.1 VERIFIT and RM500SL Test Signals and Analysis..114 0611 Verifit User’s Guide Version 2.8 Page 6...
-
Page 7: About Verifit
20: Speechmap Technical Details 11: REM Screen Setup 21: Troubleshooting In addition you will find a glossary, references and more information in the electronic user’s guide on the Audioscan software CD. FastFacts 1.1: Verifit Help topics 0611 Verifit User’s Guide Version 2.8... -
Page 8: New In This Software Release
FastFacts 1.2: New in this software release Electronic user’s guide A printable user’s guide is on the Audioscan CD-ROM supplied with a new instrument or mailed as a software update. You may want to copy it to your PC before installing the CD-ROM in the Verifit. Once installed in the Verifit, the CD- ROM may be later removed by following the instructions in 3.7: CD-ROM removal... -
Page 9: Warranty, Trademarks, Acknowledgements
Warranty, Trademarks, Acknowledgements The Audioscan Verifit model VF-1 is manufactured by Etymonic Design Inc., 41 Byron Ave., Dorchester, Ontario, Canada N0L 1G0. Phone: 800-265-2093 (USA only); 519-268-3313 Fax: 519-268-3256 www.audioscan.com Email: info@audioscan.com service@audioscan.com Warranty: The Verifit model VF-1 is warranted against defects for two years from date of purchase. -
Page 10: Declaration Of Emc Compliance For The European Community
Declaration of EMC compliance for the European Community The compliances listed in the following table are met with the supplied RECD transducer, microphones, headphones, mouse and keyboard connected and with unterminated speaker cables (2), USB cables (2), ethernet cable, parallel printer cable, serial cable and VGA display cable connected. -
Page 11: Getting Started
Getting Started Section overview This section provides help on unpacking the Verifit and connecting various components and accessories and on installing the CD-ROM. The following topics are covered in this section: 2.2: Unpacking and connecting 2.3: CD-ROM installation 2.4: Microphone connection 2.5: Microphone care 2.6: Battery pill use and care 2.7: Mouse, keyboard, barcode scanner... -
Page 12: Cd-Rom Installation
CD-ROM installation Operating software, some test signals, the online Help files and a printable user’s guide are all on the Verifit CD-ROM supplied with the instrument. The CD-ROM must be present in the CD drive for normal instrument operation. Operation without the CD is possible but Speechmap tests, Sensory Loss Simulator, and Help will not work. -
Page 13: Microphone Connection
2) Plug the probe microphone assemblies into the probe connectors located at the front edge of the built-in keypad as shown. NOTE: A microphone extension cable (VA-130) is available from Audioscan. Standard audio extension cables should not be used. They will substantially increase noise levels. -
Page 14: Microphone Care
Microphone care Coupler microphone: 1) DO NOT twist the cable when attaching a coupler to the coupler microphone. Turn only the coupler or unplug the coupler microphone before turning it. 2) DO NOT leave the coupler microphone plugged in when transporting. 3) DO make sure that the 2cc coupler is tightly screwed to the coupler microphone when performing hearing instrument tests. -
Page 15: Battery Pill Use And Care
UCL and RECD data directly from a Verifit or RM500SL printout. Barcoded threshold data printed by some Grason-Stadler audiometric equipment may also be scanned. Scanners other than that supplied by Audioscan may not work and are not supported by Audioscan. -
Page 16: External Display, Printer, Speaker
6: Printing and Storing Results Connectors for external front and back real-ear measurement speakers are provided. Speakers are available from Audioscan but any small 4 - 8 ohm speaker having a smooth frequency response and good efficiency may be used. The rear external speaker is automatically selected when required by a test but the front speaker must first be selected in Setup. -
Page 17: Input Device Operation
Input device operation The Verifit may be operated by means of the built-in keypad, an external mouse or an external QWERTY keyboard. These devices are used to summon on- screen menus and select items from them, to operate on-screen buttons and to input data. -
Page 18: Barcode Data Input
Barcode data input In Speechmap and Insertion gain tests, audiometric data in barcode form on a Verifit or RM500SL printout may be entered by scanning the appropriate barcode. In Speechmap, threshold, UCL, RECD, transducer,age, and ABR nHL to eHL conversion factors are encoded. In Insertion gain, threshold and transducer type are encoded. -
Page 19: Keypad Keys
Keypad keys Keypad Button Function <Help> Summon context-sensitive Help Screen. <Setup> Summon Setup Menu containing a list of Verifit features that can be modified. Any modifications made will be maintained after power off. <Tests> Summon Test Selection Menu containing a list of the available test procedures. -
Page 20: Menus, Lists And Buttons
Menus, lists and buttons Menu Setup Box List Box Screen Buttons are identified by a circle within a raised block and are located at the right hand end of a line of screen text. A screen button highlighted using the keypad or a QWERTY keyboard is surrounded by a heavy line. -
Page 21: Cd-Rom Removal And Replacement
CD-ROM removal and replacement To remove the CD-ROM from the Verifit CD drive: 1) Press <Setup> then highlight and <PICK> [CD-ROM]. 2) Highlight and <PICK> [Open CD drive]. 3) Open the CD drive by pressing the OPEN button on the door of the CD drive. 4) Remove the CD-ROM by carefully snapping it off the spindle. -
Page 22: Date And Time Setup
Date and time setup To set the date and time that appears on printouts and calibration screens: 1) Press <Setup>, then highlight and <PICK> [Date & Time] on the Setup poster. 2) To change the date, highlight and <PICK> the month window to display a drop- down list of months. -
Page 23: Networking
Networking Section overview The Verifit may be connected to a Windows network by connecting to the rear connector panel using a Cat 5, RJ-45 cable. This allows screen images to be printed on a network printer or on a shared printer on a networked PC. Images and underlying data may also be saved to a shared folder on a networked PC. -
Page 24: Networking Setup
Networking setup Check 5.2: Networking requirements and connect the Verifit to your network. 1) Press <Setup> then highlight and <PICK> [Network] 2) In the Network poster, highlight and <PICK> [Enable networking]. 3) If your network supports automatic address assignment (DHCP), highlight and <PICK>... -
Page 25: Printing And Storing Results
Printing and Storing Results Section overview Pressing <Print> will cause the current screen image to be printed on the internal printer, on an external local printer, on a network printer, on a Windows-shared printer on a networked PC, or saved to file on a USB memory stick, or a Windows- shared file on a networked PC. -
Page 26: Internal Printer Paper Loading
Internal printer paper loading On-screen instructions on paper replacement are provided if you try to print to the internal printer when it is out of paper or when the paper lever has been raised. To load a new roll of paper: 1 Lift the printer head using the small black lever to the left of the printer. -
Page 27: Barcodes, Headers And Comments On Printouts
Barcodes, headers and comments on printouts The date and a header, such as facility or patient name, may be added to printouts. Barcodes representing hearing threshold, UCL and RECD, where applicable, may be added to printouts of Speechmap, Insertion gain and RECD tests. -
Page 28: Printing To A Usb Memory Stick
Printing to a USB memory stick 1) Plug a USB memory stick into one of the USB ports on the rear connector panel. The Verifit may be either on or off. 2) Press <Setup>, then highlight and <PICK> [Printing]. 3) Highlight and <PICK> [Print to USB file]. 4) Highlight and <PICK>... -
Page 29: Network Printer Setup
Network printer setup To print to a network printer or to a Windows-shared printer on the network, you must first enable networking. See section Networking. To print to a printer on a Windows PC connected to a network, you must also share the printer on the PC by selecting Start, Settings and Printers. -
Page 30: Printing To A Network File
Printing to a network file To save the screen image as a file on a network PC, you must first enable networking. See Networking. You must also "share" a folder in the PC root directory (e.g. c:\MyData) and ensure that Change permissions are enabled. 1) Press <Setup>, then highlight and <PICK>... -
Page 31: Data Storage Using Noah
Data storage using NOAH Overview: The Verifit NOAH module transfers hearing instrument test (HIT), audiometric and real-ear measurement (REM) data between the Verifit and the NOAH 3 framework via a proprietary serial cable. Data are stored as an action in the NOAH 3 client session list. -
Page 32: Noah 3 Module Use
6.10 NOAH 3 module use To launch the module, if there is no Verifit action in the session list, click on it has been set up) or click and select VERIFIT under the tab for Measurement modules. If there is a previous Verifit action in the session folder, you may also launch the module by double-clicking the action. -
Page 33: Hearing Instrument Tests Setup
Hearing Instrument Tests Setup Section overview The appearance of Hearing Instrument Test (HIT) screens may be changed in several ways. Most screens may be viewed as a single, full-screen or dual, side by side panels. Most screens may be formatted to show results in graphical or tabular format. -
Page 34: Graph Or Table Format
Graph or table format Except for Distortion, Input/Output, Battery drain and Manual control screens, you have the option of selecting either a graphic or tabular format. To change the data format, highlight, then <PICK> [Graph] or [Table]. FastFacts 7.3: Graph or table format Output or gain scale On the Multicurve test screen, you have the option of displaying test results in SPL (dB) or gain (dB). -
Page 35: Ansi Test Frequencies
ANSI test frequencies The Frequencies feature allows hearing instruments to be evaluated at the Special Purpose Average (SPA) frequencies defined by ANSI S3.22, rather than the default High Frequency Average (HFA) frequencies. The choice of SPA (or HFA) frequencies influences the average OSPL90, average full-on gain, reference test gain, bandwidth and equivalent input noise. -
Page 36: Calibration Of Hit Reference Microphone
Calibration of HIT reference microphone Remove any coupler from the coupler microphone before calibration. 1) Position the HIT reference microphone opening concentric with the coupler microphone opening and about 1 – 2 mm from as shown below. 2) Close and seal the test chamber by tightening the latch at the front of the lid. 3) Press <Tests>, then highlight and <PICK>... -
Page 37: Calibration Check For Coupler Microphone
7.10 Calibration check for coupler microphone Accuracy of HIT measurements depends on the calibration of the coupler microphone. This should be checked regularly using a microphone calibrator with an adapter ring. The RE780 (1 1/8”) and RE781 (1”) rings are designed for Quest CA22 and QC-10/20 respectively. -
Page 38: Coupling The Hearing Instrument
7.11 Coupling the hearing instrument The Verifit is supplied with 2 metal couplers, a type HA-1 (ITE) and a type HA-2 (BTE). Note that an ANSI standard coupler for CICs does not exist. These must be tested in the HA-1 coupler. When threading the couplers onto the coupler microphone, it is very important that they be firmly tightened to ensure a good acoustic seal. -
Page 39: Positioning The Hearing Instrument
7.12 Positioning the hearing instrument 1) The hearing instrument should be coupled to the appropriate coupler and a battery or battery pill installed. See 7.11: Coupling the hearing instrument 2.6: Battery pill use and care. 2) Place the instrument and coupler in the test chamber so that the microphone opening(s) of the instrument are on the crossbar within the test zone.>>... -
Page 40: Ansi S3.22-1996 Facts
ANSI S3.22-1996 facts The Verifit performs selected hearing instrument tests in accordance with ANSI S3.22-1996. This standard expresses some outputs and gains as High Frequency Average (HFA) values. The HFA is the average of values at 1000, 1600 and 2500 Hz. -
Page 41: Ansi 1996 Linear And Agc Tests
ANSI 1996 Linear and AGC tests 1) Press <Tests>, then highlight and <PICK> [Linear] or [AGC]. 2) Highlight and <PICK> [Start test]; test setup instructions will be displayed. 3) Refer to 7.11: Coupling the hearing instrument, 7.12: Positioning the hearing instrument 2.6: Battery pill use and care to prepare the instrument for... -
Page 42: Ansi 2003 Linear And Agc Tests
ANSI 2003 Linear and AGC tests 1) Press <Tests>, then highlight and <PICK> [Linear] or [AGC]. 2) Highlight and <PICK> [Start test]; test setup instructions will be displayed. 3) Refer to 7.11: Coupling the hearing instrument, 7.12: Positioning the hearing instrument 2.6: Battery pill use and care to prepare the instrument for... -
Page 43: Ansi Test Results
ANSI test results In 1996 tests: Full-on average gain is measured at 50 dB SPL, average gain at is usually (but not always) measured at 60 dB SPL and the frequency response is run at 60 dB SPL for linear aids or at 50 dB SPL for AGC aids. In 2003 tests: Full-on average gain is measured with a 50 dB input SPL, average gain at RTS is always measured at 60 dB input SPL and the frequency response curve is always run at 60 dB input SPL. -
Page 44: Ansi Input-Output Curves
ANSI input-output curves An input/output curve shows the output level of a hearing instrument as a function of input level and frequency. It is a steady-state pure-tone curve and does not reflect performance with complex signals such as speech. You may run the tests at any setting of the instrument controls but ANSI S3.22 requires that certain settings be used. -
Page 45: Ansi Telecoil Terminology
ANSI telecoil terminology The Verifit test chamber contains an integrated telephone magnetic field simulator (TMFS) and a telecoil test loop, meeting the requirements of ANSI S3.22, that enable the measurement of coupler SPL produced by a hearing instrument with a telephone pickup coil. -
Page 46: Ansi Telephone Simulator (Tmfs) Test
ANSI telephone simulator (TMFS) test ANSI S3.22 requires that the gain control be set to RTP (1996) or RTS (2003) before running this test. The reference test gain (RTG) is required in order to calculate the STS (1996) or RSETS (2003). The easiest way to meet both requirements is to run a [Linear] or [AGC] test before running this test. -
Page 47: Ansi Test Loop Test
8.10 ANSI test loop test ANSI S3.22 requires that the gain control be set to RTP (1996) or RTS (2003) before running this test. The reference test gain (RTG) is required in order to calculate the STS (1996) or RTLS (2003). The easiest way to meet both requirements is to run a [Linear] or [AGC] test before running this test. -
Page 48: Other Hearing Instrument Tests
Other Hearing Instrument Tests Section overview In addition to the tests of ANSI S3.22, the Verifit provides the following: Distortion: Harmonic distortion at 2 or 3 harmonics and 2 plus 3 with input levels varying from 60 – 90 dB SPL. Directional: A unique real-time broad-band test signal presented simultaneously from left and right speakers and analysed into two separate reponse curves. -
Page 49: Directional Function Test
Directional function test Directional characteristics such as polar plots and Directivity Index (DI) are typically measured in a large anechoic chamber using sound from one direction and at one frequency at a time. This means they apply only for a hearing aid set for linear amplification. -
Page 50: Directional Ite Positioning
Directional ITE positioning Attach the provided clip to the coupler for stability. Orient the instrument as shown so that the direction of maximum sensitivity is toward one of the speakers and a line joining the microphone ports is at 45° and horizontal. Locate the HIT reference microphone at the front microphone opening on the faceplate and seal any vent at the faceplate. -
Page 51: Directional Bte Positioning
Directional BTE positioning Use the provided coupler clip to keep the instrument off the floor of the test chamber. The directional BTE instrument should be positioned so that a line joining the microphone openings on the instrument is at 45 ° as shown. Position the HIT reference microphone at the front microphone opening on the instrument. -
Page 52: Directional Hit Procedure
Directional HIT procedure To test directional function in the test chamber: 1) Mount the hearing aid to the appropriate coupler (see 7.11: Coupling the hearing instrument). 2) Position the hearing instrument in the test chamber as shown in 9.4: Directional ITE positioning 9.5: Directional BTE positioning. -
Page 53: Multicurve Results
Multicurve results 1) Output curves for the noise signal are in 1/12 octave bands. They will be approximately 18 dB lower than pure tone curves for a linear instrument. 2) Gain curves for a linear instrument will be the same for both swept and pink noise test signals. -
Page 54: Battery Drain Test
9.10 Battery drain test The battery drain test automatically measures the battery current when there is no input signal (quiescent), when the input signal is a 1 kHz tone at 65 dB SPL and the average of the currents when the input signal is 90 dB SPL at the HFA or SPA frequencies (Avg @ 90 dB). -
Page 55: Manual Control Procedure
Test]. To stop the measurement, highlight and <PICK> [Stop test]. You may change Level and Frequency without stopping the test. NOTE: A microphone extension cable (VA-130) is available from Audioscan. Standard audio extension cables should not be used. They will substantially increase noise levels. -
Page 56: Real-Ear Measurement Setup
10 Real-Ear Measurement Setup 10.1 Section overview For safe and effective operation, the Real-Ear Measurement (REM) system must be properly set up and calibrated, the client must be properly positioned and the probe tube must be properly positioned in the ear canal. Real-Ear Unaided Response (REUR): SPL, or band SPL, in the open (unaided) ear canal for a given stimulus. -
Page 57: External Rem Speaker Setup
10.2 External REM speaker setup In some installations, the internal REM speakers may not be convenient or may yield speaker overdriven errors because of severe standing waves from nearby walls or shelves. In these cases, an external speaker having a smooth response from 200 - 8000 Hz and an impedance of 4 ohms or greater may be connected to the Front REM speaker connector on the rear connector panel. -
Page 58: Rem Calibration Facts
10.3 REM calibration facts The probe microphone and its associated tubing does not have a flat frequency response. The REM calibration process compares this response with the flat, factory-calibrated response of the REM reference microphone and compensates all subsequent probe-tube measurements for this difference. It may be performed as often as desired but will be invalidated at 1 am the following day or at 1 am the following Monday, depending on the choice of Daily or Weekly calibration interval. -
Page 59: Calibration Check For Probe Module
10.5 Calibration check for probe module The calibration curve for the probe module is a comparison of the response of the probe microphone (with tube) to the response of the REM reference microphone. Any change in the curve indicates a change in one of these microphones (or the probe tube). -
Page 60: Max Tm Spl Setup
10.6 Max TM SPL setup The Max TM SPL safety feature allows you to set a limit on the SPL, measured by the probe microphone, above which a test terminates. The MAX TM SPL limit is shown on all REM screens. The default limit is 120 dB. To choose a different Max TM SPL setting: 1) Press <Setup>, then highlight and <PICK>... -
Page 61: Positioning The Client
10.8 Positioning the client Sound reflections from nearby surfaces (including the operator) can cause large measurement errors, especially if the client moves between REUR and REAR measurements. Room noise can increase test time, cause errors and alter the operation of the hearing instrument being evaluated. 1) Choose a quiet location and position the client and the real-ear speakers at least 1.5 m (5 feet) away from any hard surfaces. -
Page 62: Rem Screen Setup
11 REM Screen Setup 11.1 Section overview To accommodate your working preferences, the appearance of REM screens may be changed in several ways. This section covers the following topics: 11.2:REM single or dual view 11.4: SPL or HL scale 11.3: Graph, table or 2cc target format 11.5: Hide or show REM curves FastFacts 11.1: REM screen setup 11.2 REM single or dual view... -
Page 63: Graph, Table Or 2Cc Target Format
11.3 Graph, table or 2cc target format Most REM test screens may be viewed in graphic or tabular format. v In RECD and Directional tests, highlight and <PICK> [Format] to toggle between [Graph] and [Table] views. v In Speechmap and Insertion gain, highlight and <PICK> [Format], then highlight and <PICK>... -
Page 64: Hide Or Show Rem Curves
11.5 Hide or show REM curves On screens capable of showing more than one curve, you may show or hide test curves. Hiding a curve does not erase it. To erase curves use the <Session> key. To hide or show test curve(s): 1) Highlight, then <PICK>... -
Page 65: Real-Ear Directional Test
12 Real-Ear Directional Test 12.1 Section overview Directional characteristics such as polar plots and Directivity Index (DI) are typically measured in a large anechoic chamber using sound from one direction at a time and often presented one frequency at a time. These methods assume a hearing aid set for linear amplification and an environment free of reflections. -
Page 66: Rem Directional Testing
12.2 REM directional testing Best results are obtained for this test if an external front REM speaker is used in place of the internal REM speakers because this eliminates sound reflections from the display screen and test chamber lid. See 10.2: External REM speaker setup. -
Page 67: Rem Manual Control
13 REM Manual Control 13.1 Section overview Manual control displays the reference microphone SPL, the probe microphone SPL, their difference in dB (gain) and probe microphone signal distortion at any selected 1/12 octave frequency and at a selected input level from 40 to 90 dB (in 5 dB steps) and at 0 dB (off). -
Page 68: Sound Level Meter Using Rem Probe
13.3 Sound level meter using REM probe The manual control feature enables the Verifit to be used as a sound level meter to perform C-weighted, A-weighted or 1/12 octave analysis of sound as measured by the probe and reference microphones. A and C-weighted measurements are limited to frequencies above 100 Hz and the averaging time and update rate are 384 ms. -
Page 69: Sensory Loss Simulator
14 Sensory loss simulator 14.1 Sensory loss simulator description A pure conductive loss attenuates loud and soft sounds equally, and is easily simulated by just turning down the volume or inserting an earplug. Losses of a sensory nature are more complex and more difficult to simulate. The most common sensory loss is caused by outer hair cell damage and results in loss of audibility for soft sounds but near-normal loudness for loud sounds. -
Page 70: Occlusion Effect Test
15 Occlusion Effect Test 15.1 Occlusion effect measurement 1) Refer to 10: Real-Ear Measurement Setup to prepare the system for use and for proper positioning of the client and the probe tube. 2) Insert the earmold or custom hearing instrument into the ear, being careful not to advance the probe tube further into the ear canal. -
Page 71: Recd (Real-Ear To Coupler Difference)
16 RECD (real-ear to coupler difference) 16.1 Section overview The RECD measurement procedure may be accessed by selecting RECD from the REM tests list or from the Audiometry poster within Speechmap. This section covers the following topics: 16.2: RECD facts 16.3: RECD coupler response 16.4: RECD real-ear response 16.5: RECD results... -
Page 72: Recd Coupler Response
16.3 RECD coupler response Prepare the system for HIT tests. See 2.4: Microphone connection, 7.9: Calibration of HIT reference microphone. Connect the RECD transducer to the RECD jack on the front of the test chamber 1) Press <Tests> then highlight and <PICK>... -
Page 73: Recd Real-Ear Response
16.4 RECD real-ear response Connect the RECD transducer to the RECD jack on the test chamber. Prepare the system for REM tests. See 10.4: Calibration of REM probe microphone. 2) Press <Tests> then highlight and <PICK> [RECD] from the REM tests list. 3) If no coupler response exists or the measurement interval has been exceeded, go to 16.3:RECD coupler... -
Page 74: Recd Results
16.5 RECD results The RECD measurement screen shows the response of the RECD transducer in the real ear (pink) and in the 2cc coupler (green). The difference between these curves is the RECD (cyan). An age-appropriate average RECD is shown for reference (dotted). -
Page 75: Insertion Gain
17 Insertion Gain 17.1 Section overview Insertion gain is the difference between aided and unaided ear canal SPL (REIG = REAG - REUG). It inherently assumes a sound-field audiogram. For non-linear hearing aids, REIG is stimulus-dependent and the dependency is specific to each hearing aid. -
Page 76: Insertion Gain In Hl
17.3 Insertion gain in HL 10: Real-Ear Measurement Setup 11: REM Screen Setup 1) Press <Tests>, then highlight & <PICK> [Insertion gain] from the REM tests list. 2) Highlight and <PICK> [Instrument] to chose from BTE, ITE, ITC, CIC, Body. This changes the CORFIG used for 2cc targets. -
Page 77: Audiometric Data Entry
17.4 Audiometric data entry Threshold data and parameters may be entered by scanning a barcode on a previous Verifit or RM500SL printout or manually using a mouse, the keypad or the numeric keypad on an external keyboard. See 2.7: Mouse, keyboard, barcode scanner, and 3.2: Input device operation. -
Page 78: Reur Measurement Procedure
17.5 REUR measurement procedure Performing a REUR test erases all existing REAR and REIG data associated with the current test ear. REUR should be measured only if Transducer = Soundfield. Otherwise it is more accurate to use average. See 17.4: Audiometric data entry. -
Page 79: Rear Measurement Procedure
17.6 REAR measurement procedure 1) Press <Tests>, then highlight and <PICK> [Insertion gain] from the REM list 2) Referring to 10: Real-Ear Measurement Setup 11: REM Screen Setup, prepare the system, position the patient and insert the probe tube. (For tight- fitting hearing aids or earmolds, the probe tube may be inserted through a vent.) 3) Without disturbing the probe tube, insert the hearing instrument or earmold. -
Page 80: Sii Calculation In Insertion Gain
17.7 SII calculation in Insertion gain The Verifit calculates a Speech Intelligibility Index (SII) value for unaided speech at 70 dB SPL (REUR), the target REIG and for each aided test. The calculations use the 1/3 octave band method of ANSI S3.5 –1997 without the 160 Hz band and without masking effects with results expressed as a % by multiplying by 100. -
Page 81: Cros Fitting Using Insertion Gain
17.8 CROS fitting using Insertion gain 10: Real-Ear Measurement Setup, and 11: REM Screen Setup. 1) Place a probe module on each ear and insert the probe tube into the good ear only. Position the CROS instruments on (in) the ears and turn them ON. 2) Position the speaker at 45°... -
Page 82: Speechmap
18.2 Speechmap facts Speechmap is a trademarked hearing instrument fitting environment introduced by Audioscan in 1992. It presents hearing threshold, UCL and amplified speech spectra as SPL in the ear canal. The fitting goal is to make amplified speech audible and comfortable while avoiding discomfort for loud sounds. Originally speech was simulated using amplitude-modulated tonal signals. -
Page 83: Dsl 5.0 In Speechmap
1) DSL 5.0 uses RECD values for ages > 119 months from a different source than for ages ≤ 119 months; Audioscan has used the RECD values for a 119 month old for ages > 119 months so all values come from the same study. -
Page 84: Dsl 5.0 Changes
18.4 DSL 5.0 changes The Audioscan version of DSL 5.0 includes provision for bone conduction and ABR threshold, binaural targets, targets for speech levels from 50 to 75 dB SPL, new targets for children, targets for adults and new RECD default values for children (1 month to 10 years) and adults. -
Page 85: Using Speechmap
18.6 Using Speechmap The Speechmap fitting environment provides a number of distinctly different stimuli. Speech and noise are analyzed in 1/3 octave bands and (except for pink noise) data are presented as 3 curves. The top curve is the level exceeded 1% of the time (speech peaks), the lower curve is the level exceeded 70% of the time (speech valleys) and the middle curve is the average. -
Page 86: Screen Tour - Unaided Screen
18.7 Screen tour - unaided screen FastFacts 18.7: Screen tour - unaided screen 18.8 Screen tour - aided screen FastFacts 18.8: Screen tour - aided screen 0611 Verifit User’s Guide Version 2.8 Page 86... -
Page 87: Rem Or S-Rem Mode
18.9 REM or S-REM mode The Speechmap environment provides two hearing instrument verification options: REM (real-ear measurement) and S-REM (simulated REM). In REM mode, the stimulus is controlled by the REM reference microphone below the ear and SPL in the ear canal is measured by the probe microphone. In S-REM mode, levels measured in the 2cc coupler are converted to estimated ear canal levels using the RECD values (age-appropriate average, entered, or measured). -
Page 88: Sii Calculation In Speechmap
18.10 SII calculation in Speechmap The Verifit calculates a Speech Intelligibility Index (SII) value (in %) for unaided speech at 70 dB SPL and for each aided test. The calculations use the 1/3 octave band method of ANSI S3.5 –1997 without the 160 Hz band and without masking effects with results expressed as a % by multiplying by 100. -
Page 89: Speechmap Fitting Procedures
19 Speechmap Fitting Procedures 19.1 Section overview The procedures in this section assume a familiarity with 10: Real-Ear Measurement Setup, 11: REM Screen Setup 18: Speechmap ®. This section covers the following topics: 19.2: Assessment data entry 19.7: Fitting to targets for mid-level speech 19.3:Assessment data choices - 1 19.8: Open fittings in Speechmap 19.4: Assessment data choices –... -
Page 90: Assessment Data Choices - 1
19.3 Assessment data choices - 1 The following audiometric assessment parameters can be specified in the Speechmap Audiometry setup box. Defaults are the last-used choices if test setup memory has been turned on. See 4.4: Saving test setup. 1) Target: Select fitting targets from [DSL adult, DSL child, NAL-NL1, None]. DSL 5 and NAL-NL1 differ in the derivation of amplified LTASS and RESR targets. -
Page 91: Assessment Data Choices - 2
19.4 Assessment data choices – 2 Continued from: 19.3 Assessment data choices - 1 5) UCL: Uncomfortable Level. Select from [Enter, Average]. If measured UCL values are entered, these values will be converted to real-ear SPL and used as real-ear saturation response (RESR) targets. Note that DSL 5.0 has changed this term to Upper Limit of Comfort (ULC). -
Page 92: Fitting To Targets For Soft Speech
19.5 Fitting to targets for soft speech 18.9: REM or S-REM mode, 18.6: Using Speechmap 19.2: Assessment data entry for setup and audiometric data entry. 1) Select [Audiometry] to choose the target method and enter audiometric data. 2) Select REAR 1 and set stimulus to [Speech-std(1)] or [Speech-std(2)] and level to 50. -
Page 93: Fitting To Targets For Loud Sounds
19.6 Fitting to targets for loud sounds 4) Select REAR 2 & set stimulus to [MPO]. In S-REM mode, a 90 dB tone sweeps continuously. In REM mode, the tone sweeps when you press <Continue>. 5) In S-REM mode, adjust high-level gain and/or output limiting (e.g.,MPO, PC) so the curve matches the + REAR90 targets (DSL) or approaches but doesn’t exceed the ∗... -
Page 94: Fitting To Targets For Mid-Level Speech
19.7 Fitting to targets for mid-level speech 6) Select REAR 3 and set stimulus to [Speech-std(1)] or [Speech-std(2)] and level to 70. Elongated symbols show the target range for 70 dB speech LTASS. 7) Adjust gain for mid-level sounds so that the middle curve (the LTASS) falls within the target range. -
Page 95: Fm Fitting And Verification
19.9 FM fitting and verification FM fitting is complex and strategies are varied and fluid. These instructions are intended to provide the general principles involved, not a detailed and proven method. They assume familiarity with the use of Speechmap in fitting hearing aids. 1) Set up the hearing aid or receiver/earpiece as if to fit a hearing aid in REM or S- REM mode. -
Page 96: Cros Fitting In Speechmap
19.10 CROS fitting in Speechmap 18.6: Using Speechmap. 1) Place a probe module on each ear and insert the probe tube into the good ear only. Position the CROS instruments on (in) the ears and turn them ON. 2) Position the speaker at 45° to the good ear and set Instrument to [BTE]. 3) Select REAR 1 and record a response using [Pink noise] at Soft (55). -
Page 97: Speechmap Technical Details
20 Speechmap Technical Details 20.1 Section overview Speechmap provides a variety of stimuli for the testing of non-linear hearing aids with a range of digital processing features. This section covers the following topics: 20.2: Speechmap stimuli 20.4: Microphone location effects 20.3: Stimulus levels 20.5: Speech signal analysis For additional details, see... -
Page 98: Stimulus Levels
20.3 Stimulus levels 1/3 octave band SPL Add to band SPL for Speech ICRA Pink Loud Noise Noise Voice Chest Boom Standard Female Child 56.8 54.9 32.3 52.9 -2.2 19.2 56.0 53.1 51.5 55.9 10.7 12.0 22.2 53.0 48.4 57.3 56.9 11.0 16.6... -
Page 99: Microphone Location Effects
20.4 Microphone location effects Microphone Location Effects Add to all stimuli in S-REM mode Hearing instrument type Frequency BTE BODY 1000 1250 -1.6 1600 -0.3 -1.9 -4.0 2000 -4.0 2500 -3.0 3150 -2.0 4000 5000 -1.2 6300 -0.4 -1.8 8000 -1.9 -5.6 Microphone location effects are added after the overall rms level has been set... -
Page 100: Speech Signal Analysis
20.5 Speech signal analysis One of the most-used measures of a speech signal is the long-term average speech spectrum (LTASS). This is a 1/3 octave spectrum averaged over a sufficiently long portion of the speech material to provide a stable curve. In practice a 10 second average meets this requirement and, for this reason, all Verifit passages are at least 10 seconds long. -
Page 101: Troubleshooting
This section covers common problems encountered when using the Verifit. If you require further assistance, note your model and serial number (located next to the power switch) and contact your local distributor, or Audioscan at 519-268-3313 800-265-2093 (USA only), 519-268-3256 (fax) or service@audioscan.com PLEASE DO NOT SHIP YOUR UNIT BACK TO THE FACTORY. -
Page 102: Hit High Distortion Or Noise
21.3 HIT high distortion or noise High distortion and/or noise numbers in an ANSI test v There may be a leak between the hearing instrument under test and the coupler it is connected to. For BTE type instruments, check the integrity of the #13 tubing at the end of the coupler where it joins with the ear hook. -
Page 103: Hit Curves Differ From Specifications
If any have been pushed back into the connector, you should contact Audioscan. FastFacts 21.7: No HIT reference mic. detected 0611 Verifit User’s Guide Version 2.8... -
Page 104: Invalid Hit Calibration
21.8 Invalid HIT calibration Invalid HIT Calibration! This message may be displayed during the HIT calibration procedure. It indicates that the calibration curve is significantly different from what is expected. It may be accompanied by a missing HIT reference microphone error. v Check that the there is no coupler on the coupler microphone and that the microphones are correctly positioned for HIT calibration. -
Page 105: Rem Speaker Overdriven
21.11 REM speaker overdriven REM speaker overdriven! or External REM speaker overdriven! This message may occur on REM Directional or REM unaided or aided tests if: v No external front speaker is connected but one has been selected in Setup. 2.8: External display, printer, speaker, 10.2: External REM speaker... -
Page 106: Technical Specifications
ANSI S3.22 - 1996 and 2003 tests available 22 Technical Specifications aOSPL90 aFull-on Gain Storage & Transportation aReference Test Gain aFrequency Response Temperature ............- 20°C to +60°C aFrequency Range Relative humidity (non-condensing)......5% to 95% aMaximum OSPL90 Atmospheric pressure........500 - 1060 hPa aHarmonic Distortion aAttack &... -
Page 107: Glossary
23 Glossary AGC, Automatic Gain Control, the means by which gain is automatically controlled by the level of the signal being amplified. (ANSI S3.22) AGC-I, input-controlled AGC (see "input compression"). AGC-O, output controlled AGC (see "output compression"). AGRAM, Abbreviation for audiogram. ANSI, American National Standards Institute. - Page 108 Gain (in dB), output sound pressure relative to input sound pressure, expressed in decibels; gain = 20log (output sound pressure / input sound pressure); also, gain = (output SPL) - (input SPL). Gain control, a manually or electronically operated control for the adjustment of overall gain (ANSI S3.22).
- Page 109 MPO, Maximum Power Output, the maximum SPL that a hearing aid can deliver in response to a steady narrow band input. The stimulus may be pulsed (a tone burst) to avoid discomfort and to obtain a worst- case maximum output. Modulation, the process of varying a characteristic of one signal with another.
- Page 110 REUR, Real-Ear Unaided Response, SPL (or BSPL), as a function of frequency, at a specified measurement point in the ear canal, for a specified sound field, with the ear canal unoccluded (ANSI S3.46). Reference microphone, microphone used to measure the stimulus level in the measurement process or to control it in the equalization process.
-
Page 111: References
Byrne, D. (1977). The speech spectrum - Some aspects of its significance for hearing aid selection and evaluation. British Journal of Audiology, 11,40-46. Cole, W.A. & Sinclair, S.T. (1998). The Audioscan RM500 Speechmap/DSL fitting system. Trends in Amplification, 3(4):125-139. Corliss, E. L. R. (1990) The ear as a mechanism of communication. Journal of Audio Engineering Society, 38(9):640-652. - Page 112 Dunn, H. K., & White, D. S. (1940). Statistical measurements on conversational speech. Journal of the Acoustical Society of America, 11:278-288. Feigin, J.A., Kopun, J.G., Stelmachowicz, P.G. & Gorga, M.P. (1989). Probe-tube microphone measures of ear-canal sound pressure levels in infants and children. Ear and Hearing, 10(4), 254-258. Fikret-Pasa, S.
- Page 113 Seewald, R.C. (1994a). Current issues in hearing aid fitting. In J-P Gagne and N. Tye-Murray (Eds.), Research in Audiological Rehabilitation: Current Trends and Future Directions. Journal of the Academy of Rehabilitative Audiology Monograph, XXVII. Seewald, R.C. (1994b). Fitting children with the DSL method. The Hearing Journal, 47(9), 10,48-51. Seewald, R.C., Moodie, K.S., Sinclair, S.T.
-
Page 114: Appendix 1: Audionote 2.1 Verifit And Rm500Sl Test Signals And Analysis
25 Appendix 1: AudioNote 2.1 VERIFIT and RM500SL Test Signals and Analysis For additional details of the signals and their analysis, see the appended AudioNote. Within the European Community: EU Authorised representative: PC Werth Ltd. Audiology House 45 Nightingale Lane, London SW12 8SP UK Council Directive 93/42/EEC for Medical Devices. - Page 115 Drive levels at each frequency are then set to achieve the desired band levels at the reference Page 1 07/05/06 © Etymonic Design Incorporated, 41 Byron Ave., Dorchester, ON, Canada N0L 1G0 USA 800-265-2093 519-268-3313 FAX 519-268-3256 www.audioscan.com...
- Page 116 2.2.3 Real-speech signals Real-speech signals are provided in Speechmap for both REM and S-REM measurement modes. Four different Page 2 07/05/06 © Etymonic Design Incorporated, 41 Byron Ave., Dorchester, ON, Canada N0L 1G0 USA 800-265-2093 519-268-3313 FAX 519-268-3256 www.audioscan.com...
- Page 117 In addition to these well-controlled and repeatable signals, live speech may be used as a test signal. It will, of course, be unequalized and at an uncontrolled level. Page 3 07/05/06 © Etymonic Design Incorporated, 41 Byron Ave., Dorchester, ON, Canada N0L 1G0 USA 800-265-2093 519-268-3313 FAX 519-268-3256 www.audioscan.com...
- Page 118 Figure 5 shows output (A) and gain (B) for a linear hearing aid, obtained using a swept tone (1) and pink noise (2) with a 60 dB overall SPL. Page 4 07/05/06 © Etymonic Design Incorporated, 41 Byron Ave., Dorchester, ON, Canada N0L 1G0 USA 800-265-2093 519-268-3313 FAX 519-268-3256 www.audioscan.com...
- Page 119 Figure 5: Output (left) and Gain (right) curves for a linear hearing aid, generated using a swept tone (1) and pink noise analyzed in 1/12 octave bands (2). (Dual view not available in RM500SL) Page 5 07/05/06 © Etymonic Design Incorporated, 41 Byron Ave., Dorchester, ON, Canada N0L 1G0 USA 800-265-2093 519-268-3313 FAX 519-268-3256 www.audioscan.com...
- Page 120 100 - 200 ms is likely. The Verifit and RM500SL use a Page 6 07/05/06 © Etymonic Design Incorporated, 41 Byron Ave., Dorchester, ON, Canada N0L 1G0 USA 800-265-2093 519-268-3313 FAX 519-268-3256 www.audioscan.com...
- Page 121 When using live speech as a test signal, a “Freeze curve” function is available to capture the short-term spectra for examination and counseling purposes. Figure 7: Example of speech envelope and LTASS Page 7 07/05/06 © Etymonic Design Incorporated, 41 Byron Ave., Dorchester, ON, Canada N0L 1G0 USA 800-265-2093 519-268-3313 FAX 519-268-3256 www.audioscan.com...
- Page 122 Figure 9: When LTASS is at threshold, SII ≈ 33% which corresponds approximately to SRT Page 8 07/05/06 © Etymonic Design Incorporated, 41 Byron Ave., Dorchester, ON, Canada N0L 1G0 USA 800-265-2093 519-268-3313 FAX 519-268-3256 www.audioscan.com...
- Page 123 4000 5000 6300 8000 BAND CENTER FREQUENCY (Hz) Figure 11: LTASS for Speechmap speech signals at average vocal effort Page 9 07/05/06 © Etymonic Design Incorporated, 41 Byron Ave., Dorchester, ON, Canada N0L 1G0 USA 800-265-2093 519-268-3313 FAX 519-268-3256 www.audioscan.com...
- Page 124 8000 BAND CENTER FREQUENCY (Hz) Figure 13: Level of 70 percentile for Speechmap speech signals at average vocal effort Page 10 07/05/06 © Etymonic Design Incorporated, 41 Byron Ave., Dorchester, ON, Canada N0L 1G0 USA 800-265-2093 519-268-3313 FAX 519-268-3256 www.audioscan.com...
- Page 125 5000 6300 8000 BAND CENTER FREQUENCY (Hz) Figure 14: Dynamic range of Verifit speech signals at average vocal effort Page 11 07/05/06 © Etymonic Design Incorporated, 41 Byron Ave., Dorchester, ON, Canada N0L 1G0 USA 800-265-2093 519-268-3313 FAX 519-268-3256 www.audioscan.com...