Table of Contents
Advertisement
Advertisement
Table of Contents

Subscribe to Our Youtube Channel
Related Manuals for Metek Tono-Pen AVIA

Summary of Contents for Metek Tono-Pen AVIA
- Page 1 Tono-Pen AVIA ® Tonometer User’s Guide...
-
Page 2: Serial Number
Serial Number: _________________________________ Date of Purchase: ______________________________ ©2017 AMETEK, Inc. Reichert, Reichert Technologies, Tono-Pen, Tono-Pen AVIA, Tono-Pen AVIA POWERCEL and Ocu-Film are registered trademarks of Reichert, Inc. AMETEK is a registered trademark of AMETEK, Inc. All other trademarks are property of their respective owners. -
Page 3: Table Of Contents
Features .............. 10 Parts Identification..........11 Available Accessories ..........11 Instructions for Use ............ 12 Tono-Pen AVIA Tonometer Modes ...... 12 Tono-Pen AVIA Tonometer Verification ....13 Tono-Pen AVIA Tonometer Tones ......15 Battery Installation and Replacement ....16 Liquid Crystal Display - User Interface ....17 Tono-Pen AVIA Tonometer Preparation .... -
Page 4: Warnings And Cautions
WARNING: IF THIS INSTRUMENT IS MODIFIED, APPROPRIATE INSPECTION AND TESTING MUST BE CONDUCTED TO ENSURE CONTINUED SAFE USE OF THIS INSTRUMENT. WARNING: DO NOT USE THE TONO-PEN AVIA TONOMETER ON A PATIENT WITHOUT AN OCU-FILM + TIP COVER OR INACCURATE READINGS MAY BE OBTAINED. - Page 5 Warnings and Cautions (continued) WARNING: DO NOT USE THE TONO-PEN AVIA TONOMETER IF THE TRANS- DUCER ASSEMBLY IS CRACKED, CHIPPED OR SHOWS ANY IRREGULARITY OF THE SURFACE, TO PREVENT PATIENT INJURY, AND/OR INACCURATE READINGS. WARNING: DO NOT USE EXCESSIVE PRESSURE DURING APPLANATION OR EYE INJURY MAY OCCUR.
- Page 6 OR SYSTEM. CAUTION: AN INSTRUCTION THAT DRAWS ATTENTION TO THE RISK OF DAMAGE TO THE PRODUCT. CAUTION: DO NOT USE THE TONO-PEN AVIA TONOMETER WITHOUT AN OCU-FILM + TIP COVER TO PREVENT DAMAGE TO THE TRANSDUCER AS- SEMBLY. CAUTION: DO NOT TOUCH THE TRANSDUCER ASSEMBLY WITHOUT AN OCU-FILM + TIP COVER APPLIED OR DAMAGE TO THE TRANSDUCER AS- SEMBLY MAY RESULT.
- Page 7 THE SPECIFICATIONS SECTION OF THIS MANUAL OR DAMAGE TO THE UNIT MAY OCCUR. CAUTION: DO NOT ATTEMPT TO MODIFY THE TONO-PEN AVIA TONOMETER OR THE TONO-PEN AVIA POWERCEL BATTERY OR DAMAGE TO THE DEVICE MAY OCCUR. CAUTION: DO NOT STORE THE TONO-PEN AVIA TONOMETER WITHOUT AN OCU-FILM + TIP COVER OR DEBRIS MAY ENTER THE TRANSDUCER ASSEM- BLY AND CAUSE MALFUNCTIONS.
-
Page 8: Symbols
Symbols Caution Catalog Number Serial Number Date of Manufacture 2017 Manufacturer Waste of Electrical and Electronic Equipment Compliance to Medical Device Directive 93/42/EEC Consult Instructions for Use Authorized Representative in European Community Fragile Contents in Shipping Container - handle with care Do not get Shipping Container wet Type BF Applied Part... -
Page 9: Introduction
If used properly, the Tono-Pen AVIA tonometer will provide you with fast, accurate and reliable measurements for many years. -
Page 10: Device Description
Goldmann applanation tonometry and direct measurements of IOP. • Versatile - The Tono-Pen AVIA tonometer may be used easily with the patient in any position, making the instrument suitable for the office, in glaucoma clinics, at the hospital bedside, and in remote locations. -
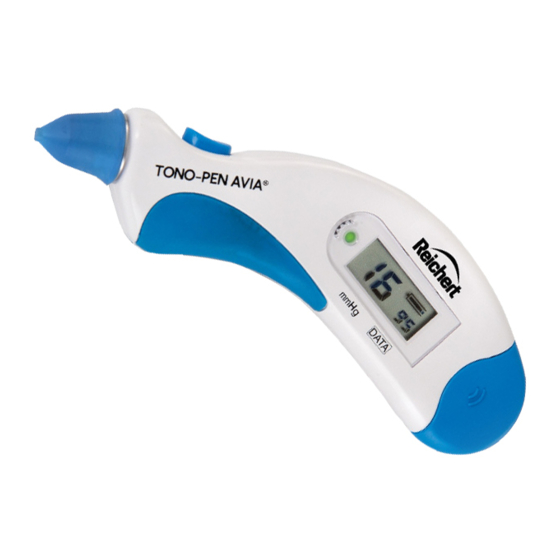
Page 11: Parts Identification
C LCD - displays the IOP in mmHg, number of applanations collected, statistical confidence indicator, and battery life status D LED - green light on in Applanation Mode. E Tono-Pen AVIA POWERCEL Battery - battery Activation Button - Applanation Mode select button. Figure 1. Key Features Accessories... -
Page 12: Instructions For Use
Verification Mode Pressing and holding the activation button for 5 seconds initiates an electronic self test mode. See Tono-Pen AVIA Tonometer Verification section for details. Sleep Mode A power-saving mode automatically activated after 25 seconds of non-use. -
Page 13: Tono-Pen Avia Tonometer Verification
This will ensure that the Transducer Assembly and electronics are performing correctly. Verification Hold the Tono-Pen AVIA tonometer with the Transducer Assembly end pointing down towards the floor. Press and hold the activation button for 5 seconds - a beep will sound at one second intervals. - Page 14 ]. A single press of the Activation button will re-start the verification test. Note: The Tono-Pen AVIA tonometer will remain in the Verification mode until it passes verification test. The most common cause for failure is debris in the tip of the Transducer Assembly.
-
Page 15: Tono-Pen Avia Tonometer Tones
Instruction for Use (continued) Tono-Pen AVIA Tonometer Tones The Tono-Pen AVIA tonometer generates two different tones. A “BEEP” will sound when: • Power Up Mode fails • Verification Mode fails • Applanation Mode starts • IOP testing is completed • IOP values are out of range (<5 or >55) •... -
Page 16: Battery Installation And Replacement
Instruction for Use (continued) Battery Installation and Replacement The Tono-Pen AVIA tonometer is supplied with a Tono-Pen AVIA POWERCEL Battery that needs to be installed prior to use. The Tono-Pen AVIA POWERCEL Battery is the only replacement battery that can be used with this device. -
Page 17: Liquid Crystal Display - User Interface
Instruction for Use (continued) Liquid Crystal Display - User Interface POWER UP MODE - USER INTERFACE SEQUENCE OF EVENTS User Interface LED Off LCD/Battery Passed Battery Life Test/Passed Test LCD Test (SEE APPLANATION MODE) POWER UP MODE - USER INTERFACE ERROR CODES LED Off User Interface Battery Level Critical... - Page 18 Error Code (>55mm Hg) LED Off User Interface Timeout - not enough IOP Error Code values collected VERIFICATION MODE - SEQUENCE OF EVENTS Hold Tono-Pen AVIA User Interface tonometer with transducer Begin Verification down towards floor Mode (LED Off) User Interface...
-
Page 19: Tono-Pen Avia Tonometer Preparation
Make certain that the rubber is flat across the tip, but not taut. Figure 5. Tono-Pen AVIA Tonometer Preparation Note: Use of the Ocu-Film + Tip Cover is required under original Tono-Pen instrument warranty and service contract terms. -
Page 20: Verification Mode
If the verification test resulted with the LCD displaying [F ], repeat the verification test, or reference the troubleshooting section for potential causes for test failure. Note: The Tono-Pen AVIA tonometer will remain in the Verification mode until it passes verification. 68E3892 Rev. J... -
Page 21: Performing Iop Measurements
(i.e. ear, nose, distant object) to minimize eye movement, with eyes fully open. 4. Hold the Tono-Pen AVIA tonometer as you would a pencil and position yourself to allow viewing of the Transducer Assembly and the patient’s cornea where contact will be made. For normal corneas, central corneal contact is recommended. -
Page 22: Applanation
] will flash on the LCD, a double row of dashes [===] will be displayed, the green LED will turn on, and a “beep” tone will sound, indicating the Tono-Pen AVIA tonometer is ready to measure intraocular pressure. 3. Tap very lightly and briefly on the corneal surface. The device will chirp and the DATA field on the LCD will increment for each valid IOP reading obtained. -
Page 23: Interpreting The Iop Measurement
Instruction for Use (continued) Interpreting the IOP Measurement During the measurement, the LCD shows the cumulative number of applanations detected. Once 10 applanations are achieved, the LCD will display the IOP in millimeters of mercury (mm Hg), along with a statistical confidence indicator. A statistical confidence indicator of 95 means that the standard deviation of the valid measurements is 5% or less of the number shown. -
Page 24: Cleaning & Maintenance
Note: Never use the Tono-Pen AVIA tonometer without an Ocu-Film + tip cover installed. Note: Ocu-Film + tip covers are the only manufacturer approved covers for use with the Tono-Pen AVIA tonometer. Use of any other type of branded tip cover may affect readings or may void your warranty. -
Page 25: Battery
Storage • Cover the tip with an Ocu-Film + tip cover for protection. • If the Tono-Pen AVIA tonometer is not to be used until a subsequent day, the instrument and accessories should be placed in the storage case provided. -
Page 26: Troubleshooting
Troubleshooting The table below provides a guide for troubleshooting some basic Tono-Pen AVIA tonometer operational problems. If a problem persists after using this guide contact Reichert technical services. SYMPTOM PROBABLE CAUSE CORRECTION Battery symbol Low Tono-Pen AVIA Replace Tono-Pen AVIA... -
Page 27: Specifications
Atmospheric Pressure range: 50 kPa to 106 kPa (14.8 to 31.3 in.Hg) 50 kPa ELECTRICAL RANGE OF IOP MEASUREMENTS Accuracy by manometric measurements (95% Confidence) Input Voltage (Tono-Pen AVIA POWERCEL Battery) Measurement (mmHg) Accuracy (mmHg) 2 x 3V Lithium Manganese 5-25 ± 1.2... -
Page 28: Guidance & Manufacturer's Declaration
Guidance and Manufacturer’s Declaration – Electromagnetic Emissions The Tono-Pen AVIA is intended for use in the electromagnetic environment specified below. The customer or user of the Tono-Pen AVIA should ensure that it is used in such an environ- ment. Electromagnetic Environment... - Page 29 Guidance and Manufacturer’s Declaration – Electromagnetic Immunity The Tono-Pen AVIA is intended for use in the electromagnetic environment specified below. The customer or user of the Tono-Pen AVIA should ensure that it is used in such an environ- ment. Immunity...
-
Page 30: Device Regulatory Classification
The Tono-Pen AVIA is intended for use in the electromagnetic environment in which radiated RF disturbances are controlled. The customer or user of the Tono-Pen AVIA can help prevent electromagnetic interference by maintaining a minimum distance between portable and mobile RF Communications Equipment and the Tono-Pen AVIA as recommended below, according to the maximum output power of the communications equipment. -
Page 31: Warranty
Warranty This product is warranted by Reichert, Inc. against defective material and workmanship under normal use for a period of one year from the date of invoice to the original purchaser. (An authorized dealer shall not be considered an original purchaser.) Under this warranty, Reichert’s sole obligation is to repair or replace the defective part or product at Reichert’s discretion. - Page 32 Manufactured By Reichert, Inc. 3362 Walden Ave Depew, NY 14043 Toll Free: 888-849-8955 Phone: 716-686-4500 Fax: 716-686-4555 Email: reichert.information@ametek.com www.reichert.com Authorized European Representative AMETEK GmbH Business Unit Reichert Carl-von-Linde-Strasse 42 85716 Unterschleissheim/Munich GERMANY Email: info.reichert-de@ametek.com Tel. +49 (89) 315 891 10 Fax.
Need help?
Do you have a question about the Tono-Pen AVIA and is the answer not in the manual?
Questions and answers