Table of Contents
Advertisement
Advertisement
Table of Contents

Related Manuals for Grundig GKFI7030


Summary of Contents for Grundig GKFI7030
- Page 1 REFRIGER ATOR USER INSTRUCTIONS GKFI7030 E NG FOR A GOOD REASON www.grundig.co.uk...
-
Page 3: Table Of Contents
Contents Introduction & safety warnings................4 Electrical requirements..................5 Transportation instructions.................6 Important Installation instructions ..............7 Getting to know your fridge / freezer..............8 Suggested arrangement of food in the fridge / freezer........9 Operating the product..................10 Starting......................11 Storing frozen food....................11 Freezing fresh food....................11 Making ice cubes....................11 Defrosting......................12 Zero temperature compartment.................12 Cleaning and care.....................13... -
Page 4: Introduction & Safety Warnings
Congratulations on your choice of a GRUNDIG quality Appliance which has been designed to give you service for many years. WARNING ! IMPORTANT ! DO NOT connect your appliance to the electricity supply until all packing and transit protectors have been removed. -
Page 5: Electrical Requirements
Should the mains lead of the appliance become damaged or should it need replacing at any time, it must be replaced by a special purpose made mains lead which can only be obtained from a GRUNDIG Authorised Service Agent WARNING! THIS APPLIANCE MUST BE EARTHED If the f tted moulded plug is not suitable for your socket, then the plug should be cut off and an appropriate plug f tted. -
Page 6: Transportation Instructions
Do not allow children to play with the appliance or tamper with the controls. GRUNDIG declines to accept any liability should the instructions not be followed. • This appliance is not intended for use by persons (including children) with reduced... -
Page 7: Important Installation Instructions
IMPORTANT INSTALLATION INSTRUCTIONS 1. The space in the room where the appliance is installed must not be smaller than 10 cubic metres. 2. See pages 16 to 32 for detailed Installation Instructions including reversing door opening direction. 3. This appliance has been designed to operate in ambient temperatures up to 38 degrees C (90 degrees F) and is equipped with Freezer Guard technology which ensures that even if the ambient temperature falls to -15 °C, frozen food in the freezer does not thaw thanks to this. -
Page 8: Getting To Know Your Fridge / Freezer
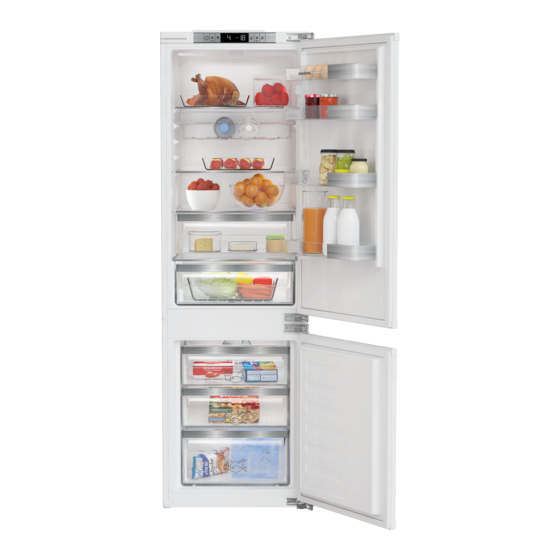
GETTING TO KNOW YOUR COMBI FROST FREE FRIDGE / FREEZER Control panel Door shelf Interior light Door shelf Egg tray Cabinet shelves Door shelf Wine rack Shelf wire 0 °C Compartment Bottle Defrost water shelf collection channel Salad crisper Freezer fan Ice bank Frozen food storage drawers... -
Page 9: Suggested Arrangement Of Food In The Fridge/Freezer
SUGGESTED ARRANGEMENT OF FOOD IN THE FRIDGE/FREEZER Arrangement Examples (See diagram) 1. Baked, chilled cooked food, dairy products, cans. 2. Wine rack 3. Meat, sausages, cold cuts. 4. Fresh fish, meat and easily perishable food 5. Fresh fruit and vegetables 6. -
Page 10: Operating The Product
OPERATING THE PRODUCT Indicator panel 1. On/Off Indicator Use the quick freeze function when you want to quickly freeze the food When the fridge is off, ( ) symbol placed in freezer compartment. If is lit. All the other symbols are turned off. you want to freeze large amounts of 2. -
Page 11: Starting
STARTING Final Check Before you start using the fridge/freezer check that: 1. The interior is dry and air can circulate freely at the rear of the cabinet. 2. Clean the interior as recommended under "CLEANING AND CARE." 3. Insert the plug into the wall socket and switch on the electricity supply. •... -
Page 12: Defrosting
DEFROSTING A) FRIDGE COMPARTMENT The fridge compartment defrosts automatically. The defrosting water runs to the drain tube via a collection container at the back of the appliance (1).(see diagram) During defrosting water droplets may form at the back of the fridge compartment where concealed evaporator is located. -
Page 13: Cleaning And Care
CLEANING AND CARE ** We recommend that you switch off the appliance at the socket outlet and pull out the mains plug before cleaning. ** Never use any sharp abrasive instrument, soap, household cleaner, detergent and wax polish for cleaning. ** Use luke warm water to clean the cabinet of the appliance and wipe it dry. -
Page 14: Do's And Don'ts
DO'S AND DON'TS Clean and defrost your appliance regularly (See "Defrosting") Keep raw meat and poultry below cooked food and dairy products. Take off any unusable leaves on vegetables and wipe off any soil. Leave lettuce, cabbage, parsley and caulif ower on the stem. Wrap cheese f rstly in greaseproof paper and then in a polythene bag excluding as much air as possible. -
Page 15: Energy Saving Tips
ENERGY SAVING TIPS 1- Ensure your appliance is installed in a well ventilated area. If the ambient temperature is low (but in no case lower than 5 degrees C), then the energy saving will be more. In this case, check temperatures of fridge and freezer compartments with an accurate thermometer and lower the temperature setting if necessary. -
Page 16: Installation Instructions Detailed Step By Step
INSTALLATION INSTRUCTIONS DETAILED STEP BY STEP No wooden Backwall min. 200 cm Adjusting the legs (*optional) If your refrigerator is unbalanced; You can balance your refrigerator by turning the legs of it as illustrated in the figure. The corner where the leg exists is lowered when you turn in the direction of black arrow and raised when you turn in the opposite direction. - Page 17 200 cm 2 min 200 cm 2...
- Page 18 Torx Wood Plastic Sheet Wood (PS) (1TW) * Spares Included 90 ° Note: Installation step for 2, screws for connecting top plastic part should not be screwed very hard, because of moving the plastic part easily left or right side.
- Page 20 (2T) 1.F' 1.F'' (1TW) click click...
- Page 21 2.C' (1TW)
- Page 22 (1TW) (1TW) 4 0 . 4 0 . (in line with furniture)
- Page 23 2 box x...
- Page 26 A = 2 mm is recommended. Top view A = 2 mm empfohlen Ansicht von oben...
- Page 27 C =( HD 1) - (X ) y =1072 - (HD3) - ( C )
- Page 30 A1=A2 A1=A2...
- Page 31 2 mm 2 mm 2 mm...
-
Page 32: Reversing The Doors
Reversing the doors Proceed in numerical order... -
Page 33: Guarantee Details
Repairs to the product required as a result of faulty materials, defective components or manufacturing defects. • Functional replacement parts to repair a product. • The costs of a Grundig Approved Engineer to carry out the repair. What is not covered? • Transit and delivery damage. •... - Page 34 not be held liable for any financial loss incurred in connection with the failure of any product to operate in accordance with the expected standards. Such financial loss includes but is not limited to loss arising from: • Time taken off work. •...
- Page 35 Does Grundig offer replacements? This is a repair-only guarantee. On occasion, the Manufacturer may at its sole discretion, replace your product with a new product instead of carrying out a repair. Where a replacement is offered, this would normally be an identical model, but when this is not possible, a model of similar specification will be provided.
-
Page 36: How To Obtain Service
Should you experience any difficulty in obtaining service contact the Grundig Customer Helpline on Tel: 0333 207 9920 or e-mail: customerservice@support.grundig.co.uk ………………………………………………………….......... - Page 37 Recycling This product bears the selective sorting symbol for waste electrical and electronic equipment (WEEE). This means that this product must be handled pursuant to European Directive 2002/96/EC in order to be recycled or dismantled to minimize its impact on the environment. For further information, please contact your local or regional authorities.
- Page 38 Notes ......................................................................................................................................................................................................................................................................................................................................................................................................................................................................................................................................................................................................................................................................................................................................................................................................................................................................................................................................................................................................................................................................................................................................................................................................................................................................................................
- Page 39 Notes ......................................................................................................................................................................................................................................................................................................................................................................................................................................................................................................................................................................................................................................................................................................................................................................................................................................................................................................................................................................................................................................................................................................................................................................................................................................................................................................
- Page 40 Grundig 1 Greenhill Crescent Watford HERTS WD18 8QU Tel: 0845 603 1234 Fax: 0845 600 4922 www.grundig.co.uk www.grundig.co.uk 4578336341/AA...
Need help?
Do you have a question about the GKFI7030 and is the answer not in the manual?
Questions and answers