Table of Contents
Advertisement
Quick Links
Advertisement
Table of Contents

Related Manuals for Willfine 2.8C


Summary of Contents for Willfine 2.8C
- Page 1 USER’S MANUAL Scouting Trail Camera...
-
Page 2: Table Of Contents
Contents Whole View and Details of Camera..................- 1 - Front View of Camera......................- 1 - Camera Screen Display (Test Mode Main Interface).............. - 2 - Camera Menu List Introduction.....................- 3 - Quick Start..........................- 4 - Power On Camera........................- 4 - Manual Photographing/ Video Recording................- 4 - Enter Menu for Setup Functions.................... -
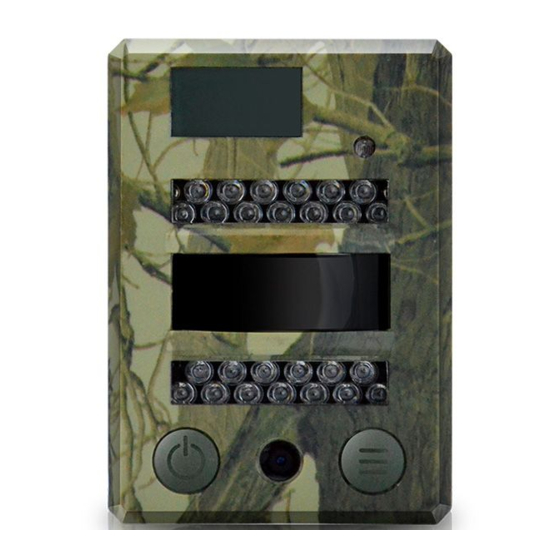
Page 3: Whole View And Details Of Camera
1. Whole View and Details of Camera Front View of Camera Light Sensor LCD Screen day/night Indicator Light 13 IR LEDs 13 IR LEDs PIR Sensor Lens Power/Navigation Button Menu/OK Button USB Port/ DC in SIM Card Slot Invalid Currently MicroSD Card Slot Screw Slot Battery Slot... -
Page 4: Camera Screen Display (Test Mode Main Interface)
Camera Screen Display (Test Mode Main Interface) Photo Mode Interface Photographing hour/min/sec Photo Resolution Multi Shot Number 0001: recorded file number of photos & video clips 9998: estimated available file number based on left memory space in memory card Video Recording Video Mode Interface Video FPS Video Resolution... -
Page 5: Camera Menu List Introduction
2. Camera Menu List Introduction 1) First Navigation Menu Camera ID Back to Photo Video Photo+Video Settings Delete Previous Page 2) Second Navigation Menu: Settings : Photo Video Timer Time Lapse Delay Stamp SD Cycle Camera Sound Back to PIR Sensitivity GPRS ON/OFF Reset Date/Time... -
Page 6: Quick Start
3. Quick Start 1. Open back cover to insert MicroSD Card and batteries; Power On Camera 2. Press and hold Power/Navigation button for 3 sec; camera will enter PIR Auto Working mode after indicator flashes 5 times; 3. Press Menu/OK button once to wake up camera LCD screen to enter TEST Mode;... -
Page 7: Camera Operation Flow Chart
Camera Operation Flow Chart Press and hold Power / Navigation button PIR Auto 3 sec; camera will enter PIR Auto Working mode Working Mode after indicator flashes 5 times; ON/OFF Camera In PIR Auto Working Mode, press Menu / OK (PIR Auto, TEST, OFF) TEST Mode button... -
Page 8: Detail Setups
4. Detail Setups Camera Modes (Default Settings) Camera ID Photo Video VGA (640*480) Photo+Video Settings Delete Back to Previous Page If wanted setting icon is not showing on camera LCD screen, press repeatedly until it appears. a. Set up 1) Press to enter configuration page, press to choose ON;... -
Page 9: Photo Settings (Default Settings)
of interface b. Start Recording Press and hold button for 3 seconds to return back to TEST Mode main interface; then press to take a video clip; press again to stop recording. a. Set up Press to enter Photo + Video mode; icon OK appears at right bottom of interface Photo + Video b. -
Page 10: Video Settings(Default Settings)
setting. (8MP/5MP/2MP: 3264x2448, 2560x1920, 1920x1080) Set up Press to enter configuration page, press choose desired Photo Burst number; press Multi-shot confirm setting. (Support 1~7 photos per burst/ trigger.) Video Settings(Default Settings) Video Size Video Length Video Frame 30FPS Frequency 50Hz Audio Recording If wanted setting icon is not showing on camera LCD screen, press repeatedly until... -
Page 11: Camera Settings (Default Settings)
Set up Press to enter configuration page, press to choose to turn ON/ OFF audio recording in video; press to confirm setting. Audio Recording Select “ON”, audio available in video clips. Camera Settings (Default Settings) Timer Time Lapse Delay Stamp SD Cycle Recording Camera Sound PIR Sensitivity... - Page 12 a. Set up 1) Press to enter configuration page, press choose ON; press again to set Time Lapse; 2) Press to choose wanted number, press confirm and move to next number; Time Lapse 3) Press again after all numbers are selected to Exit. b....
-
Page 13: Software Upgrade
temperature; 4) easier to trigger camera to record. In high temperature environment, body heat of subjects and environment temperature is hard to tell by camera, suggest to High. a. Set up 1) Press to enter configuration page; 2) Press to choose, press to confirm wanted number and move to next number;... -
Page 14: Usb Connection
8. Upgrade succeeds when red indicator led is off; 9. Plug out batteries/or power cable; 10. Insert batteries/ or power cable; turn on camera. Done. Note: Don’t cut off power supply during software upgrade; otherwise, camera will not be able to be turned on again unless software upgrade via PC. USB Connection When camera is connected via USB, press and hold button , camera speaker... -
Page 15: Microsd Card Selection & Battery Life Test Report
5. MicroSD Card Selection & Battery Life Test Report MicroSD Card Selection A memory card is required to operate the camera. When the camera is "ON" and no memory card is inserted, screen displays "No SD Card". Micro SD Card slot of camera supports up 32 GB memory card. -
Page 16: Specification
Model 2.8C Recording Video Format .avi 720P (1280*720) Video Resolution D1 (640*480) CIF (320*240) Video Frame Rate 15 / 30 FPS; programmable Video Length 5-60sec. programmable Still Image Format JPEG 2MP (1920x1080) Still Image Resolution 5MP (2560x1920) 8MP(3264x2448) Shooting Numbers... - Page 17 Auto Power Off Enter PIR Auto Mode in 1min without any operations Interface USB; Micro SD card slot Micro SD Card, up to 32G Memory Type and Size Display 1.0 inch B/W Screen Language English Sensor Type PIR (Passive Infrared) Sensor Range 12~15m;...
-
Page 18: Warranty
7. Warranty With great pride and full confidence in our products, we always keep our words which are given to our customers as specified warranty terms and service below. Based on a strict QC system, we initially offer all our customers one year long time limited warranty, come along with selectable chargeable...
Need help?
Do you have a question about the 2.8C and is the answer not in the manual?
Questions and answers