Table of Contents
Advertisement
Advertisement
Table of Contents

Related Manuals for Questyle Audio QP2R

Summary of Contents for Questyle Audio QP2R
- Page 1 www.questyleaudio.com...
-
Page 2: Table Of Contents
Getting Started QP2R Overview Power Management Charge QP2R Battery Insert/Remove Micro SD Card Update Firmware Connect QP2R to Computer Transfer Music Files Play Music Files How to Use QP2R Native Playback of Music Files Main Menu Description Icons in Status Bar... -
Page 3: Getting Started
Thank you for buying Questyle Audio QP2R High-res Portable Audio Player. Read this User Manual to find out how to use QP2R. Getting Started Cloth bag QP2R Quick Start Guide 表面 保护用 USB type C Optical cable Silicone disc for... -
Page 4: Qp2R Overview
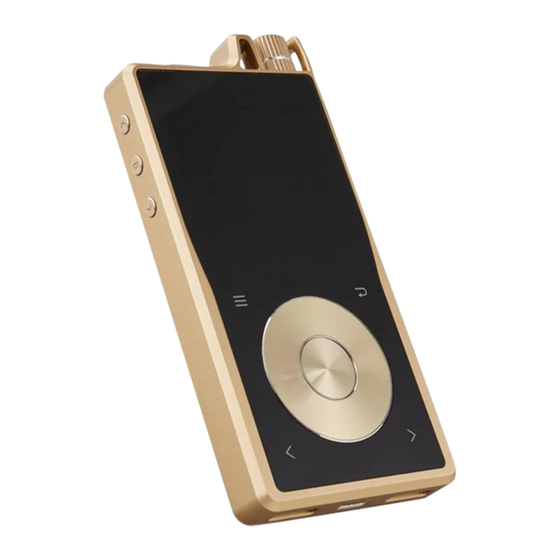
④ Steering wheel: scroll the wheel to move up, down, left or right. ⑤ OK/Pause/Play button: click it to confirm selections or to play/pause a song, or to wake the screen.(Press and hold it to disconnect QP2R from the USB connection to your computer.) ⑥ Previous/Fast backward button: click it to move to the previous track, or to the... - Page 5 ⑩ Micro SD card slot: it is used to insert in a micro SD card (Max. 200G). USB type C port: it is used to connect QP2R to your computer, or to charge QP2R battery. Please use the included USB type C cable.
-
Page 6: Power Management
Connect QP2R to an adapter or a computer with the included USB type C cable and charge QP2R battery. - QP2R battery will be fully charged in about 4 hours via a 5V/2A adapter. It will take a little longer to be fully charged via a computer. -
Page 7: Insert/Remove Micro Sd Card
1) Copy file “DAP003GL.upt” to your micro SD card and insert it into the card slot. 2) Start QP2R and select “Settings” - “Update firmware” - “Begin”. 3) After update, the display will show “Update is finished”. Connect QP2R to Computer Connect QP2R to your computer with the included USB type C cable. -
Page 8: Transfer Music Files
Transfer Music Files Connect QP2R to your computer via the included USB type C cable, and you will see a computer-QP2R connection (as shown below) on the QP2R screen. Meanwhile, there will be a new removable storage device named QP2R shown on your computer, and you can transfer music files to the QP2R. -
Page 9: How To Use Qp2R
DSD64-DSD128 will be converted to PCM88.2kHz. Files of DSD256 will not be supported in this case. Main Menu Description Select language when you start QP2R for the first time, then view the main menu items including “Playing”, “Category”, “Playlists”, “Browse files” and “Settings”. NOTE:... -
Page 10: Icons In Status Bar
Icons in Status Bar :Gain: (L: low gain, M: middle gain, H: high gain) :Volume :Battery :Micro SD card : Play mode: Order/Single/Loop/Shuffle Operation Instructions 1) Playing: when you see the Playing screen, you can scroll the steering wheel to view “Playing”, “Lyrics” and “Song information”. Click and you will see icons for Favorites/Loop/Add to/Delete, then you can add the playing song to “Favorites”, or set the play mode, or “Delete”... -
Page 11: Settings
For a selected item, “-” is to remove it form the +Regular items, and “+” is to to show it. Language: select your language when you start QP2R for the first time. Languages support Chinese Simplified, Chinese Traditional, English, German, Japanese and Russian. - Page 12 When you set it to “Standard”, the BIAS indicator on the right side of QP2R is orange, when you set it to “High”, the BIAS indicator is red, and the system power consumption will increase under the High BIAS setting.
- Page 13 “On” or “Off”. When you set it to “On”, QP2R will self power off when there is 5 minutes of inactivity. You can set it to “Off” to disable this feature.
-
Page 14: Qp2R Usb Dac
QP2R supports headphone and line outputs, as well as Optical and S/PDIF outputs. ( When QP2R is used as a DAC for digital output, DSD files sampling at DSD256 in your computer is processed only in DoP mode other than Native mode.) You can press the OK button to disconnect QP2R from the USB connection... -
Page 15: Instructions
Instructions 1. Start QP2R and select “Settings” - “USB ” - “DAC”. 2. Connect QP2R to your computer via the included USB cable, then the QP2R display will show “USB DAC” (as shown below). DAC mode 3. If your computer is Windows OS, you have to install the USB DAC driver first. - Page 16 3) File Format There are some limitations on files supported by QP2R USB DAC. It supports audio files sampling at PCM 32kHz-192kHz.(Files within this sample range will be directly output to USB without SRC on PC.) Files sampling at PCM384 or higher will be converted over SRC to that of lower sample rate (PCM192kHz) before they are played.
-
Page 17: Usb Dac Driver Installation
USB DAC Driver Installation QP2R can be recognized by your computer after installing the QP2R USB DAC Driver on Windows OS. We take Win7 64bit operating system for an example to show the Driver installation. 1) Visit Questyle Audio website (www.questyleaudio.com) , click “Download” - “Driver”... - Page 18 Installation will take 3 or 5 minutes Installation is completed, click “Next” Click “Finish” to exit the installation 4) Restart your computer and the QP2R Driver installation is done. 5) Installation on Win XP, Vista is similar to the above.
-
Page 19: Dsd Setup On Jriver Media Center
DSD Setup on JRiver Media Center 1) Open JRiver Media Center, click “Tools” and then select “Options”. 2) Select “Questyle ASIO Driver[ASIO]” under “Audio Device”. 3) Select “Settings” under “Audio Device”, and click “Open Driver Control Panel” under the ASIO, then select “Format”- “2Channels,24Bits”, select “Buffer Settings”- “Safe”, “Auto”, then close and click “OK”. - Page 20 4) Click “DSP & output format” under “Settings”. Make sure nothing on the left row is ticked. (To wit: without any processing to DSD data, ensuring original sound.)
- Page 21 5) Select “Custom” under “Bitstreaming: Yes (DSD)”. 6) Tick “DSD” and then click “OK”. Save and exit. The setup is completed.
-
Page 22: Foobar Setup
Foobar Setup 1, Install Foobar2000 2, Install Plugins 1) Install plugins according to the following steps highlighted from 1 to 8. - Page 24 Cancel 2) Restart Foobar2000 and go to the install location to confirm that the three plugins highlighted in the following figure are installed successfully. If so, you will see two more options(ASIO and SACD) on the left of the interface. (as shown in the figure below)
- Page 25 3) Install ASIO driver: double click in the unzipped folder and then finish the installation according to the following steps highlighted from 1 to 3.
- Page 26 If you come to this step, you have completed all the preparations. 3, Software Settings 1) Connect QP2R to your computer with the included USB cable and power it on. Finish software settings according to the following steps highlighted from 1 to 8.
-
Page 27: Setup On Mac Os X
Connect QP2R to your Mac via the included USB cable, go to “ Preferences”- “Sound” on your Mac, and make sure QP2R is selected as the default output device (as shown below). When you see the following interface, the QP2R USB DAC is... -
Page 28: Specifications
Specifications Patented fully discrete/full-balanced/Current Mode AMP Pure Class A BIAS control system Audio Formats Supported WAV, FLAC, WMA, MP3, OGG,APE(Normal/High/Fast), AAC, ALAC, AIFF, DFF, DSF PCM : 32kHz - 384kHz (16/24/32Bit) Sample Rate DSD Native: DSD64(1Bit 2.8MHz), DSD128(1Bit 5.6MHz), DSD256(1Bit 11.2MHz) AKM AK4490 DAC chip Outputs Headphone out(3.5mm)/Optical out(3.5mm) -
Page 29: Miscellaneous
Miscellaneous Cautions 1. There is a built-in battery in your QP2R, please keep it from long-time exposure to sunlight, fire or overheated environment. 2. If you need to replace the QP2R battery, please contact your dealer. Do not disassemble QP2R or replace the battery by yourself.
Need help?
Do you have a question about the QP2R and is the answer not in the manual?
Questions and answers