Roland SYSTEM-8 Owner's Manual
Plug-out synthesizer
Hide thumbs
Also See for SYSTEM-8:
- Reference manual (38 pages) ,
- Manual (17 pages) ,
- Owner's manual (11 pages)
Table of Contents
Advertisement
Quick Links
Owner's Manual
Contents
. . . . . . . . . . . . . . . . . . . . . . . . . . . . . . . . . . . . . . .
. . . . . . . . . . . . . . . . . . . . . . . . . . . . . . . . . . . . . . . . . . . . .
. . . . . . . . . . . . . . . . . . . . . . . . . . . . . . . . . . . . . . . . . . . .
. . . . . . . . . . . . . . . . . . . . . . . . . . . . . . . . . . . . . . . . . . . . .
. . . . . . . . . . . . . . . . . . . . . . . . . . . . . .
. . . . . . . . . . . . . . . . . . . . . . . . . . . . . . . . . . . . . . 10
. . . . . . . . . . . . . . . . . . . . . . . . . . . . . . . . . . . . . . . . 10
. . . . . . . . . . . . . . . . . . . . . . . . . . . . . . . . . 10
. . . . . . . . . . . . . . . . . . . . . . . . . . . . . . . . 11
. . . . . . . . . . . . . . . . . . . . . . . . . . . . . . . . . . . . . 13
. . . . . . . . . . . . . . . . . . . . . . . . . . . . . . . . . . 13
. . . . . . . . . . . . . . . . . . . . . . . . . . . . . . . . . . . . . . 13
. . . . . . . . . . . . . . . . . . . . . . . . . . . . . . . . . . . . . . . . . . 14
Owner's Manual (this document)
Read this first. It explains the basic things you need to know in order
to use the SYSTEM-8.
PDF Manual (download from the Web)
5 Reference Manual
This explains all functions of the SYSTEM-8.
. . . . . . . . . . . . . .
. . . . . . . . . . . . . . . . . . . . . . . . . .
. . . . . . . . . . . . . . .
. . . . . . . . . . . . . . . . . . . . . . . . . . . . 13
. . . . . . . . . . . . . . . . . . . . . . . . . . . . 14
. . . . . . . . . . . . . . . . . . . . . . 15
. . . . . . . . . . . 17
. . . . . . . . . . 17
Before using this unit, carefully read "USING THE UNIT SAFELY" and
"IMPORTANT NOTES" (leaflet "USING THE UNIT SAFELY" and Owner's
Manual p. 23-p. 24). After reading, keep the document(s)
including those sections where it will be available for immediate
reference.
Copyright © 2016 ROLAND CORPORATION
2
2
6
. . . . . . . . . . . . . . . . . . . . . . . . . . . . . . . . . . . . . . . . . . . . . . . 18
7
8
8
8
9
. . . . . . . . . . . . . . . . . . . . . . . . . . . . . . . . . . . . . . . . . . . . . 21
. . . . . . . . . . . . . . . . . . . . . . . . . . . . . . . . . . . . . . . . . . 22
. . . . . . . . . . . . . . . . . . . . . . . . . . . . . . . . . . . . . . 22
. . . . . . . . . . . . . . . . . . . . . . . . . . . . . . . . . . . . . . 24
To obtain the PDF manual
1.
Enter the following URL in your computer.
http://www.roland.com/manuals/
2.
Choose "SYSTEM-8" as the product name.
. . . . . . . . . . . . . . . . . . . . . . . . . . . . 18
. . . . . . . . . . . . . . . . 18
. . . . . . . . . . . . . . . . . . . . . 18
. . . . . . . . . . . . . . . . . . . . . . . . 18
. . . . . . . . . . . . . . . . . . . . . . . 19
. . . . . . . . . . . . . . . . . . . . . . . . . . . 19
. . . . . . . . . . . . . . . . . . . . . . 19
. . . . . . . . . . . . . . . . . . . . . . . . 19
. . . . . . . . . . . . . . . . . . . . . . . . . . . . . . . . . 23
I
Advertisement
Table of Contents

Subscribe to Our Youtube Channel
Related Manuals for Roland SYSTEM-8


Summary of Contents for Roland SYSTEM-8
-
Page 1: Table Of Contents
Top Panel Using the SYSTEM-8 as a MIDI Controller .......... -
Page 2: Panel Descriptions
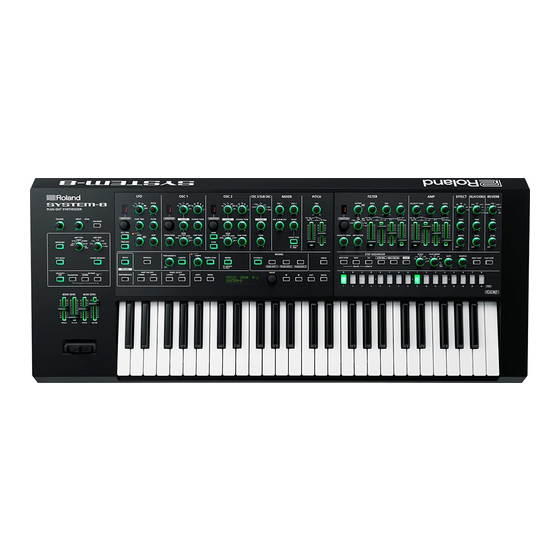
Panel Descriptions Top Panel Controller Explanation Common section MODE Here you can make the following settings for the SYSTEM-8. [PERFORMANCE] Switches to Performance mode (p. 9, p. 10). Controller Explanation button PART ON/OFF [VOLUME] knob Adjusts the volume. In performance mode, switch the lower... - Page 3 Here you can select the waveform that determines the character of manual. the sound, and specify its pitch. The SYSTEM-8 has three oscillators [VALUE] knob Changes the value at the cursor position. (OSC 1, OSC 2, and OSC 3/SUB OSC).
- Page 4 Panel Descriptions Controller Explanation (for variation 1) PITCH This is a ring modulator. It generates a Here you can create time-varying change (envelope) for pitch. complex waveform by multiplying OSC 1 and OSC 2. Controller Explanation [RING] button If this knob is turned toward the right, the OSC 1 (OSC 2 only) pitch initially becomes higher and then...
- Page 5 Panel Descriptions Controller Explanation (for variation 1) EFFECTS, DELAY/CHORUS, REVERB This knob specifies the depth and direction Here you can adjust the effect, delay/chorus, and reverb depth. of the cutoff frequency change produced by the [A], [D], [S], and [R] sliders. Controller Explanation If the knob is turned toward the right, the...
-
Page 6: Rear Panel
USB 2.0 cable, you can synchronize it with a DAW on your feels gritty to the touch when you touch this device, microphones computer via USB MIDI, and record the sound of the SYSTEM-8 into connected to it, or the metal portions of other objects. This is due your DAW via USB audio. -
Page 7: Placing The System-8 On A Stand (Ks-18Z)
Placing the SYSTEM-8 on a Stand (KS-18Z) If you want to place the SYSTEM-8 on a stand, use the Roland KS-18Z. Be careful not to pinch your fingers when setting up the stand. Place the instrument on the stand as follows. -
Page 8: Introduction
SOFTWARE SYNTHESIZER Performance mode: About the lower and upper parts The SYSTEM-8’s performance mode has two parts: upper and lower. If this is set to “Single, ” you can perform using either the upper part or the lower part, not both (p. 10). -
Page 9: Selecting Sounds (Patches/Performances)
Introduction Turn the power on in the following order: SYSTEM-8 Playing Sounds with the Current Knob and 0 connected devices. Slider Settings (Manual Mode) * This unit is equipped with a protection circuit. A brief interval (a few seconds) after turning the unit on is required before it will operate normally. -
Page 10: Editing The Sounds
With the “Dual” mode setting, you can perform using both the Press the MODE [PATCH] button. upper part and the lower part. The maximum polyphony of each The SYSTEM-8 is in patch mode. part is four notes. With the “Single” mode setting, you can perform using either the Select a patch as necessary (p. -
Page 11: Saving A Sound (Write)
Editing the Sounds Also when you’re editing a patch (upper, lower) in performance Saving a Sound (WRITE) mode, you should first save the edited patch before saving the performance. In patch mode Selecting a performance <WRITE> [Ent] Press the [WRITE] button. PERFORMANCE* À... - Page 12 Editing the Sounds A confirmation message appears. Patch write? [Exit]:N [Ent]:Y Perform write? [Exit]:N [Ent]:Y To save, press the [ENTER] button. If you decide to cancel, press the [EXIT] button. When saving is finished, the screen indicates “Completed!” Completed! Repeat steps 1–8 to save the performance or patch (upper, lower) that you want to keep.
-
Page 13: Playing Arpeggios Or Chords
Playing Arpeggios An “arpeggio” is the performance technique of playing the notes of a chord one at a time. By using the SYSTEM-8’s arpeggiator, you can simply hold down a chord to produce an arpeggio consisting of the notes in that chord. -
Page 14: Step Sequencer
Step Sequencer Playing the Step Sequencer Specifying the Note Value of a Step (SCALE) Turn the [SCALE] knob. Press the [EDIT/DISP] button to make it light. Indication Explanation Press the [START] button. Eighth note The step sequencer data plays. 1/16 Sixteenth note Step Step... -
Page 15: Recording On The Step Sequencer
Step Sequencer Erasing All Step Sequencer Data Muting a Specific Part (PART MUTE) (PATTERN ERASE) When you play the step sequencer in performance mode, the upper part and lower part play simultaneously. In performance mode, use the PART SELECT [UPPER] Here’s how to mute the performance of a specific part. - Page 16 Step Sequencer Press the [REAL TIME REC] button. MEMO 5 The note you play is recorded in step 1; you then Press the [START] button to start recording. automatically advance to step 2, and the [2] button blinks. You can also start recording by pressing the [REAL TIME REC] 5 By selecting multiple notes without releasing, you can record button during playback.
-
Page 17: Saving Step Sequencer Data (Pattern Write)
Step Sequencer Saving Step Sequencer Data (PATTERN WRITE) Step sequencer data is saved within the patch data (p. 11). You can save (overwrite) just the step sequencer data without writing the sound settings of the patch. In performance mode, use the PART SELECT [UPPER] [LOWER] buttons to select a part that you want to save. -
Page 18: Connecting External Devices
Connecting External Devices Using the SYSTEM-8 as a MIDI Controller You can use the SYSTEM-8 as a controller for PC software without using its internal sound engine. Press the [MENU] button. Use the Cursor [ K ] [ J ] buttons to select “SYSTEM,”... -
Page 19: Overall Settings For The System-8
Press the [MENU] button. Making System Settings (SYSTEM) Use the Cursor [K] [J] buttons to select “UTILITY,” and then press the [ENTER] button. Here’s how to make overall settings for the SYSTEM-8 itself. The UTILITY screen appears. Press the [MENU] button. UTILITY [Ent] Use the Cursor [K] [J] buttons to select “SYSTEM,”... - Page 20 * Depending on the manufacturer or type of memory card, it If a backup file with the same file name already exists, the might not be possible for the SYSTEM-8 to correctly save or read confirmation message “Overwrite?” appears. data on the card.
-
Page 21: Making The Power Automatically Turn Off After A Time (Auto Off)
When the factory reset is completed, the screen indicates “Completed!” Completed! Turn off power. Turn the power of the SYSTEM-8 off, then on again. Removing a PLUG-OUT (PLUG-OUT REMOVE) Press the [MENU] button. Use the Cursor [K] [J] buttons to select “UTILITY,”... -
Page 22: Error Messages
SD card. The SYSTEM-8 was unable to start up. The format of the SD Use the SYSTEM-8 to format Use the correct program to card is invalid. the SD card (p. 20). The program could perform the update once not be read correctly. -
Page 23: Using The Unit Safely
This unit is designed to be used in combination with specific stands Even with the power switch turned (KS-18Z) manufactured by Roland. off, this unit is not completely If used in combination with other separated from its main source of stands, you risk sustaining injuries as the power. -
Page 24: Important Notes
Kernel under T-License 2.0 granted by the precautions that were supplied with the T-Engine Forum (www.tron.org). external memory device. • Roland, BOSS, AIRA, PLUG-OUT are either • Do not remove the device while registered trademarks or trademarks of reading/writing is in progress.
Need help?
Do you have a question about the SYSTEM-8 and is the answer not in the manual?
Questions and answers