BenQ WDC10 InstaShow User Manual
Hide thumbs
Also See for WDC10 InstaShow:
- Installation manual (67 pages) ,
- Product white paper (12 pages) ,
- Instruction (4 pages)
Table of Contents
Advertisement
Quick Links
Advertisement
Table of Contents

Related Manuals for BenQ WDC10 InstaShow


Summary of Contents for BenQ WDC10 InstaShow
- Page 1 WDC10 InstaShow™ User Manual...
-
Page 2: Copyright
The illustrations and the images in this guide are for your reference. BenQ ecoFACTS BenQ has been dedicated to the design and development of greener product as part of its aspiration to realize the ideal of the “Bringing Enjoyment 'N Quality to Life” corporate vision with the ultimate goal to achieve a low-carbon society. -
Page 3: Table Of Contents
Table of contents Copyright ............................2 Disclaimer ............................. 2 BenQ ecoFACTS ......................... 2 Introduction ..........................4 Product features .............................. 4 Package content ............................... 5 Overview ................................6 InstaShow Button ..................................6 InstaShow Host ..................................... 6 Installation ............................. 8 Assembling InstaShow Host .......................... 8 Setting up InstaShow Host .......................... -
Page 4: Introduction
PC or Mac and start presenting immediately. Convenient button switches between Presentation mode and Video InstaVideo mode for precise productivity or smooth 1080p video, only from BenQ. See Play video with InstaShow™ on page 20 for details. Auto Channel InstaShow™... -
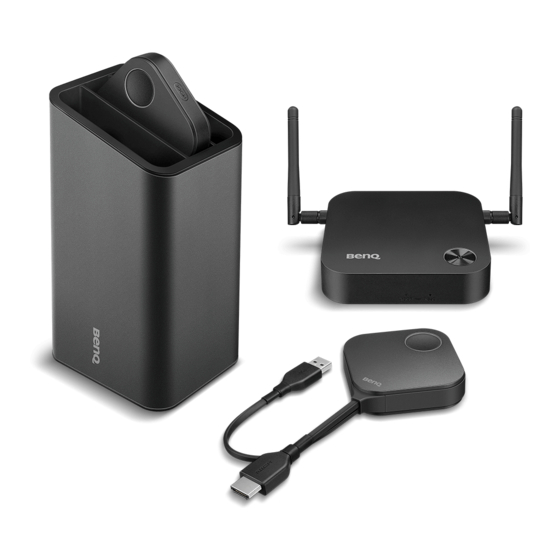
Page 5: Package Content
Package content InstaShow Buttons InstaShow Host 2 Antennas Cradle Adapter & Plugs Cable: USB A(M) to Micro B(M) Cable: HDMI A(M) to A(M) Cable: USB A(F) to USB A(M) Screws & Rubber Foot Velcro Strap Round Double-sided sponge Quick Start Guide & Safety Tape Statement •... -
Page 6: Overview
Overview InstaShow Button Present key with LED indicator Press to start or stop presenting. MODE key Press to pair with InstaShow Host or to switch to Video mode. USB 3.0 connector Connect to a computer or laptop. HDMI 1.4 connector Connect to a computer or laptop. - Page 7 LED indicators of InstaShow Button and InstaShow Host Please refer below for detailed indicator and status description of InstaShow Button and InstaShow Host. LED indicator on Status Description InstaShow Button Static blue The device is presenting. Flashing blue The device is in pairing state for 10 seconds. Flashing green The device is upgrading the firmware.
-
Page 8: Installation
Installation This section will guide you on how to prepare the unit before its initial use. As your InstaShow™ could work with different displays, the steps required to complete the installation may vary according to the actual environment and your display specifications. Follow the procedures below and refer to the specified sections for details. -
Page 9: Attaching Instashow Host To The Ceiling
Attaching InstaShow Host to the ceiling 1. Rotate the lid clockwise until the lid is removed from InstaShow Host. 2. Place the lid on the ceiling and locate the alignment hole. 3. Use the screws provided to lock the lid to the ceiling. 4. -
Page 10: Placing Instashow Host On A Table
Placing InstaShow Host on a table If your display is placed on a table, attach the rubber foot provided to InstaShow Host and put InstaShow Host right next to the display. Installing InstaShow Host on the wall or trolley If you need to install InstaShow Host near a display: 1. -
Page 11: Connecting The Hdmi Cable And Power
Assembling the adapter on page 11 for details. • Some of the BenQ projector models may be equipped with a USB type A jack (1.5V) to provide power supply for InstaShow Host. See Power supply via a USB type A jack (1.5V) on page 12 details. -
Page 12: Connecting The Hdmi Cable
Power supply via a USB type A jack (1.5V) Just connect one end of the supplied USB cable to the mini USB jack of InstaShow Host and the other end to the USB type A jack (1.5V) of the BenQ projector. See the illustration. HDMI... -
Page 13: Power Supply Via A Power Adapter
InstaShow Host is connected to the power mains. HDMI HDMI BenQ signages are suggested to have power supply via a power adapter. Setting up and power supply of InstaShow Button 1. Connect InstaShow Button’s HDMI and USB jacks to the corresponding inputs of a laptop. See the illustration. -
Page 14: Using Cable Usb A(F) To Usb A(M)
3. Press Present key when the LED indicator turns green. • Handle the Button cable with care. Rough handling might cause defects. • Take the plug instead of the cable when inserting or removing InstaShow Buttons. Using Cable USB A(F) to USB A(M) Two cables USB A(F) to USB A(M) are provided for MacBook or laptop users. -
Page 15: Pairing Instashow Button And Instashow Host
Pairing InstaShow Button and InstaShow Host A set of InstaShow™ includes an InstaShow Host and two InstaShow Buttons, which are paired before shipment. In that case, you don’t need to pair them again. However, if you buy two or more sets of InstaShow™, and you want to pair a Button with a different Host, you need to follow the instruction below. - Page 16 3. Press PAIRING key of InstaShow Host for five seconds, then the LED indicator of InstaShow Host will blink blue for two minutes, waiting to pair with InstaShow button. 00:00:00 PAIRING 00:00:05 4. Press key on the side of InstaShow Button for five seconds. The LED indicator of MODE InstaShow Button will blink blue for about 10 seconds.
-
Page 17: Waking Up Instashow Host
5. The LED indicator of InstaShow Button turns static green when InstaShow Host and InstaShow Button are successfully paired. The maximum number of InstaShow Buttons you can pair with one InstaShow Host is 16. Waking up InstaShow Host When InstaShow Host’s power indicator turns 50% static green, press Present key of InstaShow Button to start presentation and InstaShow Host will wake up automatically. -
Page 18: Starting And Stopping Presentation
Starting and stopping presentation This section will guide you on how to start and stop a presentation using InstaShow™. Getting ready Make sure that all the connected devices have been powered on and ready for the presentation. As your InstaShow™ could work with different projectors, TVs, or monitors with standard HDMI ports, the steps required to start a presentation may vary according to the actual environment and your display specifications. -
Page 19: Idle Presentation
Idle presentation 1. To stop presentation, press Present key. 2. The device stops presenting, and the LED indicator of InstaShow Button turns green. 3. Users can press Present key to go back to presentation. Present Starting and stopping presentation... -
Page 20: Play Video With Instashow
Play video with InstaShow™ Our exclusive InstaVideo function optimizes InstaShow™'s audiovisual settings to instantly switch from clear Presentation mode to smooth Video mode with stereo sound at the click of a button without requiring IT support, cable clutter or complex software settings. By enabling presenters to quickly customize the projection for precise productivity or smooth wireless Full HD 1080p video, users can confidently blend text, graphs and charts, pictures, and multimedia audio and video without hesitation for the most effective meetings. - Page 21 3. You can see the Video message on the upper left corner of the screen. Now you can play full HD 1080p videos smoothly. Video Video Starting and stopping presentation...
-
Page 22: Web Management
Web management Your InstaShow™ is equipped with the web management that enables you to configure its features through a browser such as Google Chrome, Internet Explorer, or Firefox. The features may vary according to different firmware versions. How to access to the web management Log into the web management via a laptop 1. -
Page 23: Log Into The Web Management Via Lan
4. On your browser, key in the IP address: 192.168.20.1. On the login page, key in the default user name (admin) and password (0000). 5. You will successfully log into the web management. Log into the web management via If your InstaShow™ is connected to LAN, you can key in the IP Address shown on the screen via a web browser. - Page 24 connected to InstaShow™, key in the IP Address, "192.168.168.2" (for example, WEB_WIRELESS) via a web browser. The following is an example of how you can log into the web management via a mobile phone with IEEE 802.11ac. 1. Go to Settings > Wi-Fi, and you can see the SSID of Your InstaShow Host: WDC10_02A00C. 2.
-
Page 25: Getting Started
Getting started You can now use the web management to configure various settings of your InstaShow Host. Top command buttons Main column Function Top command buttons Change language 1. The default language is English. To change the interface language, go to the language settings panel and you can see all available languages. -
Page 26: Main Column
2. An information window will pop up. Press Apply to log out. Main column The main column shows the detailed content from the function bar. Web management... -
Page 27: Function Bar
Function bar Information Click Information button, and you will see detailed information of System Information, WAN, and Wireless Network. You can change the Host Name under System Information. Web management... - Page 28 Click WAN button, and you will see the default WAN IP Address of InstaShow Host. If you want to change your WAN IP Address, choose Static IP under WAN Connection Type. Press Apply after changing the WAN IP Address. Wireless Network Click Wireless Network button, and you will see the Setting and Wi-Fi Radio Setup of InstaShow Host.
- Page 29 For Wi-Fi Security Option, you can choose WPA2 or WPA2_Enterprise. On Wi-Fi Radio Setup, you can change Transmission Power from 1-6 (6 being the strongest). When the Channel is unstable, you can switch the Channel by pressing Rescan. Supported wireless channels listed may vary according to wireless regulations of the country/region. Web management...
- Page 30 After you configure all the Wireless Network, press Apply to proceed. Pairing Click Pairing button, and you will see Pairing and Pairing Status. Pairing is often used when InstaShow Host is attached to the ceiling. It is not easy to press PAIRING key of InstaShow Host when the device is high on the ceiling.
- Page 31 1. Connect InstaShow Button’s HDMI and USB jacks to the corresponding inputs of a laptop. HDMI MODE 2. When InstaShow Button is successfully connected to the laptop, the LED indicator of InstaShow Button will blink red. 3. Make sure InstaShow Host is well connected to a power source. 4.
- Page 32 5. Press key on the side of InstaShow Button for five seconds. The LED indicator of MODE InstaShow Button will blink blue for about 10 seconds. The pairing process is ongoing. The “Pairing” message will be shown on the screen. 00:00:00 00:00:05 MODE...
- Page 33 Advanced Setting Click Advanced Setting button to adjust Picture Quality Mode, Frame Rate, Screen Lock, EDID Management, Network Standby Mode, and HDMI Standby Mode. You can change mode to Presentation mode, Video mode, and Low Power via Picture Quality Mode. The default mode is Presentation mode. Low Power is used under USB 2.0 condition. Mode Performance Presentation mode...
- Page 34 You can turn HDMI Standby Mode On/Off. To have HDMI Standby Mode On, the screen will be shut down automatically after 10 minutes of idle time. InstaShow Host will enter HDMI Standby Mode. After you configure all the Advanced Setting, press Apply to proceed. If you want to restart InstaShow Host, press Restart and a window will pop up.
- Page 35 Scheduling You can change the schedule by clicking Scheduling button. You can set System Time and Periodical Restart. You can select your Time Zone and check Enable to set Daylight Saving. You can check Enable to set Periodical Restart. You can also set restart time and day. Web management...
- Page 36 After you configure all the Scheduling, press Apply to proceed. Tool By clicking Tool button, you can adjust Password Setup, Firmware Upgrade, Configuration Backup, and Log Setting. • Password Setup You can change Password by: 1. Entering your old Password. 2.
- Page 37 4. Pressing Apply to proceed. • Firmware Upgrade/Driver Upgrade Before executing Firmware Upgrade/Driver Upgrade, please download the latest firmware and driver at http://www.benq.com. Install the latest firmware and driver according to the following procedure: 1. Button_Driver_xxxx.bin 2. Host_Driver_xxx.bin 3. Button_Firmware_xxx.bin 4.
- Page 38 To upgrade your InstaShow Button firmware, 1. Press Browse and choose the file to upgrade. 2. Press Firmware Upgrade to proceed. To upgrade your InstaShow Host firmware, 1. Press Browse and choose the file to upgrade. 2. Press Firmware Upgrade to proceed. •...
- Page 39 You can set Import Configuration File by: 1. Pressing Browse and choose the file to import. 2. Pressing Import to proceed. You can set Export Configuration File by: 1. Pressing Export. 2. Choosing Open or Save the .exp file. 3. The following set value will not be exported: Information: Host Name Wireless Network: SSID setting and password setting Pairing: Pairing Status...
- Page 40 • Log Setting In Log Setting, log can be set to Save To Flash, Download To PC, and Clear Log. Save To Flash: Allow InstaShow Host to save the current log into the flash memory. In other words, If InstaShow Host restarts, the last log will be kept and can be exported by Downloaded To PC.
-
Page 41: Troubleshooting
Troubleshooting Category Problem Cause Solution Web Management > System The system is locked. Lock > Disable Your screen is not InstaShow Button is InstaShow Button should be appearing on the connecting to other paired again with InstaShow display when InstaShow Host. Host. - Page 42 Category Problem Cause Solution The HDMI The message, "No connection between Reconnect the HDMI cable of Signal", from your laptop and InstaShow Button. InstaShow Host is InstaShow Button is shown on the loose. display when • Reconnect the USB cable of Your laptop cannot InstaShow Button is InstaShow Button.
- Page 43 Category Problem Cause Solution • Make sure you use USB 3.0 as the power supply for InstaShow Button. • If the USB 2.0 port is the only InstaShow Button option for the power supply Insufficient power InstaShow Button automatically for InstaShow Button, try to supply restarts sometimes.
- Page 44 Category Problem Cause Solution The HDMI connection between After connecting Reconnect the HDMI cable of your laptop and InstaShow Button InstaShow Button. InstaShow Button is to your laptop, the EDID loose. second screen (InstaShow™) Laptop problem Reboot your laptop. cannot be detected. InstaShow Button is Reconnect the USB cable of shutdown.
-
Page 45: Product Specification
Product specification Feature Color Black Video outputs HDMI 1.4 Frame Rate Up to 30fps depending on environment Video Timing: 1280x720 (720P), 1920x1080 (1080p) PC Timing: 800 x 600, 1024 x 768,1280 x 768, Output resolution 1280 x 1024,1280 x 960,1360 x 768,1440 x 900, 1400 x 1050,1680 x 1050 Input resolution Up to 1920x1080... - Page 46 Feature 110*110*27mm (99mm with DC Power x1 (micro USB) Dimension antenna, not include antenna Jack and rubber foot) Red (booting), Green Weight (include (ready for connection), 150g antenna) Blue (presenting) Cradle Dimension 85*97.5*170.4mm Weight 630g Product specification...
Need help?
Do you have a question about the WDC10 InstaShow and is the answer not in the manual?
Questions and answers