Table of Contents
Advertisement
Quick Links
Advertisement
Table of Contents

Related Manuals for Loadrite PRO


Summary of Contents for Loadrite PRO
- Page 1 Weighing System OPERATORS MANUAL...
- Page 3 Please note that while every effort has been made to ensure that the data given in this document is accurate, the information, figures, illustrations, tables, specifications, and schematics contained herein are subject to change without notice. Actronic Ltd assumes no liability in connection with the use of any Loadrite branded product. © 2002 ACTRONIC LIMITED...
-
Page 5: Table Of Contents
Contents Introduction ......................... 1 Indicator Lights .............................. 2 Keypad ................................2 Quick Start Guide ....................... 5 Switching On ..............................5 Standby................................5 The Warm Up Screen ..........................5 The Ready Screen ............................6 Weighing a Load ............................6 Static Weigh function........................... 7 Adding a Load ............................... - Page 6 Blend Weighing ............................47 Split Mode ..........................49 Tip Off..........................52 Menu Options........................56 Setup ................................57 Clock Setting (Clock) ..........................57 Changing Scale Number (Scale#) ......................57 Clear All Long Totals (ClearAll) ........................58 Auto Add On/Off Setting (Auto Add) ....................58 Rotary Trigger Position Screen (TrigScrn)....................58 LD941 Data Module Properties (Module)...................59 Data Edit (DataEdit) ............................59 Data List (DataList)............................60 Alarm Clock On/Off...........................61...
-
Page 7: Introduction
The Loadrite Weighing System measures the weight of loads lifted by front- end loaders, log loaders, forklift trucks and similar machines that use hydraulic rams to lift the load. The Loadrite is installed in the cab of the loading machine and is connected to sensors on the lifting arms. -
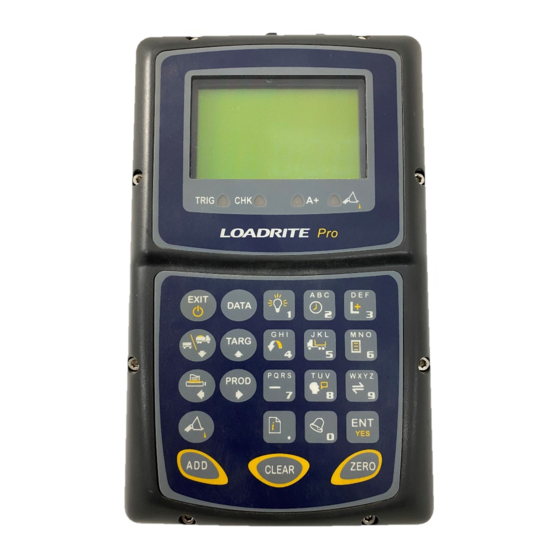
Page 8: Indicator Lights
LOADRITE PRO OPERATING MANUAL The Loadrite has internal memory which stores settings and production data even when switched off. Indicator Lights Four indicator lights are provided below the LCD screen. Trigger Tip-Off Auto-Add Check Trigger Illuminates when a load is lifted past the Pages 7 trigger point. - Page 9 Enter key for accepting data or changes. Exits an operation without changing the data. When pressed on the Ready screen, puts the Loadrite into standby mode. To return to the Ready screen, press any key. Allows you to enter additional Data.
- Page 10 LOADRITE PRO OPERATING MANUAL Adds the current load to the total. Also toggles Page 13 into Auto Add mode. Clears the short total for the current product. Page 19 Zeroes out the current load. Page 15...
-
Page 11: Quick Start Guide
Switching On The Loadrite powers up automatically when you switch on the ignition of the loading machine. If the Loadrite has been switched off for more than 1 hour, it displays the Warm Up screen when powered up. Standby The Loadrite has a ‘standby’ mode which is similar to turning the Loadrite off. -
Page 12: The Ready Screen
The short total is simply the sum of loads since you last cleared the total. When the Ready screen is displayed, the Loadrite is in Total mode and is ready to weigh. Note that Sand in the below example represents the current product of choice. -
Page 13: Static Weigh Function
The trigger point is where the metal plate passes the body of the trigger. Static Weigh function The Loadrite has an option known as ‘Static Weigh’. When this is used, the weight display is always ‘live’ and no trigger is used. -
Page 14: Clearing The Short Total
R e a d y S a n d Zeroing It is required to zero the Loadrite from time to time. This is to avoid inaccurate readings due to build up of material in the bucket. (Weights shown are examples only) - Page 15 LOADRITE PRO OPERATING MANUAL R e a d y Press S a n d The Loadrite performs the zero adjustment and returns to the Ready state. More detailed information about Zeroing can be found on page 15.
-
Page 16: Weighing Overview
3 Weighing Overview Weighing Modes While individual bucket weight can be measured, the Loadrite also has an ability to accumulate how much weight you have loaded on to a truck. The main weighing modes are shown in the following table. The modes that are available in a particular Loadrite depend on the installation. -
Page 17: Short And Long Totals
- simply press access the required mode. Short and Long Totals The Loadrite keeps a total of the bucket weights that you add. For each product, two independent totals are stored. Short Total Typically used to display the total weight lifted onto a truck. -
Page 18: General Method Of Weighing
The Loadrite beeps, turns the TRIG light on and displays the load. (See also page 6). ADD. The Loadrite waits for a few seconds for you to take one of the following actions: •... -
Page 19: Weighing Procedures
Ready state. (New total 7800) The Loadrite has an option to use a remote add button. If fitted, the remote add button is normally mounted on the lift lever. In Target mode, the display is different. For details, see Target Mode on... -
Page 20: Auto Add
Auto Add Auto Add is an optional feature that is selected during installation. If Auto Add is enabled, the Loadrite can automatically operate the ADD function every time a load is lifted past the trigger point. The Auto Add indicator light illuminates R e a d y when the Loadrite is in Auto-Add mode. -
Page 21: Zeroing
Raise the load smoothly past the trigger S a n d point. 5 6 0 0 2200 The Loadrite beeps and displays the load. (Weight of load 2200) R e a d y P Q R S Press S a n d... - Page 22 If the weight is greater than 5% of full scale, when you press , the Loadrite prompts Bucket Empty? If it is, press ENT which will zero the empty bucket. Pressing EXIT will not zero the scale If the weight is greater than 10% of full scale, when you press...
- Page 23 Zeroing when Auto Add is On The procedure to zero may be different when Auto Add is on and Auto Add Time is set to 0. If this is how your Loadrite is configured, you will need to carry out the following procedure:...
-
Page 24: Recalling Last Load
If the last action was a “subtract”, you can add. (Example: subtracting a load that was previously added, new total 3400) If you press a key that is not allowed in the circumstances, such as when the recalled load was previously added, the Loadrite ignores the key press. -
Page 25: Viewing Long Total
D E F L o n g T o t In Ready screen, press 23400 After a few seconds, the Loadrite automatically returns to the Ready screen. Clearing Totals To clear the Short Total for the current product (Weights shown are examples only) - Page 26 E N T / E X I T Press again to clear all totals or to return to the menu without clearing. If the Loadrite has a printer connected, the Long Totals are printed together with a grand total before being cleared.
-
Page 27: Tare Function
LOADRITE PRO OPERATING MANUAL Tare Function The Loadrite has two ways of using Tare and this is selected at time of installation. The Tare can work either with the lifted weight, or the total weight. This is explained in more detail below. - Page 28 LOADRITE PRO OPERATING MANUAL Measuring a Tare weight A Tare weight can be measured by the Loadrite. This is common when finding the Tare weight of a pallet on the forks of a loader. (It is not normal to measure the Tare weight when the Tare value is set to work on the Total).
-
Page 29: Product Management
LOADRITE PRO OPERATING MANUAL 5 Product Management Loadrite supports up to 30 products. Each product is associated with a product number, product name, short total, long total and add bucket counter. The product info screen enables you to manage your products. - Page 30 LOADRITE PRO OPERATING MANUAL R e a d y Press to select the product and return G r a v e l to the Ready screen.
-
Page 31: Data
LOADRITE PRO OPERATING MANUAL 6 Data If this feature is enabled, the Loadrite allows you to enter five data fields (up to eight characters) that provide additional information to the weight data. Each field has a label to identify it and can be configured as a specific data type (e.g. - Page 32 Name Speed Dial and Scrolling The Loadrite keeps a list of names for the data fields i.e. Customer List. You can either use 5 6 keys to scroll through the list, or dial the index to the list to recall the name.
- Page 33 LOADRITE PRO OPERATING MANUAL Use speed dial to recall Smith: • Press D E F • You can press (the 3 name on the list), then The data list can be printed out via Print Function: Print Data List as described on page 68.
- Page 34 LOADRITE PRO OPERATING MANUAL Suppose we want to recall the target value for Truck AUQ887. In Ready mode, C u s t o m e r S m i t h press . You will be prompted for the first data field (Data 1: Customer). Since we use Data 3 for Truck number, you must first enter data for Data 1 and Data 2.
- Page 35 T a r g e t Truck AUQ887 is Truck #2), and then I n d e x press Loadrite will use the index 2 and look up T a r g e t the corresponding target value. 1 6 5 0 0...
-
Page 36: Automatic Data Prompt
Automatic Data Prompt Automatic Data Prompt is an optional function that is selected during installation. If enabled, the Loadrite automatically prompt for data field entries when a new product is selected. Data Suspend... - Page 37 Or, enter a new J o e name, if desired. Loadrite will then display a message to confirm that the Data Suspend has been de-activated. As soon as the Data Suspend function is de-activated, the Loadrite will resume normal operation.
-
Page 38: Target Mode
This feature provides an easy way to load up to a target weight for a product in a series of lifts. In Target mode, the Loadrite displays the “To Load” value, which is the remaining amount to reach the target. - Page 39 (Weights shown are examples only) T o L o a d S a n d Press The Loadrite displays Target Reset for T a r g e t a few seconds and then … R e s e t 9000 …...
- Page 40 T o t a l Press to go to total mode. M o d e The Loadrite displays Total Mode for a few seconds and then … … return to total mode. The message R e a d y Ready is shown along with the current S a n d total.
-
Page 41: Batch Mode
8 Batch Mode Batch mode allows you to weigh and load products according to a predefined recipe. You enter the target weight of the batch, the Loadrite will work out exactly what you need for each product. The recipe can contain up to ten products. It specifies the relative amount of each product in a batch. -
Page 42: The Batch Screen
LOADRITE PRO OPERATING MANUAL The Batch Screen All Batch weighing operations are started from the Batch screen. R e c i p e From the Ready screen, press E N T : O K Note: if Target or Blend modes are also... -
Page 43: Viewing The Current Recipe
R e c i p e the recipe details after you have entered E N T : O K the Recipe confirm screen. The Loadrite briefly displays the proportion B a t c h of each product in turn. S a n d... -
Page 44: Changing The Recipe
In this example, 4 units of product 3 (sand) have been keyed in. The Loadrite automatically moves on to the P r o d # ? next product number in sequence. G r a v e l... -
Page 45: Entering The Batch Total
T a r g e t ? Press to accept. 7000 The Loadrite beeps and returns to the To T o L o a d Load screen with the target value for the S a n d first product displayed. -
Page 46: Batch Weighing
To start a Batch weighing operation, you need to access Batch mode and enter or accept the batch total. See Entering the Batch Total above. During Batch weighing, the Loadrite maintains a "To Load" target for each product in the recipe. Each time that you add a weight, the “To Load” value is reduced by that weight. -
Page 47: Clearing The Batch Totals
Clearing the Batch Totals To finish a Batch weighing operation, press The Loadrite clears the totals for all the products in the recipe and returns to the Ready screen in Total mode. Returning to Total Mode The Loadrite automatically returns to Total mode after a CLEAR operation. -
Page 48: Mix Mode
Mix mode is similar to Batch mode except that target value for the mix is not required. You load the first product to a certain amount. When you change to the next product, the Loadrite will work out exactly what you need to load based on the predefined recipe. -
Page 49: The Mix Screen
Mix Weighing To start a Mix weighing operation, you need to access Mix mode. During Mix weighing, the Loadrite maintains a "To Load" target for each product (except the primary product) in the recipe. Each time that you add a weight, the “To Load” value is reduced by that weight. - Page 50 Sand. We are ready to load another S a n d product in the mix. 4000 Changing Product You can change product at any time (the Loadrite maintains the individual totals for each product). M i x S a n d 4000...
-
Page 51: Clearing The Mix Totals
2000 Clearing the Mix Totals To finish a Mix weighing operation, press The Loadrite clears the totals for all the products in the recipe and returns to the Ready screen in Total mode. Returning to Total Mode The Loadrite automatically returns to Total mode after a CLEAR operation. -
Page 52: Blend Mode
Blend mode is similar to Batch mode except that the recipe contains the total number of buckets of each product and you do not enter a target load. When weighing, the Loadrite tracks the number of lifts of each product and automatically changes to the next product when the required number of buckets has been loaded. -
Page 53: Blend Weighing
Blend screen. Press to accept the recipe (or press to enter a new recipe). The Loadrite displays the first product and B l e n d how many buckets need to be added. S a n d Raise the load smoothly past the trigger S a n d point. - Page 54 LOADRITE PRO OPERATING MANUAL B u c k e t 1 Press A d d e d The Loadrite briefly displays the number of 2200 buckets loaded for this product and then … … updates the short total and returns to B l e n d the Blend screen.
-
Page 55: Split Mode
LOADRITE PRO OPERATING MANUAL 11 Split Mode Split Mode is an optional feature that is selected during installation. This feature provides an easy way to load a truck with a trailer. You can split the total into multiple sub-totals. The following example illustrates how to use the split function. - Page 56 LOADRITE PRO OPERATING MANUAL EXAMPLE (continued) TOTAL MODE TARGET MODE Add # 2: 5 000 R e a d y T o L o a d S a n d S a n d The truck is full with a weight of 10 000.
- Page 57 LOADRITE PRO OPERATING MANUAL EXAMPLE (continued) TOTAL MODE TARGET MODE Add # 5: 5 000 R e a d y T o L o a d (Final add towards the trailer). 2 5 0 0 0 2 5 0 0 0...
-
Page 58: Tip Off
12 Tip Off This feature allows you to load a truck to an exact value by using only part of the last bucketful. There are two different methods, depending on the way the Loadrite has been set up: • Truck tip-off, or •... - Page 59 LOADRITE PRO OPERATING MANUAL To tip off into truck a weight of 400kg: T r u c k Middle number shows weight tipped off onto the truck. 5600 Lower number shows total weight as it is being tipped onto the truck.
- Page 60 LOADRITE PRO OPERATING MANUAL Stock Pile Tip-off Using this method, you dump product from the bucket until it contains the right amount for loading onto the truck. The following example illustrates the weigh screen shots when in Total Mode or Target Mode.
- Page 61 LOADRITE PRO OPERATING MANUAL Roll the bucket partially forward, S a n d S a n d dumping product : 5 6 0 0 4 0 0 1900 1900 with 300kg tipped off so far… The Loadrite displays the ‘live’...
-
Page 62: Menu Options
LOADRITE PRO OPERATING MANUAL 13 Menu Options The Menu allows you to change some of the settings of the Loadrite. The options are as follows: Setup... Installation functions (security code required) Clock Clock setting Scale # Change scale Clear All... -
Page 63: Setup
Setup. Press to select. The Loadrite prompts you to enter an access code. For special functions, key in your security code and press Clock Setting (Clock) Clock Setting editing is an optional function that is selected during installation. -
Page 64: Clear All Long Totals (Clearall)
Auto Add On/Off Setting (Auto Add) Auto Add is an optional feature that is selected during installation. If Auto- Add is enabled, the Loadrite can automatically operate the ADD function every time a load is lifted past the trigger point. -
Page 65: Ld941 Data Module Properties (Module)
LOADRITE PRO OPERATING MANUAL Press to accept the setting. This function is only available if the Loadrite is configured to use rotary trigger. LD941 Data Module Properties (Module) This function is available only if the LD940 MMS data logger feature has been enabled during installation. -
Page 66: Data List (Datalist)
3. Press to accept the new name. To add a new customer name 1. Press 2. The Loadrite will find the next available empty slot in the list and put you in Edit mode. 3. Press to accept the new name For your convenience, the Loadrite automatically goes to the next slot for your next new customer. -
Page 67: Alarm Clock On/Off
Alarm Clock On/Off This option turns the alarm clock on or off. The alarm clock will alert when the Loadrite in either Ready or Standby mode. The alarm clock will not alert if the Loadrite is powered off. When the alarm time is reached The Loadrite sounds an alert tone, Alarm Clock is displayed and all indicator lights flash. -
Page 68: Self Test (Selftest)
Selftest. Press to select. Uplink (Uplink) Uplink mode is a special mode that communicates with a PC using Loadrite © Link (optional PC application). In this mode, you can use Loadrite Link to program product names and data list (customer list). -
Page 69: Print Functions
If a printer is connected, all data will be printed as it is generated. This is described in the section ‘Printed Data’ below. All data generated is temporarily stored in the Loadrite so that it can be printed in full later, or summary reports printed. This is described in the section ‘Print Menu’... -
Page 70: Printed Data
LOADRITE PRO OPERATING MANUAL Printed Data When a Loadrite printer is connected, weight data can be printed as you weigh loads. The print options are set up at installation time. The data can be automatically printed when particular functions are performed as listed below. - Page 71 CLEAR events. If the data is not stored, it will not be printed. For example, if the Loadrite is not configured to log ADD events, weights added will not be printed. This function requires internal storage to be enabled.
- Page 72 LOADRITE PRO OPERATING MANUAL Sample Printout: Zero Add(1) 5100 Add(2) 5220 SAND 10320 CUSTOMER SMITH 03 NOV 02 07:45AM ....PROD03 PUMICE Zero Add(1) 5080 Add(2)
- Page 73 LOADRITE PRO OPERATING MANUAL Print Special This is the most powerful function in the print menu. It allows simple reports to be printed from the stored data. P r i n t Press and use to scroll to S p e c i a l...
- Page 74 Print Data List Names This function prints out a list of all the Data1 names (normally Customers) configured in the Loadrite. This function is normally only used to check the names when the list has been updated. Print Product Names This function prints out a list of all the Product names configured in the Loadrite.
- Page 75 LOADRITE PRO OPERATING MANUAL Print Usage This function displays the current usage of the internal print buffer. Percentage free storage will be displayed. Print Reset The Reset function allows all data in the temporary internal print buffer to be deleted. It is recommended to run this reset function regularly after other...
-
Page 76: Obtaining The Best Accuracy
Lifting Speed The hydraulic pressure required to lift a load varies with the speed of lift. The Loadrite electronically corrects for most variations, but better accuracy is obtained if you limit the range of lifting speed used. Keep engine revs constant. -
Page 77: Error Messages
This indicates a fault in either the pressure transducer or the cable that connects the transducer. Check Trigger The Loadrite has detected a fault in the trigger or the cable that connects the trigger. Check that the lens on the optical trigger is clear and dust-free. -
Page 78: Lift Under Range
Module Data Lost The Loadrite has an ability to store data internally in the event that the Data Logger Module LD941 is absent or full. The Loadrite will generate this message when the internal data storage is full and some data has been lost as a result. -
Page 79: Overload
Check that the printer is on-line and not out of paper. Return Under Range The Loadrite has detected that the Return pressure was too low. This indicates a fault in either the pressure transducer or the cable that connects the transducer. -
Page 80: Speed Changed
The Loadrite zero function can only zero up to 4% of full scale. See page 15 for details. Warm Up Lift This message appears if the Loadrite has been switched off for more than 1 hour. You need to lift the bucket/forks a few times to warm up. -
Page 81: Specifications
LOADRITE PRO OPERATING MANUAL 17 Specifications Suitable Applications The Loadrite measures weight by sensing the hydraulic pressure required to lift a load. A trigger mechanism senses the position of the lifting arms. Typical vehicles using the Loadrite system are: • Front end loaders (bucket and/or fork) •... - Page 82 LOADRITE PRO OPERATING MANUAL Display LCD display Back light Keypad 22 keys Back light. Numeric and special functions Clock Hours, minutes, day, month, Built-in clock year. Year 2000 compliant Physical Loadrite indicator Protected to IP54 Weight: 1.6kg Pressure transducer Protected to IP67...
-
Page 83: Output / Input Connections
LOADRITE PRO OPERATING MANUAL 18 Output / Input Connections Transducer +12V Return pressure input Transducer current input +10 volt excitation Lift pressure input Shield Ground Power/Control Negative supply (ground) Positive supply Remote button 2 (clear) Remote button 1 (add) N.C. -
Page 84: Appendix I Time And Date
To set the time and date: You may need an access code from your Loadrite Dealer to be able to set the clock. This is configured at installation time. A code is needed if the “Clock” function does not appear on the menu. - Page 85 LOADRITE PRO OPERATING MANUAL The Loadrite displays the first of the time / T i m e date screens. 1 1 : 3 1 You can use to scroll through the time/ date screens. When on the required screen, press to change the setting.
- Page 86 LOADRITE PRO OPERATING MANUAL Time of day screen: C l o c k 2 4 H r Press to allow editing. The setting will flash. Use the to change the setting. Press to confirm the new setting.
-
Page 87: Appendix Ii Span Calibration Adjustment
Appendix ii Span Calibration Adjustment This function allows small changes to be made to the Loadrite calibration if the bucket or forks of the loader are modified or if no accurate test weight is available when the Loadrite is calibrated at installation time. - Page 88 Ready screen. Checking the Adjustment You can check the Calibration Adjustment by obtaining and comparing new Loadrite and Weighbridge Values. If necessary, the Calibration Adjustment can be performed again using the new data. Notes to remember: All trucks and trailers should have tare weights confirmed for all loads to be checked.
- Page 89 LOADRITE PRO OPERATING MANUAL Notes...
- Page 90 LOADRITE PRO OPERATING MANUAL Index MMS...............25, 59 Module Error - message ........72 Accuracy ..............70 Module Full - message ........72 specifications ...........75 Adding a load ............13 Alarm..............3 No Lock - message..........72 Clock On/Off ............61 Time Set............61 Odometer.............30 Auto Add ..............14 Over target - message .........72 Overload - message ..........73...
Need help?
Do you have a question about the PRO and is the answer not in the manual?
Questions and answers