Table of Contents
Advertisement
Quick Links
Advertisement
Table of Contents

Related Manuals for Asus ZenBeamGo


Summary of Contents for Asus ZenBeamGo
- Page 1 E12339 First Edition April 2017 E-Manual...
- Page 2 ASUS will only be responsible for or indemnify you for loss, damages or claims based in contract, tort or infringement under this Warranty Statement. This limit also applies to ASUS’ suppliers and its reseller. It is the maximum for which ASUS, its suppliers, and your reseller are collectively responsible.
-
Page 3: Table Of Contents
Table of Contents About this manual ..................... 5 Conventions used in this manual ............... 6 Typography ......................6 Multi-language versions ................6 Safety precautions ..................... 7 Using your LED projector ................7 Servicing and replacement of parts ............7 Caring for your LED projector ..............8 Proper disposal .................... - Page 4 Information .......................35 Appendices FAQs ........................38 Federal Communications Commission Statement ......40 Regional notice for California ..............40 Canadian Department of Communications Statement .....41 Global Environmental Regulation Compliance and Declaration ...41 ASUS Recycling/Takeback Services ............41 Specifications for E1Z LED projector ............42 LED projector E-Manual...
-
Page 5: About This Manual
About this manual This manual provides information about the hardware and software features of your LED projector through the following chapters: Chapter 1: Knowing your LED Projector This chapter details the parts of your LED projector and its accompanying remote control. Chapter 2: Setting up This chapter shows you how to set up your LED projector and use its parts for input device connection. -
Page 6: Conventions Used In This Manual
Bold = This indicates a menu or an item that must be selected. Italic = This indicates sections that you can refer to in this manual. Multi-language versions Download other language versions of this E-Manual via this website: https://www.asus.com/support/ LED projector E-Manual... -
Page 7: Safety Precautions
Contact your local ASUS service center for assistance. • Risk of explosion if battery is replaced by an incorrect type. Dispose used batteries according to safety instructions and contact your local ASUS service center for assistance. • When replacing parts of your LED projector, purchase items as specified by ASUS and contact your local service center for assistance. LED projector E-Manual... -
Page 8: Caring For Your Led Projector
Caring for your LED projector • Switch off then unplug the LED projector from the power outlet before cleaning it. • When cleaning the LED projector’s housing, use a clean soft cloth dampened with water or a mix of water and neutral detergent. Wipe it dry using a soft dry cloth. • Ensure that the lens is cool before cleaning it. Gently wipe the lens using a lens cleaning paper. DO NOT touch the lens with your hands. -
Page 9: Chapter 1: Knowing Your Led Projector
Chapter 1: Knowing your LED projector Chapter 1: Knowing your LED projector LED projector E-Manual... -
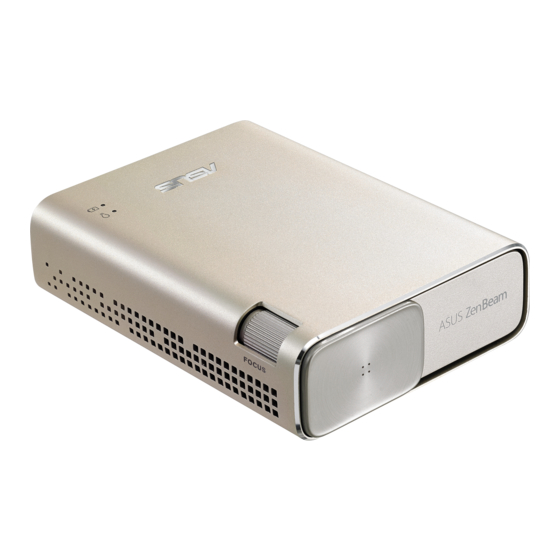
Page 10: Features
Features Top view Focus ring The focus ring allows you to adjust the image focus of your LED projector. LED projector E-Manual... - Page 11 Power indicator and battery status indicator This LED indicator indicates the following scenarios for your LED projector: • It lights up when the LED projector is powered on. • It lights up as either green or red depending on the battery charge status. For details on how this LED indicator functions as a battery status indicator, refer to the following table: Color Status Solid Green...
-
Page 12: Front View
Front view Lens cover The lens cover protects the lens from scratches and possible dirt build-up. IMPORTANT! Remove the lens cover before using your LED projector. Lens The lens projects video or image files onscreen from your input device. WARNING! • DO NOT touch the lens with your hands or any sharp object. -
Page 13: Rear View
Rear view Manual reset hole Insert a straightened paper clip in this hole to restore your LED projector to its default settings. Audio output jack port The audio output jack port allows you to connect your LED projector to amplified speakers or headphones. Micro USB 2.0 port This port also allows you to connect your LED projector to a compatible device to stream media contents. - Page 14 Power (DC) input port Insert the bundled power adapter into this port to charge the battery pack and supply power to your LED projector. IMPORTANT! Use only the bundled power adapter to charge the battery pack and supply power to your LED projector. WARNING! The adapter may become warm to hot while in use.
-
Page 15: Right Side
Right side Focus ring The focus ring allows you to adjust the image focus of your LED projector. Air vents The air vents allow cool air to enter and warm air to exit the LED projector. WARNING! Ensure that paper, books, clothing, cables, or other objects do not block any of the air vents or else overheating may occur. -
Page 16: Left Side
Left side Air vents The air vents allow cool air to enter and warm air to exit the LED projector. WARNING! Ensure that paper, books, clothing, cables, or other objects do not block any of the air vents or else overheating may occur. -
Page 17: Bottom View
Bottom view Tripod socket Attach the LED projector to a tripod using this socket. LED projector E-Manual... -
Page 18: Extended Features
Extended features Your LED projector also have stand-alone features that are launched by pressing the Power / Splendid button while your LED projector is on battery mode. NOTE: • These feature are only available when no power adapter or signal is connected to the LED projector. • To turn off or switch between the flashlight and SOS feature of your LED projector, just press the Power / Splendid button until your preferred lighting feature is disabled or enabled. -
Page 19: Sos
Open the cover of your LED projector’s lens. Press the Power / Splendid button repeatedly until the LED projector flashes a steady white light. The LED projector flashes a blinking white light when you use this feature. Power / Splendid button To use your LED projector as an emergency light: Disconnect all peripherals from your LED projector then long press the power button to turn it on. - Page 20 LED projector E-Manual...
-
Page 21: Chapter 2: Setting Up
Chapter 2: Setting up Chapter 2: Setting up LED projector E-Manual... -
Page 22: Operating Your Led Projector
Operating your LED projector This portable LED projector allows you to plug and play your devices so you can easily open multimedia files and hear audio straight from its built-in SonicMaster speakers. For your safety and to maintain the quality of this unit, refer to the following steps when operating your LED projector. - Page 23 IMPORTANT! • Use only the bundled power adapter to charge the battery pack and supply power to your LED projector. • Ensure that your LED projector is connected to the power adapter before turning it on for the first time. We strongly recommend that you use a grounded wall socket while using your LED projector on power adapter mode. • The socket outlet must be easily accessible and near your LED projector.
-
Page 24: Connect The Led Projector To Your Device
Connect the LED projector to your device Connecting micro USB devices A. Connect one end of the micro USB to micro USB cable into your LED projector. Connect the other end of the micro USB to micro USB cable to your device. -
Page 25: Connecting Usb Type-C Devices
Connecting USB Type-C devices A. Connect the micro USB connector of the micro USB cable into your LED projector. Connect the other end of the micro USB cable to the USB Type-C male to USB Type-A female adapter. Connect the adapter to your device. LED projector E-Manual... -
Page 26: Connecting Peripherals
Connecting peripherals Audio output Power output (5V/1A) LED projector E-Manual... -
Page 27: Press The Power Button
Press the power button NOTE: The battery pack inside your LED projector stops charging while the LED projector is in use. Refer to the battery indicator for the current charge status of your LED projector. You may also refer to the Top View section in this manual for more details. -
Page 28: Open The Lens Cover And Adjust The Focus Ring
Open the lens cover and adjust the focus ring NOTE: Use a still image when adjusting the onscreen display. A. Open the lens cover by moving it to the right. Adjust the image focus of the projection onscreen by moving the focus ring up or down. -
Page 29: Screen Size And Projection Distance Table
Screen size and projection distance table Adjust the LED projector’s distance from the screen using the table below. Screen size - 16:9 Projection distance (meters) (inches) (millimeters) 2540 3048 LED projector E-Manual... - Page 30 LED projector E-Manual...
-
Page 31: Chapter 3: Using The Led Projector
Chapter 3: Using the LED projector Chapter 3: Using the LED projector LED projector E-Manual... -
Page 32: Downloading The Companion Apps
Downloading the companion apps Your LED projector requires additional companion apps on your device before you can stream media contents from it. A. Connect your device to the Internet, then log in or sign up for a Google account. Scan the QR codes or Launch Play Store and search for the companion apps. -
Page 33: Using The Companion App
Using the companion app After you have installed the additional companion apps, you can use the apps to change the settings of your LED projector. Settings Select this menu option to adjust your LED projector settings. Projection Turn this menu option ON to stream media contents from your device. -
Page 34: Brightness
Brightness Move the slider to adjust the brightness of your projection onscreen. Keystone Auto keystone Select this menu option to automatically adjust the alignment of your image. Correction This option allows you to manually adjust the alignment of your image. You can also move the slider to make quick adjustments. Projection Position This option allows you to change the way your projections are oriented onscreen based from the current location of your LED... -
Page 35: Information
Refer to the following information for details on the different modes you can activate via Splendid: Presentation mode - This mode allows you to optimize the • brightness of your LED projector and is suitable for quick presentations of up to ninety (90) minutes. Standard - This mode fits general display uses of the LED •... - Page 36 LED projector E-Manual...
-
Page 37: Appendices
Appendices Appendices Appendices LED projector E-Manual... -
Page 38: Faqs
If the DisplayLink Presenter app does not pop-up when you connect your android device, try restarting your LED projector and your android device. • If the problem still exists, contact your local ASUS service center for assistance. 3. Why does my android device keep disconnecting with my LED projector? Some android devices will stop the USB connection after the screen is off or enters the lock screen mode. If this happens, try... - Page 39 5. Audio is stuttering and not playing correctly from my LED projector. USB audio performance may vary across different android devices and manufacturers. If audio performance from your android device is inconsistent, we recommend disabling USB audio routing and use the internal speakers instead. To manually configure the USB audio routing settings, go to Settings >...
-
Page 40: Federal Communications Commission Statement
Federal Communications Commission Statement This equipment has been tested and found to comply with the limits for a class B digital device, pursuant to Part 15 of the Federal Communications Commission (FCC) rules. These limits are designed to provide reasonable protection against harmful interference in a residential installation. -
Page 41: Canadian Department Of Communications Statement
ASUS follows the green design concept to design and manufacture our products, and makes sure that each stage of the product life cycle of ASUS product is in line with global environmental regulations. In addition, ASUS disclose the relevant information based on regulation requirements. -
Page 42: Specifications For E1Z Led Projector
Keystone adjustment (Up to ± 40 degree) Auto Keystone Aspect Ratio 16:9 Front table, Front ceiling, Projector Placement Rear table, Rear Ceiling Audio 2W speaker (ASUS Built-in speakers SonicMaster Audio Features technology) (continued on the next page) LED projector E-Manual... - Page 43 Signal 24.7 KHz(H) to 74.6 Digital Signal KHz(H) / 50 Hz(V) to 60 Frequency Frequency Hz(V) Power Power Consumption <18W (Typical) Power Standby <0.5W mode Internal Battery 6400mAh (1A@5V) Battery Life 24Wh (up to 5 hours) Noise 30 dB (Standard mode) Acoustic Noise 28 dB (Theater mode) Interface...
- Page 44 Accessories Two USB Type A to micro USB Type B cables, micro USB to micro USB cable, USB Type C OTG, projector cover, power adapter, AC plug, warranty card, quick start guide Regulation CB, CE, FCC, VCCI, CU, C-Tick, CCC, PSE, IEC62471, Approvals NOTE: • Specifications are subject to change without prior notice.
Need help?
Do you have a question about the ZenBeamGo and is the answer not in the manual?
Questions and answers