
Related Manuals for ABK NEERIM

Summary of Contents for ABK NEERIM
- Page 1 GEBRUIKSAANWIJZING | INSTALLATIEVOORSCHRIFT USER MANUAL | INSTALLATION MANUAL NEERIM...
-
Page 3: Table Of Contents
Inhoudsopgave Hoofdstuk 1 1.1 Introductie 1.2 Beschrijving Hoofdstuk 2 2.1 Veiligheidsvoorschriften Hoofdstuk 3 3.1 Installatie 3.2 Montage 3.3 Technische gegevens 3.4 Afvoeren verpakking en afzuigkap Hoofdstuk 4 4.1 Afstandsbediening 4.2 Standenindicator (EB900) Hoofdstuk 5 5.1 Randafzuigingspaneel openen 5.2 Filters verwijderen 5.3 Filters reinigen 5.4 Halogeen spotjes | lampjes vervangen 5.5 Reinigen van RVS... -
Page 4: Hoofdstuk 1
Hoofdstuk 1 1.1 Introductie 1.2 Beschrijving Met de aanschaf van uw ABK InnoVent De afzuigkap wordt uitsluitend geleverd in afzuigkap heeft u zondermeer gekozen een uitvoering met een externe motor. voor een kwaliteitsproduct. Plaatsing van de afzuigkap, zowel elektrisch, ventilatietechnisch als... -
Page 5: Hoofdstuk 2
Hoofdstuk 2 Ten aanzien van het gebruik: 2.1 Veiligheidsvoorschriften Onder de afzuigkap niet flamberen! Ten aanzien van de installatie: Onder de afzuigkap alleen frituren en Laat de afzuigkap uitsluitend installeren grillen onder direct toezicht, daar door een erkende installateur. frituurolie of vet tot zelfontbranding kan komen. -
Page 6: Hoofdstuk 3
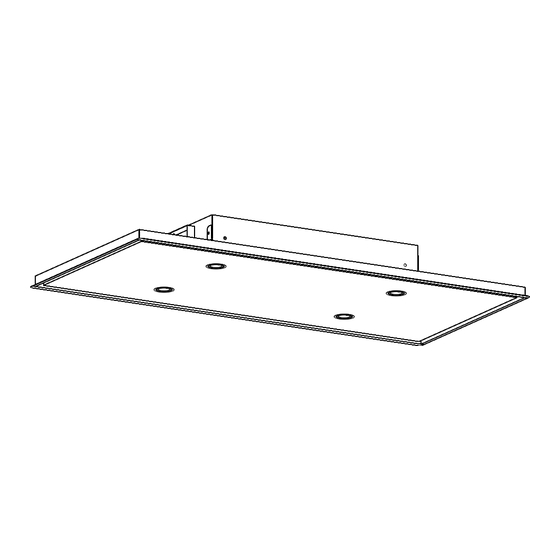
Hoofdstuk 3 met de lange zijde, dient een extra 3.1 Installatie uitsparing in de voorste balk ter hoogte van de afdekkap van de standenindicator Plaatsing van deze afzuigkap, zowel aangebracht te worden. elektrisch, ventilatietechnisch als uitvoeringstechnisch, dient te geschieden afmeting [mm] door een erkende installateur volgens de 800x500... - Page 7 Verwijder het koppelsnoer van de NEERIM Plaats de afzuigkap in de plafond- en plaats deze in de wandcontactdoos uitsparing. welke aan de binnenzijde van de inbouwruimte geplaatst dient te zijn. Bevestig de afzuigkap middels de bijgeleverde schroeven aan de balkenlaag.
-
Page 8: Technische Gegevens
(EB800 - EB900) Afhankelijk van de uitvoering is uw afzuigkap uitgevoerd met de electronische bediening EB800 of EB900 of met de standen indicator EB990 (NEERIM) 3.4 Afvoeren verpakking en afzuigkap De verpakking van de afzuigkap is volledig recyclebaar. De verpakking bestaat uit: karton, polystyreen schuim (PS) en polyethyleen folie (PE). -
Page 9: Standenindicator (Eb900)
Knop voor de aan/uit stand van 4.2 Standenindicator (EB990) de verlichting. Hoofdschakelaar, kan ge- Knop voor het kiezen van een b r u i k t w o r d e n o m d e lagere stand; minimaal nul. afzuigkap en/of verlichting uit - Display geeft stand weer. -
Page 10: Hoofdstuk 5
Hoofdstuk 5 5.1 Randafzuigingspaneel openen 5.2.1 Magneetfilters verwijderen Alvorens de filters verwijderd kunnen De vetfilters mogen pas verwijderd worden dient u eerst de randafzuiging- worden nadat de afzuigkap 2 minuten panelen te openen.Vervolgens kunnen de uitgeschakeld is, dit i.v.m. het uitlopen van vetfilters worden verwijderd. - Page 11 5.2.2 Klikfilters verwijderen De vetfilters mogen pas verwijderd worden nadat de afzuigkap 2 minuten uitgeschakeld is, dit i.v.m. het uitlopen van de motor. De schuifknop op het filter naar achteren drukken en het filter uit de afzuigkap kantelen. Pas op dat het filter niet valt en voor beschadigingen zorgt.
-
Page 12: Filters Reinigen
Het paneel van de plafondunit zal 5.3 Filters reinigen regelmatig gereinigd moeten worden in verband met de vetafzetting. Door de hoge Door de zeer goede filtering van de montage ontstaat er sneller visuele kookdampen dienen de filters, bij normaal vetafzetting op de plafond unit, regelmatig gebruik, minimaal 1 maal per maand te schoonmaak is dus geboden. -
Page 13: Reinigen Van Rvs
RVS ontstaan. Hiervoor kunt u gebruik maken van de krachtiger RVS reiniger van ABK InnoVent. (Art nr. KZ99000001) Het verdient dan ook de aanbeveling dit onderhoud door een vakman te laten uitvoeren. - Page 14 Geslepen (of geborsteld) RVS Schoonwrijven met een zachte doek met de RVS reiniger van ABK InnoVent.. De wrijfbeweging uitvoeren in de slijprichting van het materiaal. Oppervlak inspuiten met RVS Reiniger, inwrijven, even wachten en met een zachte, droge doek uitwrijven. Deze laatste behandeling geeft een dunne beschermende laag aan het RVS.
-
Page 15: Ce-Verklaring
CE-VERKLARING VAN OVEREENSTEMMING Richtlijn 73/23/EEG, bijlage II, onder A Fabrikant ABK InnoVent Adres Plakhorstweg 12 7008 AT DOETINCHEM Verklaart hiermede dat de afzuigkap: - Voldoet aan de relevante bepalingen van de Laagspanningsrichtlijn 73/23/EEG, zoals laatstelijk gewijzigd. - Voldoet aan de relevante bepalingen van de EMC-richtlijn 89/336/EEG, zoals laatstelijk gewijzigd. - Page 17 ENGLISH Contents Chapter 1 1.1 Introduction 1.2 Description Chapter 2 2.1 Security instructions Chapter 3 3.1 Installation 3.2 Fitting 3.3 Technical data 3.4 Disposal of packaging and extractor Chapter 4 4.1 Remote control 4.2 Motor position indicator (EB900) Chapter 5 5.1 Opening the perimeter extraction panel 5.2 Removing the filters 5.3 Cleaning the filters...
-
Page 18: Introduction
Chapter 1 1.1 Introduction 1.2 Description With the purchase of this ABK InnoVent The extractor either has an internal motor, extractor you have chosen for a quality with or without recirculation system, or product. can be connected to an external ABK... -
Page 19: Safety Instructions
Chapter 2 Regarding the use of the extractor: 2.1 Safety instructions Never flambe under the extractor. Regarding the fitting of your extractor: Keep a close watch when deep frying and The extractor may be fitted only by a grilling, because the hot oil or grease can certified fitter. -
Page 20: Installation
Chapter 3 3.1 Installation dimension [mm] 800x500 >36 1200x500 >36 The electrical, ventilation and execution 1200x700 >36 technical installation has to be executed 1500x500 1250 >36 by a certified fitter in accordance with the 1500x700 1250 >36 current national and local regulations. For 1500x700* 542-315-542 >36 custom made versions of the extractor,... - Page 21 Remove the connection cable on the book screws and a liquid thread locker. NEERIM extractor unit and connect it to a Connect the lamp connectors. Place the power socket which has to be fitted inside safety chains. the space where the extractor is to be built If a minilift is used during the fitting, remove the perimeter extraction panel.
-
Page 22: Technical Data
3.3 Technical data 4.1 Remote control Please read the technical data on the The NEERIM is controlled with a remote washable type sticker on the inside of the control, which enables you to set it on the extractor. In case of reclamations always... - Page 23 On/off switch for the lighting. 4.2 Position indicator (EB990) Main switch, can be used to Reducing the extraction switch off the extractor capacity, starts with zero (0). and/or lighting without using - Display indicates motor the remote control. position. - Display switches off Attention! The extractor is automatically after 1 minute not dead!
-
Page 24: Opening The Perimeter Extraction Panel
Chapter 5 5.1 Opening the perimeter 5.2.1 Taking out the filters extraction panel magnetic filter Before you can take out the filters, you The grease filters may only be removed, must open the perimeter extraction after the extractor has been switched off panel(s).After that you can take out the completely for at least 2 minutes, because grease filters. - Page 25 If the magnetic filter is equipped with an optional charcoal filter, this combination is locked by a removable chain. This only applies for ABK extractors with 390x270mm filters which you can read in the description in the brochure. Filters can be fitted with a restriction plate for a more efficient extraction.
-
Page 26: Cleaning The Filters
5.3 Cleaning the filters 5.4.1 Halogen lights | Replacing the halogen bulbs [round] Because of the very intensive cleaning of the cooking vapours the filters must be Before replacing the lights, you must cleaned at least once a month, in case of disconnect the appliance by taking the an average use, preferably in the dish plug out of the socket or by switching off... -
Page 27: Maintenance Of Stainless Steel
5.4.1 Halogen lights | Replacing 5.5 Maintenance of stainless steel the halogen bulbs [square] In the every day use, stainless steel surfaces are being damaged and polluted. Before replacing the lights, you must These pollutions or damages can diminish disconnect the appliance by taking the the resistance against corrosion or even plug out of the socket or by switching off cause corrosion, depending on the nature... - Page 28 Brushed stainless steel 5.5 Maintenance of stainless steel Clean with a soft/damp cloth and a minor In the every day use, stainless steel quantity of a liquid abrasive (like CIF). surfaces are being damaged and polluted. Move the cloth in the same direction as These pollutions or damages can diminish the polishing direction of the material.
-
Page 29: Ec Declaration Of Conformity
EC DECLARATION OF CONFORMITY Council Directive 73/23/EC, supplement II, under A Manufacturer ABK InnoVent Adress Plakhorstweg 12 7008 AT DOETINCHEM Hereby declares that the extractor: - is in conformity with all relevant provisions of Council Directive 73/23/EC, according to most recent version. - Page 30 Notes EN 16 Notes...
- Page 31 EN 17...
- Page 32 Plakhorstweg 12 NL-7008 AT Doetinchem t: +31 [0]314-320910 f: +31 [0]314-320919 e: info@abk-innovent.nl w: www.abk-innovent.nl Maat-, modelwijzigingen voorbehouden / Measure- and modelmodification prohibited. [Rev.101130] Art.Nr. KDA0100014...
Need help?
Do you have a question about the NEERIM and is the answer not in the manual?
Questions and answers