Table of Contents
Advertisement
Quick Links
Advertisement
Table of Contents

Related Manuals for swamp SDK-DM20


Summary of Contents for swamp SDK-DM20
-
Page 1: Digital Mixer
Digital Mixer All rights reserved to SOUNDKING. No part of this manual may be reproduced, translated or photocopied by any means for any purpose, without the written permission of SOUNDKING. The information involved in this manual is subject to change without notice. -
Page 2: Table Of Contents
Specification DM20 DB20P DB20P-600 INDEX 12 MIC(4 COMBO), 2 Stereo, S/PDIF input, USB input Line input Intro.............................2 Phase, Delay, high pass filter, 4-band parametric EQ, noise gate, Input channel Featur..........................2 Compressor, L/R Pan, Effects function Control and connection......................3 8 assignable XLR + AES/EBU, S/PDIF and stereo headphone Line output Input channel........................7 MIC channel.........................7... -
Page 3: Intro
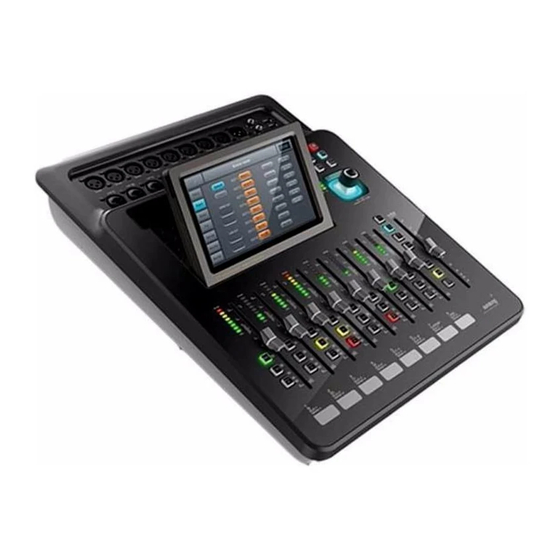
Intro. Signal Flow Chart This is a full function compact digital mixer from Soundking that features premium hardware, touch operation, iPad remote control, the 4th generation SHARC floating point processor, 24bit/192kHz AD/DA conversion, 8 effect modules, reverb, delay, modulation, GEQ,20 inputs including 12 pro mic and 2 stereo, professional digital signal input port, 16 BUSSES including 8 assignable analog and digital output ports. -
Page 4: Control And Connection
Control and connection 5.3.Open the APP just downloaded. 5.4. Click shown above to search, find Console, click . If many Consoles appear, type in the IP address of mixer you want for direct connection. If necessary, you can change name in to differentiate your devices. - Page 5 IPAD Part five buttons SETUP BIACK PLAY/PAUSE, COPY , PASTE. 5.1. Use the IPAD from Apple Inc, search “soundking” or “DM20” in App Store, as shown below, install the SETUP is enter the system page. APP accordingly. BIACK is to exit the system. COPY and PASTE is to copy and paste the channel parameter setting.
- Page 6 3. WIFI Mode Log-in, Mixer Setting Suitable for all fixed places covered with WIFI, remote distance depends on the power of your wireless router. DB20P front panel 7” high definition touch screen Main output, 16-band level meter USB 2.0 interface 3.1 Click tab shown above, select the correct WIFI you need in the list.
- Page 7 WIFI PAGE Setting Mode One of IPAD WIFI Connecting Mixer Firstly, please make sure you have plugged the WIFI module attached into the USB port of mixer. Mixer Setting DB20P rear pane 1. Click “Setup” on the panel of mixer, enter SETUP tab page. 2.
-
Page 8: Input Channel
Input Channel Monitor Page DM20 has 12-channel mono inputs, 2 analogue stereo inputs, 1 stereo S/PDIF input channel and 1 stereo The page mainly contains settings for Oscillator, Monitor / Phones and Solo. USB input. INPUT 1-8 and INPUT 9-12 ST-USB buttons are for input page up/page down. INPUT 1-8 covers 8 channels MONO input channel CH1~CH8, INPUT 9-12 ST-USB covers 4 mono inputs (CH9~CH12), 2 analogue stereo input channels, 1 stereo S/PDIF input and 1 stereo USB input. -
Page 9: Input Stage Subpage
Input Stage subpage Recorder Page Player 48V phantom power Press the key, to enable the 48V phantom power. Press again to disable it. The default is set as disabled. The player can display the name of selected soundtracks and playback progress, includes 8 function Switch channels buttonsstop ( ) play/pause (... - Page 10 Scenes Page EQ Sub Page The page contains Scene List and operations for scenes. Scene List Scene List contains number(No) selection(Sel) name(Name) and creat/update time(Time). To select a certain scene through single pressing option frame in the Sel column. Operation Switch Channels Delete Delete scenes.
- Page 11 GEQ Subpage Library Double press “GEQ 1 or 2” in the FX Subpage, access to Subpage of GEQ parameter tuning, as showed in Save or load user's EQ settings. Single press the dropdown button and select a library file from a popped-up the picture below list, in order to load the EQ setting.
- Page 12 Module Selection Compressor Single press left right selection button, to choose FX module: Modul1-Modul2-Delay1-Delay2-Reverb IN: Press the key to enable Compressor, press again to disable it. The default is set as disabled 1-Reverb2-GEQ1-GEQ2) Compressor: Threshold modifies breakpoint's position on the curve, Ratio modifies the bending rate of Type Single press dropdown button, then choose a wanted type from the dropdown list the curve above the breakpoint, Gain controls the vertical position of the diagonal.
-
Page 13: Bus Send Sub
Bus Send Sub-page Chart 1 Factor Ratio to BPM The input channel can send signal into 4-channel mono bus, 4-channel stereo bus and L/R master output bus. 1/24 1/16 1/12 Equivalent to BPM Feedback: to return output delay into input, so as to generate echo from amplitude attenuation. Ranges from 0 to 90, with a default @ 0. -
Page 14: Output Stage Sub
Module Selection Output Stage Sub-page Single press left right selection button, to choose FX module: Modul1-Modul2-Delay1-Delay2-Reverb The sub-page mainly contains PAN, Solo, Mute, fader control and signal level display 1-Reverb2-GEQ1-GEQ2) Type Single press dropdown button, then choose a wanted type from the dropdown listOne Echo 1/4 Two Echo 1/8 Three Echo 1/16 Three Echo 1/16 Delayed Four Echo 1/16 One Echo 1/4 with 4 Reflect. -
Page 15: Stereo Channel
Stereo Channel EQ LS Curve chart: displays the LS curve Stereo input and Mono channel are the same, also include five modules, which are Input Stage, EQ, Dynamics, Gain: ranges is ±18 dB, with a default @ 0 dB. Adjust the Gain by turning the main Encoder or on the Bus Send and Output Stage. -
Page 16: Dynamics Subpage
Channel Switch The Effects have 8 modules, which are 2 Modulation, 2 Delay, 2 Reverb and 2 15-band GEQ. All the modules can be inserted to input processing channel or bus processing channel, for one time only. Single press the button to switch between previous or next channel on the same layer Note, input processing channel can only be inserted with one effect module, while the bus can have two. -
Page 17: Bus Send Subpage
Bus Send Subpage Meter Page The page contains two parts: signal level from input processing channel and outputs. The Bus Send subpage of Stereo ST1 and ST2 is the same as Mono channel, please refer to P10. S/PDIF and USB Channel can only be sent to Bus5~ Bus8 and Master L&R, the operation is the same as the stereo send of Mono Channel, interface as below. -
Page 18: Input Stage Subpage
Patch page This page is mainly for selecting busses to be assigned to 8 analogue outputs, S/PDIF output and USB output. The console has 4 mono bus (Bus 1~Bus 4), 4 stereo bus (Bus 5L~Bus 8R) and master output bus Master L, Master R. - Page 19 Maintenance page Switch Channel Single press the button to switch between previous or next channel on the same layer Update from USB Single press “Update from USB” button, a dialog pops up “After the update the System will reboot Bus send enable automatically.
-
Page 20: Eq Subpage
EQ Subpage Setup page This Subpage is the same as EQ Subpage of the MIC channel, please refer to MIC channel EQ page. The page contains Information, Sample Rate, Delay Unit, System, WiFi, Remote, Brightness and Time & Date. Output Stage Subpage The page contains Delay, PAN, Solo, Mute, fader level control and signal level display.
Need help?
Do you have a question about the SDK-DM20 and is the answer not in the manual?
Questions and answers