
Subscribe to Our Youtube Channel
Related Manuals for Tempest Cyclone G4


Summary of Contents for Tempest Cyclone G4
-
Page 1: User Manual
User Manual Cyclone G4 Revision 01.5 May 2017 © Tempest Lighting, Inc. Cyclone G4 User Manual... -
Page 2: Table Of Contents
Single Feed Power Termination ............................... 20 Split Feed Power Termination ................................. 20 Wire Path ......................................20 Single or Three-Phase? ..................................20 Three phase Split Feed ..................................20 AC Supply Voltage..................................... 20 North America, 208V Single Feed ..............................21 Cyclone G4 User Manual... - Page 3 Reset Lamp Hours..................................... 39 Status Display ....................................40 DEC4 Firmware Updates ..................................41 Indirect Firmware Updates .................................. 41 Requirements ....................................41 Installation Procedure ..................................41 Mounting the Projector .................................... 46 Enclosure Configuration ..................................46 Landscape Configurations ................................46 Cyclone G4 User Manual...
- Page 4 Clean Port Glass ....................................51 Check Filter ....................................... 51 Check Temperature/Humidity Sensor ............................. 52 For After Sales Support ..................................52 Troubleshooting ......................................53 Warranty ........................................55 Appendix – TEMP Protocol ..................................56 Physical Layer ......................................56 Developer’s Guide ....................................56 Cyclone G4 User Manual...
-
Page 5: Approvals - North America
This is to certify that the following products: 55.xxx.US Series Cyclone G4 Projector Enclosures Have been tested and approved to standards UL 508 (electrical) and UL 50 (environmental), as NEMA 3R enclosures, for use in the United States and Canada. -
Page 6: Approvals - Europe
+1 818 787 8984 f: +1 818 252 7101 e: info@tempest.biz www.tempest.biz Tempest Lighting, Inc. declares that t heir Cyclone G4 Projector Enclosure Series 55.xxx.xx complies with the Essential Requirements of the following EU Directives: Low Voltage Directive 2006/95/EC Test Report G4.51.LVD... -
Page 7: Approvals - China
Approvals – China Cyclone G4 User Manual... -
Page 8: Introduction
In the event of difficulty, please contact your Tempest reseller or Tempest direct: info@tempest.biz +1 818 787 8984 We will do everything we can to help you get the very best results from your Tempest enclosure. IMPORTANT: Safety Advisories ... -
Page 9: Installation
29”/737 22”/559 65lb/30kg 55.500 Barco HDQ Landscape 69.4”/1763 37.4”/951 35.4”/899 67”/1702 35”/889 245lb/111kg We are adding models all the time – check our web site for submittal drawings or consult factory for models not shown here Cyclone G4 User Manual... -
Page 10: Access Clearance
Observe the minimum clearances shown around your 3”/75mm enclosure Snow Clearance In areas where snow is likely, make sure the base of the enclosure is at least 24” [60cm] above highest potential snow drift level. 60cm/24in Cyclone G4 User Manual... -
Page 11: Mounting Hardware Options
IMPORTANT SAFETY NOTICE Installer must ensure that all mounting points are secure and conform to local safety regulations. Tempest Lighting Mounted from Below: Inc. accepts no responsibility for damage or injury arising from inappropriate or unsafe installation. -
Page 12: Mounting Options - Stacking Kit
Mounting Options – Stacking Kit Cyclone G4 may be stacked up to four units high, using Bolt top leg to M12 the 51.SK stacking Kit. You will need the total number of socket each corner Cyclones to be stacked, minus one stacking kit(s). -
Page 13: Cyclovator 2 Tilt Kit
…or, on a rooftop, projecting downwards. In either case, the maximum tilt angle is 60°. Cyclovator – Unistrut Mounting Rails When Cyclone G4 is used with the Cyclovator Tilt Kit, the Unistrut Kit (55.UR.xxx) is required to attach the enclosure to the Cyclovator. -
Page 14: Fixing The Cyclovator In Place
It is the responsibility of the installer to obtain approval from a structural engineer or other competent person for all such installations, and to adhere strictly to local building and safety codes at all times. Cyclone G4 User Manual... -
Page 15: Mounting The Enclosure
INSIDE the Unistrut rails. PUSH UP and tighten the four M12 channel nut bolts, so that the channel nuts lock in the Unistrut channels. Loosen the locking knobs and turn the crank handle to test movement. Cyclone G4 User Manual... -
Page 16: Setting The Show Position Stop
Tighten the Locking Collar nut (a) You now have two reference locations: Horizontal Show ALWAYS MAKE SURE THAT BOTH LOCKING KNOBS (c) ARE LOOSE WHEN RAISING/LOWERING THE CYCLOVATOR, AND TIGHT WHEN IN SHOW OR SERVICE POSITION. Cyclone G4 User Manual... -
Page 17: Wiring The Enclosure
All electrical work must be done in full compliance with all electrical and safety norms applicable to the installation site. Isolate all power feeds before opening the enclosure. Tempest Lighting, Inc., its employees and agents will not be held responsible for damage or injury caused by disregarding this notice. Electrical Standards Important: Enclosure model numbers including .US are for use in countries using US and Japanese style electrical systems:... -
Page 18: Wiring Access
Aux Equipment Power Outlet (dual C13) AC Terminal Block Earth/Ground Terminal Projector Power Outlet (types vary) DEC4 Motherboard DEC4 Daughter Board(s) Up to 3 daughter boards: types include Fan Control, RS485 Comms, Ethernet, AC Assist Relay Cyclone G4 User Manual... -
Page 19: One Or Two Power Circuits
One or Two Power Circuits? Tempest enclosures may be wired on single or double circuit supplies. On a single feed, both enclosure and projector are permanently on. With a split (double) feed supply, you can switch off the projector when not in use, while the enclosure continues to protect it 24/7. -
Page 20: Single Feed Power Termination
Some Christie projectors with external ballast, eg Roadie 45K, CP4230 …a 3-phase AC supply is required. AC Supply Voltage Tempest Cyclone enclosures require supply voltage in the nominal range 200-250VAC, 50/60Hz. Tempest G4 enclosures are very tolerant of supply voltage variations: ... -
Page 21: North America, 208V Single Feed
North America, 208V Single Feed Cyclone G4 User Manual... -
Page 22: North America, 208V Split Feed
North America, 208V Split Feed Cyclone G4 User Manual... -
Page 23: North America - 120/208V Three Phase, Single Feed
North America – 120/208V Three Phase, Single Feed Cyclone G4 User Manual... -
Page 24: North America - 120/208V Three Phase, Split Feed
North America – 120/208V Three Phase, Split Feed Cyclone G4 User Manual... -
Page 25: International, 230V Single Feed
International, 230V Single Feed Cyclone G4 User Manual... -
Page 26: International, 230V Split Feed
International, 230V Split Feed Cyclone G4 User Manual... -
Page 27: International, 230/400V Three-Phase, Single Feed
International, 230/400V Three-Phase, Single Feed Cyclone G4 User Manual... -
Page 28: International, 230/400V Three-Phase, Split Feed
International, 230/400V Three-Phase, Split Feed Cyclone G4 User Manual... -
Page 29: Remote Monitoring Connections
Board 51.EN Ethernet Board RS485 Daisy Chain (use CAT5 Cable) Ethernet LAN Ethernet LAN Tempest System Manager Local PC Remote PC Smartphone Local PC Note: Tempest System Manager and web-based monitoring will be available early 2017 Cyclone G4 User Manual... -
Page 30: Rs485 (Dmx/Rdm) Cable Terminations
By powering the projector down it will tolerate much higher temperatures without harm. Tempest recommends the JESE RDM-TRI interface to monitor enclosure status in any installation and control the enclosure power relay in smaller systems. -
Page 31: Dmx/Rdm Network, Using Jese Rdm-Tri
DMX/RDM Network, using JESE RDM-TRI The 2000.195 JESE RDM-TRI MK2 passes DMX information from a show control system to each DEC4 controller. Set a DMX address for each controller in the range 1-510. See DEC4 section below for more information. Cyclone G4 User Manual... -
Page 32: Digital Enclosure Control
Digital Enclosure Control DEC4 – that’s Digital Enclosure Control, fourth Typical DEC4 Generation – is the brain of your Tempest enclosure. It will configuration, with maintain the internal environment in a comfortable Motherboard, fan temperature and humidity range, and prevent control board and condensation –... -
Page 33: Dec4 Main Functions
You do not need to do anything. Please skip to the Power Connections section below. Standard default temperature and humidity settings DMX, RDM and Remote Monitoring disabled Best for standalone operation If your needs are more complex, read on. Cyclone G4 User Manual... -
Page 34: Other Operating Modes
Normal operation is suspended and the enclosure functions as a 3-channel DMX device: Lamp Relay (Slot 1) Fans (Slot 2) Heater (Slot 3) Service mode is ONLY for troubleshooting – DO NOT use Service mode for normal operation. Cyclone G4 User Manual... -
Page 35: Dec4 Control Parameters
In moving light enclosures the temperature sensor is located in the exhaust airflow. Temperatures shown may be higher than those around the projector. We recommend using the factory default settings for several weeks or months before making any changes. In most cases they will not be necessary. Cyclone G4 User Manual... -
Page 36: Control Interface
Control Mode and no valid data packet has been detected. ON (GREEN) Good data packet received. ON (RED) Control Mode: Data Fail. A previously good data signal has failed. Monitor Mode: No RDM information being received (this is normal) Cyclone G4 User Manual... -
Page 37: User Interface Lcd Display
Use to set the item parameter, or to scroll to the next menu level. Use ESC to go BACK, or OK to confirm settings ( ). To LOCK, hold ESC for 5 seconds. Menu will time out after ten minutes. Cyclone G4 User Manual... -
Page 38: Control Menu
CONTROL Monitor, plus use of a single DMX slot to control Lamp relay TEMP Same as Basic, but supports remote monitoring over RS485 with Ethernet adapter and Tempest TEMP protocol SERVICE Monitor, plus use of three DMX slots to control Lamp, Heater and Fan Important: Please ensure that the DEC4 is NOT left in Service Mode. -
Page 39: Set Temp Units
Lamp on point may be set in 0.2 Amp increments between 0.2 Amps and 2.0 Amps. Reset Lamp Hours Reset each time you change the lamp in the projector. Make this a part of your maintenance instructions. Cyclone G4 User Manual... -
Page 40: Status Display
Air temperature, in degrees C or F PCB temperature (this will usually be significantly higher than air temperature) Voltage – line Voltage reaching the DEC Current being drawn by projector/light, in Amps Lamp Hours elapsed since last reset Firmware version Cyclone G4 User Manual... -
Page 41: Dec4 Firmware Updates
DEC4 Firmware Updates From time to time Tempest may introduce new DEC4 firmware for feature enhancements and bug fixes. Please note that the main System Control Board (SCB) and the various optional daughter boards each have their own firmware, and it will be good practice to update all firmware in an enclosure for optimal performance and interoperability. - Page 42 Power up the target SCB, ideally with mains power, or alternatively, with a USB power adaptor connected to the USB Port on the SCB. Connect the RDM-TRI to the RS485 connection on the DEC4 communications board with the fly lead. Cyclone G4 User Manual...
- Page 43 Open the GetSet application, connect to the RDM-TRI and discover the DEC. To run discovery, click the Icon indicated below Right click on the highlighted item in the list view and select ‘Reprogram’ from the popup menu. This will open the firmware upload tool. Cyclone G4 User Manual...
- Page 44 In the Firmware upload handler, search for a file to upload by clicking the file icon. Find and select the file to load and click the Open button. 10. On returning to the File upload tool window, select the green upload arrow to initiate the upload process. The upload will the start. Cyclone G4 User Manual...
- Page 45 Close the application and disconnect the USB Cable from the SCB Important: If the Tempest enclosures are connected to an RDM interface or controller, set the DATA MODE for each enclosure as follows: RDM MONITOR ONLY To view status information over RDM...
-
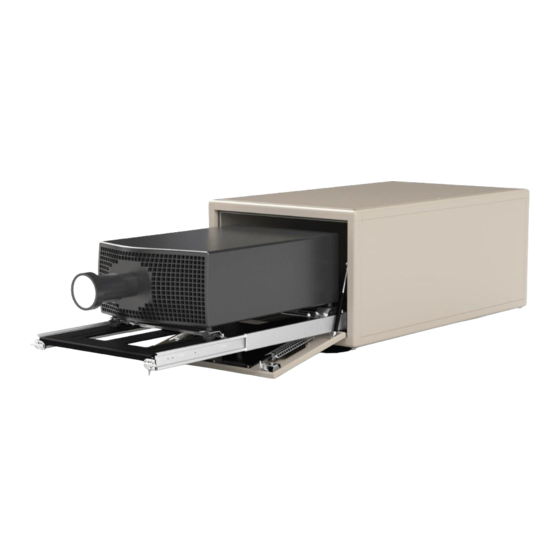
Page 46: Mounting The Projector
The projector must be Cyclone Portrait enclosures may be manufactured with mounted to comply front or rear slide, just like landscape enclosures. with manufacturer specification for portrait operation. Cyclone G4 User Manual... -
Page 47: Projector-Specific Mounting
Projector attaches to mounting plate with screws supplied. Mounting plate allows +/- 7.5° tilt adjustment. Use lens shift for pan adjustment. Cyclone G4 User Manual... -
Page 48: Connect Projector And Aux Equipment
Projector-specific information below. Panasonic PT-DZ21K Family (1) Flip the projector onto its back and remove the four adjustable feet – the Tacit projector clamps cannot grip them (2) Replace with the four M10 Thumbscrews provided Cyclone G4 User Manual... -
Page 49: Christie J-Series/Roadster Family
Locking knobs to adjust front-to-back positioning M12 mounting bolts – note that the three sets of holes and slots allow height and some tilt adjustment Cyclone G4 User Manual... -
Page 50: Barco Hdq
Note that pan adjustment may be achieved by moving the projector right or left on the enclosure tray. Tilt adjustment must be achieved using projector lens shift. X-Frame Barco HDQ projectors require a three-phase electrical supply – see three-phase wiring instructions Cyclone G4 User Manual... -
Page 51: Routine Maintenance
The filter will drop out. Replace filter and filter clamp. To replace the filter from inside the enclosure Remove both side panels Slide the projector tray out Remove the eight M4 nuts holding the filter assembly Cyclone G4 User Manual... -
Page 52: Check Temperature/Humidity Sensor
DEC RH: 100% user interface. RH: #### If you see any of these messages, contact Tempest for a replacement sensor. For After Sales Support Contact your Tempest dealer or email info@tempest.biz... -
Page 53: Troubleshooting
If wiring is ok, fan may be faulty. Check the UI display for RH (relative humidity) message. If display reads RH 5%, RH 100%, or RH###, there is a sensor fault. Contact Tempest for a replacement sensor. Dirt/Debris inside enclosure Filter is either missing or damaged? - Page 54 DEC4 motherboard to maintain the integrity of the board’s conformal coating. None of the above? Contact info@tempest.biz Cyclone G4 User Manual...
-
Page 55: Warranty
SELLER AGREES THAT IT WILL, AS THE SOLE AND EXCLUSIVE REMEDY UNDER THE CONTRACT OR OTHERWISE, FOR ANY NONCONFORMITY OR BREACH OF WARRANTY, AND AT SELLER'S SOLE ELECTION: (i) REPAIR SUCH GOODS; OR (ii) REPLACE SUCH GOODS. Cyclone G4 User Manual... -
Page 56: Appendix - Temp Protocol
Appendix – TEMP Protocol AVAILABLE TO SPECIAL ORDER Tempest can optionally provide a firmware load that facilitates TEMP over RS485, suitable for interfacing to an Ethernet adapter. TEMP is a lightweight proprietary ASCII based protocol, intended for rapid integration into management systems.
Need help?
Do you have a question about the Cyclone G4 and is the answer not in the manual?
Questions and answers