Table of Contents
Advertisement
Advertisement
Table of Contents

Related Manuals for Craftex CX413

Summary of Contents for Craftex CX413
- Page 1 MODEL CX413 3 HP DUST CYCLONE USER MANUAL Version 1.0...
-
Page 2: Table Of Contents
TABLE OF CONTENTS General Safety Instructions..................3 Specific Safety Instructions ..................4 CX413 Features...................... 5 CX413 Physical Features ..................6 Un-Packing ......................7 Proper Grounding ....................8 Assembly ........................ 9 Cyclone Bag Frame Assembly................11 ON/OFF Switch....................... 11 Remote Controller....................12 Test Run ......................... -
Page 3: General Safety Instructions
GENERAL SAFETY INSTRUCTIONS FOR MACHINES Extreme caution should be used when operating all power tools. Know your power tool, be familiar with its operation, read through the user manual and practice safe usage procedures at all times. ALWAYS read and understand the NEVER leave a tool unattended while it user manual before operating the is in operation. -
Page 4: Specific Safety Instructions
CX413 – 3HP DUST CYCLONE SPECIFIC SAFETY INSTRUCTIONS READ and follow all the instructions METALLIC OBJECTS that strike the and safety precautions in the user impeller may produce a spark which can manual before setup or use. smolder in wood dust for a long period of time before fire or flame is detected. -
Page 5: Cx413 Features
As part of the growing line of Craftex woodworking equipment, we are proud to offer the CX413 a 3HP Dust Cyclone. By following the instructions and procedures laid out in this user manual, you will receive years of excellent service and satisfaction. The CX413 is a professional tool and like all power tools, proper care and safety procedures should be adhered to. -
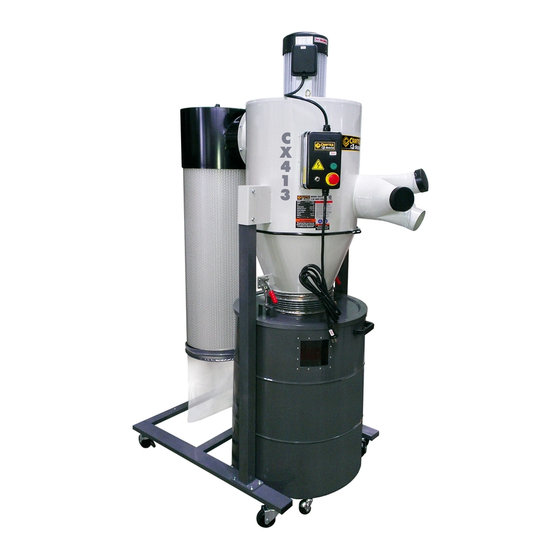
Page 6: Cx413 Physical Features
CX413 - 3HP DUST CYCLONE PHYSICAL FEATURES 3 HP Motor ON/OFF Canister Filter Magnetic Switch Cleaning Handle Main Housing 4" Y-Inlet Canister Adapter Filter Bottom Bag Quick-Lock Levers Cone Collection Drum Base Hose Wheels... -
Page 7: Unpacking
M. Bag Clamp ........1 UNPACKING N. Drum Wheel ........4 O. Base Wheel ........4 The machine is properly packaged and P. Cone Clamp ........1 shipped completely in carton for safe Q. PE Bag..........2 transportation. When unpacking, carefully R. -
Page 8: Proper Grounding
CX413 is equipped with a 220-volts, single phase motor which features a 3-conductor cord and a 3-prong grounded plug to fit a grounded type receptacle. Do not remove the grounding prong to fit it into a 2-pronged outlet. -
Page 9: Assembly
Get the help of a friend or use a fork truck ASSEMBLY and lift up the main housing (#16) and place it on the stand (#22). Using the flange bolt Attach the base wheels (#24) to the base screw 5/16" x 1/2" (#21) secure the main (#25) using the 5/16"... - Page 10 Attach the handle (#62) to the canister filter Paste the foam (#54) as a circle around the (#55) and secure it with the set screw 5/16" canister filter (#55) and tighten the PE bag x 3/4" (#61) and nut 5/16" (#60) as shown in (#52) with bag clamp (#53) as shown in figure-8.
-
Page 11: Cyclone Bag Frame Assembly
ON/OFF SWITCH Pull down the quick lever and thread the nut The CX413 features a magnetic ON/OFF (#41) onto the quick lever thread and switch with a large Emergency Stop/Reset tighten it. This will secure the drum lid to the button located on the left side of the inlet. -
Page 12: Remote Controller
REMOTE CONTROLLER TEST RUN The CX413 features a remote controller Once you have assembled your machine (#50) that allows you decrease or increase completely, it is now time for a test run to the amount of time the impeller runs before make sure that the machine works properly automatically shutting off. -
Page 13: Maintenance
MAINTENANCE CLEANING THE CANISTER During the life of your machine, you will The canister (#55) features a cleaning need to practice some regular maintenance handle (#62) which is used to clean the to keep your machine in peak performance canister filter. To clean the canister filter condition. -
Page 14: Cx413 Parts Breakdown
CX413 PARTS BREAKDOWN... -
Page 15: Cx413 Parts List
CX413 PARTS LIST DESCRIPTION SPECIFICATIONS QUANTITY Motor Bushing MP-20 Bushing MP-16 5/16” Spring Washer 5/16” Motor Cord 7x7x25 Motor Washer Flange Bolt Screw 5/16”x3/4” Hanger 5/16” Motor Plate Hex. Head Bolt 5/16”x1” Set Screw 3/8”x3/4” Impeller 15” Washer Cap Screw... - Page 16 Phillips Head Screw M5x8 3/8” Foam Hose Clamp 12-1/2” Hose 12” Drum Lid Button Head Screw M5x10 Drum Handle Flat Head Screw 1/4”x1/2” Packing Acrylic Board Rivet Drum Wheel 5/16”x3” Drum Allen Wrench Open Wrench 10x12mm Remote Control Bar PE Bag for Canister Filter Bag Clamp Φ370 Foam...
-
Page 17: Warranty
This warranty shall not apply to consumable products such as blades, bits, belts, cutters, chisels, punches etceteras. Craftex shall in no event be liable for injuries, accidental or otherwise, death to persons or damage to property or for incidental contingent, special or consequential damages arising from the use of our products.
Need help?
Do you have a question about the CX413 and is the answer not in the manual?
Questions and answers