Table of Contents
Advertisement
Quick Links
Acaia Pearl Operation Manual
Using Your Pearl
FW 2.0.008
Identification
The instructions in this operation manual apply to Acaia Coffee Scale. You have purchased a
quality precision weighing scale that requires handling with care. Make sure to read through this
operation manual prior to using the scale.
Advertisement
Table of Contents

Related Manuals for acaia Pearl


Summary of Contents for acaia Pearl
- Page 1 FW 2.0.008 Identification The instructions in this operation manual apply to Acaia Coffee Scale. You have purchased a quality precision weighing scale that requires handling with care. Make sure to read through this operation manual prior to using the scale. ...
- Page 2 Disclaimer Notice Calibrate your scale using calibration weight of the appropriate tolerance (class). A scale can be no more accurate than standard masses to which it has been compared. For more details, please read Calibration Mode section in the operation manual. CAUTION: 1.
-
Page 3: Table Of Contents
Contents Chapter 1: Scale at a Glance Introduction Specification Scale overview Accessories Buttons LED indicators Battery charge Chapter 2: Getting Started Preparation Installation Chapter 3: Basics Basic operations Modes Mode 0 - Weighing mode Mode 1 - Espresso mode Mode 2 - Timer mode Mode 3 - Auto Start Mode Mode 4 - Beverage Mode Mode 5 - Auto Tare Mode... -
Page 4: Chapter 1: Scale At A Glance
Chapter 1: Scale at a Glance Introduction Thank you for choosing one of our scales. The Acaia Coffee Scale is designed and manufactured to the most rigorous standard to give you the best coffee brewing experience. First of all, check the shipping carton to find the followings:... -
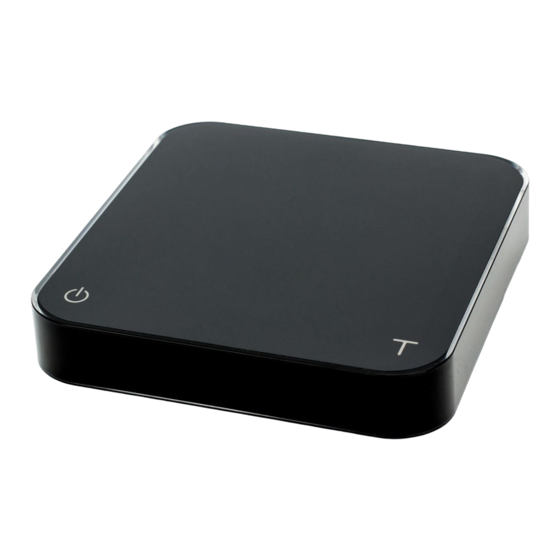
Page 5: Scale Overview
Scale Overview Weighing Pan Power Button LED Display Tare Button Scale Front Micro-B USB port Scale Back *Note: For the best performance, place the weight in center of weighing platform. Chapter 1: Scale at a Glance... -
Page 6: Accessories
Accessories Micro-B USB Cable Heat Resistant Pad Micro-B Micro-B to Type-A USB cable Type A Buttons Button Function Example Turn on Long Press to turn on the scale. Turn off Double-tap the power button to turn off the scale. Switch mode (Default) While the scale is turned on, press and hold for 2 seconds to switch mode. -
Page 7: Led Indicators
It takes about 1~2 hours to fully charge the battery from empty. You can charge the battery more frequently so that it will never hit empty. A fully charged battery can continuously last for about 25 hours. Battery percentage can be viewed via Acaia APP. Chapter 1: Scale at a Glance... -
Page 8: Chapter 2: Getting Started
Chapter 2: Getting Started Preparation This scale is intended for indoor use. Select a work place that is stable, vibration-free and, if possible, a horizontal location for the weighing platform. Do not locate the scale near any equipment/instrument which contains magnets. Avoid places where room temperatures are unstable. -
Page 9: Installation
Installation To use AC adapter instead of the built-in battery, plug the USB cable into the Micro-B USB port located on the back panel of the scale. Long Press to turn on the scale. * It is highly recommended to calibrate the scale with calibration weight before using. Please make sure to use a heat resistant pad under hot objects. -
Page 10: Chapter 3: Basics
Chapter 3: Basics Basic Operations Action Operation Turn On Scale Long Press Turn Off Scale Double Tap Switch Mode Long Press Tare Weight Short Press Reset Mode Double Tap Modes *To Enable/Disable Modes Please go to Chapter 5: Configuration on Page 16. Mode 0 - Weighing Mode Mode 1 - Espresso Mode Mode 2 - Timer Mode... -
Page 11: Mode 1 -Espresso Mode
Mode 1 -Espresso Mode 0. 0.0 Action Operation Start/Pause/Reset Short Press Timer Tare Weight Short Press Reset Mode Double Tap Switch Mode Long Press 1. The LED Timer on the left, weighing result on the right. 2. The timer displays from 0 to 59 seconds in cycle and will reset when reaching 60 seconds. When it resets, the Mode Indicator flashes 3. -
Page 12: Mode 3 - Auto Start Mode
Mode 3 - Auto Start Mode 0.00 Place materials on scale. Tap Power Button to automatically tare. Begin pouring and timer will start with the pour. Timer stops when brewing equipment is removed. Action Operation Initiate Auto Start Short Press Tare Short Press Stop Timer... -
Page 13: Mode 4 - Beverage Mode
Mode 4 - Beverage Mode Follow instructions on the display to place the carafe, filter, and coffee (tap Tare in between steps). Timer will start with the pour. Lift dripper and filter off to stop timer. The flashing number is your beverage weight with all items subtracted. -
Page 14: Mode 5 - Auto Tare Mode
Mode 5 - Auto Tare Mode (after version 2.0.008) Displays weight only. Place item on and off scale and it will automatically tare. Action Operation Tare Weight Short Press Reset Mode Double Tap Switch Mode Long Press *To Enable/Disable Auto Tare Mode, please go to Chapter 5: Configuration on Page 16. Chapter 3: Basics... -
Page 15: Chapter 4: Calibration
Chapter 4: Calibration Calibration Mode 1. While the scale is in Weighing Mode and the weighing unit is in gram, press button quickly multiple times until LED display shows [ CAL ] and then [ 500 ]. 2. Place a 500g calibration weight on scale and wait for the scale to execute calibration procedure. 3. -
Page 16: Chapter 5: Configuration
Enter Settings 1. Press and hold while turning ON the scale. Pressed. when the LED display shows [ n ACAIA ] and turns [ SEt ], Long Press 2. Keep for another 2 seconds without releasing button. when displays [ F.0000 ]. -
Page 17: Auto Zero Settings
1. When Auto Zero setting is off or disabled, the initial weight on weighing pan must be less than 50% of capacity, i.e., less than 1kg for Acaia coffee scale before the scale is turned on; otherwise, an error [ Er.303 ] occurs. When the error occurs, the scale would not work until the initial weight on weighing pan is cleared. -
Page 18: Weighing Filter Settings
Notice: The difference between zero operation and tare operation is that zero operation would simply ignore the weight and display as 0 while tare operation would deduct the weight from weighing result. However, zero operation does not increase the scale capacity. Weighing filter setting 1. -
Page 19: Appendix
Appendix Error Code Error Code Description 100 Code error 101 EEPROM error 102 AD read error Over load: the weight is over the maximum capacity. Under load: the weight is under the minimum capacity. 303 Unable to make zero point, for the initial weight exceeds the limit (50% of capacity). 304 Please do calibrate in a stable environment without wind or shake etc. - Page 20 All rights reserved. No part of the operation manual may be reproduced, processed, duplicated or published in any form by photocopying, microfilming, reprinting or any other method, in particular electronic means, without the written agreement of Acaia. © Acaia, Cupertino, CA, 2017.
Need help?
Do you have a question about the Pearl and is the answer not in the manual?
Questions and answers