Table of Contents
Advertisement
F2000 Series Shape Cutting Control System Operation and Installation Manual
FangLing Shape Cutting Control System
Operation and Installation Manual
(Ver.2.1)
(Apply to F2000 series: F2100B/T、F2200B/T、F2300(A/B)、
F2300T(A/B)、F2500(A/B)、F2500T((A/B)、F2600T)
Shanghai FangLing Computer Software Co., LTD.
2014-04
i
Advertisement
Table of Contents

Subscribe to Our Youtube Channel
Summary of Contents for FangLing F2100B/T
- Page 1 F2000 Series Shape Cutting Control System Operation and Installation Manual FangLing Shape Cutting Control System Operation and Installation Manual (Ver.2.1) (Apply to F2000 series: F2100B/T、F2200B/T、F2300(A/B)、 F2300T(A/B)、F2500(A/B)、F2500T((A/B)、F2600T) Shanghai FangLing Computer Software Co., LTD. 2014-04...
- Page 2 F2000 Series Shape Cutting Control System Operation and Installation Manual REVISION HISTORY Version Date Page Description Spec.01 2011/8/10 New manual creation Add Section 8.7.4, 8.7.5, 8.7.6, and Spec.02 2012/2/28 Chapter 14 Add Section 8.7.6.1-8.7.6.3 and Spec.03 2012/4/12 3.11, modify Section 1.3 Modify Section 4.1 and Chapter Spec.04 2012/8/8...
-
Page 3: Read This Manual
Read this Manual This manual is used to the numerical control cutting machine system (F2000 series) produced by Shanghai FangLing Computer Software Co., Ltd.. Read and understand this instructional manual, the cutting machine manuals and local security regulation before use carefully. - Page 4 F2000 Series Shape Cutting Control System Operation and Installation Manual Loose fitting clothing or ties may become entangled in the machinery. These items should not be worn while operating the machine. This controller should only be operated by trained service person. ...
-
Page 5: Table Of Contents
F2000 Series Shape Cutting Control System Operation and Installation Manual Catalog FANGLING SHAPE CUTTING CONTROL SYSTEM OPERATION AND INSTALLATION MANUAL ..............................I USER GUIDE ............................III ..........................EAD THIS ANUAL ..........................ONDITION ............................. AINTENANCE ........................... OLTAGES CATALOG .............................. V CHAPTER 1 F2000 SERIES CONTROL SYSTEM INTRODUCTION .......... 1 1.1 S... - Page 6 F2000 Series Shape Cutting Control System Operation and Installation Manual 3.4 B ........................... 18 ACKWARD 3.5 E ................18 UTTING FFSET UTTING ETURN 3.6 B ....................20 ACK TO EFERENCE UNCTION 3.7 O ................... 21 XYGEN REHEAT EGULATION 3.8 P ....................
- Page 7 F2000 Series Shape Cutting Control System Operation and Installation Manual 6.7.1 Select Work Folder ....................47 6.7.2 New Folder ......................48 6.8 C ........................... 49 LEAR CHAPTER 7 PARAMETER SETTING ..................... 50 7.1 C ......................... 50 OMMON ARAMETERS 7.2 F ........................
- Page 8 YSTEM ESET CHAPTER 13 INSTALLATION AND DEBUGGING ..............111 13.1 H ..............111 ORIZONTAL ERTICAL ULSES UMBER ETTING CHAPTER 14 SHANGHAI FANGLING F1500 REMOTE CONTROLLER ......113 14.1 W ....... 113 IRELESS EMOTE ONTROL ODULE ERFORMANCE AND HARACTERISTIC 14.2 T ..................
- Page 9 A3.4 C ONTIME THC ..................129 ONNECTION WITH A3.5 C PTHC-2 ..................... 130 ONNECTION WITH APPENDIX 4 INTERPRETATION OF F2000 FULL SERIES SYSTEM INSTALL SIZE ..132 A4.1 F2100B/T P ..................... 132 ROFILE NSTALL A4.2 F2200B/T P ..................... 132 ROFILE NSTALL A4.3 F2300A/B/T P...
-
Page 10: Chapter 1 F2000 Series Control System Introduction
The motion control algorithm is optimized so that the machine can move more stale and reliable, and it can save the life of the motor and the mechanical parts. The numerical control system of F2000 series consists of F2100B/T, F2200B/T, F2300A/B、F2300T A、F2300T B、F2500A/B、F2500T A、F2500T B and F2600/T system. -
Page 11: F2200 B/T System
Chapter 1 F2000 Series Control System Introduction 1.1.2 F2200 B/T System Fig 1.2 F2200B Fig 1.2 F2200T 1.1.3 F2300A/B/T (A)/(B) System Fig 1.3 F2300A Fig 1.3 F2300T(A) Fig 1.4 F2300B Fig 1.4 F2300T (B) -
Page 12: F2500A/B/T (A)/ (B) System
Chapter 1 F2000 Series Control System Introduction 1.1.4 F2500A/B/T (A)/ (B) System Fig 1.5 F2500 A/T (A) Fig 1.6 F2500 B/T (B) 1.1.5 F2600/T System Fig 1.7 F2600/T... -
Page 13: Characteristics Of System
Chapter 1 F2000 Series Control System Introduction 1.2 Characteristics of System Chinese/English/French/Portuguese/Russian/Denmark/Korean language menu, the menu can be switched only by one key. 47 categories different graphics (including grid pattern), chip part and hole part are alternative. Support the EIA code (G code) and various FastCAM、 FreeNest、 SmartNest、 IBE software. -
Page 14: Technical Indicator
Chapter 1 F2000 Series Control System Introduction control arcing signal, check for location. 23) Plasma arc controlling supports two close arc THC ways of speed and distance to make the machine more stable and safer. 24) Support edge cutting. It can save the preheat time for the thick steel plate. 25) Movement speed can be real-time acceleration, deceleration. -
Page 15: System Interface
Chapter 1 F2000 Series Control System Introduction ℃ Relative Humidity, 0~95%. 10) Working Temperature: -10℃~+60 . 1.4 System Interface 15 pins SMA Male interface of 2 axes of motor drive. 25 pins SMA Female interface of 16 channels optoelectronic isolation output ports max back flow current 300mA. -
Page 16: F2300 A/B/T Hardware Configuration
Chapter 1 F2000 Series Control System Introduction System master frequency: 400MHz USB: USB 1.1 front interface Keyboard: electronic PCB foil keyboard(one machine) or standard industrial keyboard(split type machine) Chassis: full-steel structure completely shielded which defends electromagnetic radiation, interference and static electricity 1.5.3 F2300 A/B/T Hardware Configuration Monitor: 10.4 inch 800*480, high definition 16 million colors and high brightness LCD... - Page 17 Chapter 1 F2000 Series Control System Introduction Keyboard: no, but standard keyboard with PS2 interface supportable Chassis: full-steel structure completely shielded which defends electromagnetic radiation, interference and static electricity...
-
Page 18: Chapter 2 Starting Up Of System
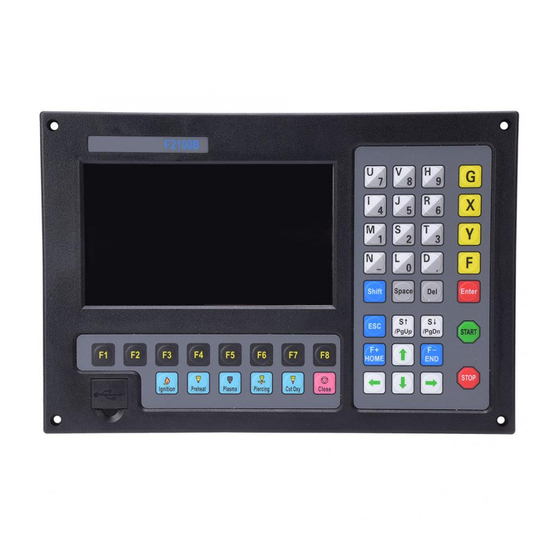
Chapter 2 Starting up of System Chapter 2 Starting up of System 2.1 Introduction of System Operation Board Fig 2.1 F2100 B system board Fig 2.1 F2100 T system board Fig 2.2 F2200 B system board Fig 2.2 F2200 T system board... - Page 19 Chapter 2 Starting up of System Fig 2.3 F2300 A/T(A) system board Fig 2.3 F2300 B/T(B) system board Fig 2.4 F2500A/T(A) system board Fig 2.4 F2500B/T(B) system board 【F1】-【F8】 Function key in different interface 【S↑/PgUp】 page-up key of code interface or Torch up in other interface 【S↓/PgDn】...
-
Page 20: Power On Processing And Main Interface
Chapter 2 Starting up of System the speed limit you have set, press【2】, change the cutting speed to 20% of the speed limit you have set 【G】、【X】、【Y】、【F】 Frequently-used keys in operation box can quickly modify the parameters in the main interface. 2.2 Power on Processing and Main Interface When power just on, the system will first go into the interface of starting up:... - Page 21 Chapter 2 Starting up of System Note: the system type “F2200T” shown in “FLSK F2200T” at the left and up corner of above figure shows different contexts, the following is the same, it will not be interpreted repeatedly. For example, it will show “FLSK F2100T” in the system of F2100T.
-
Page 22: Function Index Of Main Interface
Chapter 2 Starting up of System 2.3 Function Index of Main Interface Main Interface ShapeLib Part Zoom In Manual Zero Files Setups Diagnose Option Move Origin Point Input Disk File common select Film size Diagnose moving Output continue U Disk Hole size Angle Flame... -
Page 23: Chapter 3 Cutting Function
Chapter 3 Cutting Function Chapter 3 Cutting Function In the main interface, press the 【SPACE】 to enter the cutting interface, shown as follows: Current Line/Hole: FLSK F2200T Speed: File: Status: 00000/00000 Version 3.3.73.1 00000 SHAPE_43.TXT Stop ●Ignition ●LowHeat ●HighPreheat ●Pierce1 ●Pierce2 ●Pierce3 ●TorchUp... - Page 24 Chapter 3 Cutting Function 【F3】: Return to the starting point of cutting torch, i.e. the starting point of the current work piece. 【F4】: Decrease the cutting speed, each decrease of 1% click rate. Decrease the rate of manual moving machine in manual mode. 【F5】: Increase the cutting speed, each 1% increase in click rate.
-
Page 25: Cutting Operation Index
Chapter 3 Cutting Function 3.1 Cutting Operation Index Cutting Interface F1 Back F2 Demo F3 GoBack/Frame F4 Speeddown F5 Speedup F6 Preheat down F7 Preheat up F8 Jump to pierce/ZoomIn Fig 3.2 Cutting operation index... -
Page 26: Speed Regulation
Chapter 3 Cutting Function 3.2 Speed Regulation 3.2.1 Normal Speed Regulation In automatic operation, or when the system is suspended, in the cutting interface the system can regulate speed. In the operation panel, press 【F5】, 【PRE】 or【HOME】, increasing 3% of current rate with per click. -
Page 27: Backward
Chapter 3 Cutting Function 3.4 Backward During the running process, if you want to go backward according to the origin trail to (maybe the iron board was not cut through), you can follow the following direction: First, press “STOP” key to set the machine at pause status. In the automatic function interface, press key 【... - Page 28 Chapter 3 Cutting Function Current Line/Hole: FLSK F2200T Speed: File: Status: 00000/00000 Version 3.3.71.1 00000 SHAPE_43.TXT Stop ●Ignition ●LowHeat ●HighPreheat ●Pierce1 [G]Cutting return ●Pierce2 ●Pierce3 [X]Offset cutting ●TorchUp ●TorchDn [Y]only return ●THC En ●Blow CutSpeed 【X】 300.00 Kerf【N】1.20 ManualSpeed【Y】3000.00 Angle 0.00 Manual 【F】...
-
Page 29: Back To Reference Function
Chapter 3 Cutting Function 3.6 Back to Reference Function Pause in the processing, if press the 【F3】, then the system will prompt: Current Line/Hole: FLSK F2200T Speed: File: Status: 00000/00000 Version 3.3.71.1 00000 SHAPE_43.TXT Stop ●Ignition ●LowHeat ●HighPreheat ●Pierce1 ●Pierce2 Are you sure to return? ●Pierce3 ●TorchUp... -
Page 30: Oxygen Gas Preheat Time Regulation
Chapter 3 Cutting Function back to reference and stop has no limit. 3.7 Oxygen Gas Preheat Time Regulation In the preheat process, press the START (F9) key to skip the process of preheat and perforation delay, and immediately open the perforation signal then begin to cut. - Page 31 Chapter 3 Cutting Function Current Line/Hole: FLSK F2200T Speed: File: Status: 00000/00000 Version 3.3.71.1 00000 SHAPE_43.TXT Stop ●Ignition ●LowHeat ●HighPreheat ●Pierce1 ●Pierce2 Jump to new pierce? ●Pierce3 ●TorchUp ●TorchDn ENTER: sure ESC: cancel ●THC En ●Blow CutSpeed 【X】1000.00 Kerf【N】1.20 ManualSpeed【Y】3000.00 Angle 0.00 Manual 【F】...
-
Page 32: Dynamic Amplification
Chapter 3 Cutting Function 3.9 Dynamic Amplification After the start of cutting, the F8 in the cutting interface will become "dynamic amplification", then press the F8 key, full-screen amplify the processing graphic , and dynamically tracking. F1 Back F2 Demo F3 GoBack F8 ZoomIn Speeddown... -
Page 33: Frame
Chapter 3 Cutting Function 3.11 Frame FLSK F2200T Speed: File: Status: Current Line/Hole: Version 3.3.71.1 00000 SHAPE_43.TXT Stop 00000/00000 ●Ignition ●LowHeat ●HighPreheat ●Pierce1 ●Pierce2 ●Pierce3 ●TorchUp ●TorchDn ●THC En ●Blow CutSpeed 【X】1000.00 Kerf【N】1.20 ManualSpeed【Y】3000.00 Angle 0.00 Manual 【F】 keepMov StepDis【G】 5.00 Flame Cu 【M】... - Page 34 Chapter 3 Cutting Function as follows: Fig.3.11 Arc and location signal wiring schematic Fig.3.12 Interfaces of arc partial pressure circuit board schematic...
-
Page 35: Arc Setting And Actual Arc Displaying
Chapter 3 Cutting Function ifting body monitor and limit switch wiring Fig.3.13 L Interpret: specific system wiring interpretation with arc THC module, please reference to the section of 11.4.4. 3.12.2 Arc Setting and Actual Arc Displaying In the main interface or auto interface, display the arc setting and actual arc. Auto interface is shown as the figure 3.14. -
Page 36: Set Arc / Adjust Arc While Running
Chapter 3 Cutting Function 1. Location check signal outside inputs to location successful import.(the fifth pin of CN1) 2. When torch has not touched with steel panel, in the system diagnosis(Chapter 8) , location successful feedback signal display “●”. When torch has touched with the steel panel, location successful feedback signal display “●”. -
Page 37: Crash / Position Successful Signal Check
Chapter 3 Cutting Function 3.12.6 Crash / Position Successful Signal Check In the non plasma cutting status, punch occurs to crash and crashing signal or location successful signal is available, torch automatically ascending time is location up time. Refer to location up time in the figure 7.4. ... -
Page 38: Chapter 4 Part Option
Chapter 4 Part Option Chapter 4 Part Option Before starting cutting, you can use “F3 Part Option” in the main interface. Press F3 to enter part options menu: Current Line/Hole: FLSK F2200T Speed: File: Status: 00000/00000 Version 3.3.71.1 00000 SHAPE_43.TXT Stop 【X】... - Page 39 Chapter 4 Part Option F1 Center F2 L&B F3 L&T F4 R&B F5 R&T At this time, press 【F1】 - 【 F5】 , the starting point of cutting part automatically jump to relevant location. For example, press 【F4】, the part of start point will automatically jump to lower right corner.
-
Page 40: Angle Adjustment
Chapter 4 Part Option 4.3 Angle Adjustment Press F2, the system will prompt: F1- steel plate adjust F2- enter angle Press F1 to adjust steel plate Press F2 to enter angle directly Press ESC to exit angle adjusting 4.3.1 Steel Plate Adjustment After entering steel plate adjustment menu, the system will prompt: X-start Y-OK ESC-exit... -
Page 41: Steel Plate Adjust Angle Memory Function
Chapter 4 Part Option 【ENTER】, the system will back to the start point of the operation, if press 【ESC】, the system will do nothing but go back to the graphic interface. FLSK F2200T Speed: File: Status: Current Line/Hole: Version 3.3.71.1 00000 SHAPE_43.TXT Pause... -
Page 42: Array
Chapter 4 Part Option this time, the system will clear the angle of steel plate adjusting or manual entering. In the general condition, the angle entered is not as the angle of steel plate adjusting. If the angle entered here needs to be as the angle of steel plate adjusting, please refer to section 8.7.6.8. - Page 43 Chapter 4 Part Option Fig 4.8 Arrange in matrix The result is shown in fig 4.9 FLSK F2200T Speed: File: Status: Current Line/Hole: Version 3.3.71.1 00000 SHAPE_43.TXT Stop 00000/00000 【X】 Xmirror 【Y】 Ymirror CutSpeed 【X】1000.00 Kerf【N】1.20 ManualSpeed【Y】3000.00 Angle 0.00 Manual 【F】...
- Page 44 Chapter 4 Part Option The result is shown in figure 4.11: FLSK F2200T Speed: File: Status: Current Line/Hole: Version 3.3.71.1 00000 SHAPE_43.TXT Stop 00000/00000 【X】 Xmirror 【Y】 Ymirror CutSpeed 【X】1000.00 Kerf【N】1.20 ManualSpeed【Y】3000.00 Angle 0.00 Manual 【F】 keepMov StepDis【G】 5.00 Flame Cu 【M】...
-
Page 45: Zoom In/Out
Chapter 4 Part Option The result is shown in figure 4.13: FLSK F2200T Speed: File: Status: Current Line/Hole: Version 3.3.71.1 00000 SHAPE_43.TXT Stop 00000/00000 【X】 Xmirror 【Y】 Ymirror CutSpeed 【X】1000.00 Kerf【N】1.20 ManualSpeed【Y】3000.00 Angle 0.00 Manual 【F】 keepMov StepDis【G】 5.00 Flame Cu 【M】... -
Page 46: Select Row/Number
Chapter 4 Part Option 4.6 Select Row/Number In part options menu, press【F5】to enter selecting row/number, the system will prompt: FLSK F2200T Speed: File: Status: Current Line/Hole: Version 3.3.71.1 00000 SHAPE_43.TXT Stop 00000/00000 【X】 Xmirror 【Y】 Ymirror F1 Select line F2 Select pierce CutSpeed 【X】1000.00 Kerf【N】1.20 ManualSpeed【Y】3000.00 Angle... -
Page 47: Select Number
Chapter 4 Part Option Here, you can directly enter the row number or press 【ENTER】 to enter the interface and press 【←】or【→】 to select row. FLSK F2200T Speed: File: Status: Current Line/Hole: Version 3.3.71.1 00000 SHAPE_43.TXT Stop 00000/00000 【X】 Xmirror 【Y】... -
Page 48: Restore
Chapter 4 Part Option Current Line/Hole: FLSK F2200T Speed: File: Status: 00003/00000 Version 3.3.71.1 00000 SHAPE_43.TXT Pause ●Ignition ●LowHeat ●HighPreheat ●Pierce1 ●Pierce2 ●Pierce3 [X] Offset cutting ●TorchUp [Y] Only return ●TorchDn ●THC En ●Blow CutSpeed 【X】1000.00 Kerf【N】1.20 ManualSpeed【Y】3000.00 Angle 0.00 Manual 【F】... -
Page 49: Chapter 5 Manual Function
Chapter 5 Manual Function Chapter 5 Manual Function In the automatic interface, press 【F7】(Manual) to enter manual function interface, shown as Fig 5.1: Current Line/Hole: FLSK F2200T Speed: File: Status: 00000/00000 Version 3.3.71.1 00000 SHAPE_43.TXT Stop ●Ignition ●LowHeat ●HighPreheat ●Pierce1 ●Pierce2 ●Pierce3 ●TorchUp... -
Page 50: Continuous Moving Function
Chapter 5 Manual Function 5.2 Continuous Moving Function When in the manual interface, press 【F2】to enter the continuous-moving function interface. At this moment, the system will move toward the specified direction if any directory key is pressed and then released, and when the directory key or stop key is pressed the system will stop. - Page 51 Chapter 5 Manual Function In the process of incising, when power is off, the system will regard the power-off point as the breakpoint and remember it. When you need to process after the breakpoint, after the system powers on, don’t move the torch, press 【F7】...
-
Page 52: Chapter 6 File Operation
Chapter 6 File Operation Chapter 6 File Operation The system supports cutting code which has txt and CNC postfix. The maximum capacity is 1M and the largest number of rows is 10000 lines. You can edit, compile, delete, export internal document, also you can import the file in the U disk into system. In the main interface, press key【F2】(code) to enter local machine code interface, shown as follows: Work folder:/flash... -
Page 53: Files In Theu Disk
Chapter 6 File Operation Press F6, if the current position of the cursor is txt file or CNC file, you could copy the current file to the flash disk when it is connected to the USB interface. Press F7, if the current position of the cursor is txt file or CNC file, you could preview the current graphic. - Page 54 Chapter 6 File Operation 1: SHAPELIB/SHAPE_18.TXT 2: SHAPELIB/SHAPE_00.TXT 3: SHAPELIB/SHAPE_01.TXT 4: SHAPELIB/SHAPE_43.TXT 5: SHAPELIB/SHAPE_.TXT 6: SHAPELIB/UsedPart.abs 7: SHAPELIB/UsedNoKf.abs File: \SHAPE_43.TXT F1 DiskFile F2 UDisk F3 Search F5 DelFile F8 OK EditFile CopyToDisk Preview Fig 6.3 save U disk files When input file name, if you do not want to change the file name, you can be directly press 【Enter】...
-
Page 55: Search File
Chapter 6 File Operation change the file name, press 【Esc】, change the file name and then save. 6.3 Search File In the file manage interface, press key【F3】to search a file. You can input all or part of the file name, then press 【Enter】, and the system will list all the files that include the input word or file name. -
Page 56: New File
Chapter 6 File Operation press 【F3】 to delete the current line. Press 【F】 + 【Home】 key, the cursor automatically moved to the first character of the current editing line, press the 【F】 + 【End】, the cursor automatically moved to last character of the current line. Each edit line supports 128 characters maximum. -
Page 57: New Folder
Chapter 6 File Operation 1: SHAPELIB/SHAPE_18.TXT 2: SHAPELIB/SHAPE_00.TXT 3: SHAPELIB/SHAPE_01.TXT 4: SHAPELIB/SHAPE_43.TXT 5: SHAPELIB/SHAPE_.TXT 6: SHAPELIB/UsedPart.abs 7: SHAPELIB/UsedNoKf.abs F1 DiskFile F2 UDisk F3 Search F5 DelFile F6 CopyToU F8 OK EditFile Preview Fig 6.6 Folder 1 The current folder will switch into /flash/DIR1 and then all supported G code files under the current folder will be shown. -
Page 58: Clear File
Chapter 6 File Operation Then press【F4】-- edit file, the function keys under the edit file show as figure 6.8. F1Compile F2AddRow F3Del Row F4NewFile F5NewFolder F8Save Fig 6.8 Edit file interface At this time, press【F5】, input the folder’s name in the prompting frame and then press【Enter】. -
Page 59: Chapter 7 Parameter Setting
Chapter 7 Parameter Setting Chapter 7 Parameter Setting In the main interface, you can get the parameter interface by pressing key【F4】 (Setups). The parameter function interface is showed in Fig 7.1 Max cutting speed 1000.000 mmpm Manual move speed 3000.000 mmpm G00 move Speed 1000.000... -
Page 60: Flame Parameters
Chapter 7 Parameter Setting Cutting Speed: the maximum cutting speed, unit is mm/m. Manual Move Speed: the moving speed of cutting torch in manual, unit is mm/m. G00 Move Speed: the cutting torch speed when G00 is executed or the cutting torch go back to the reference or some other occasion, unit is mm/m. - Page 61 Chapter 7 Parameter Setting Ignition time 0.00 Low preheat time 10.00 High preheat time 0.00 Pierce 1 time 0.00 Pierce 2 time 0.00 Pierce 3 time 0.10 Blow time 0.00 Torch up time 0.00 Torch down time 0.00 Pierce up time 0.00 Pierce down time 0.00...
- Page 62 Chapter 7 Parameter Setting Pierce Up Time: Time for the torch to lift up during perforating. The difference between Torch Up Time and Pierce Up Time is that: Torch Up Time means the time that the torch needs to lift up when it needs to move to another place after the current cutting is over;...
-
Page 63: Plasma Parameters
Chapter 7 Parameter Setting When press 【G】, after the system ignites to punch hole and continues to cut to the suspend point, it will continue to cut. This should be the function of edge cutting hole. This function will be especially useful when cut the thick steel plate. Thick steel plate is hard to be punched holes and the punched hole will be also larger. - Page 64 Chapter 7 Parameter Setting Torch Up Time: When arc press is turned off, the time for the torch to lift up. Enter any positive number, unit is s. Arcing Check Time: Enter any positive number, unit is s. If not detected any ...
-
Page 65: Powder Parameters
Chapter 7 Parameter Setting (The following is typical of the "T" in F2000 series CNC system) Set Arc:set the arc while cutting, the range of value is 50.00-300.00。Unit: V Arc Protection Value: When actual arc value ≥ (arc value setting + protection ... -
Page 66: System Parameters
Chapter 7 Parameter Setting Marker Ignition Time 0.00 Marker Preheat Time 0.00 Mix powder Open Time 0.00 Mix powder Close Time 0.00 Marker Up Time 0.00 Marker Down Time 0.00 Marker Horizontal Offset 0.000 Marker Vertical Offset 0.000 F1 Common F2 Flame F3 Plasma F4 Powder... - Page 67 Chapter 7 Parameter Setting Fig 7.6 System Parameters Horizontal Axis Pulse: The number of pulse that system needs to generate when the machine move1mm towards X axis, maintaining 3 digits at most after decimal point. Vertical Axis Pulse: The number of pulse that system needs to generate when the machine move 1mm towards Y axis , maintaining 3 digits at most after decimal point.
-
Page 68: Parameter Import
Chapter 7 Parameter Setting when the motor is up to the cutting speed. Emergency STOP Time: When encounter Emergency Stop input, the time for dropped from the current speed to zero. Start Speed: the system’s speed when it began to start. Generally do not have to start from 0 , motor will allow a start speed. -
Page 69: Parameter Export
Chapter 7 Parameter Setting Horizontal Axis Pulse 125.000 n/mm Vertical Axis Pulse 125.000 n/mm Max cutting speed 2000.000 mmpm Max G00 speed 6000.000 mmpm Max Manual speed 3000.000 mmpm Small arc limit 500.000 mmpm Limit speed below radius 0.00 Sure to import Parameter? Flame adjust time 0.40 Plasma adjust time... -
Page 70: Save Parameters
Chapter 7 Parameter Setting Horizontal Axis Pulse 125.000 n/mm Vertical Axis Pulse 125.000 n/mm Max cutting speed 2000.000 mmpm Max G00 speed 6000.000 mmpm Max Manual speed 3000.000 mmpm Small arc limit 500.000 mmpm Limit speed below radius 0.00 Sure to export Parameter? Flame adjust time 0.40 Plasma adjust time... -
Page 71: Chapter 8 Diagnosis Function
Chapter 8 Diagnosis Function Chapter 8 Diagnosis Function input forward limit Move up input back limit Move down input right limit Move left input left limit Move right input emergency stop Acceleration input arcing feedback Deacceleration input Position detect Torch up input Plasma Collision Torch down input F1 Input... -
Page 72: Diagnosis Interface Index
Chapter 8 Diagnosis Function 8.1 Diagnosis Interface Index System Diagnosis Input Diagnosis Output Diagnosis Keyboard Diagnosis System SelfCheck Date Time System Definition ParaRecover ParaBackup Define Encrypt UnEncry Language ClearFile Update Fig 8.2 Diagnosis interface index 8.2 Input Diagnosis The system will read current IO information when press 【F1】 (Refresh) to refresh the ●”... -
Page 73: Output Diagnosis
Chapter 8 Diagnosis Function 8.3 Output Diagnosis In diagnosis interface ,press 【F2】to enter output diagnosis interface,shown as Fig Output Ignition Blow Low preheat THC enable High preheat Position detect Low Oxygen Arc starting Medium Oxygen HoldTorch High Oxygen Marker Output Torch up Mix powder Torch down... -
Page 74: System Self-Check
Chapter 8 Diagnosis Function Key Code: F1 Input F2 Output F5KeyBrd F6SelfCheck F7DateTime F8SystemDef Fig 8.4 Keyboard Diagnosis 8.5 System Self-check In the system diagnosis interface, press【F6】to enter the system self-check interface. 1. backup parameter first all 2. lose breakpoint 3. -
Page 75: Date And Time
Chapter 8 Diagnosis Function If the self-check is OK, the system will show: Self check pass Fig 8.6 Self-check pass If the self-test is down, there will be the following alarm type: DSP Dual ram is error ARM Dual RAM is error When coming across these situations, please power off, reboot after about half minutes. -
Page 76: System Definition
Chapter 8 Diagnosis Function Move the cursor to the corresponding date, time or week, press 【↑】 or【↓】to adjust the time. 8.7 System Definition In the system diagnosis interface, press F8 to enter the system custom definition interface, in the interface, you could set the input IO, output IO or system coordinate, also reset or backup the parameters and one key switch between English or Chinese. -
Page 77: Output Definition
Chapter 8 Diagnosis Function definition of input Port Type Port Type forward limit Move up input back limit Move down input left limit Move left input right limit Move right input emergency stop Acceleration input arcing feedback Deacceleration input Position detect Torch up input Plasma Collision Torch down input... -
Page 78: Coordinate Definition
Chapter 8 Diagnosis Function definition of output Port Type Port Type Blow Ignition Low preheat THC enable Position detect High preheat arc starting Low Oxygen HoldTorch Medium Oxygen Marker Output High Oxygen Mix powder Torch up dust preheat Torch down Port- press PgUp/PgDn Type-press Enter F1 Input... - Page 79 Chapter 8 Diagnosis Function press Enter to change coordinate ↑ -X ← → +X ↓ F1 Input F2 Output F3 Axes F4 Motor F5 Option F8 Save Fig 8.10 Coordinate Definition In the interface, press Enter repeatedly to change among 8 type of coordinates. Press 【F8】...
-
Page 80: Motor
Chapter 8 Diagnosis Function 8.7.5 Motor ▌ Horizontal direction Vertical direction XY exchange Press Enter to change. F1 Input F2 Output F3 Axes F4 Motor F5 Option F8 Save Fig 8.11 Motor direction Press up or down key, move the cursor ▌to the axes of which needs to change motor rotation direction, then press 【Enter】, the motor direction can switch between positive and reversal. -
Page 81: Remote Controller
Chapter 8 Diagnosis Function 8.7.6 Option 8.7.6.1 Remote Controller ▌ Remote Controller Type No <> Corridate Type: Relative IJ coordinate type Relative Default unit Metric Fitting short line Steel angle remember F forbidden Save input angle as steel angle No Press ←→... -
Page 82: Switch Between Metric And Inches
Chapter 8 Diagnosis Function code is relative coordinate or absolute coordinate. Under the general circumstance, the arc’s IJ coordinate is relative coordinate, only minority several G code of arc’s IJ coordinate is absolute coordinate. 8.7.6.4 Switch between Metric and Inches As the figure 8.12 shows, default unit can be switched to either the metric or the inches, after switching, the data’s units about length are all switched. -
Page 83: Add A Language File
Chapter 8 Diagnosis Function 8.7.8 Add a Language File From the company get the language pack file and copy it into the USB. Insert the USB into the system USB port. In the main interface, move the cursor to add language file, press 【Enter】... - Page 84 Chapter 8 Diagnosis Function Function Update: after press 【F1】, it will update function. The function update file is F2100B.exe or UserApp.exe. Welcome Update: after press 【F2】, it will update the welcome interface. This welcome interface is the first shown interface after power on. If you want to find the method of make new welcome interface, please contact with our after-sale service department.
-
Page 85: Chapter 9 Graph Management
Chapter 9 Graph Management Chapter 9 Graph Management In the main interface, press【F1】(Shape Lib) to enter graph interface,shown as follows: F8 OK Fig 9.1 Page of graph Library You can press 【↑】 、 【↓】 、 【←】 、 【→】to choose different graph. 9.1 Choose Graph In home interface of graph, move the cursor to the required graph, press 【F8】... -
Page 86: Film/Hole Size
Chapter 9 Graph Management Lead In 10.00 Lead Out 10.00 Size 1 100.00 Size 2 100.00 Lead out Lead in F1 Inside F2 Outside F8 OK Fig 9.2 Chip size interface You can press【 ↑】 、 【↓】 、 【←】 、 【→】to modify sizes, after modification , press 【F8】to confirmed. - Page 87 Chapter 9 Graph Management Lead In 10.00 Lead Out 10.00 Size 1 100.00 Size 2 100.00 res=1,L/C apart F1 Inside F2 Outside F8 OK Fig 9.3 Hole size Modify sizes like modify chip sizes. After modification , press 【F8】to confirmed, then enter into the interface of cutting as shown in Fig 3.1.
-
Page 88: Chapter 10 Code Explanation
Chapter 10 Code Explanation Chapter 10 Code Explanation 10.1 Code Symbol and Interpretation In the cutting machine programming, the following programming symbols are generally available, with corresponding parameter following it. Table 10.1 Programming symbols interpretation programming Function interpretation symbols Programming segment number Code for ready Auxiliary function... -
Page 89: G Code Explanation
Chapter 10 Code Explanation Descartes coordinate system Fig 10.1 Descartes coordinate system Of course, the system also can be defined coordinate system by user, referencing “8.7.4 Coordinate definition”. 10.3 G Code Explanation The G code which this system supports for is shown as the table 10.2. Table 10.2 Common G code table Parameter: X/U Y/V I J Part option parameter... - Page 90 Chapter 10 Code Explanation After input this code, coordinate of reference point to be set by G92 can be saved automatically. Before new cutting code hasn’t been inputted, the coordinate of this reference point is always available, whether system is power off or not. After input a new cutting code, if new code has G92 instruction, the coordinate of this reference point is the context after G92, if no G92, the reference point is default (0, 0).
- Page 91 Chapter 10 Code Explanation G91 usage G92 X0 Y0 // Reference point (0,0) (140,100) // Relative coordinate G00 X20 Y0 //Rapidly moving gun to (20,0) //Cutting device on G01 X120 Y100 //Cutting to(140,100) //Cutting device off // End of program (20,0) Fig 10.3 G91 usage 3.
- Page 92 Chapter 10 Code Explanation unit(mm); Yn – displacement of endpoint’s Y coordinate relative to working start point, unit(mm); Example: (100,100) G92 X0 Y0 // Reference point (0,0) // Relative coordinate G00 X100 Y100 //rapidly moving tool to (100,100) Fig 10.4 G00 usage 5.
- Page 93 Chapter 10 Code Explanation Jn – displacement of circle centre’s Y coordinate relative to start point of current segment, unit(mm); R[-]n – the radius of arc, when the angle of arc <=180°, R is positive. Otherwise, it’s negative, unit(mm); (In the relative coordinate system): ...
- Page 94 Chapter 10 Code Explanation Format: G41 //Enable Left Kerf Compensation …… // incision code G40 //Disable Left Kerf Compensation G42 // Enable Right Kerf Compensation …… // incision code G40 // Disable Right Kerf Compensation Example: ( Convex Roof Trapezoid w/Hole ) /* metric unit */ /* relative coordinate */ G99 X1 Y0 I0 J0...
-
Page 95: M Code Explanation
Chapter 10 Code Explanation Y – rotate angle, can be set from -360° to 360°. I – image of X axis, make image along X axis, 1 expresses that there is image, 0 expresses that there is no image. ... - Page 96 Chapter 10 Code Explanation Control System. M00 End of instruction In the processing of incision, the system will stop the machine tool with the M00 instruction, waiting for the next operation. M02/M30 End of program...
-
Page 97: Chapter 11 Port Explanation
Chapter 11 Port Explanation Chapter 11 Port Explanation 11.1 Input Port +3.3V +24V External input signal 3.3VG 24VG System Fig11.1 input port circuit Input signal is a mechanical contact switch, normally open type and closed type are all supported, it is effective when it is connected to 24VG,and it is ineffective when it is float or connected to 24V. - Page 98 Chapter 11 Port Explanation Emergency stop Emergency stop input, float if not use Arcing successfully Positioning successfully Plasma collision Move left/C Remote control input Move right/D Remote control input Move Remote control input forward/A Move Remote control input backward/B 11,20-23 Spare 12,24 +24V...
-
Page 99: Input Wiring Instructions
Chapter 11 Port Explanation 11.1.1 Input Wiring Instructions Right limit input Right limit Left limit input Left limit Front limit input Front limit Back limit input Back limit Emergency Emergency Stop stop input ignition Arcing Arcing successfully successfully feedback Cutting oxygen Positioning Positioning successfull... -
Page 100: Remote Controller Input
Chapter 11 Port Explanation 11.1.2 Remote Controller Input The system supports two external remote control input, one for line input type, the other for 8421 encoded input type. Line Input Type The pin 7, 8,9,10 of input port represents left, right, forward, backward, when inputting valid signal , the machine can move toward... -
Page 101: Output Port
Chapter 11 Port Explanation 1101 raise the cutting torch 1110 Move toward right horizontally 1111 Start 8421-type remote control input is designed by the user; the user can also use the company's wireless remote control module. 11.2 Output Port +3.3V +24V External Relay... - Page 102 Chapter 11 Port Explanation oxygen High pressure cutting oxygen Torch up Torch down Exhaust Enable high adjusting box Plasma locating Plasma arc starting Corner low-speed output Or automatic / manual Spray dust Raise dust Dusting Preheat 9,10,22,23 Not used 11,12,24 +24V +24V/3Aoutput 13,25...
-
Page 103: Output Wiring Instructions
Chapter 11 Port Explanation 11.2.1 Output Wiring Instructions 11.2.1.1 Oxygen Gas Typical Connection +24V(common) Control of perheat Control of oxygen and fuel gas and Low pressure gas (low active) preheat preheat Control of cutting High pressure oxygen oxygen(low active) cutting oxygen valve Torch up control(low active) Torch up... -
Page 104: Three Level Perforation Circuit
Chapter 11 Port Explanation 11.2.1.2 Three Level Perforation Circuit +24V(common) Control of perheat Control of oxygen and fuel gas and Low pressure gas(low active) preheat preheat Level three High pressure oxygen perforation(low active) cutting oxygen valve Torch up control(low active) Torch up Torch down control(low active) Torch down... -
Page 105: Typical Circuit Of Using Powder
Chapter 11 Port Explanation 11.2.1.3 Typical Circuit of Using Powder +24V Low pressure preheat High pressure cutting oxygen Torch up Torch down Ignition control(effective low) Ignite Plasma arc starting Low pressure cutting oxygen High pressure perheat Mid-pressure preheat Low rate at corner exhaust Plasma... -
Page 106: Typical Circuit Of Using Plasma Cutting
Chapter 11 Port Explanation 11.2.1.4 Typical Circuit of Using Plasma Cutting +24V(common) Low pressure preheat High pressure cutting oxygen Torch up control (Low active) Torch up Torch down control (Low active) Torch down Ignite Connect to high Plasma adjusting device’s (Low active)... - Page 107 Chapter 11 Port Explanation THC during decreasing rate and this signal should be broken off at normal cutting time. Height-adjusting device wiring with automatic / manual When the height-adjusting device takes automatic / manual control function instead of corner low-speed input, the system needs to use the "corner low-speed" output to control the height-adjusting device's automatic / manual signal.
-
Page 108: Motor Port
Chapter 11 Port Explanation the plasma parameter interface (refer to section 7.3 plasma parameters), set the location detecting time and locating up time to needed values. 11.3 Motor Port XDIR+ XDIR- XDIR/XPWM- XCP+ XCP- XPWM+ Signal YDIR+ Shaping Photoele- Different- YDIR/YPWM- YDIR- ctric... -
Page 109: Typical Wiring Diagram Of The Motor Interfaces
Chapter 11 Port Explanation 11.3.1 Typical Wiring Diagram of the Motor Interfaces 11.3.1.1 Connection Methods for Differential Stepper Driver Power input DIR+ XDIR+ DIR- XDIR- PUL+ XCP+ PUL- XCP- YDIR+ ENA+ YDIR- ENA- YCP+ YCP- Stepper Drives Power input DIR+ DIR- PUL+ PUL-... -
Page 110: Com-Anode Connection Methods For Stepper Driver
Chapter 11 Port Explanation 11.3.1.2 Com-anode Connection Methods for Stepper Driver Power input XDIR+ XDIR- XCP+ Free XCP- YDIR+ YDIR- YCP+ YCP- Stepper drives Power input Offline switch Free Stepper drives Figure 11.10 com-anode connection methods for stepper driver... -
Page 111: Connection Methods Of Servo Driver Of Panasonic Company
Chapter 11 Port Explanation 11.3.1.3 Connection Methods of Servo Driver of Panasonic Company Power input XDIR+ 5 SING1 6 SIGN2 XDIR- 3 PULS1 XCP+ 4 PULS2 XCP- YDIR+ YDIR- YCP+ Panasonic YCP- A5/A4 Power input 5 SING1 6 SIGN2 3 PULS1 4 PULS2 Panasonic A5/A4... -
Page 112: Arc Thc Module Interface (Thc)
Chapter 11 Port Explanation 11.4 Arc THC Module Interface (THC) (typical of the “T” in F2000 series CNC system) Compare to common F2000 series CNC system without arc THC, F2000T CNC system adds the interface of arc THC as the red frame area in following figure based on the original system. -
Page 113: Arc Import Instruction
Chapter 11 Port Explanation Table 11.4 Motor Interface Signal Definition of Arc THC Module 5 Cores Interface Pin Number Signal Name Comment LIM- Lower limit LIM+ Upper limit +24V power ground Motor + for THC Motor - for THC 11.4.2 Arc Import Instruction Arc import pins are ARC+、ARC-. -
Page 114: Position Interface (Ps) Instruction
Chapter 11 Port Explanation 11.4.3 Position Interface (PS) Instruction Position interface (PS) is also in the 7 pins interface like arc import. Input pins are links with the positive pole of location approach +24V(OUT), SIGNAL,COM +24V(OUT) switch, links with the signal of NPN approach switch, links with the SIGNAL negative pole of location approach switch. -
Page 115: Wiring Diagram Of F2100T Cnc System With Arc Thc Module
Chapter 11 Port Explanation 11.4.5 Wiring Diagram of F2100T CNC System with Arc THC Module DOWN_LIMIT UP_LIMIT MOTOR_1 MOTOR_2 Lifting motor Power negsative V- Blue SIGNAL Signal Black Brown Power positive V+ +24V(OUT) Torch Arc_2 ARC- Arc_1 ARC+ ARC_START1 ARC_START2 Approach DC 24V - DC +24 Power... -
Page 116: Wiring Diagram Of Double Approach Switch
Chapter 11 Port Explanation 11.4.6 Wiring Diagram of double approach switch Two NPN-style approach switches are used for location, which can either be linked with the parallel mode or be linked with series mode. To make the location more accurate and stable, we recommend using series mode to link the two switches. -
Page 117: Chapter 12 Use Of Bios
Chapter 12 Use of BIOS Chapter 12 Use of BIOS When the system powers on, it will display as shown in Fig 12.1. Press F2 to run BIOS Auto boot after: 3 Fig 12.1 Power on When press DEL before the system counts down to 0, the system will enter the BIOS. -
Page 118: System Upgrade
Chapter 12 Use of BIOS 12.1 System Upgrade After entering BIOS, press【F1】to upgrade the system, it should satisfy the following conditions: Flash Disk is connected to the system. There should be the upgrade file UserApp.exe in the root folder of the flash disk. Under the circumstance of above two conditions satisfied, Press 【F1】... -
Page 119: System Reset
Chapter 12 Use of BIOS 12.5 System Reset After entering BIOS, press 【F5】 to return to the original system that has been backup. -
Page 120: Chapter 13 Installation And Debugging
Chapter 13 Installation and Debugging Chapter 13 Installation and Debugging 13.1 Horizontal / Vertical Pulses Number Setting Horizontal / vertical pulses number setting Here, horizontal / vertical pulses number is also introduced in the section of 7.5 system parameter. It’s easy to set the number of horizontal (vertical) pulses. Before drawing a line, assume one value of horizontal pulses XPls and one value of vertical pulses YPls, set these two parameters and then save the settings. - Page 121 Chapter 13 Installation and Debugging Note: The most reasonable number of pulses is between 150 and 1200. The number of pulses exceeds this range, please refer to the interpretation of driver and modify subdivision number of stepper driver and denominator of Servo driver.
-
Page 122: Chapter 14 Shanghai Fangling F1500 Remote Controller
Chapter 14 Shanghai FangLing F1500 Remote Controller Chapter 14 Shanghai FangLing F1500 Remote Controller 14.1 Wireless Remote Control Module Performance and Characteristic 433MHz free ISM frequency channel, free license on trial Remote controlling distance > 30m,at least not below 0.5m ... -
Page 123: The Layout Of Remote Controller
Chapter 14 Shanghai FangLing F1500 Remote Controller 14.2 The Layout of Remote Controller Antenna Power On/Off Fig.14.1 layout of remote controller 14.3 The Output Port of Receiver... -
Page 124: Interpretation Of Jumper Switch
Chapter 14 Shanghai FangLing F1500 Remote Controller OUT1- OUT16 Internal circuit Fig.14.2 The output port of receiver Note:Receiver will pull down the IO ports which are relative of Out1-Out8 according to code value of different button which is transmitted by sender. Specific corresponding relationships of sender and receiver reference the content of the 14.4... - Page 125 Chapter 14 Shanghai FangLing F1500 Remote Controller Table 14.1:8421 code receive mode (the 1 bit of jumper switch has jumper cap) Sender OUT1-OUT4 OUT5 OUT6 OUT7 OUT8 OUT9-OUT16 S+/Speed S-/Speed ↑ ↓ ← → Mode T↑ T↓ Start Stop Back...
-
Page 126: Wiring Connection Figure Of F1500 And Fang Ling Numerical Control System
Chapter 14 Shanghai FangLing F1500 Remote Controller 14.5 Wiring Connection Figure of F1500 and FangLing Numerical Control System Output ports of F1500 OUT1 OUT2 OUT3 OUT4 OUT5 OUT6 OUT7 OUT8 24V+ 24VG remote controller Input ports of F2000 series digital control system Fig 14.4 Wiring connection interpret of F2000 series numerical control system and remote... -
Page 127: Appendix 1 G、M Code Rapid Consult
Appendix 1 G、M Code Rapid Consult Appendix 1 G、M Code Rapid Consult Serial number order function rotation、proportion、mirror image reference coordinate Relative coordinate system Absolute coordinate system English unit Metric unit Left kerf gap compensation Right kerf gap compensation Cancel kerf gap compensation Quickly move Liner cutting Clockwise arc cutting... -
Page 128: Appendix 2 Io Timing Sequence Figure Of F2000 Series Numerical Control System
Appendix 2 I/O Timing Sequence Figure of F2000 Series Numerical Control System Appendix 2 IO Timing Sequence Figure of F2000 Series Numerical Control System A2.1 Flame Cutting Timing Sequence Level 3 perforation timing sequence with no THC Ignition High Preheat Low Preheat TorchDn TorchUp... - Page 129 Appendix 2 I/O Timing Sequence Figure of F2000 Series Numerical Control System Level 3 perforation timing sequence with Ignition High Preheat Low Preheat THC Enable TorchUp Torch Pierce 1 time Pierce 2 Pierce 3 Blow Note: Red words mean output port.
-
Page 130: A2.2 Plasma Io Timing Sequence
Appendix 2 I/O Timing Sequence Figure of F2000 Series Numerical Control System Level 1 perforation timing sequence with Ignition Low Preheat Torch THC Enable time TorchUp Pierce 3 Blow Note: Red words Blow mean output Cutting time port. Bold black words mean parameter. - Page 131 Appendix 2 I/O Timing Sequence Figure of F2000 Series Numerical Control System The port type of Speed to lock THC is red.(Define it by pressing F5,F8,F3,F2). Plasma position TorchDn Plasma arc starting TorchUp Lock THC Cutting Current rate≤(Speed to lock THC *cutting speed)/100 The distance between cutting point and start/end point of current...
-
Page 132: Appendix 3 Interpretation Of Wiring Connection Between F2000 Series And Common Thc
Appendix 3 Interpretation of Wiring Connection between F2000 Series and Common THC Appendix 3 Interpretation of Wiring Connection between F2000 Series and Common THC A3.1 Connection with F1620/F1630 THC FangLing F2000 series CNC F1620 THC TO CNC Output port AUTO Auto Signal... - Page 133 Appendix 3 Interpretation of Wiring Connection between F2000 Series and Common THC F2000 Series CNC F1630 THC TO CNC Output port AUTO Auto signal UP Up signal DOWN Down signal IHS_ARCON Arcing signal with original position DIR_ARCON Immediately arcing signal TRANSFER1 Pierce finished signal TRANSFER2 Pierce finished signal COM Common port of control signal...
-
Page 134: A3.2 Connection With Hyd Thc
Appendix 3 Interpretation of Wiring Connection between F2000 Series and Common THC A3.2 Connection with HYD THC F2000 output ports HYD THC (to CNC) IHSARCON Plasma arc starting EXAUTO Lock THC Torch up Torch down DOWN GND5 24VG ARCTRANS1 F2000 input ports ARCTRANS2 Arcing feedback 24VG... - Page 135 Appendix 3 Interpretation of Wiring Connection between F2000 Series and Common THC Output definition Port Type ● Lock THC The method of definition: F2100T, F2200T, F2300T (A/B), F2500 T (A/B), F2600T: F5(Diagnose), F8(System Def), F3(define), input password: 1396.
-
Page 136: A3.3 Connection With Sh-Hc30 Thc
Appendix 3 Interpretation of Wiring Connection between F2000 Series and Common THC A3.3 Connection with SH-HC30 THC Connect to plasma controller F2000 output ports SH-HC30 Plasma arc starting (DB15) AUTO Lock THC Torch up Torch down DOWN 24VG Plasma parameter Range of value Recommended value Delay Before Arc... - Page 137 Appendix 3 Interpretation of Wiring Connection between F2000 Series and Common THC Output definition Port Type ● Lock THC The method of definition: F2100T, F2200T, F2300 T (A/B), F2500 T (A/B), F2600T: F5 (Diagnose), F8 (System Def), F3 (define), input password: 1396.
-
Page 138: A3.4 Connection With Ontime Thc
Appendix 3 Interpretation of Wiring Connection between F2000 Series and Common THC A3.4 Connection with ONTIME THC F2000 output ports ONTIME AVC103(CON1) START ARC Plasma arc starting Lock THC AUTO Torch up Torch down DOWN 24VG MOTION F2000 input ports Arcing feedback 24VG Plasma parameter... -
Page 139: A3.5 Connection With Pthc-2
Appendix 3 Interpretation of Wiring Connection between F2000 Series and Common THC F2100T, F2200T, F2300 T (A/B), F2500 T (A/B), F2600T: F5 (Diagnose), F8 (System Def), F3 (define), input password: 1396. A3.5 Connection with PTHC-2 Plasma parameter Range of value Recommended value Delay Before Arc Pierce time... - Page 140 Appendix 3 Interpretation of Wiring Connection between F2000 Series and Common THC Input definition Port Type ● Position detect Output definition Port Type ● Lock THC The method of definition: F2100B, F2200B, F2300 A/B, F2500 A/B, F2600: F5 (Diagnose), F8 (System Def), F3 (define), input password: 1396.
-
Page 141: Appendix 4 Interpretation Of F2000 Full Series System Install Size
Appendix 4 Interpretation of F2000 Full Series System Install Size Appendix 4 Interpretation of F2000 Full Series System Install Size A4.1 F2100B/T Profile Install Size Appendix fig.4.1 F2100T installation size A4.2 F2200B/T Profile Install Size Appendix fig.4.2 F2200T installation size... -
Page 142: A4.3 F2300A/B/T Profile Install Size
Appendix 4 Interpretation of F2000 Full Series System Install Size A4.3 F2300A/B/T Profile Install Size Appendix fig.4.3 F2300T(A) installation size Appendix fig.4.4 F2300T (B) installation size... -
Page 143: A4.4 F2500A/B/T Profile Install Size
Appendix 4 Interpretation of F2000 Full Series System Install Size A4.4 F2500A/B/T Profile Install Size Appendix fig.4.5 F2500T (A) installation size Appendix fig.4.6 F2500T (B) installation size... -
Page 144: A4.5 F2600/T Profile Install Size
Appendix 4 Interpretation of F2000 Full Series System Install Size A4.5 F2600/T Profile Install Size Appendix fig.4.7 F2600T installation size... -
Page 145: Contact Information
Contact Information Contact Information Shanghai Office Name: Shanghai FangLing Computer Software Co., LTD Shanghai JiaoYi CNC equipment Co., LTD Address: Room 709-713, No.951, Jianchuan Road, Woxiangwojia mansion, Minhang, Shanghai, China Tel: 86-021-34290970 86-021-34290885 Fax: 86-021-34290970 www.flcnc.com E-mail: sales@flcnc.com Website: The Route: Route 1: Take the Metro Line 1 in the Shanghai Railway Station ... - Page 146 Contact Information...
-
Page 147: Shijiazhuang Office
Contact Information Shijiazhuang Office Address: Room 1707, No.258, Zhongshan Road South, JiaTai mansion, Shijiazhuang, Hebei, China Contacts: Manager Yao Tel: 18979685110...
Need help?
Do you have a question about the F2100B/T and is the answer not in the manual?
Questions and answers
Hello, how are you I lost the measurement settings in the system, for example, I put a drawing measuring 125 cm, and the machine operates at 40 How do I restore factory settings or how do I restore machine measurement settings?
@Zo SEIF For your information, my system f2100b cnc plasma portable
To restore factory settings on the FangLing F2100B/T machine, follow these steps:
1. Press 【F5】 (System Diagnosis) in the main interface.
2. Press 【F8】 (System Definition).
3. Press 【F1】 (Parameter Reset).
After resetting successfully, you must restart the system.
This answer is automatically generated
Some number keys not working
The FangLing F2100B/T has a keyboard diagnosis function. If some number keys are not working, you can use the system diagnosis interface and press F6 to enter the system self-check mode. If there is an issue, the system may display errors like "DSP Dual RAM is error" or "ARM Dual RAM is error". In such cases, power off the machine, wait for about half a minute, and then reboot. If the problem persists in a machine that has been used for a long time, cleaning the chassis to remove dust may help.
This answer is automatically generated
Buenas lo que pasa que tengo un control F2100B y de la primera pantalla ya no pasa